Application Security and Performance Settings
Learn how to configure security and performance settings for your KloudBean application. This guide covers Varnish Cache, CORS Headers, Public Access control, and HTTPS Redirection settings that help optimize and secure your application.
Overview
KloudBean provides a super easy way to handle your application web settings and other relevant settings. These settings allow you to optimize performance, enhance security, and control access to your application with simple toggle switches.
Settings Location
All application security and performance settings are located in:
- Application Administration → App Settings → Advanced
Settings options may vary from app to app, as for each framework these settings are different, but you will see common settings for each application type.
Prerequisites
Before configuring security and performance settings, ensure you have:
- An Active KloudBean Application: Your application must be created and running
- Access to Application Dashboard: You need to be logged in to your KloudBean account
- Appropriate Permissions: You need permissions to modify application settings
Accessing Security and Performance Settings
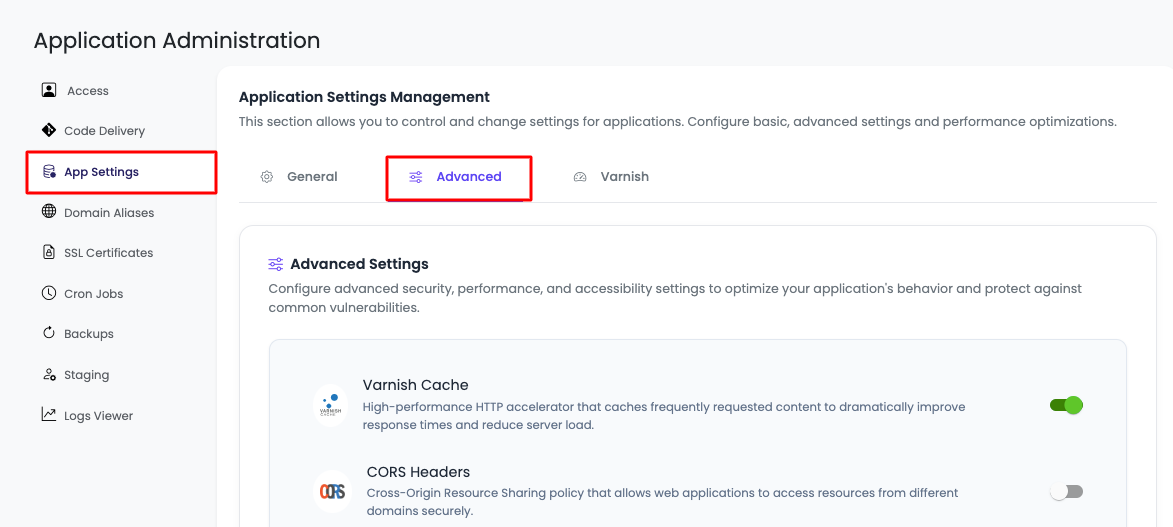
Step 1: Navigate to Advanced Settings
To access your application's security and performance settings:
- Navigate to Application Administration: Log in to your KloudBean dashboard and open the application administration page for your desired application.
- Go to App Settings: Click on "App Settings" in the application settings menu.
- Open Advanced Tab: Navigate to the "Advanced" tab within App Settings.
Step 2: View Available Settings
Here you will see toggles for multiple settings:
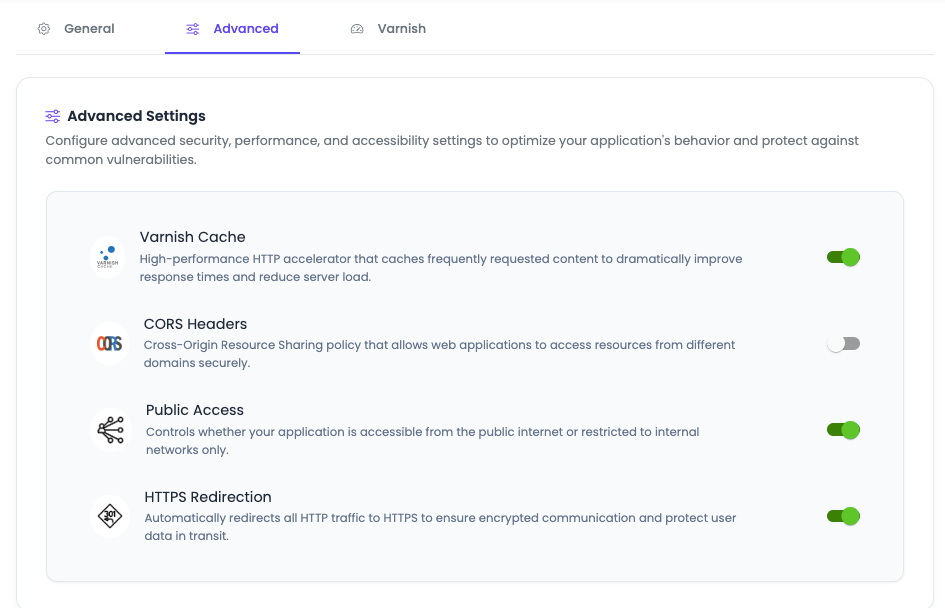
Settings options may vary from app to app. For each framework, these settings are different, but you will see common settings for each application type.
Available Settings
Varnish Cache
Description: High-performance HTTP accelerator that caches frequently requested content to dramatically improve response times and reduce server load.
Default State: Enabled by KloudBean to increase web page performance.
How It Works:
- Content Caching: Varnish stores frequently accessed content in memory, serving it directly without hitting your application server
- Performance Boost: Reduces server load by serving cached content, resulting in faster page load times
- Automatic Management: KloudBean automatically manages Varnish cache configuration for optimal performance
When to Disable:
- Development Environment: If you are in development and caching is causing issues, you can disable it from here for that particular app
- Dynamic Content: If your application serves highly dynamic content that shouldn't be cached
- Testing: When testing changes that require seeing immediate updates without cache interference
Benefits of Varnish Cache:
- Faster Response Times: Cached content is served in milliseconds instead of processing requests
- Reduced Server Load: Less CPU and memory usage on your application server
- Better User Experience: Users experience faster page loads and smoother interactions
- Cost Efficiency: Reduced server resource usage can lower hosting costs
- Scalability: Handles traffic spikes better by serving cached content
Best Practices:
- Keep Varnish enabled for production applications
- Disable only during development when needed
- Clear cache after making significant changes
- Monitor cache hit rates to optimize performance
CORS Headers
Description: Cross-Origin Resource Sharing (CORS) policy that allows web applications to access resources from different domains securely.
Default State: Disabled by default.
What is CORS?:
- Cross-Origin Requests: CORS enables web pages to make requests to a different domain than the one serving the web page
- Security Feature: It's a security feature implemented by browsers to prevent unauthorized cross-origin requests
- API Access: Essential for applications that need to access APIs from different domains
When to Enable:
- API Access: When your application needs to make requests to APIs on different domains
- Third-Party Services: When integrating with third-party services that require CORS
- Frontend-Backend Separation: When your frontend and backend are on different domains
- CDN Resources: When serving resources from a CDN on a different domain
How It Works:
- HTTP Headers: CORS uses HTTP headers to tell browsers which origins are allowed to access resources
- Preflight Requests: For complex requests, browsers send a preflight OPTIONS request to check permissions
- Access-Control Headers: Server responds with headers like
Access-Control-Allow-Originto grant or deny access
Security Considerations:
- Specific Origins: Configure CORS to allow only specific, trusted origins
- Avoid Wildcards: Don't use
*for production applications unless absolutely necessary - Credentials: Be careful when allowing credentials in CORS requests
- Methods and Headers: Limit allowed HTTP methods and headers to what's necessary
Configuration Options (when enabled):
- Allowed Origins: Specify which domains can access your resources
- Allowed Methods: Define which HTTP methods are permitted (GET, POST, PUT, DELETE, etc.)
- Allowed Headers: Specify which headers can be used in requests
- Credentials: Control whether cookies and authentication headers are allowed
Public Access
Description: Controls whether your application is accessible from the public internet or restricted to internal networks only.
Default State: Enabled (application is publicly accessible).
What It Does:
- Public Internet Access: When enabled, your application is accessible from anywhere on the internet
- Internal Network Only: When disabled, your application is restricted and not accessible from the public internet
- Temporary Downtime: This is your application access control - if you want to temporarily take down your app or make it inaccessible to the public, you can disable it from here
Use Cases for Disabling:
- Maintenance Mode: Temporarily disable public access during maintenance or updates
- Development: Restrict access during development to prevent public viewing
- Security Incidents: Quickly disable access if a security issue is detected
- Testing: Restrict access while testing new features or configurations
- Content Updates: Disable access while making significant content changes
Important Notes:
- Immediate Effect: Changes take effect immediately when toggled
- Internal Access: Disabling public access may still allow internal/administrative access
- DNS Still Active: Your domain will still resolve, but the application won't respond
- Temporary Measure: This is a temporary measure - use for short-term access control
Best Practices:
- Use this feature for temporary access control only
- Inform users before disabling public access for maintenance
- Re-enable as soon as maintenance is complete
- Don't use as a permanent security measure (use proper authentication instead)
HTTPS Redirection
Description: Automatically redirects all HTTP traffic to HTTPS to ensure encrypted communication and protect user data in transit.
Default State: Enabled by default. In order to make app content secure, KloudBean by default enables force HTTP to HTTPS redirect.
Why HTTPS Redirection is Important:
- Data Encryption: HTTPS encrypts all data transmitted between users and your server, protecting sensitive information like passwords, credit card numbers, and personal information from interception
- Data Integrity: Ensures data hasn't been tampered with during transmission, preventing man-in-the-middle attacks
- Authentication: Verifies that users are connecting to your legitimate server and not an imposter
- SEO Benefits: Search engines favor HTTPS websites, improving your search rankings
- Browser Trust: Modern browsers display security warnings for HTTP sites, which can deter users
- Compliance: Many regulations (PCI DSS, GDPR) require encrypted connections for handling sensitive data
- User Trust: The padlock icon and "Secure" indicator build user confidence in your application
How HTTPS Redirection Works:
- Automatic Redirect: When a user accesses your site via HTTP (e.g.,
http://example.com), they are automatically redirected to HTTPS (e.g.,https://example.com) - 301 Permanent Redirect: Uses HTTP 301 status code, which tells search engines the redirect is permanent
- SSL/TLS Encryption: All subsequent communication is encrypted using SSL/TLS protocols
- Certificate Validation: Browser validates your SSL certificate before establishing the secure connection
When to Disable:
- Development/Testing: Only disable during local development when SSL certificates aren't configured
- Troubleshooting: Temporarily disable to troubleshoot SSL-related issues
- Legacy Systems: Rare cases where legacy systems require HTTP access
Security Benefits:
- Prevents Eavesdropping: Encrypts data so it can't be read by unauthorized parties
- Prevents Tampering: Ensures data integrity during transmission
- Prevents Phishing: Certificate validation prevents users from connecting to fake sites
- Protects Credentials: Secures login credentials and session data
- Compliance: Meets security standards and regulations
Best Practices:
- Always Enable for Production: Keep HTTPS redirection enabled for all production applications
- SSL Certificate Required: Ensure you have a valid SSL certificate installed (see Managing SSL Certificates)
- Test After Changes: Verify redirects work correctly after making changes
- Monitor SSL Status: Regularly check that SSL certificates are valid and not expired
- Use HSTS: Consider enabling HTTP Strict Transport Security (HSTS) for additional security
Framework-Specific Settings
Settings Variation by Framework
Different application frameworks may have additional settings specific to their needs:
- WordPress: May include WordPress-specific caching, security plugins settings
- Laravel: May include Laravel-specific optimizations, queue settings
- Node.js: May include Node.js process management, cluster settings
- React/Vue/Angular: May include build optimization, static asset settings
- Python/Django: May include Python-specific optimizations, WSGI settings
While settings may vary, the core settings (Varnish Cache, CORS Headers, Public Access, HTTPS Redirection) are common across most application types.
Best Practices
Security Best Practices
- HTTPS Redirection: Always keep HTTPS redirection enabled for production applications
- Public Access Control: Use public access toggle for temporary maintenance, not permanent security
- CORS Configuration: Configure CORS carefully, allowing only trusted origins
- Regular Updates: Keep your application and dependencies updated
- Monitor Settings: Regularly review and audit your security settings
Performance Best Practices
- Varnish Cache: Keep Varnish enabled for production to maximize performance
- Development Considerations: Disable Varnish during development if it causes issues
- Cache Management: Clear cache after making significant changes
- Monitor Performance: Track performance metrics to optimize settings
- Test Changes: Test settings changes in a staging environment first
General Best Practices
- Document Changes: Keep track of settings changes and their reasons
- Test After Changes: Always test your application after modifying settings
- Backup Before Changes: Create backups before making significant configuration changes
- Understand Impact: Understand what each setting does before enabling/disabling
- Framework-Specific: Consider your application framework when configuring settings
Troubleshooting
Varnish Cache Issues
- Stale Content: Clear Varnish cache if you see outdated content
- Development Issues: Disable Varnish during development if it interferes with testing
- Performance Problems: Check cache hit rates and adjust if needed
- Cache Not Working: Verify Varnish is properly configured for your application type
CORS Issues
- Access Denied: Verify CORS is enabled and configured correctly
- Wrong Origins: Check that allowed origins match your frontend domain
- Preflight Failures: Ensure preflight requests are handled correctly
- Credentials Issues: Verify credential settings if using authentication
Public Access Issues
- Cannot Access: Check if public access is enabled
- Unexpected Downtime: Verify public access wasn't accidentally disabled
- Maintenance Mode: Remember to re-enable after maintenance
- Internal Access: Check if internal access is still available when public access is disabled
HTTPS Redirection Issues
- Redirect Loop: Verify SSL certificate is properly installed
- Mixed Content: Ensure all resources use HTTPS URLs
- Certificate Errors: Check SSL certificate validity and expiration
- Browser Warnings: Verify certificate is trusted and properly configured
Configuration Examples
Production Configuration
Varnish Cache: Enabled
CORS Headers: Enabled (with specific origins configured)
Public Access: Enabled
HTTPS Redirection: Enabled
Development Configuration
Varnish Cache: Disabled (to see changes immediately)
CORS Headers: Enabled (if needed for API testing)
Public Access: Enabled (or disabled for private testing)
HTTPS Redirection: Enabled (recommended) or Disabled (local dev only)
Maintenance Mode Configuration
Varnish Cache: Enabled
CORS Headers: Enabled
Public Access: Disabled (temporarily)
HTTPS Redirection: Enabled
Next Steps
After configuring your security and performance settings:
- Learn about Managing SSL Certificates to secure your application with HTTPS
- Explore Managing Application Domains to configure custom domains
- Review Managing Application Backups to protect your application data