Managing Application SSL Certificates
Learn how to install and manage SSL certificates for your KloudBean application. This guide covers both custom SSL certificates and free Let's Encrypt certificates, ensuring secure HTTPS connections for your domains.
Overview
SSL (Secure Sockets Layer) certificates are essential for securing your application and protecting data transmitted between your users and your server. KloudBean makes it super easy to install SSL certificates on your application, offering both custom certificate installation and free Let's Encrypt certificates with automatic renewal.
Why SSL Certificates Are Important
SSL certificates are very important for several critical reasons:
- Data Encryption: SSL certificates encrypt data transmitted between users' browsers and your server, protecting sensitive information like passwords, credit card numbers, and personal data from interception by malicious actors
- Authentication: Certificates verify that users are connecting to your legitimate server and not an imposter, preventing man-in-the-middle attacks
- Trust and Credibility: Browsers display security indicators (padlock icon, HTTPS) that build user trust and confidence in your application
- SEO Benefits: Search engines like Google favor HTTPS websites in search rankings, improving your visibility
- Browser Requirements: Modern browsers warn users or block access to non-HTTPS websites, making SSL certificates essential for user access
- Compliance: Many regulations (PCI DSS, GDPR) require encrypted connections for handling sensitive data
- How It Works: SSL certificates use public-key cryptography to establish a secure connection. When a user visits your site, their browser verifies your certificate, and then both parties establish an encrypted connection using a shared secret key
Prerequisites
Before installing SSL certificates, ensure you have:
- An Active KloudBean Application: Your application must be created and running
- Domain Configured: A valid domain must be configured and verified in your KloudBean application
- DNS Records Properly Configured: DNS records must be correctly pointing to your server IP address
Important: If you have a valid domain and it's pointing correctly to your server IP, you're ready to proceed with SSL certificate installation.
SSL Certificate Options
KloudBean offers two options for SSL certificate installation:
Option 1: Custom SSL Certificates
If you already have an SSL certificate from a Certificate Authority (CA), you can install it directly. This option allows you to:
- Use certificates from any Certificate Authority
- Install Extended Validation (EV) certificates
- Use wildcard certificates for multiple subdomains
- Install certificates with longer validity periods
Option 2: Let's Encrypt Certificates (Free)
KloudBean provides free Let's Encrypt certificates that can be installed with a single click. Key features include:
- Free of Cost: No charges for Let's Encrypt certificates
- Multiple Domain Support: Install certificates for multiple domains in one go
- Automatic Renewal: Certificates are valid for 3 months (90 days), and KloudBean automatically renews them before they reach expiry
- Easy Installation: One-click installation process
- Domain Validation: Let's Encrypt uses domain validation to verify ownership
- Widely Trusted: Let's Encrypt is trusted by all major browsers and operating systems
About Let's Encrypt: Let's Encrypt is a free, automated, and open Certificate Authority run by the Internet Security Research Group (ISRG). It provides free SSL/TLS certificates to enable encrypted HTTPS on websites. The certificates are valid for 90 days and can be automatically renewed, making them ideal for most applications. Let's Encrypt uses the ACME (Automated Certificate Management Environment) protocol to automate certificate issuance and renewal.
Installing SSL Certificates
Step 1: Navigate to SSL Certificates Section
To begin installing SSL certificates:
- Navigate to Application Administration: Log in to your KloudBean dashboard and open the application administration page for your desired application.
- Access SSL Settings: Go to the "SSL Certificates" section in the application settings menu.
- Select Certificate Type: Here you will see options to select the certificate type you want to install.
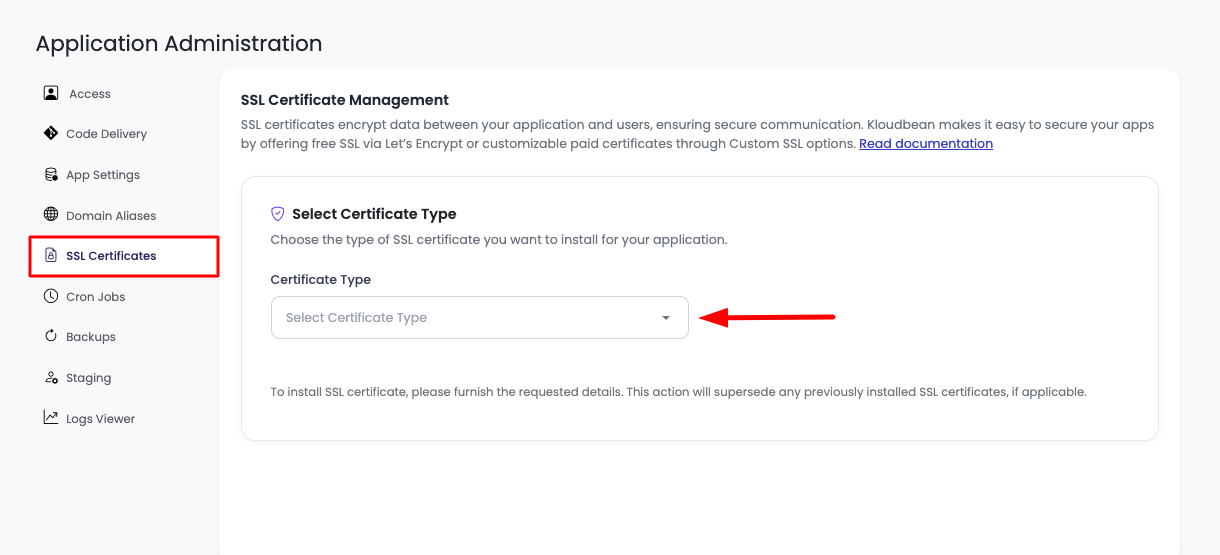
You'll see two options:
- Custom SSL Certificates: For installing your own certificates
- Let's Encrypt Certificates (Free): For free automated certificates
Installing Custom SSL Certificates
Step 1: Select Custom SSL Certificates Option
- Choose Certificate Type: Select "Custom SSL Certificates" from the dropdown or option menu.
- Certificate Form: This will provide you with options to add certificate fields.
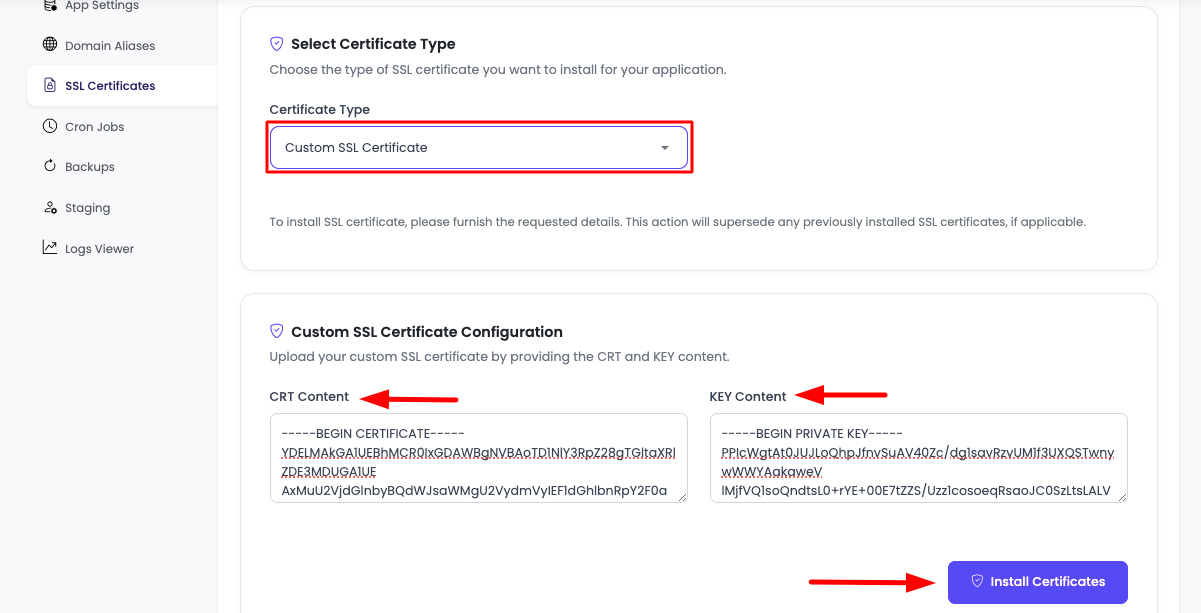
Step 2: Enter Certificate Details
The custom SSL certificate installation requires two fields:
-
Certificate Content (CRT): Paste your certificate content in the "Cert Content" field. This should include:
- Your domain certificate
- Intermediate certificates (if required)
- Certificate chain in the correct order
-
Certificate Key: Paste your certificate private key in the "Key Content" field. This is the private key that corresponds to your certificate.
Important: Ensure you paste the complete certificate and key, including:
-----BEGIN CERTIFICATE-----and-----END CERTIFICATE-----markers-----BEGIN PRIVATE KEY-----and-----END PRIVATE KEY-----markers- All intermediate certificates if required
Step 3: Install Certificates
-
Click "Install Certificates": After pasting both the certificate content and key, click on the "Install Certificates" button.
-
Validation Process: After this action, the KloudBean system will perform validation on your certificates to check:
- If the certificates are correct and valid
- If the key is the correct key matching the certificate
- If the format is correct
- If the certificate chain is complete (if applicable)
-
Error Handling: In case there is an issue, you will see an error message explaining what went wrong.
Common Issues While Pasting Certificates
Here are common issues you might encounter and how to resolve them:
- Missing Certificate Markers: Ensure you include the
-----BEGIN CERTIFICATE-----and-----END CERTIFICATE-----markers. Without these, the certificate won't be recognized. - Incorrect Key Match: The private key must match the certificate. If you see "Key mismatch" error, verify you're using the correct key file.
- Incomplete Certificate Chain: Some certificates require intermediate certificates. Make sure to include all intermediate certificates in the correct order.
- Extra Spaces or Characters: Remove any extra spaces, line breaks, or characters before the BEGIN marker or after the END marker.
- Wrong Certificate Format: Ensure the certificate is in PEM format (base64 encoded). Some certificates come in DER format and need to be converted.
- Expired Certificate: Check that your certificate hasn't expired. Expired certificates cannot be installed.
- Domain Mismatch: The certificate must be issued for the domain you're trying to use it with.
- Incorrect Order: When pasting multiple certificates (certificate chain), ensure they're in the correct order: domain certificate first, then intermediate certificates.
Step 4: Verify Successful Installation
If your certificate passes validation, it will be installed successfully:
- Success Message: You will see a success message indicating that the certificate installation is complete.
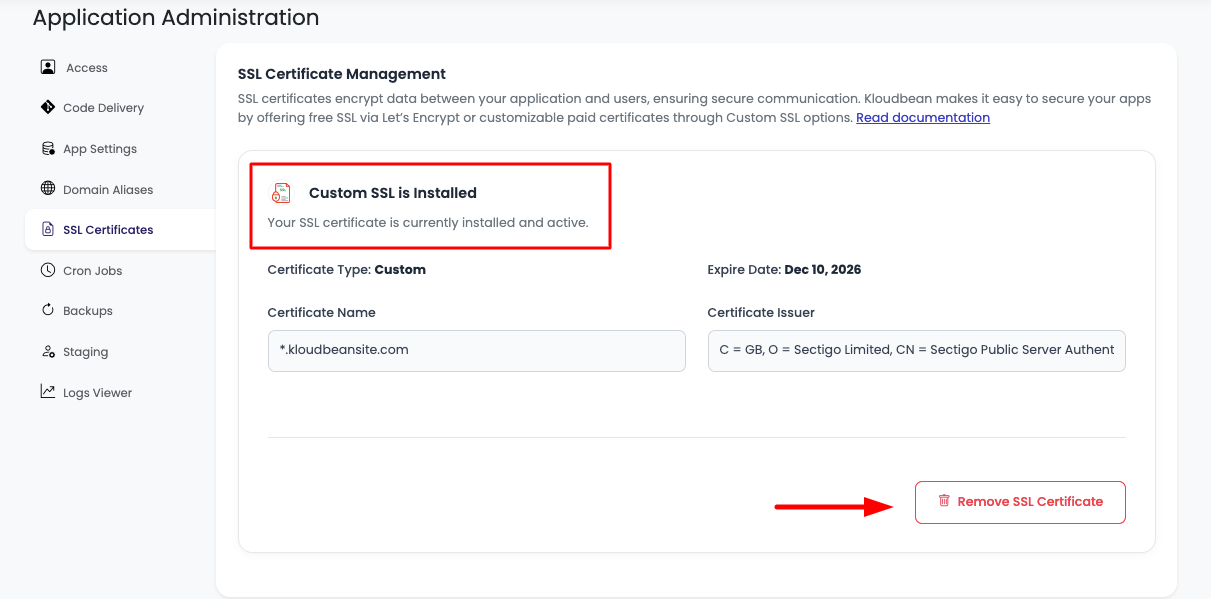
- Certificate Details: You will see the successful installation along with certificate details, including:
- Certificate Type: Custom SSL Certificate
- Certificate Details: Information about the certificate (issuer, validity period)
- Expiry Date: When the certificate will expire
- Remove Option: There will also be an option to remove these certificates if needed
Installing Let's Encrypt Certificates
Step 1: Select Let's Encrypt Option
- Choose Certificate Type: Select "Let's Encrypt Certificates" from the dropdown menu.
- Configuration Section: You will see a section that is auto-populated with:
- Email Address: Your account email address (used for certificate notifications and renewal reminders)
- Domains: All domains you have configured for this application
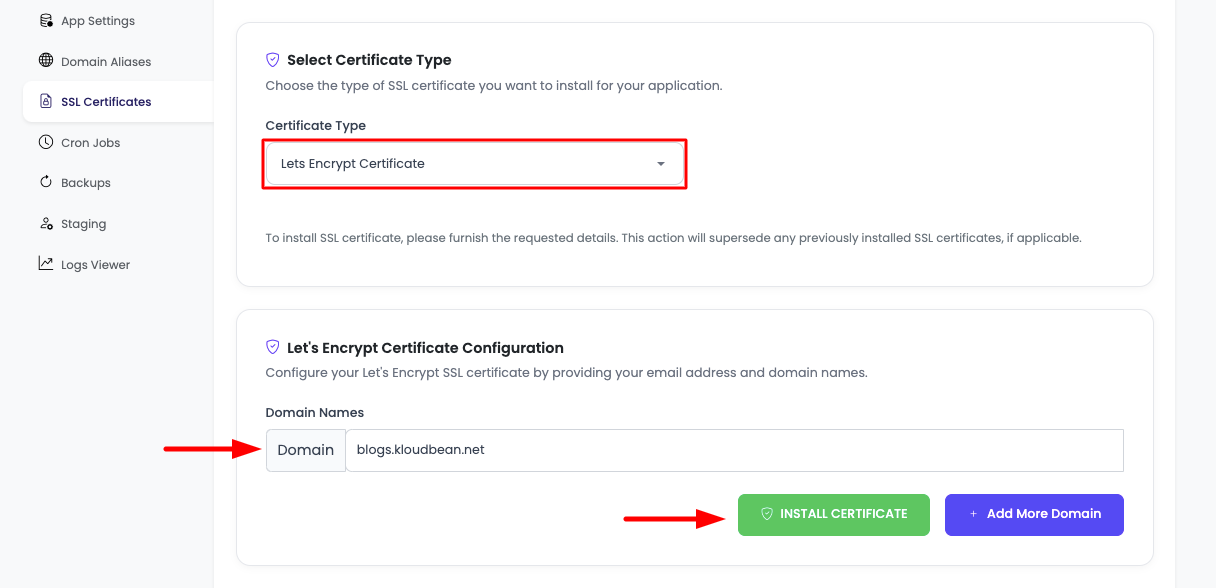
Step 2: Configure Domains
- Review Auto-Populated Domains: Check that all your domains are listed correctly.
- Add More Domains (Optional): If you want to add more domains to the certificate, click on the "Add More Domain" button. This will add another field where you can enter an additional domain name.
- Multiple Domains: You can add multiple domains to a single Let's Encrypt certificate, making it convenient for applications with multiple domains or aliases.
Step 3: Install Certificates
- Confirm Domains: Once domains are confirmed and you've added any additional domains you need, click on "Install Certificates".
- Validation Process: KloudBean will perform all the validation to see if your DNS is properly set to install these certificates.
Critical DNS Requirements:
- DNS Must Be Correctly Configured: In order to install Let's Encrypt certificates, it is important that you have already pointed DNS correctly to this server
- Single A Record: There should not be multiple A records for the same domain pointing to different servers, as that could cause installation failure
- DNS Propagation: DNS changes must have propagated before attempting certificate installation
- Domain Accessibility: The domain must be publicly accessible and resolve to your KloudBean server
Step 4: Handle Installation Errors
If your DNS is not properly configured, you may encounter errors during Let's Encrypt installation.
Domain Not Found Error
When your DNS is not added correctly and you try to install Let's Encrypt certificates, you will face a "Domain not found" error.
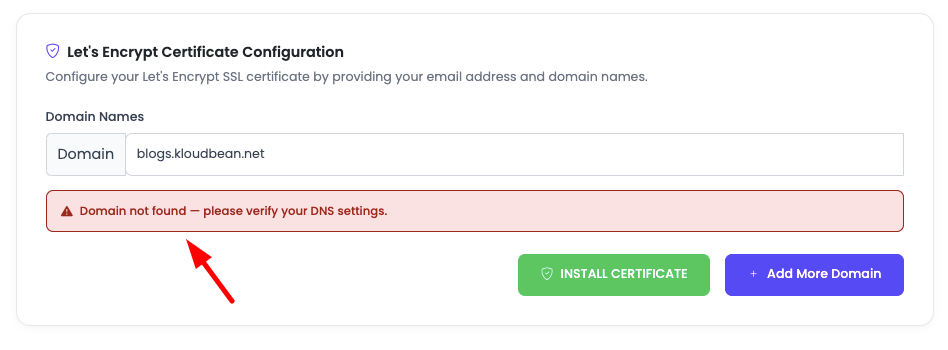
This means you have to point your DNS correctly to your KloudBean server.
Common Errors and Solutions
Here are common errors you might face due to user mistakes and how to resolve them:
-
"Domain not found" or "DNS resolution failed":
- Cause: DNS A record is not pointing to your KloudBean server IP
- Solution: Go to your DNS provider and add/update the A record to point to your server IP address
- How to Get Server IP: Navigate to Application Administration → Access → Server IP Address
-
"Multiple A records detected":
- Cause: Your domain has multiple A records pointing to different IP addresses
- Solution: Remove duplicate A records and ensure only one A record points to your KloudBean server IP
- Check: Verify your DNS records at your DNS provider
-
"Domain not accessible":
- Cause: The domain is not publicly accessible or DNS hasn't propagated
- Solution: Wait for DNS propagation (can take up to 48 hours) and verify the domain resolves correctly using DNS checking tools
- Verification: Use tools like
nslookupor online DNS checkers to verify DNS resolution
-
"Certificate validation failed":
- Cause: Let's Encrypt cannot verify domain ownership due to DNS or firewall issues
- Solution: Ensure port 80 is open (Let's Encrypt uses HTTP-01 challenge) and DNS is correctly configured
- Firewall: Check that your firewall allows Let's Encrypt validation requests
-
"Rate limit exceeded":
- Cause: Too many certificate requests for the same domain in a short period
- Solution: Wait before retrying (Let's Encrypt has rate limits: 50 certificates per registered domain per week)
- Prevention: Avoid repeatedly attempting installation if it fails
-
"Invalid email address":
- Cause: The email address format is incorrect
- Solution: Ensure the email address is in a valid format (e.g.,
[email protected])
Step 5: Configure DNS Correctly
If you encounter DNS-related errors:
- Get Server IP Address:
- Navigate to Application Administration → Access → Server IP Address
- Copy the server IP address displayed

-
Update DNS at Your Provider:
- Go to your DNS provider (e.g., GoDaddy, Namecheap, Cloudflare)
- Navigate to DNS management for your domain
- Add or update the A record:
- Type: A
- Name: @ (for root domain) or subdomain name
- Value: Your KloudBean server IP address
- TTL: 3600 (or default)
-
Wait for DNS Propagation: Allow time for DNS changes to propagate (typically 15 minutes to 48 hours)
-
Verify DNS: Use DNS checking tools to verify your domain resolves to the correct IP address
Step 6: Successful Installation
Once DNS is properly configured and working, your Let's Encrypt certificates should install successfully:
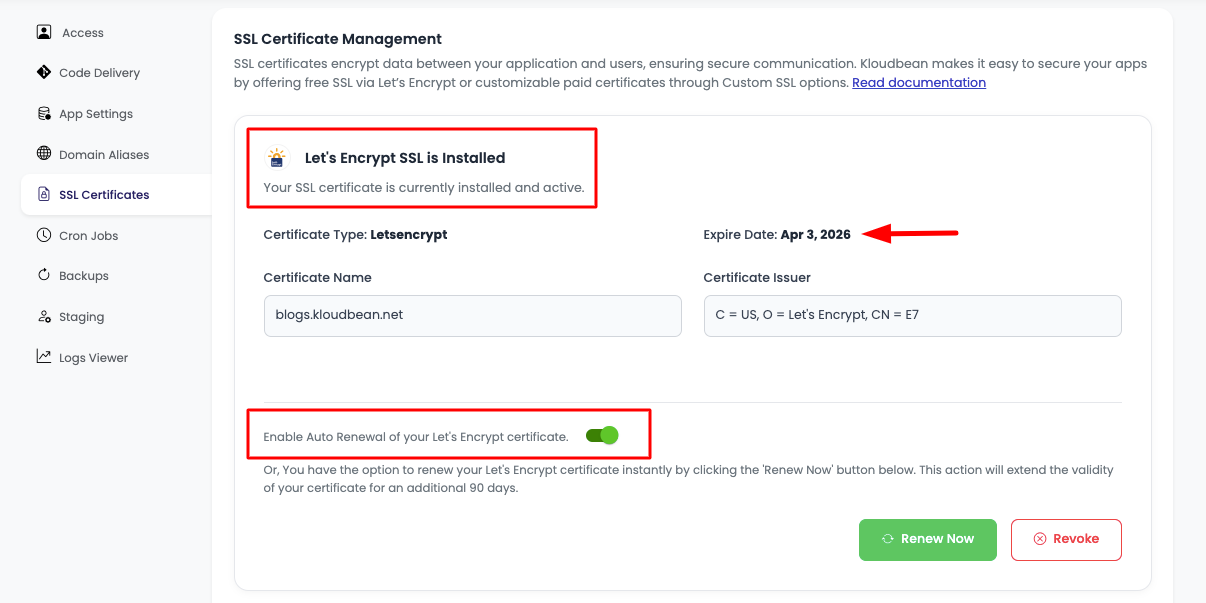
On the SSL screen, you will see:
- Successful Installation: Confirmation that the certificate has been installed
- Certificate Type: Let's Encrypt certificate
- Certificate Details: Information about the certificate
- Expiry Date: When the certificate will expire (90 days from installation)
Managing SSL Certificates
Auto-Renewal Feature
For Let's Encrypt certificates, KloudBean provides automatic renewal:
- Auto-Renewal Toggle: There is a toggle switch which will be on by default. This is the "Auto Renewal" feature.
- What It Does: Auto-renewal means KloudBean will automatically renew your certificates before they get expired, ensuring continuous HTTPS protection without manual intervention.
- Renewal Process: The system checks certificate expiration dates and automatically renews them approximately 30 days before expiry.
- Disable Auto-Renewal: You can turn off auto-renewal if needed, but this is not recommended as it requires manual certificate management.
Manual Certificate Renewal
Even with auto-renewal enabled, you can manually renew certificates at any time:
- Renew Now Button: Click on the "Renew Now" button to immediately renew your Let's Encrypt certificate.
- Use Cases: Manual renewal is useful if:
- You want to renew before the automatic renewal date
- You've made DNS changes and want to refresh the certificate
- You're troubleshooting certificate issues
Revoking Certificates
If you need to remove or revoke SSL certificates:
- Revoke Button: Click on the "Revoke" button to remove the SSL certificate.
- Confirmation: Confirm the revocation action.
- Impact: Revoking a certificate will disable HTTPS for your domain until a new certificate is installed.
Warning: Revoking a certificate will make your site inaccessible via HTTPS. Only revoke certificates if you're replacing them or no longer need HTTPS for that domain.
Best Practices
- Use Let's Encrypt for Most Cases: Let's Encrypt certificates are free, automatically renewed, and perfect for most applications
- Keep Auto-Renewal Enabled: Always keep auto-renewal enabled to ensure continuous HTTPS protection
- Verify DNS Before Installation: Always verify DNS is correctly configured before attempting Let's Encrypt installation
- Monitor Certificate Expiry: Regularly check certificate expiry dates, especially for custom certificates
- Use Single A Records: Ensure each domain has only one A record pointing to your server to avoid validation issues
- Test After Installation: After installing certificates, test your HTTPS connection to ensure everything works correctly
- Keep Certificates Updated: For custom certificates, set reminders to renew before expiration
Troubleshooting
Certificate Installation Failures
- DNS Issues: Verify DNS is correctly pointing to your server IP
- Multiple A Records: Check for duplicate A records and remove them
- Firewall Blocking: Ensure port 80 is accessible for Let's Encrypt validation
- Domain Not Accessible: Verify the domain is publicly accessible and resolves correctly
Certificate Validation Errors
- Format Issues: Ensure certificates are in PEM format with proper BEGIN/END markers
- Key Mismatch: Verify the private key matches the certificate
- Expired Certificate: Check certificate expiration date
- Domain Mismatch: Ensure certificate is issued for the correct domain
Renewal Issues
- Auto-Renewal Not Working: Check that auto-renewal toggle is enabled
- Manual Renewal Fails: Verify DNS is still correctly configured
- Certificate Expired: Manually renew if auto-renewal didn't trigger
Next Steps
After successfully installing SSL certificates:
- Learn about Managing Application Domains to configure multiple domains
- Explore Security and Performance Settings to optimize your application security
- Review Enabling Auto Deployment for automated deployment workflows