Connecting Git Repository
Learn how to connect your Git repository to your KloudBean application for seamless code deployment. KloudBean supports GitHub OAuth SSO for GitHub repositories and SSH key-based connections for GitHub, GitLab, and Bitbucket repositories.
Overview
KloudBean's Git integration allows you to connect your code repository directly to your application, enabling automated deployments and streamlined code management. Whether you're using GitHub OAuth or SSH keys, KloudBean provides a secure and efficient way to deploy your code changes.
Benefits of Git Integration
- Automated Deployments: Deploy code changes automatically when you push to your repository
- Version Control: Track and manage different versions of your application
- Secure Access: Use GitHub OAuth SSO or SSH keys for secure authentication with private repositories
- Branch Management: Deploy from specific branches of your repository
- Build Automation: Automatically build your application after pulling the latest code
Prerequisites
Before connecting your Git repository, ensure you have:
- A Git Repository: A repository hosted on GitHub, GitLab, or Bitbucket
- Repository Access: Appropriate permissions to access your repository (read access for public repos, write access for private repos)
- A KloudBean Application: An application created in your KloudBean account
- GitHub Account Access (for GitHub OAuth): Ability to sign in to GitHub and authorize the KloudBean Git Connector app
- SSH Key Access (for SSH connections): Ability to add SSH keys to your Git provider account
Connecting Your Git Repository
Step 1: Navigate to Code Delivery section
To begin connecting your Git repository:
- Log in to your KloudBean dashboard using your account credentials.
- Click on your application from the Applications list to navigate to the application administration page.
- Navigate to the "Code Delivery" tab in the application settings menu.
- Locate the "Git deployment" section - this is the first tab within the Code Delivery section.
- You will see a field labeled "Git Connection Mode" - this is where you'll start the Git connection process.
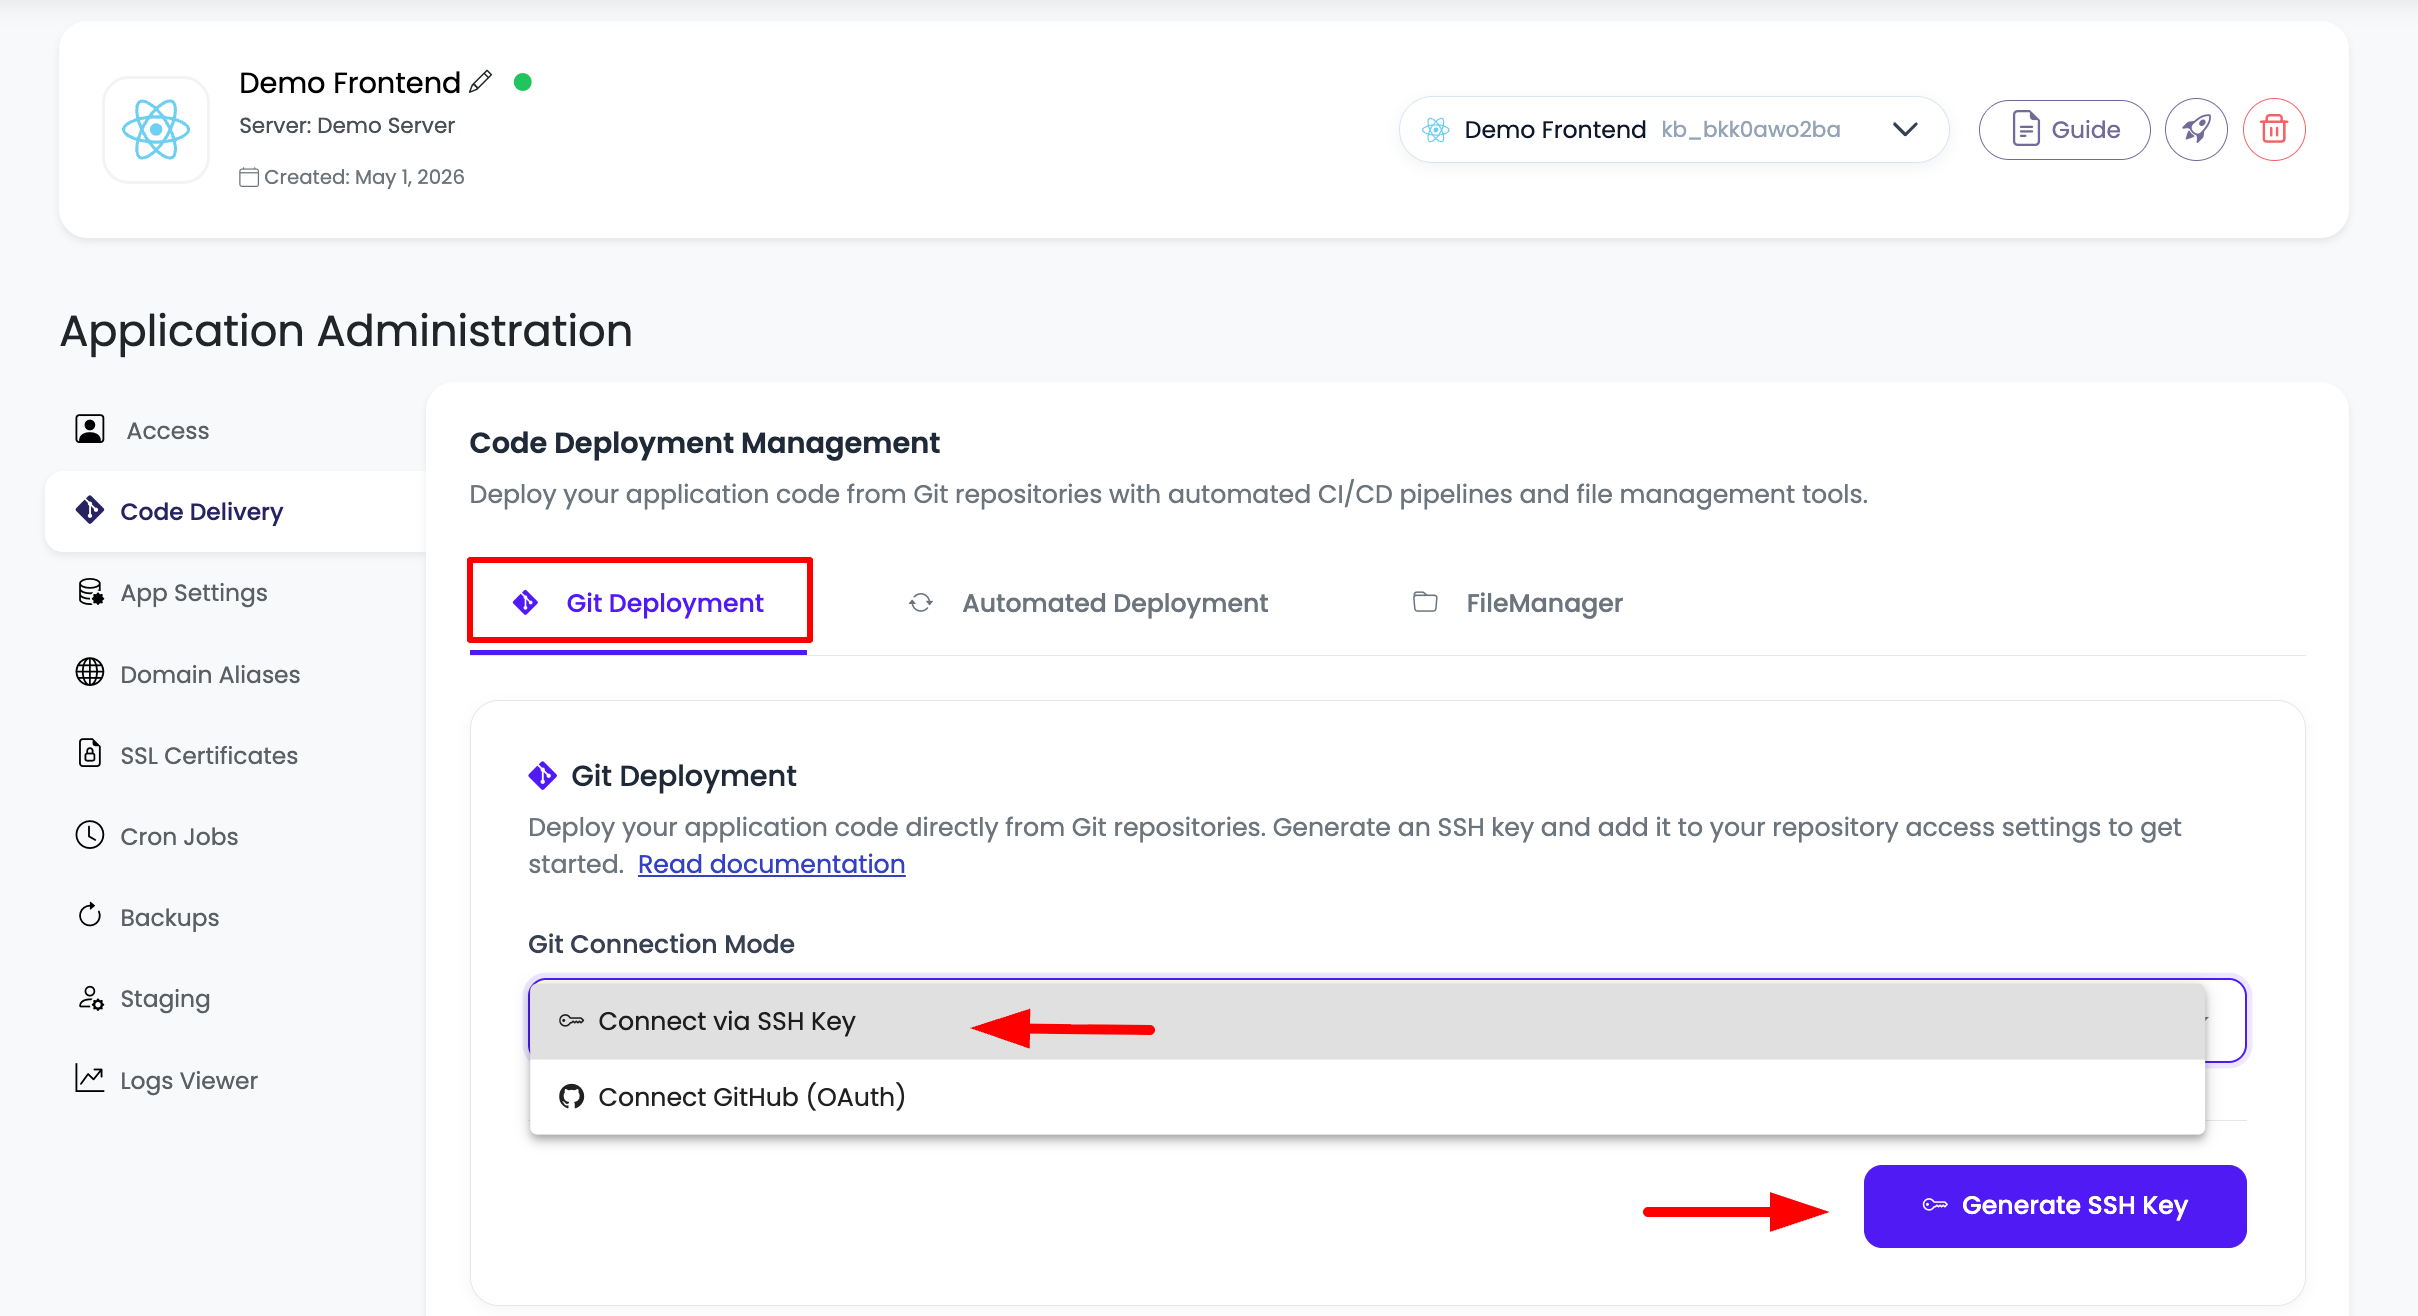
Step 2: Selection Git Connection mode
Once you're in the Git deployment section:
- Click on "Git Connection Mode" dropdown to select the preferred connection mode.
- Choose a Git connection mode:
- Connect Github (OAuth): Use GitHub OAuth SSO to authorize KloudBean from your GitHub account. This option is currently supported for GitHub repositories only.
- SSH Key: Use KloudBean's generated SSH key to connect GitHub, GitLab, or Bitbucket repositories. This is the existing SSH key-based flow.
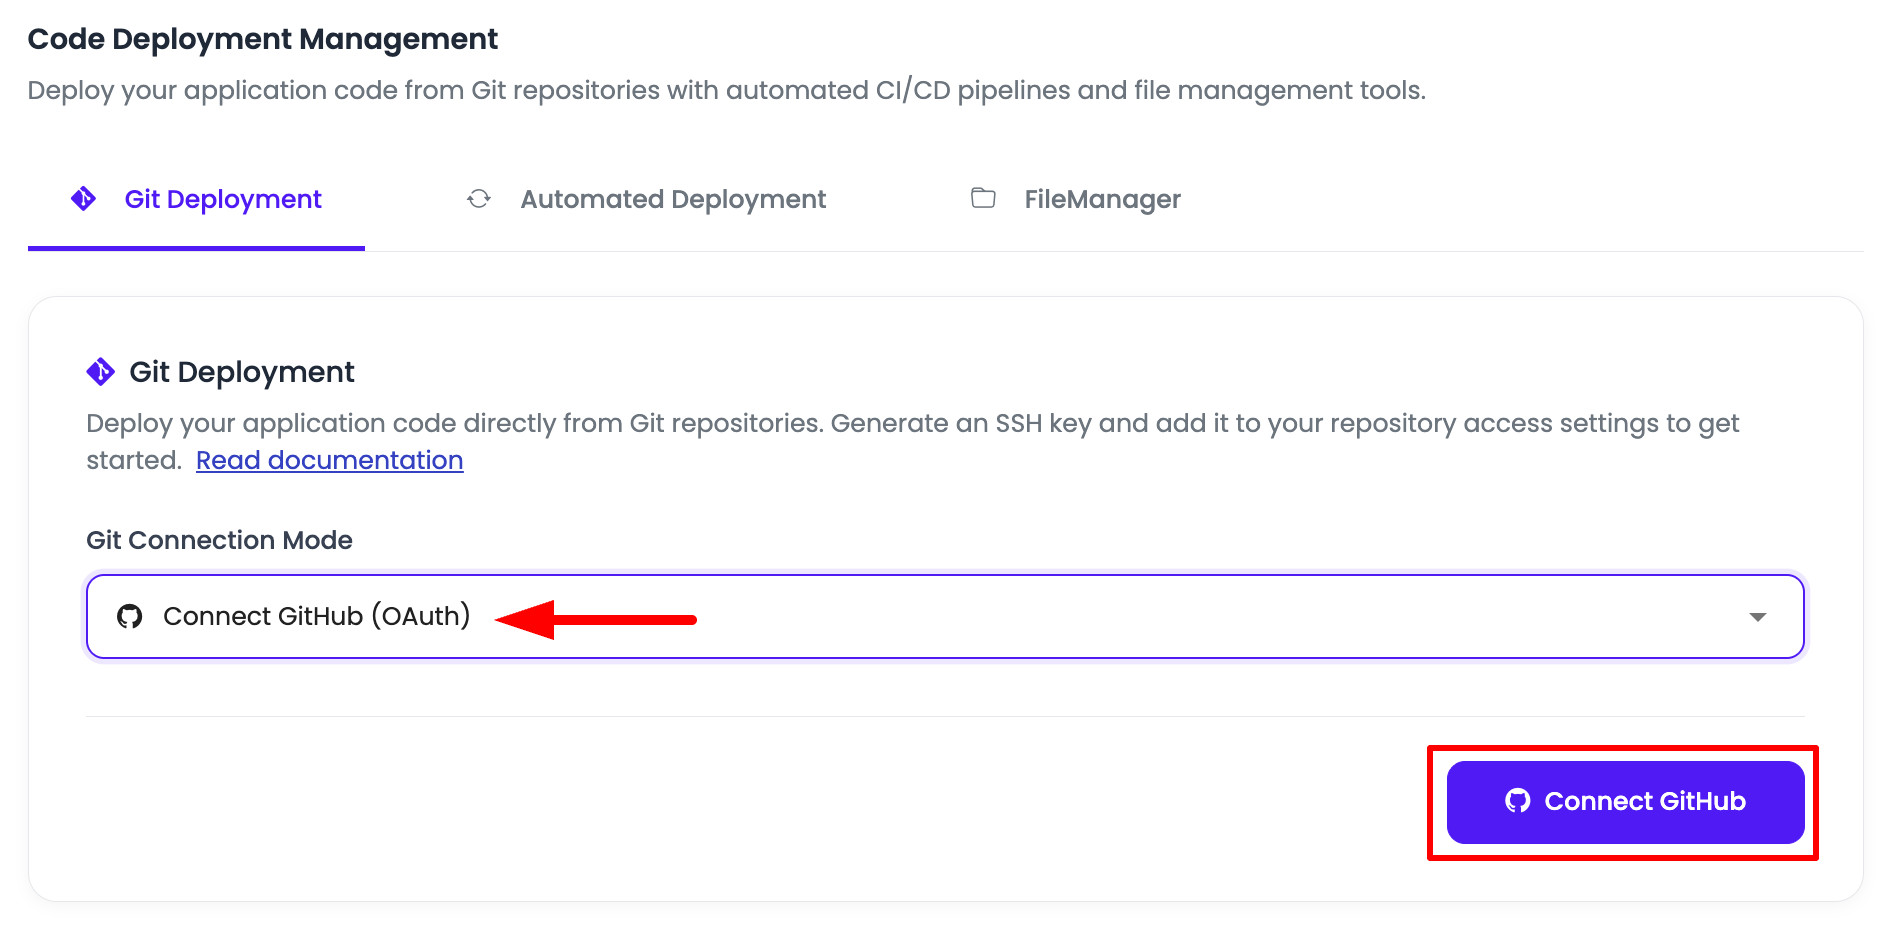
Option A: Connect GitHub with OAuth
Use this option when your repository is hosted on GitHub and you want to authorize access through GitHub OAuth instead of manually adding an SSH key.
Step 1: Start GitHub OAuth Connection
- In the "Git connection mode" dropdown, select "Connect Github (OAuth)".
- Click the "Connect Github" button.
Step 2: Authorize KloudBean in GitHub
After you click "Connect Github", a new browser window opens for GitHub authorization.
- Sign in to GitHub with the GitHub account that owns or has access to the repository you want to deploy.
- Review the authorization request for "KloudBean Git Connector".
- Choose repository access:
- Select All repositories if KloudBean should access all repositories available to your GitHub account.
- Select Only select repositories if you want to grant access to specific repositories only.
- If you choose selected repositories, pick the repositories you want KloudBean to access.
- Click Install & Authorize or Authorize to complete the GitHub connection.
- Return to KloudBean after authorization completes. Your GitHub connection will be available in the Git deployment section.
If you later want to give KloudBean access to more GitHub repositories, update the repository permissions from your GitHub account. Go to Settings > GitHub Apps, find "KloudBean Git Connector", click Configure, and update the repositories that should have access.
Step 3: Continue Repository Setup
After GitHub OAuth is connected, return to KloudBean and continue by selecting the repository and branch you want to deploy. See Connect Repository to KloudBean for the remaining setup.
Option B: Connect with SSH Key
Use this option for GitHub, GitLab, or Bitbucket repositories when you want to connect using an SSH key.
When SSH key mode is enabled:
- SSH Key Generation: KloudBean automatically creates a public SSH key for connecting to your Git repository. This key is essential if your repository is private, as it allows KloudBean to securely access your code.
- Key Purpose: The SSH key enables secure authentication between KloudBean and your Git provider (GitHub, GitLab, or Bitbucket) without requiring you to store passwords or tokens.
Step 3: View and Copy SSH Key
After enabling Git integration, you can view and copy your SSH public key:
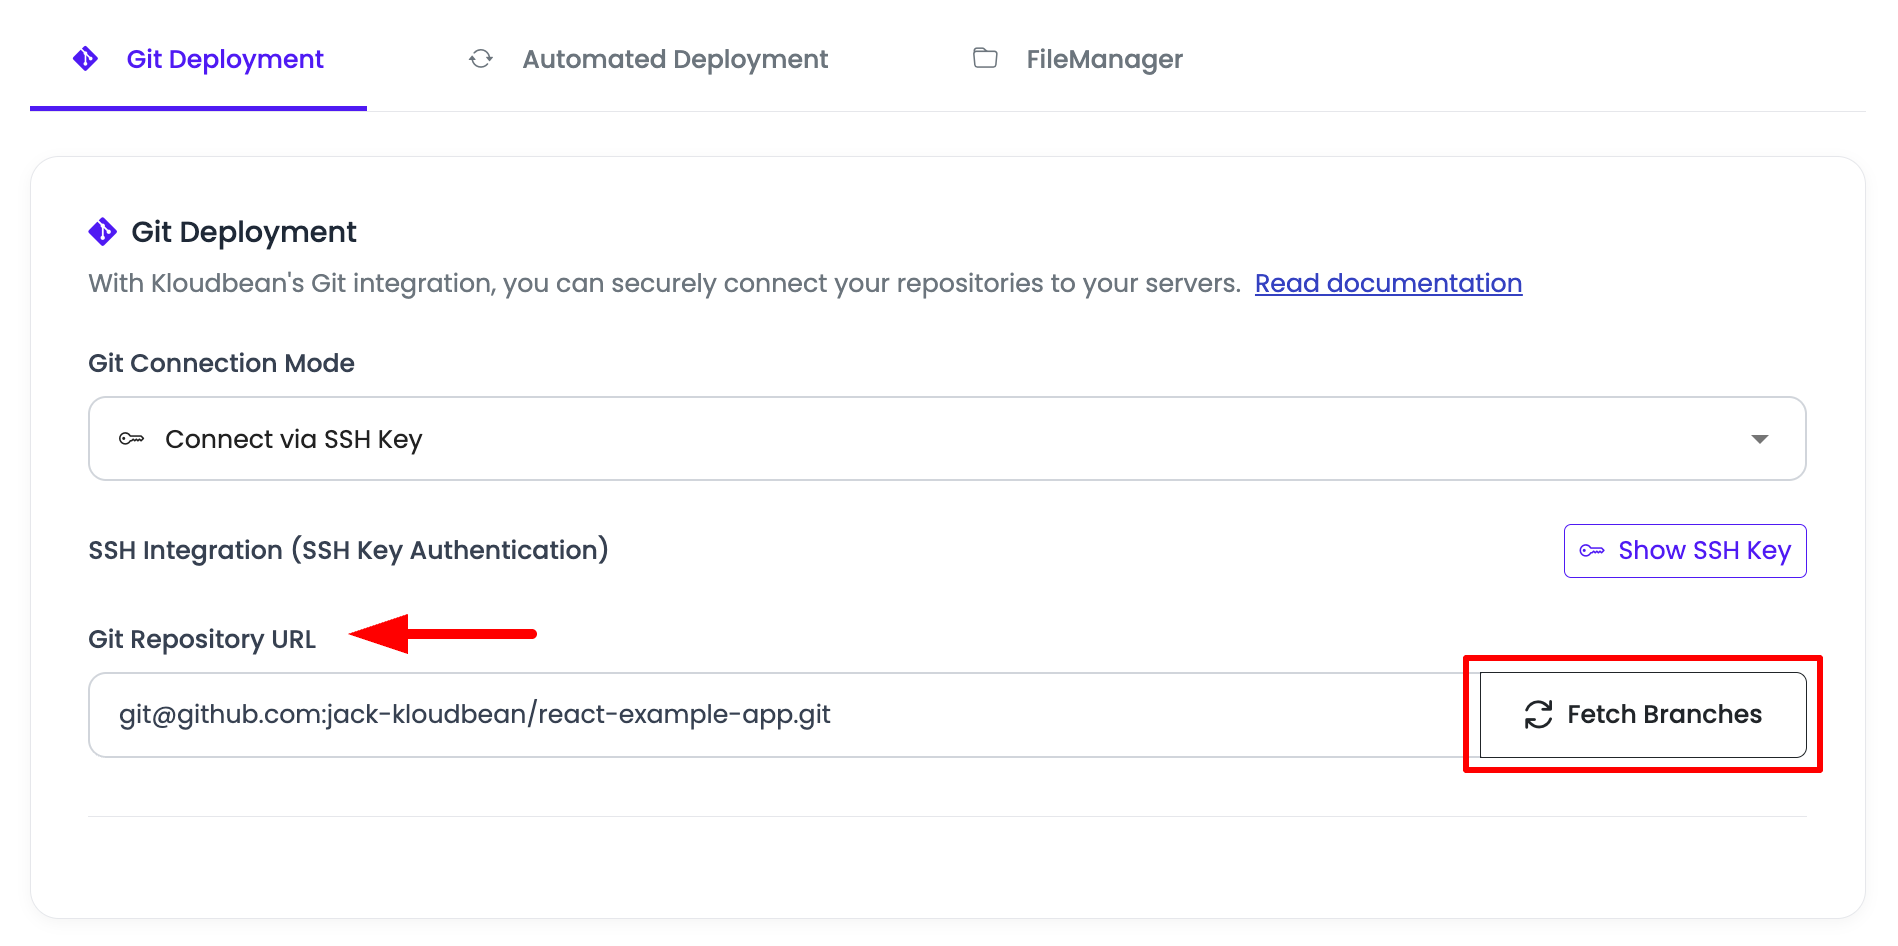
- Click on "Show SSH key" button to display your application's public SSH key.
- The SSH key will be displayed in a text field or modal window.
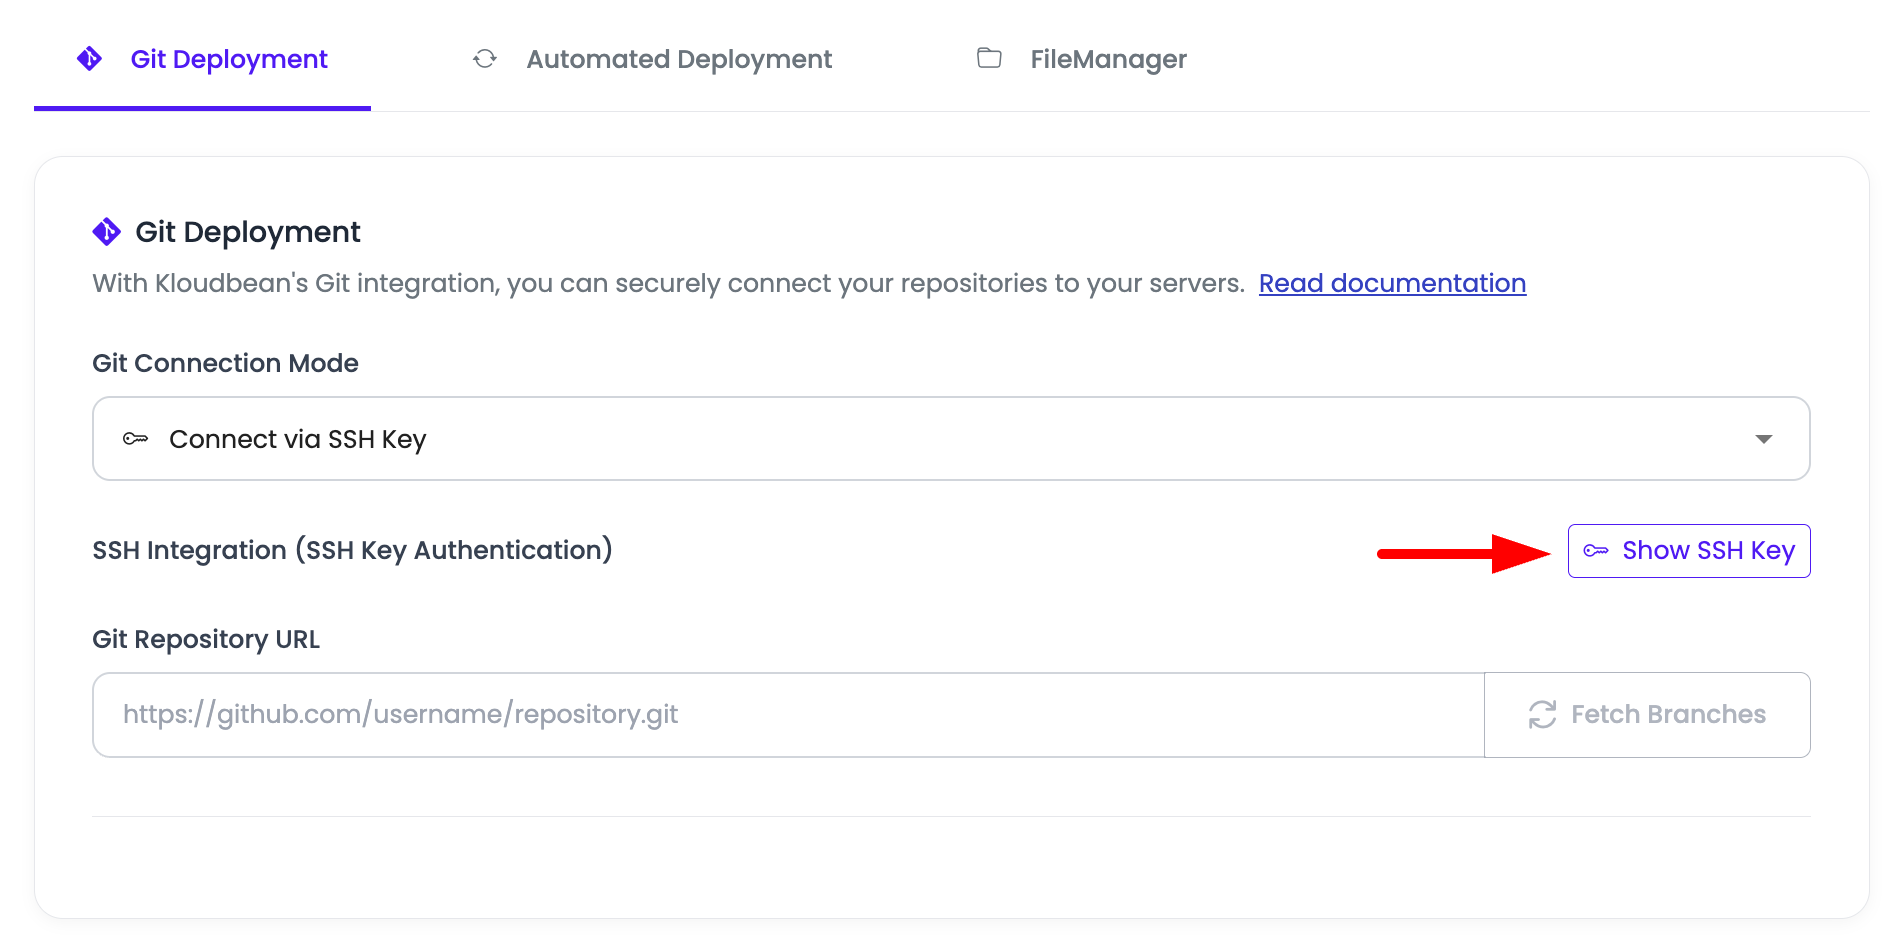
- Copy the SSH key by clicking the copy button provided. This will copy the entire key to your clipboard, ready to be added to your Git provider account.
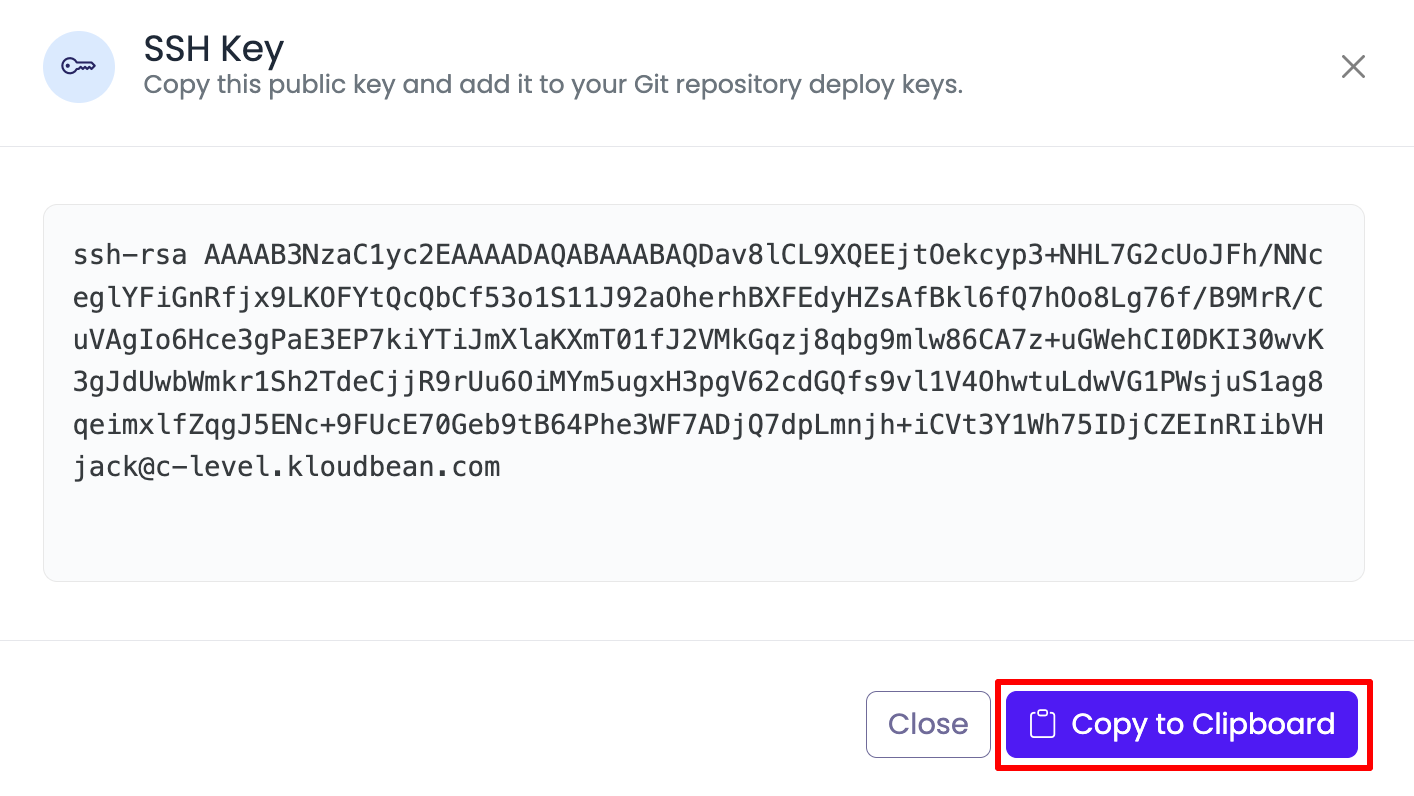
Important Notes:
- Each KloudBean application has its own unique SSH key
- Keep this key secure and only add it to repositories you trust
- The key is specific to this application and cannot be used for other applications
Step 4: Deploy SSH Key to Your Git Provider
Now that you have copied your SSH key, you need to add it to your Git provider account. The process varies slightly depending on your Git provider.
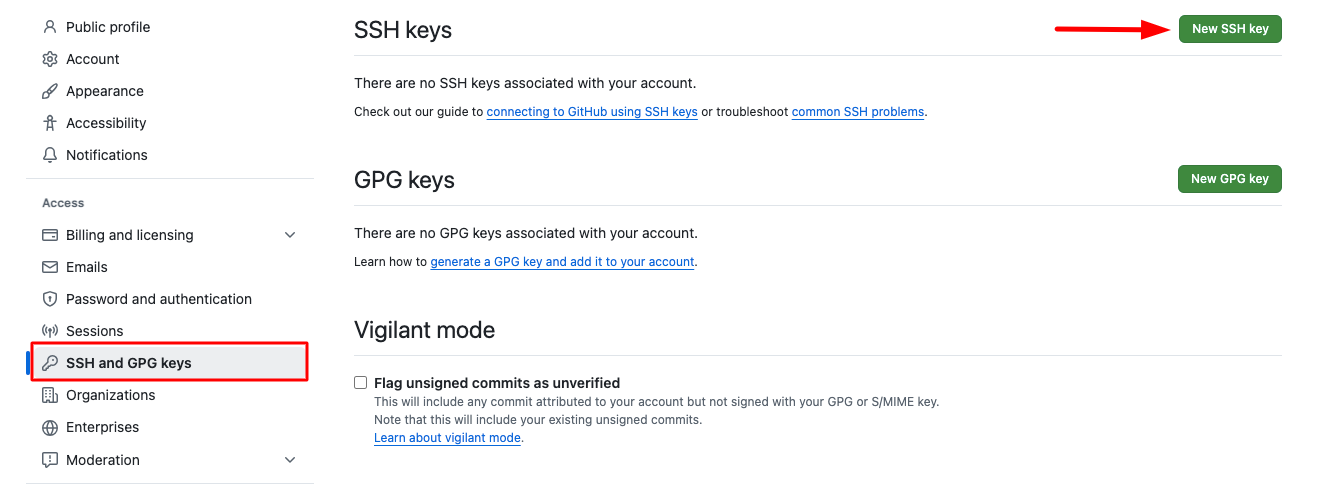
For GitHub
- Navigate to GitHub: Go to your GitHub account and click on your profile icon in the top right corner.
- Access Settings: From the dropdown menu, select "Settings".
- Open SSH Keys Section: In the left sidebar, locate and click on "SSH and GPG keys".
- Add New Key: Click on the "New SSH key" button to add a new SSH key.
- Enter Key Details:
- Title: Enter a descriptive title for this key (e.g., "KloudBean App - [Your App Name]")
- Key: Paste the SSH key you copied from KloudBean into the "Key" field
- Save the Key: Click "Add SSH key" to save and activate the key.
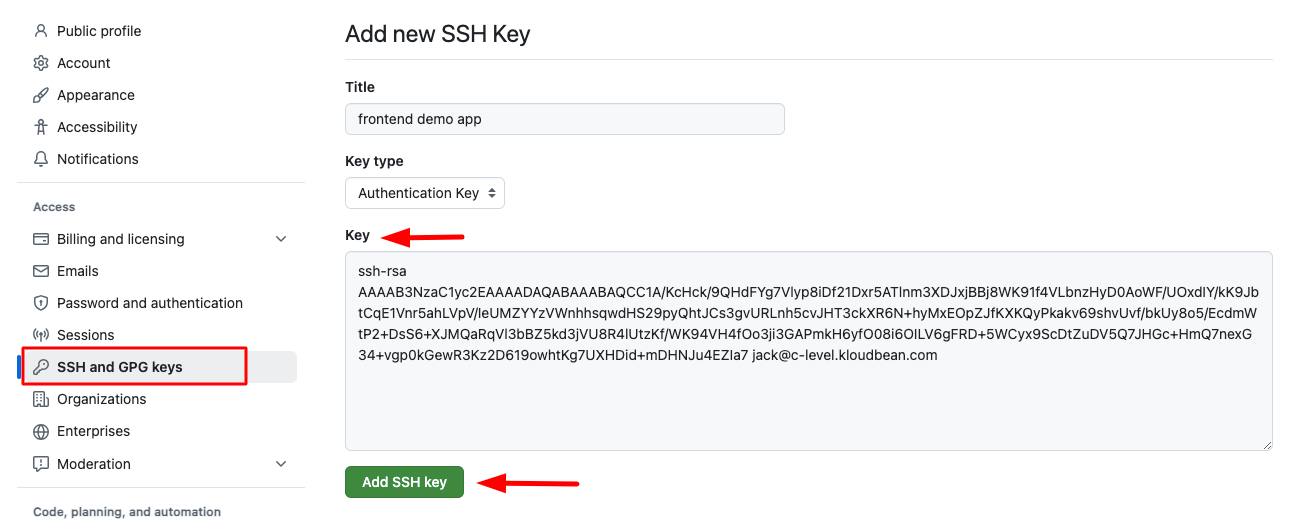
- Verification: Once added, you have successfully configured the SSH key to connect your private GitHub repository with KloudBean.
For GitLab
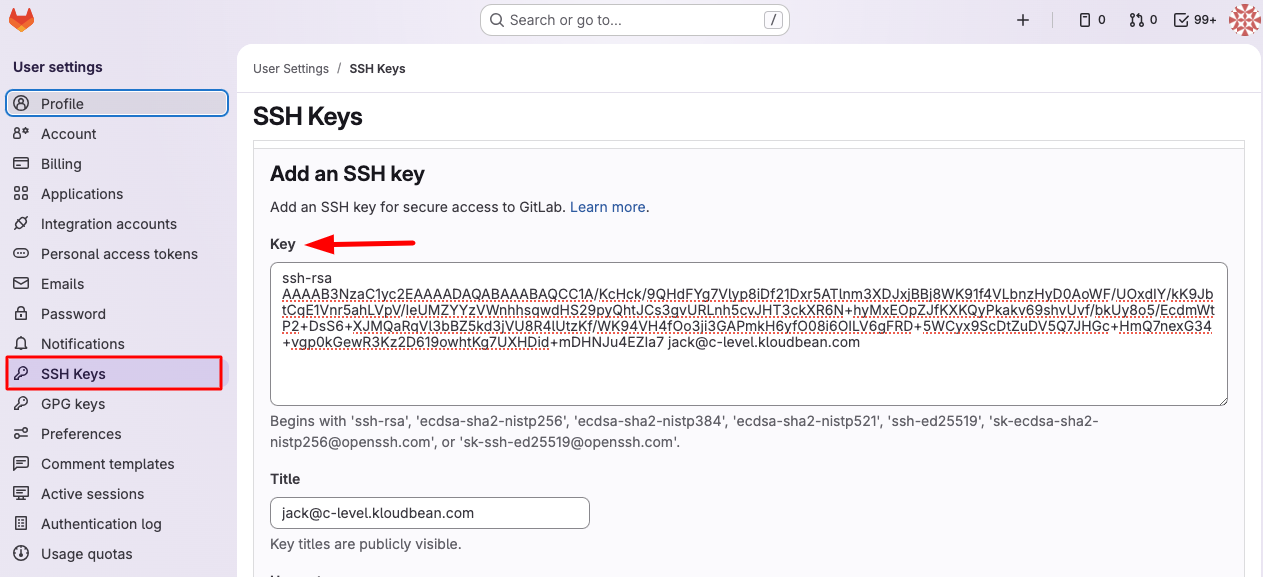
- Navigate to GitLab: Go to your GitLab account and click on your profile icon.
- Access Preferences: Select "Preferences" from the dropdown menu.
- Open SSH Keys Section: In the left sidebar, click on "SSH Keys".
- Add New Key: Click on "Add new key" button.
- Enter Key Details:
- Key: Paste the SSH key you copied from KloudBean into the "Key" field
- Title: Optionally add a descriptive title for this key
- Save the Key: Click "Add key" to save and activate the SSH key.
Step 5: Copy Your Repository URL
For SSH key-based connections, after adding the SSH key to your Git provider, you need to copy your repository URL:
- Navigate to your repository on GitHub, GitLab, or Bitbucket.
- Click on the "Code" button (or equivalent) to view repository URLs.
- Select the appropriate URL:
- For Public Repositories: Copy the HTTPS URL - this is simpler and doesn't require SSH key authentication.
- For Private Repositories: Copy the SSH URL - this uses the SSH key you just added for secure authentication.
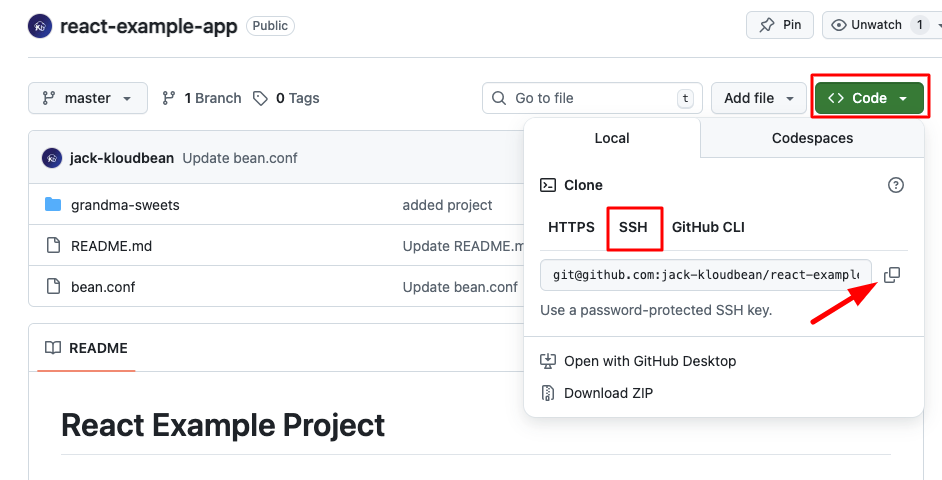
URL Format Examples:
- HTTPS:
https://github.com/username/repository.git - SSH:
[email protected]:username/repository.git
Step 6: Connect Repository to KloudBean
Return to KloudBean to complete the repository connection:
- Return to KloudBean: Go back to your KloudBean application's Git deployment section.
- Provide Repository Details:
- For GitHub OAuth: Select the GitHub repository that you authorized for KloudBean.
- For SSH key connections: In the "Git repository URL" field, paste the repository URL you copied (HTTPS for public repos, SSH for private repos).
- Fetch Branches: Click on the fetch icon (or "Load" button). This action will connect to your repository and retrieve all available branches.
-
Select Branch: Once branches are loaded, you'll see a dropdown list of all available branches. Select the branch you want to deploy (typically
main,master, or your production branch). -
Clone Repository: After selecting your branch, click on "Clone repository" to initiate the cloning process. This will download your repository code to your KloudBean application.
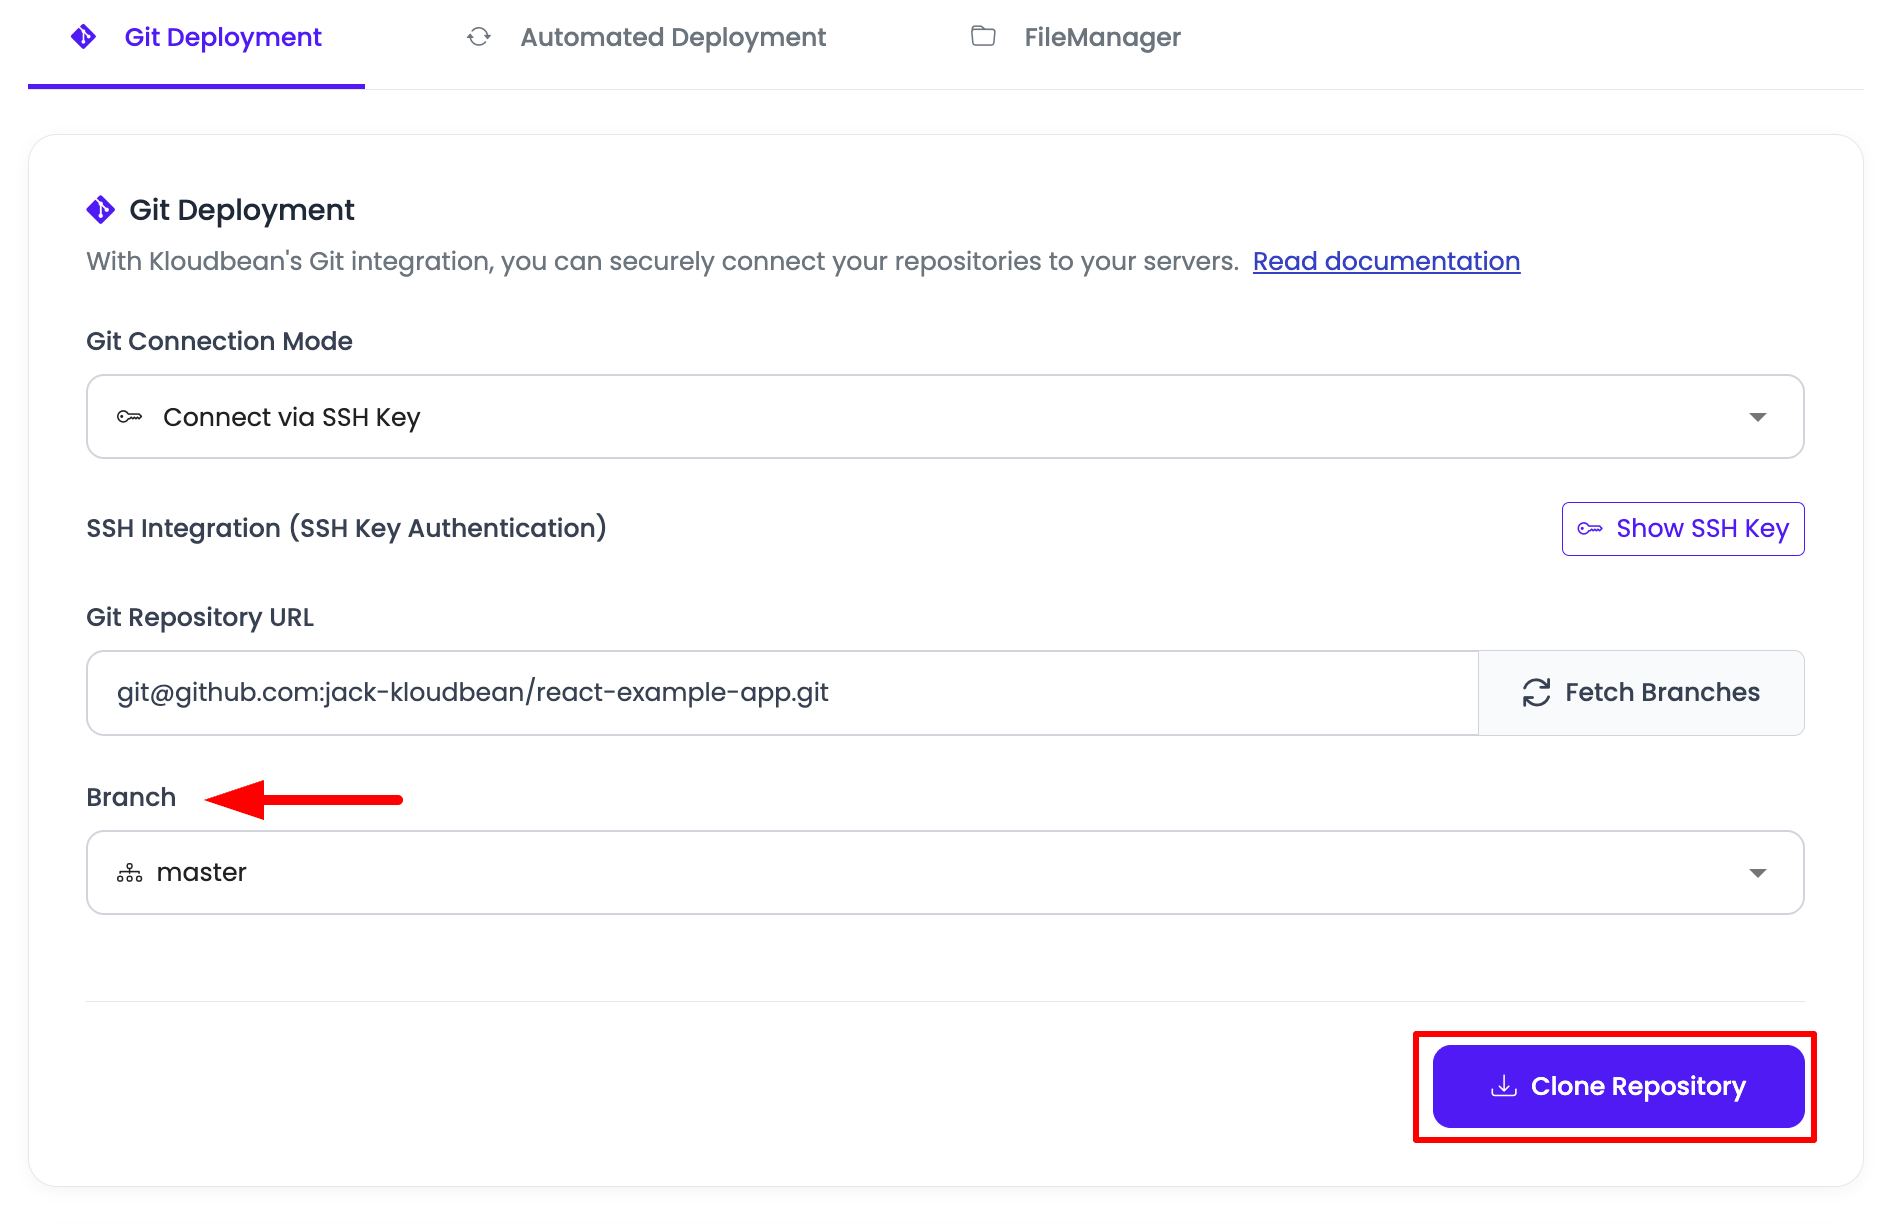
Congratulations! You have successfully cloned your repository to your KloudBean application. Your code is now available in your application's deployment directory.
Step 7: Pull and Deploy Code
After cloning your repository, you can pull the latest changes and deploy your application:
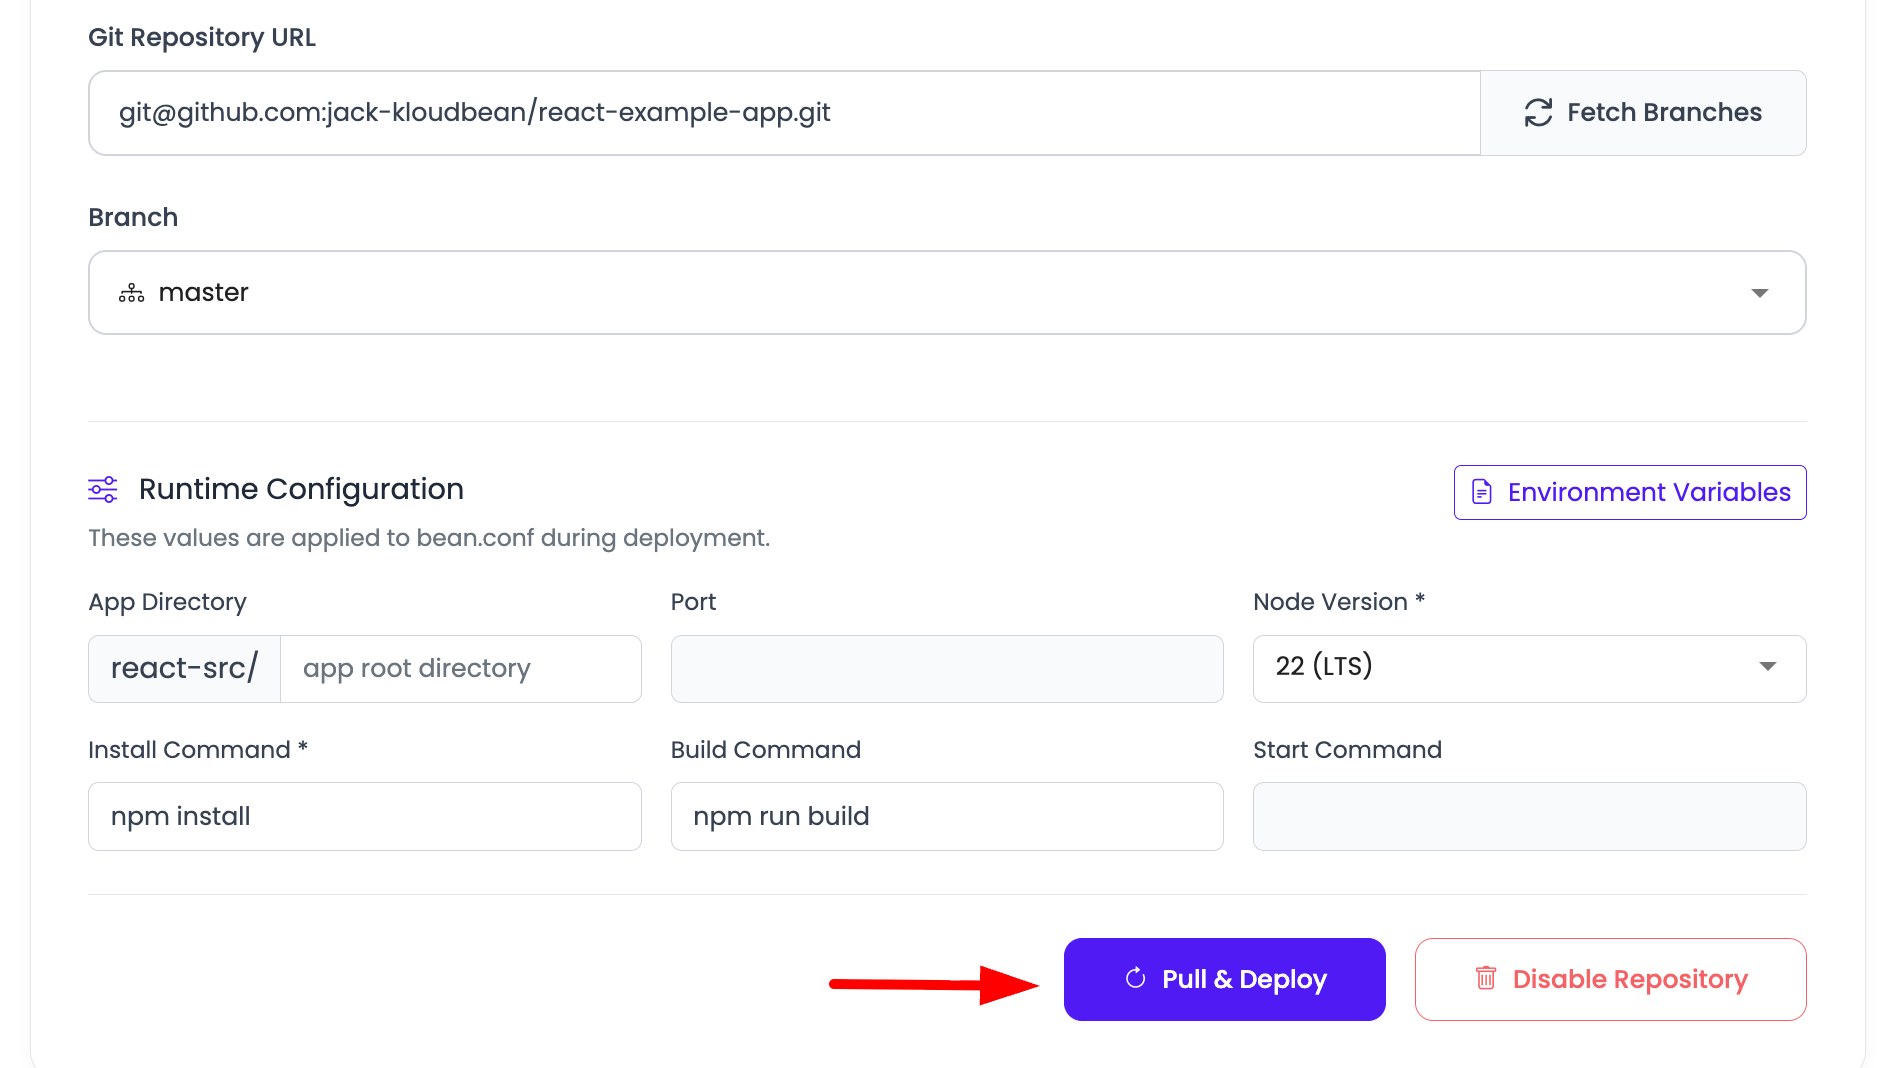
- Access Pull & Deploy: Click on the "Pull & Deploy" button in the Git deployment section.
-
What This Action Does:
- Pulls Latest Code: Retrieves the latest changes from your selected branch
- Initiates Build Process: If your application is build-dependent (requires compilation, npm build, etc.), KloudBean will automatically initiate the build process
- Deploys Application: After a successful build (if required), your application will be deployed with the latest code
-
Build-Dependent Applications:
- Applications like React, Angular, Vue.js, Next.js, or any framework requiring a build step will automatically trigger the build process
- The build process runs the appropriate build commands based on your application type
- You can monitor the build progress in the deployment logs
Understanding Git Integration Features
Public vs. Private Repositories
- Public Repositories: Can be connected using HTTPS URLs without SSH key configuration, or through GitHub OAuth for GitHub repositories
- Private GitHub Repositories: Can be connected with GitHub OAuth SSO or SSH keys
- Private GitLab and Bitbucket Repositories: Use SSH key authentication for secure access
Git Connection Modes
- GitHub OAuth SSO: Supported for GitHub repositories only. Use this mode to authorize KloudBean through the GitHub account permission flow.
- SSH Key: Supported for GitHub, GitLab, and Bitbucket repositories. Use this mode when you prefer SSH keys or when your repository is hosted outside GitHub.
Branch Selection
- You can deploy from any branch in your repository
- Common branches include
main,master,develop, or custom branch names - You can switch branches at any time by selecting a different branch and cloning again
Deployment Path
- The default deployment path is your application's root directory
- You can specify a custom path if your application code is in a subdirectory
- Useful for monorepos or applications with specific directory structures
Best Practices
- Use GitHub OAuth for GitHub Repos: Use OAuth SSO when you want to manage KloudBean repository access from your GitHub account
- Use SSH Keys for Non-GitHub Private Repos: Use SSH keys for private GitLab and Bitbucket repositories, or when you prefer SSH-based access
- Branch Strategy: Use separate branches for development, staging, and production environments
- Regular Updates: Use "Pull & Deploy" regularly to keep your application up-to-date with the latest code changes
- Monitor Builds: Check build logs if your application fails to deploy after pulling new code
- Access Management: Keep track of which GitHub repositories are authorized for KloudBean and which SSH keys are associated with each application
Troubleshooting
SSH Key Issues
- Key Not Working: Ensure the SSH key was correctly copied (no extra spaces or line breaks)
- Permission Denied: Verify the SSH key has been added to your Git provider account
- Key Already Exists: If you see an error about duplicate keys, check if the key was already added
Repository Connection Issues
- GitHub OAuth Access: If an authorized GitHub repository is missing, update repository access from GitHub Settings > GitHub Apps > KloudBean Git Connector > Configure
- URL Format: For SSH key-based connections, ensure you're using the correct URL format (HTTPS for public, SSH for private)
- Repository Access: Verify you have the necessary permissions to access the repository
- Network Issues: Check your internet connection if the fetch operation fails
Deployment Issues
- Build Failures: Review build logs to identify compilation or dependency errors
- Branch Not Found: Ensure the branch name is correct and exists in your repository
- Deployment Path Errors: Verify the deployment path is correct and accessible
Next Steps
After successfully connecting your Git repository:
- Learn about Enabling Auto Deployment to automate deployments on every push
- Explore Managing Application Domains to configure custom domains
- Review Security and Performance Settings to optimize your application