Managing Application Domains and Aliases
Learn how to add and manage multiple domains and aliases for your KloudBean application. This guide walks you through adding custom domains, configuring DNS records, and setting primary domains for your applications.
Overview
KloudBean makes it quite easy and simple to add multiple domains or aliases for your application. A domain is the primary domain of your application which is accessed through the browser, however you can assign multiple aliases to the same application, allowing users to access your application through different domain names.
Understanding Domains and Aliases
- Primary Domain: The main domain through which your application is accessed. This is the default domain that KloudBean uses for your application.
- Domain Aliases: Additional domains that point to the same application. All aliases will serve the same content as your primary domain.
- Use Cases: Useful for branding (multiple domains pointing to one app), www/non-www variants, or regional domains.
Prerequisites
Before adding domains or aliases, ensure you have:
- An Active KloudBean Application: Your application must be created and running
- Domain Name Registered: You need a domain name registered with a domain registrar (e.g., GoDaddy, Namecheap, Cloudflare)
- DNS Access: Access to your domain's DNS settings at your DNS provider
- Domain Ownership: You must own or have administrative access to the domain you want to add
Adding Domains and Aliases
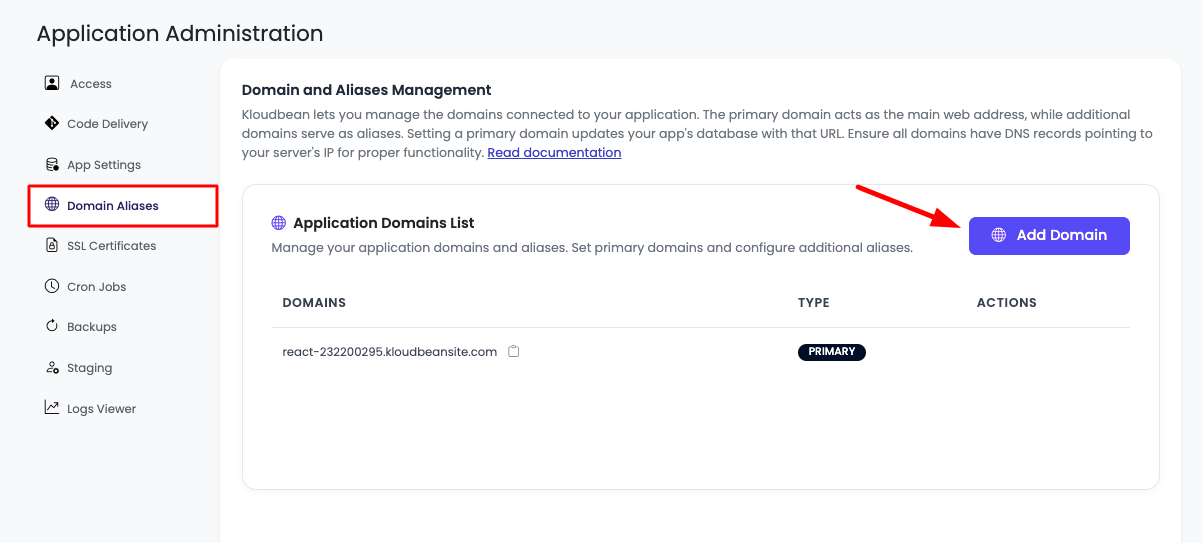
Step 1: Navigate to Domain Aliases Section
To begin adding domains or aliases to your application:
- Navigate to Application Administration Page: Log in to your KloudBean dashboard and open the application administration page for your desired application.
- Access Domain Settings: Go to the "Domain Aliases" section in the application settings menu.
- View Current Domains: Here you will see your current domains and an option to add a new domain.
If you haven't added any domain yet, then KloudBean's provided default domain will be your primary domain. This default domain is automatically assigned when you create your application.
Step 2: Add New Domain or Alias
To add another domain or alias:
- Click "Add Domain" Button: In the Domain Aliases section, click on the "Add Domain" button.
- Add Domain Form: You will see an option to add a new domain with a form or modal window.
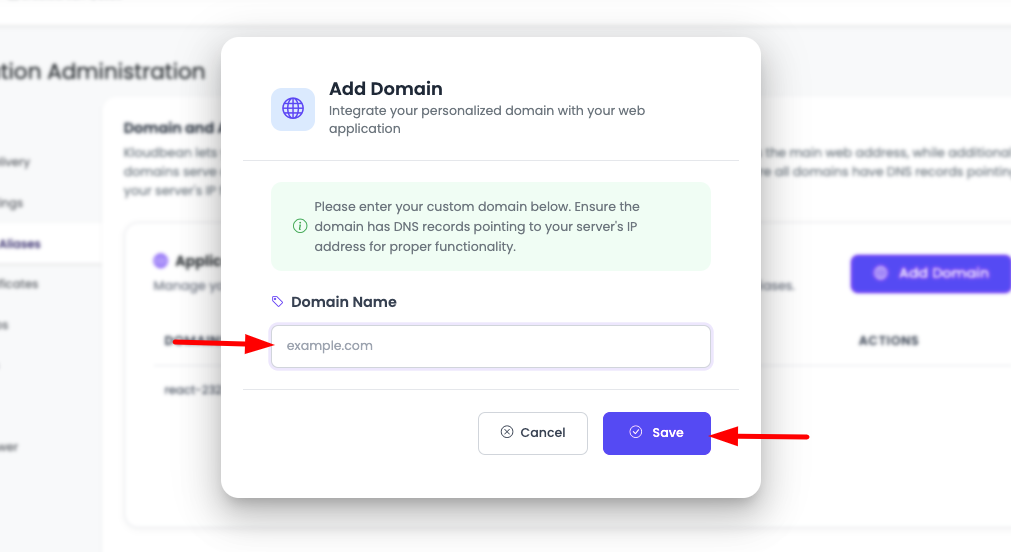
- Enter Domain Name: Enter your domain in the "Domain Name" field. Make sure you add a valid domain.
What is a Valid Domain?
A valid domain must meet the following criteria:
- Format: Must follow the standard domain format (e.g.,
example.com,www.example.com,subdomain.example.com) - No Protocol: Do not include
http://orhttps://- just enter the domain name - No Trailing Slash: Do not include a trailing slash (
/) at the end - Valid Characters: Can contain letters (a-z), numbers (0-9), hyphens (-), and dots (.)
- Proper Structure: Must have at least a top-level domain (TLD) like
.com,.org,.net, etc. - Subdomain Support: Subdomains are supported (e.g.,
api.example.com,blog.example.com) - Examples of Valid Domains:
example.comwww.example.comapi.example.comblog.example.comshop.example.com
Examples of Invalid Domains:
http://example.com(includes protocol)example.com/(includes trailing slash)example(missing TLD)example..com(double dots)
- Save Domain: Once a valid domain is entered, click the "Save" button to save it. Your domain will be added to the list.
Step 3: Configure DNS Records
After adding your domain in KloudBean, you need to configure DNS records at your DNS provider to point your domain to your KloudBean server.
Get Your Server IP Address
Before configuring DNS, you need to get your server's IP address:
- Navigate to Access Section: In your application administration page, go to "Access" section.
- Find Server IP Address: Look for "Server IP Address" - this displays your server's public IP address.
- Copy Server IP: Copy the server IP address - you'll need this for DNS configuration.

Configure DNS A Record
To make your domain accessible, configure an A record in your DNS provider:
- Log in to Your DNS Provider: Access your domain registrar or DNS provider's control panel (e.g., GoDaddy, Namecheap, Cloudflare, Route 53).
- Navigate to DNS Management: Find the DNS management or DNS settings for your domain.
- Add A Record: Add a new DNS record with the following settings:
- Record Type: Select "A" (Address record)
- Name/Host: Enter
@for root domain (e.g.,example.com) or the subdomain name (e.g.,wwwforwww.example.com) - Value/Points To: Paste the server IP address you copied from KloudBean
- TTL (Time To Live): Set to
3600(1 hour) or use the default value
DNS A Record Example:
Type: A
Name: @
Value: 192.0.2.100
TTL: 3600
For Subdomains:
Type: A
Name: www
Value: 192.0.2.100
TTL: 3600
- Save DNS Record: Save the DNS record in your DNS provider's interface.
DNS Propagation
After adding the DNS record:
- Propagation Time: DNS changes can take anywhere from a few minutes to 48 hours to propagate globally
- Check DNS Propagation: You can use online tools like
whatsmydns.netordnschecker.orgto check if your DNS has propagated - Access Your Domain: Once DNS propagation is successful, your app should be accessible now with this domain
Until DNS propagation is complete, your domain may not resolve correctly. Be patient and wait for the DNS changes to propagate.
Step 4: View Added Domains
After adding your domain and configuring DNS:
- Domain List: Your new domain is now listed in the Domain Aliases section.
- Domain Status: The domain will appear as an alias and can be accessed once DNS is properly configured.
- Make Primary Option: You have the option to make it your primary domain if desired.
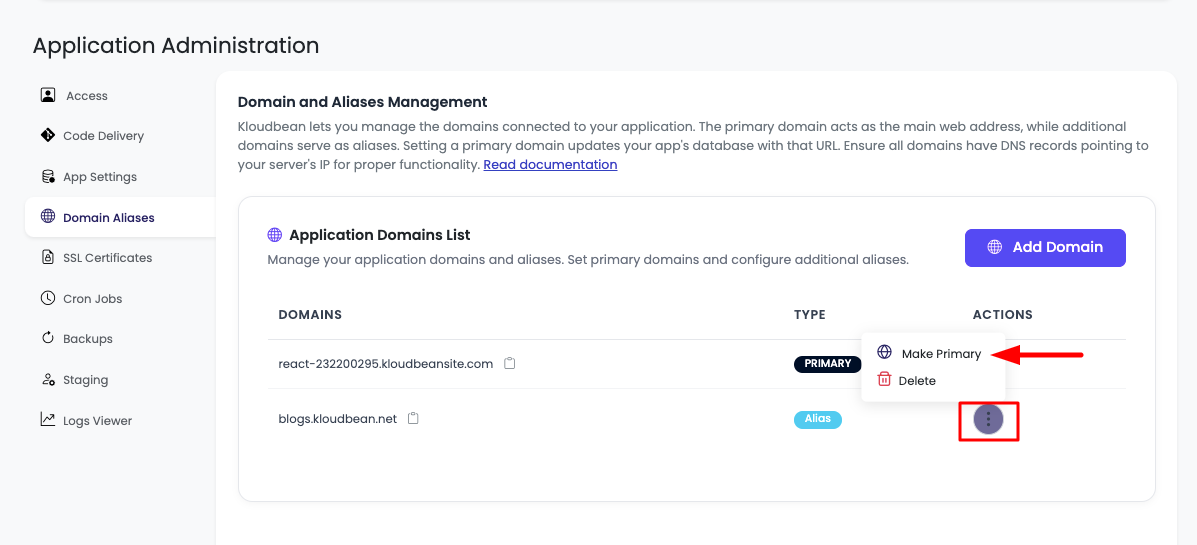
Setting Primary Domain
After adding multiple domains, you can change which domain is your primary domain:
Step 1: Access Domain Menu
- Locate Your Domain: In the Domain Aliases section, find the domain you want to set as primary.
- Open Menu: Click on the three-dotted menu (⋮) next to the domain name.
- Select "Make Primary": From the dropdown menu, select "Make Primary".
Step 2: Wait for Update
- Processing Time: It will take a few seconds for KloudBean to update your primary domain.
- Domain Update: The system will update the primary domain configuration.
- Application Update: If this is a WordPress application, KloudBean will automatically:
- Update the domain in the WordPress database
- Update all page URLs where needed
- Configure WordPress to use the new primary domain
- Ensure all internal links and references point to the new primary domain
Important Notes:
- Changing the primary domain may affect your application's internal URLs
- For WordPress applications, the site URL and home URL are automatically updated
- Some applications may require a cache clear or restart after changing the primary domain
- SSL certificates will be automatically provisioned for the new primary domain
Understanding Domain Configuration
Primary Domain vs. Aliases
- Primary Domain: The main domain that your application uses. This is the domain that appears in application settings and is used for internal references.
- Domain Aliases: Additional domains that point to the same application. They serve the same content but are treated as alternative access points.
Multiple Domains Use Cases
- Branding: Use different domains for different brands or products
- Regional Domains: Point regional domains (e.g.,
example.co.uk,example.de) to the same application - www and non-www: Set up both
www.example.comandexample.comas aliases - Marketing Campaigns: Use specific domains for marketing campaigns that point to your main application
Best Practices
- DNS Configuration: Always configure DNS records correctly before expecting the domain to work
- Propagation Patience: Allow sufficient time for DNS propagation (up to 48 hours)
- Primary Domain Selection: Choose a primary domain that represents your main brand or application
- SSL Certificates: Ensure SSL certificates are properly configured for all domains (KloudBean handles this automatically)
- Domain Verification: Verify that your domain is resolving correctly using DNS checking tools
- WordPress Considerations: For WordPress applications, changing the primary domain will update the database automatically
- Test Before Production: Test domain changes in a staging environment if possible
Troubleshooting
Domain Not Accessible
- Check DNS Records: Verify that the A record is correctly configured at your DNS provider
- Verify Server IP: Ensure you're using the correct server IP address from KloudBean
- DNS Propagation: Wait for DNS propagation to complete (can take up to 48 hours)
- TTL Settings: Lower TTL values can help with faster propagation, but may increase DNS queries
DNS Configuration Issues
- Incorrect IP Address: Double-check that the A record points to the correct server IP
- Wrong Record Type: Ensure you're using an A record, not a CNAME for the root domain
- Subdomain Configuration: For subdomains, use either A record (pointing to IP) or CNAME (pointing to primary domain)
WordPress Domain Change Issues
- Cache Clearing: Clear WordPress cache and browser cache after changing primary domain
- Database Updates: KloudBean automatically updates WordPress database, but you may need to clear caches
- Plugin Compatibility: Some WordPress plugins may need to be reconfigured after domain changes
- Search and Replace: If internal links don't update, you may need to run a search and replace in the database
SSL Certificate Issues
- Automatic Provisioning: KloudBean automatically provisions SSL certificates for added domains
- Verification Time: SSL certificates may take a few minutes to be issued after domain is added
- Mixed Content: Ensure all resources (images, scripts) use HTTPS after SSL is enabled
Next Steps
After successfully managing your domains and aliases:
- Learn about Managing SSL Certificates to secure your domains with HTTPS
- Explore Security and Performance Settings to optimize your application
- Review Connecting Git Repository for automated deployment workflows