Managing Team Members
Learn how to add, manage, and collaborate with team members on your KloudBean account using User Access Control (UAC). Control access to your resources with granular permissions.
Overview
Team collaboration allows you to invite team members to your KloudBean account, assign roles and permissions, and work together on projects and resources. This is essential for agencies, development teams, and organizations. KloudBean's User Access Control (UAC) system provides flexible and granular control over what team members can access.
Understanding User Access Control (UAC)
This section also explains how User Access Control (UAC) is enabled on KloudBean.
What is User Access Control?
If you are working as an organization or a developer who has multiple team members working on different projects and you have to allow them access to KloudBean resources but with restricted access or full access, you can take benefit using this section called User Access Control (UAC).
Benefits of UAC
- Granular Permissions: Control exactly what each team member can access
- Resource-Level Control: Grant access to specific servers, applications, databases, etc.
- Component-Level Control: Control access to specific components within resources
- Flexible Access: Choose between full access or selective access
- Security: Ensure team members only have access to what they need
- Collaboration: Enable team collaboration while maintaining security
Accessing Team Management
- Log in to your KloudBean account
- Navigate to Dashboard header → Users
- You'll see a list of all team members and their roles
Viewing Team Members
Team Overview
The team list displays:
- Name: Team member's name
- Email: Team member's email address
- Role: Assigned role and permissions
- Status: Active, Pending, or Inactive
- Last Active: Last login or activity time
- Permissions: Number of resources they can access
Adding Team Members
Inviting a New User/Team Member
In order to add a new user/team member:
- Click "Invite User":
- Click on the "Invite User" button in the team members section
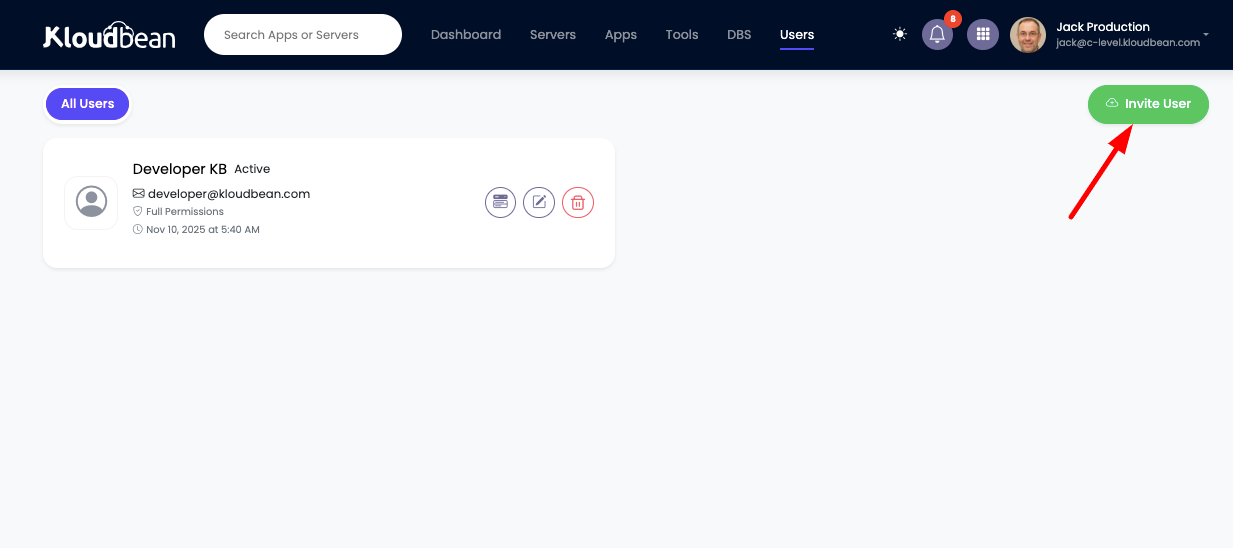
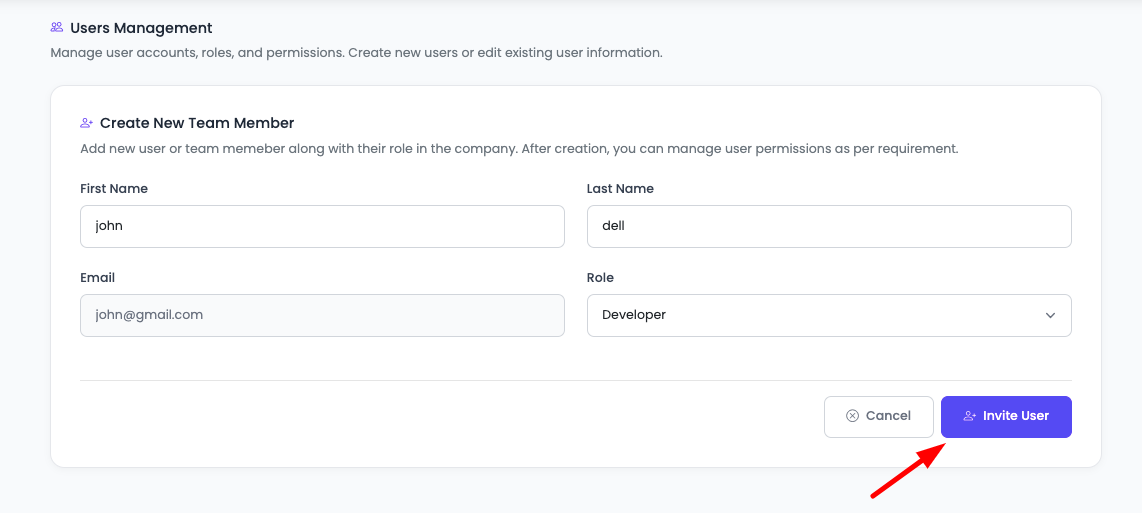
- User Provision Page:
- Once clicked, you will be navigated to the user provision page
- On this page, you will add:
- User Name: Enter the team member's name
- Email: Enter the team member's email address
- Role: Select the role for the team member
- Click "Send Invite" to send the invitation
Invitation Process
After this action:
- Email Sent: An email has been sent to that user with a link to enable their account
- Account Setup: The user clicks the link and sets a new password
- Team Addition: Once done, the user has been added to the team
- Access Granted: The user can now access KloudBean resources based on their assigned permissions
Invitation Details
- Email Invitation: User receives an invitation email
- Account Activation: User sets password to activate account
- Automatic Addition: User is automatically added to team after activation
- Permission Assignment: User receives permissions based on assigned role
Managing Team Member Information
Updating User Information
You also have control to update user basic information or enable/disable user by clicking on the edit button of that particular user.
- Click Edit Button:
- Find the user in the team list
- Click on the edit button for that user
- This will take you to the update user page

-
Update Information:
- Update user's basic information:
- Name
- Role
- Status (Active/Inactive)
- Make your changes
- Update user's basic information:
-
Save Changes:
- Click "Save Changes" to apply updates
- Changes will be reflected immediately
Temporarily Disabling Team Members
This way you can also temporarily disable any team member to access your account if you don't wish to permanently delete that user.
Benefits of Disabling vs Deleting:
- Preserve History: Keep user's activity history and records
- Temporary Suspension: Suspend access without losing data
- Easy Reactivation: Re-enable access when needed
- No Data Loss: Maintain all associated records and logs
User Permissions
Let's see how you can update and enable particular team member permissions and access to your resources on KloudBean console.
Accessing User Permissions
-
Click Permissions Icon:
- From the user list, click on the permissions icon for that user
- This will take you to the user permissions page
-
User Permissions Page:
- Here you can adjust user permissions
- Control what resources and components the user can access
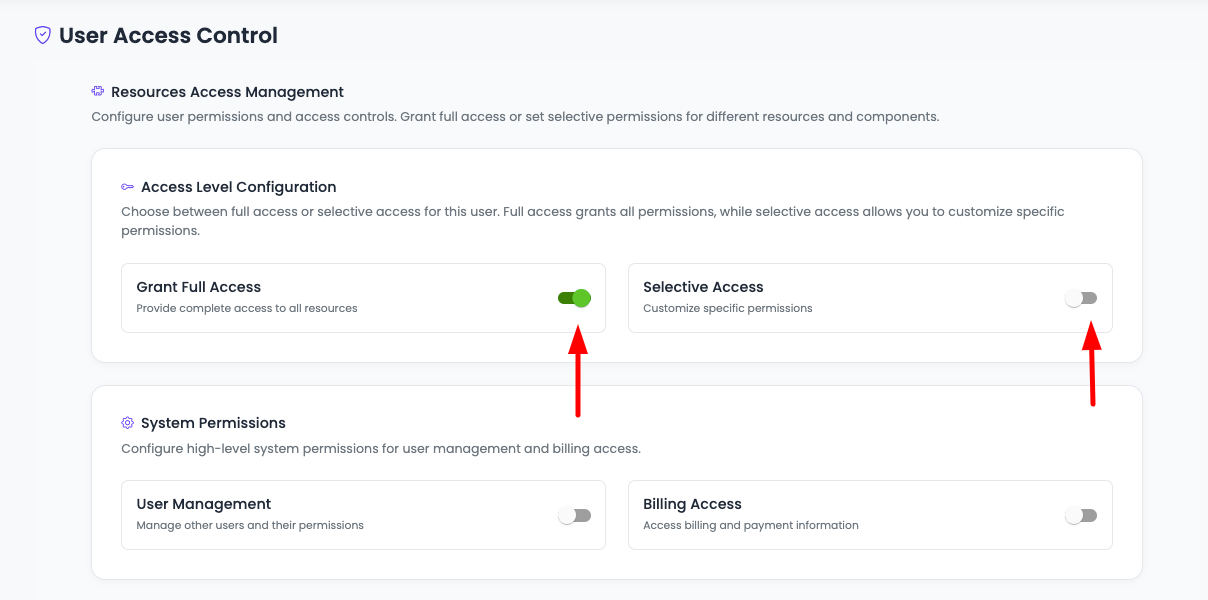
Resources Access Management
On the user permissions page, you will have a section "Resources Access Management" with the following options:
Main Access Options
-
Grant Full Access:
- User will have complete access except users and billing
- Full access to all resources and components
- Cannot manage other users or billing
-
Selective Access:
- Allowed resources only
- You choose which specific resources the user can access
- More granular control over permissions
-
User Management:
- User can view team members
- User can update user information
- Must be explicitly enabled even with full access
-
Billing Access:
- User can manage billing
- Access to invoices, subscriptions, and payment methods
- Must be explicitly enabled even with full access
Main Access Control
This is where you will control main access, either allow user Full Access or Selective Access.
Full Access
If full access is given:
- User has access to all resources and components
- Still, in this case, user doesn't have access to:
- Billing sections: Cannot access billing, invoices, subscriptions
- User management sections: Cannot manage other team members
- In order to give that access, you have to explicitly allow access to:
- User Management: Enable this option separately
- Billing Access: Enable this option separately
Selective Access
If you allow only selective access, then you will see extended options to select the resources.
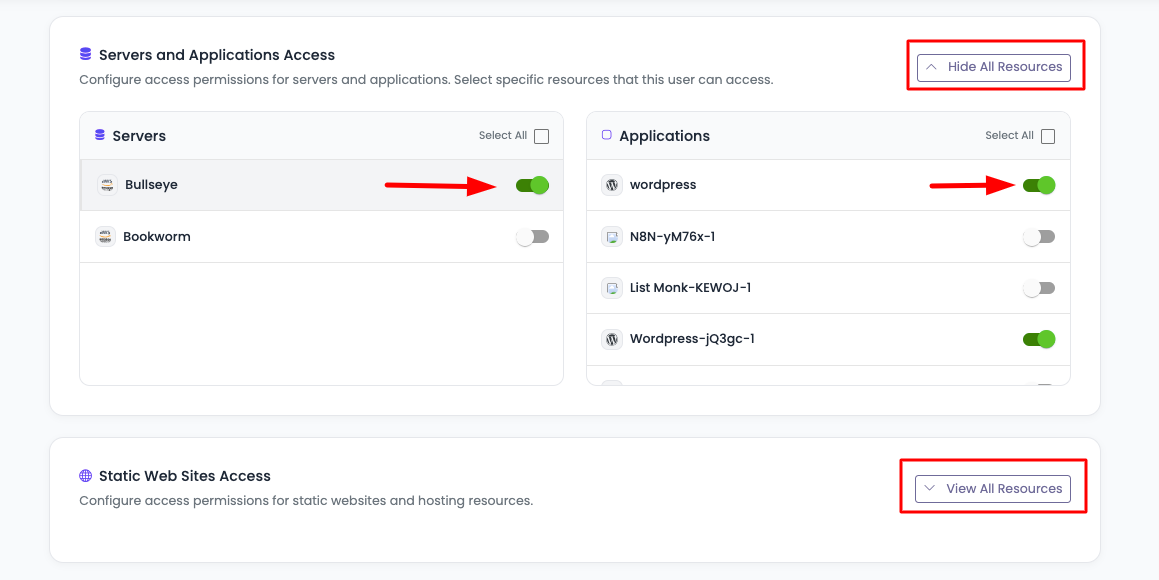
Selecting Resources
If you click on "View All Resources", you will see the resources to enable access, and you can select or deselect them according to the access you want to give.
Servers and Applications Access
- It will have a list of all servers and their applications
- Server Access: If you allow any server access, it will give access to that server
- Application Access: But not applications unless you selected apps as well which you want to allow
- Select All Apps: You can select all apps as well if you want to give access to all apps of that particular server
- Granular Control: Choose specific servers and specific applications within those servers
Other Resources
Static Web Sites Access:
- Grant access to static website hosting
- Control which static sites the user can access
- Manage static site deployments
Managed Databases Access:
- Grant access to database instances
- Control which databases the user can access
- Manage database configurations
Flexible Load-Balancers Access:
- Grant access to load balancer instances
- Control which load balancers the user can access
- Manage load balancer configurations
Components Access Management
If you are going with selective access, you have further options to enable particular components to allow access.
There is a section "Components Access Management" where you have options:
Component Access Options
-
Components Full Access:
- User has full access to all components
- Can read and write to all components
- Complete component-level access
-
Components Selective Access:
- User has access only to selected components
- You choose which components the user can access
- More granular component-level control
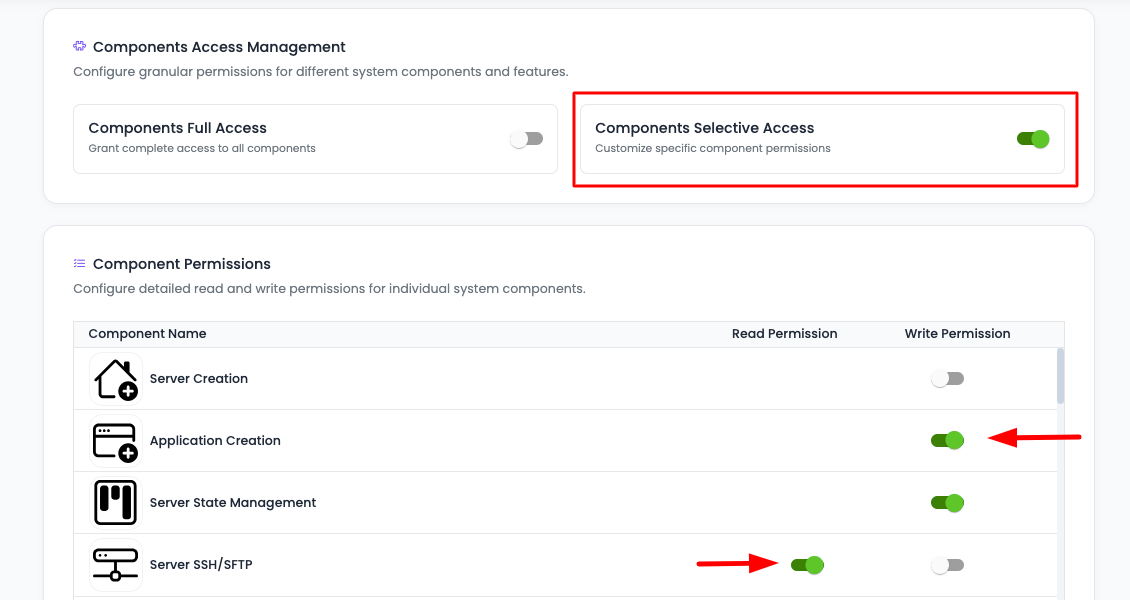
Components Selective Access
If you go with Components Selective Access, then you will see a list of all the components you can enable read or write access for those components.
Component Access Types:
- Read Access: User can view but not modify components
- Write Access: User can view and modify components
- No Access: User cannot access the component
Available Components:
- Application configurations
- Server settings
- Database configurations
- Domain management
- SSL certificates
- Environment variables
- File management
- And more...
Permission Levels Summary
Full Access
- Complete access to all resources (except users and billing)
- Can manage all servers, applications, databases, etc.
- Cannot manage team members or billing unless explicitly enabled
Selective Access
- Access only to selected resources
- Choose specific servers, applications, databases
- Choose specific components within resources
- Read or write access per component
Best Practices
- ✅ Principle of Least Privilege: Give users only the access they need
- ✅ Regular Reviews: Regularly review team member access and permissions
- ✅ Use Selective Access: Use selective access for better security
- ✅ Document Permissions: Keep track of who has access to what
- ✅ Remove Inactive Users: Disable or remove inactive team members
- ✅ Monitor Activity: Monitor team activity logs regularly
- ✅ Test Permissions: Test permissions to ensure they work as expected
- ✅ Update Regularly: Update permissions as team members' roles change
Security Considerations
Access Control Best Practices
- Limit Full Access: Only grant full access to trusted administrators
- Separate Billing Access: Keep billing access separate and limited
- User Management Control: Restrict user management to account owners
- Regular Audits: Regularly audit who has access to what
- Remove Access Immediately: Remove access when team members leave
Troubleshooting
User Cannot Access Resources
- Check Permissions: Verify user has been granted access to the resource
- Check Status: Ensure user account is active
- Review Access Settings: Review Resources Access Management settings
- Check Components: Verify component-level access if using selective access
Permission Changes Not Applied
- Refresh Page: Ask user to refresh their browser
- Check Save: Verify changes were saved correctly
- Contact Support: Reach out to support if issues persist
User Invitation Not Received
- Check Email: Verify email address is correct
- Check Spam: Ask user to check spam folder
- Resend Invitation: Resend the invitation email
- Contact Support: Reach out to support for assistance
Next Steps
After managing your team members:
- Learn about Updating Your Profile
- Explore Updating Account Security
- Review Viewing Subscriptions