Launching a New Server
Learn how to launch a new server on KloudBean. This guide covers the complete process for both new and existing users.
Overview
Launching a new server on KloudBean is an easy and straightforward process. Whether you're a new user starting with a free trial or an existing user adding another server, KloudBean makes server provisioning simple and quick.
For New Users: Starting with Free Trial
If you are a new user and want to create a trial server, KloudBean offers a free trial that allows you to explore the platform without any upfront commitment.
👉 For detailed instructions on launching a trial server, please review: Starting Your Free Trial
The free trial process includes:
- Automatic trial enablement upon account creation
- Card validation with a temporary $1 security hold
- Full access to all platform features during the trial period
- Automatic subscription setup after trial ends
For Existing Users: Launching a New Server
If you're an existing user, follow these steps to launch a new server:
Step 1: Access Server Creation Page
Navigate to the server creation page using one of these methods:
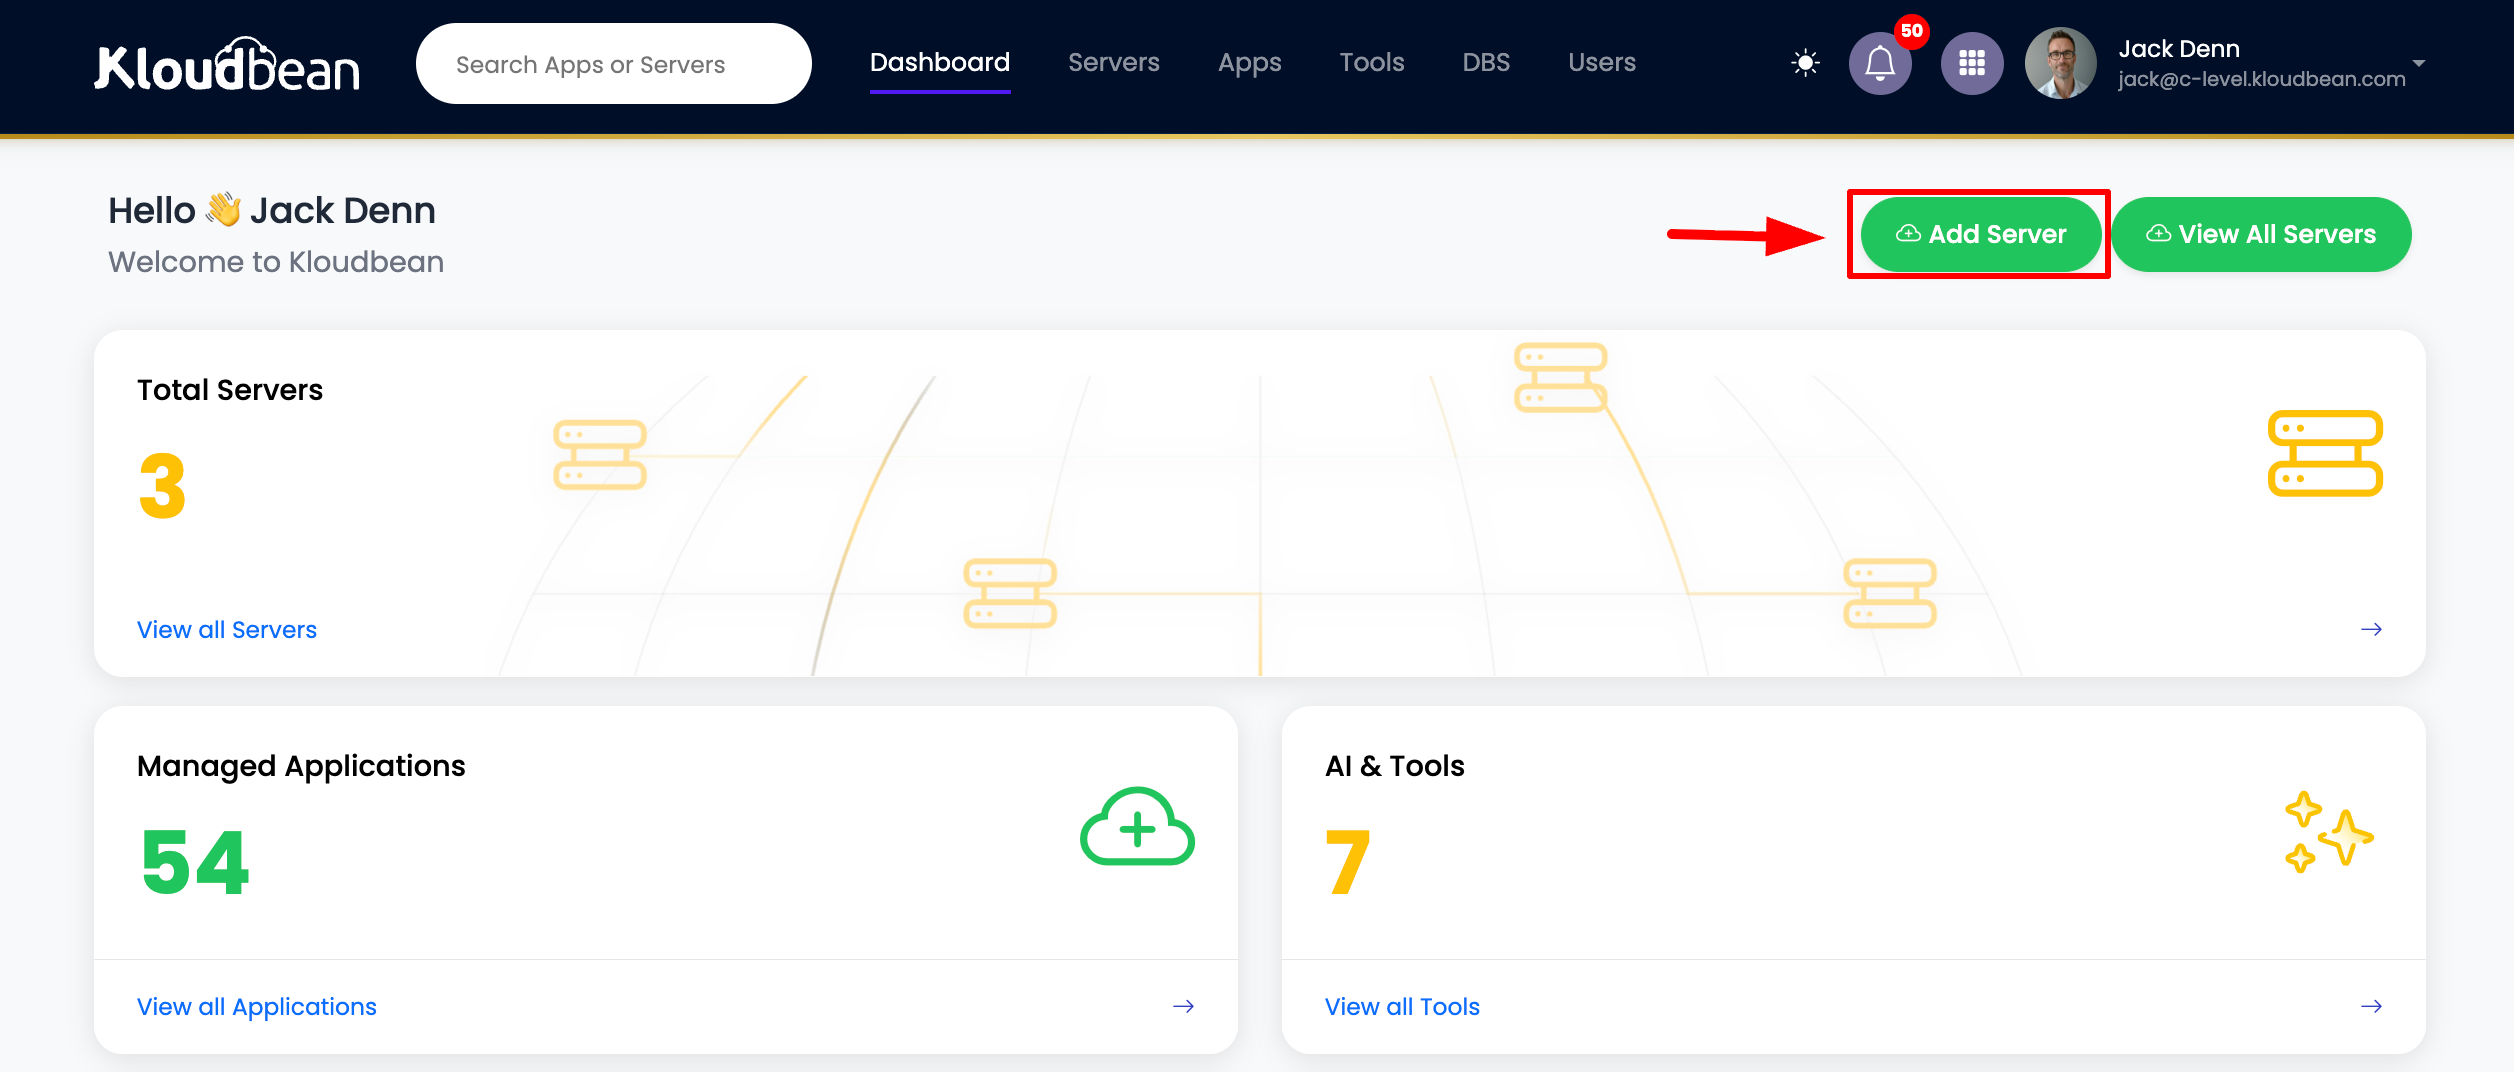
Method 1: From Dashboard
- Go to your Dashboard
- Click on Add Server button
Method 2: From Servers Page
- Select Servers from the header menu
- Click on Add Server button
Step 2: Configure Server on Provision Page
Once you're on the server provision page, you'll need to configure several settings. The process is the same as when starting a free trial:
-
Select Cloud Provider: Choose your preferred cloud provider (AWS, DigitalOcean, Linode, etc.)
- Consider factors like pricing, performance, and geographic availability
- Each provider offers different features and pricing tiers
-
Choose Application: Select the application you want to deploy
- WordPress: For WordPress websites and blogs
- Laravel: For Laravel PHP applications
- Node.js: For Node.js applications (Single Process or Multi-Process)
- React, Angular, Vue.js: For frontend frameworks
- Django, Flask, FastAPI: For Python applications
- Next.js: For Next.js applications
- And many more options
-
Select Server Location: Choose the geographic location for your server
- Select a location closest to your target audience for better performance
- Consider data residency requirements
- Review latency and availability for each region
-
Enter Names:
- Application Name: Give your application a descriptive name
- Example:
my-wordpress-siteorproduction-api
- Example:
- Server Name: Provide a name for your server
- Example:
web-server-01orapi-server-prod
- Example:
- Use clear, descriptive names for better organization
- Application Name: Give your application a descriptive name
-
Select Server Size: Choose the appropriate server size based on your needs
- Starter: For small applications and testing
- Small: For low-traffic websites
- Medium: For moderate traffic applications
- Large: For high-traffic applications
- XLarge: For enterprise-level applications
- Consider your expected traffic, resource requirements, and budget
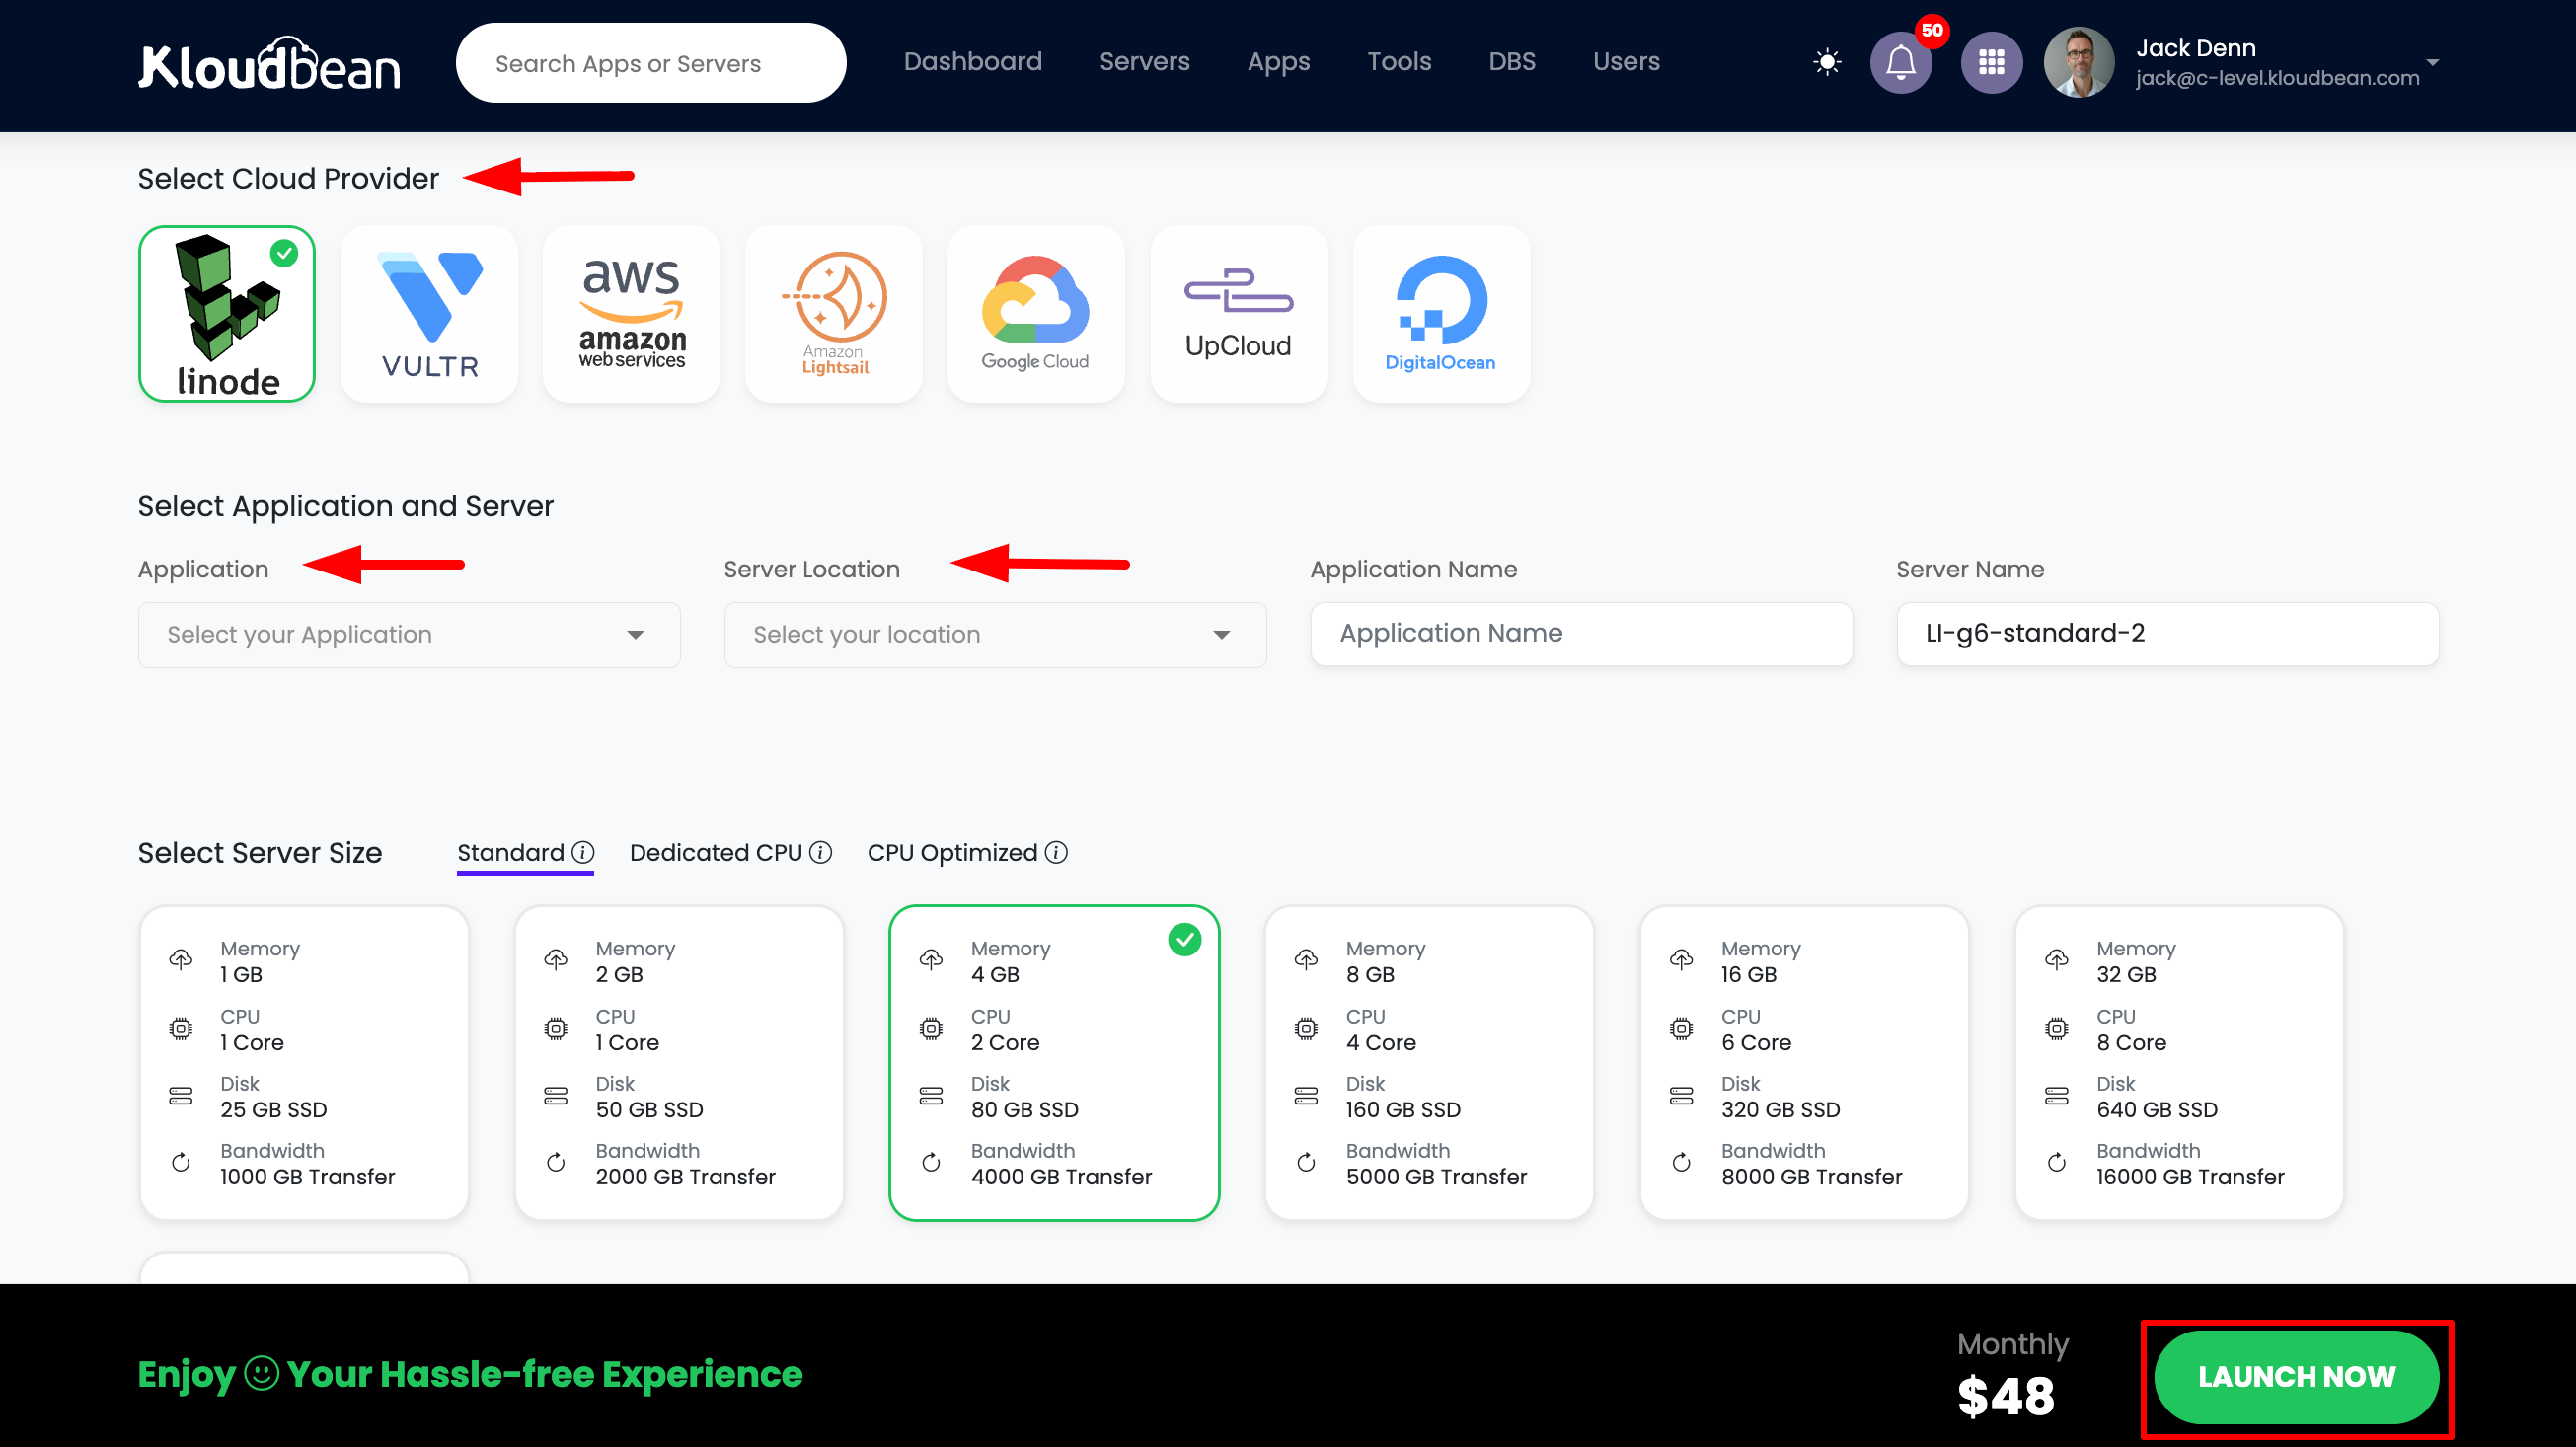
Step 3: Launch and Complete Payment
- Review Configuration: Double-check all your selections
- Launch Server: Click the "Launch Now" button
- Complete Payment: You'll be redirected to complete the payment process
- Enter your payment details
- Confirm the subscription
- Payment will be processed immediately for existing users
Step 4: Server Initiation
After completing the payment process:
- Server Creation: Your server will begin the initialization process
- Provisioning Time: Server will be ready within approximately 5 minutes
- Status Updates: Monitor real-time status updates during server creation
- Email Notification: You'll receive an email notification when your server is ready
- Dashboard Access: Access your new server from the dashboard
Launching Multiple Applications on the Same Server
Multi-Application Support
One of KloudBean's powerful features is the ability to install and run multiple applications on the same server. This allows you to:
- Maximize Resource Utilization: Make efficient use of your server resources
- Reduce Costs: Run multiple applications without needing separate servers
- Simplify Management: Manage multiple applications from a single server
- Flexible Deployment: Deploy different types of applications on one server
How It Works
After your server is created, you can:
- Add More Applications: Navigate to your server dashboard
- Install Additional Apps: Choose from available applications or tools
- Deploy Multiple Services: Run WordPress, Laravel, Node.js, databases, and more on the same server
- Manage Independently: Each application runs independently with its own configuration
Supported Multi-Application Scenarios
You can install multiple applications such as:
- Web Applications: WordPress, Laravel, Node.js, Django, etc.
- Development Tools: GitLab, n8n, Supabase, Langflow, etc.
- Databases: MySQL, PostgreSQL, MongoDB, Redis (if server size allows)
- Static Sites: Multiple static websites
- Custom Applications: Any combination of supported applications
Best Practices for Multi-Application Servers
- Resource Planning: Ensure your server size can handle multiple applications
- Performance Monitoring: Monitor resource usage across all applications
- Security: Configure proper access controls for each application
- Backups: Set up backups for all applications on the server
- Organization: Use clear naming conventions for multiple applications
Server Management After Creation
Accessing Your Server
Once your server is ready:
- View Server Details: Access server information from the dashboard
- Server Status: Monitor server health and status
- Resource Usage: View CPU, memory, and storage usage
- Application List: See all applications installed on the server
Next Steps After Server Creation
- Deploy Your First Application: If you haven't selected an application during server creation, you can add one now
- Configure Domains: Set up custom domains for your applications
- Set Up SSL: Enable SSL certificates for secure connections
- Configure Backups: Set up automatic backups for your server
- Monitor Performance: Enable monitoring and alerts
Troubleshooting
Server Creation Issues
- Payment Failed: Ensure your payment method is valid and has sufficient funds
- Provider Unavailable: Try selecting a different cloud provider or location
- Long Provisioning Time: If server takes longer than 10 minutes, contact support
- Error Messages: Review error messages and contact support if needed
Server Access Issues
- Server Not Appearing: Refresh the dashboard or check server status
- Cannot Add Applications: Verify server is in "Active" status
- Resource Limits: Check if you've reached account or server resource limits
Best Practices
- Plan Your Resources: Choose appropriate server size for your needs
- Select Optimal Location: Choose server location close to your users
- Use Descriptive Names: Name servers and applications clearly
- Enable Monitoring: Set up monitoring from the start
- Configure Backups: Enable automatic backups immediately
- Start Small: Begin with smaller server sizes and scale up as needed
- Document Configuration: Keep notes on your server setup
Next Steps
- Learn about Adding Application to Server
- Explore Selecting Cloud Provider
- Read about Selecting Server Location
- Understand Selecting Server Size
- Review Server Management