Adding Application to Server
Learn how to add applications and tools to your existing KloudBean server. This guide covers the process of launching frameworks and tools on servers you've already created.
Overview
If you already have a server with KloudBean, congratulations! You are eligible to launch any of the available frameworks and tools, depending upon the server size you have. KloudBean makes it easy to add multiple applications and tools to your existing server, maximizing your server's potential.
Prerequisites
- An active KloudBean account
- Existing server created and running
- Server with available resources for new applications
- Understanding of your server's current resource usage
Available Applications and Tools
Depending on your server size, you can launch:
- Web Frameworks: WordPress, Laravel, Node.js, React, Angular, Vue.js, Django, Flask, FastAPI, Next.js
- Development Tools: n8n, Supabase, Langflow, Listmonk, GitLab, OpenWebUI
- Databases: MySQL, PostgreSQL, MongoDB, Redis, Elasticsearch, MariaDB
- Other Applications: Various other supported frameworks and tools
Adding Applications: Two Methods
KloudBean provides two convenient methods to add applications or tools to your server. Choose the method that works best for your workflow.
Method 1: Adding Application from Apps Page
This method allows you to add applications from the central Apps page, giving you an overview of all available applications.
Step 1: Navigate to Apps Page
- Navigate to Apps from the header menu
- You'll see the Apps page with all available applications and tools
- On this page, there is a button "Add Application"
- Click the "Add Application" button
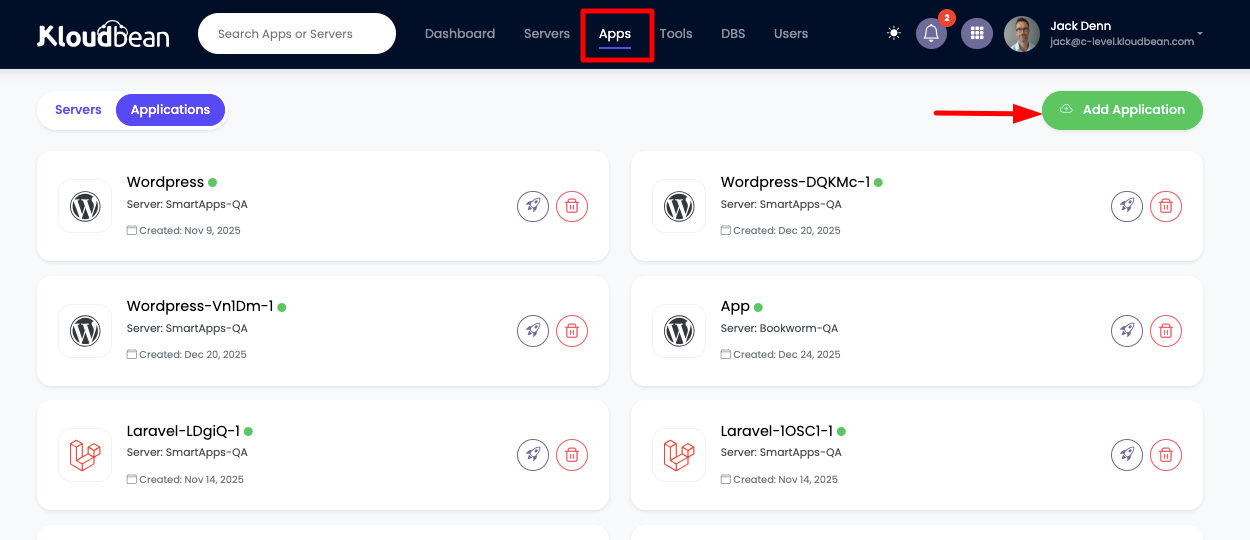
This will take you to the application provision page where you can select and configure your application.
Method 2: Server-Specific Application Addition
This method allows you to add applications directly from your server's administration page, which is convenient when you're already managing a specific server.
Step 1: Access Server Administration Page
- Navigate to your server's administration page
- On the server administration page, you can click on the plus icon (+)
- You'll see options to:
- Add Application: For adding web applications and frameworks
- Add Tool: For adding development tools and utilities
- Select the option you want (Add Application or Add Tool)
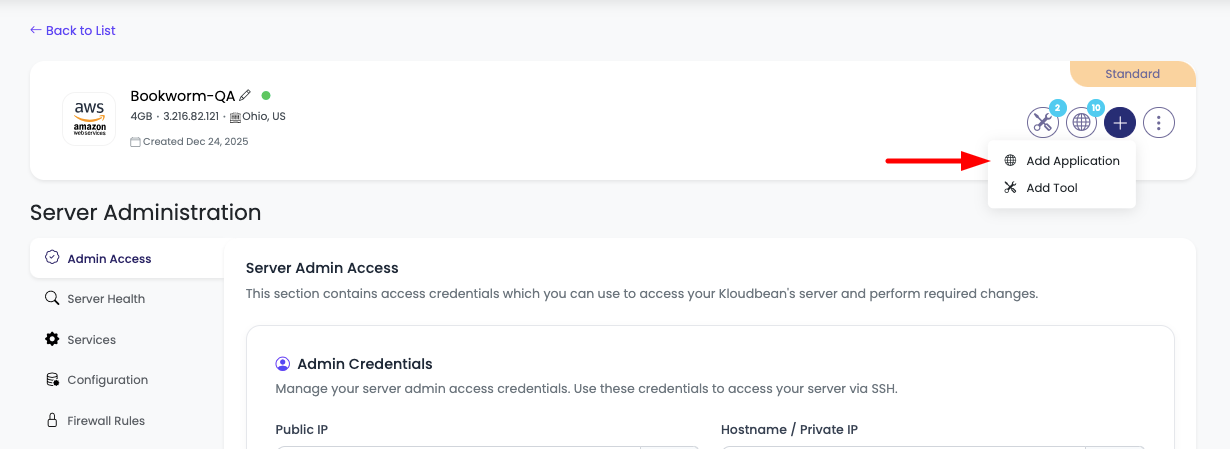
This will also take you to the application/tool provision page.
Application/Tool Provision Page
Once you're on the application/tool provision page, you'll need to configure your new application or tool.
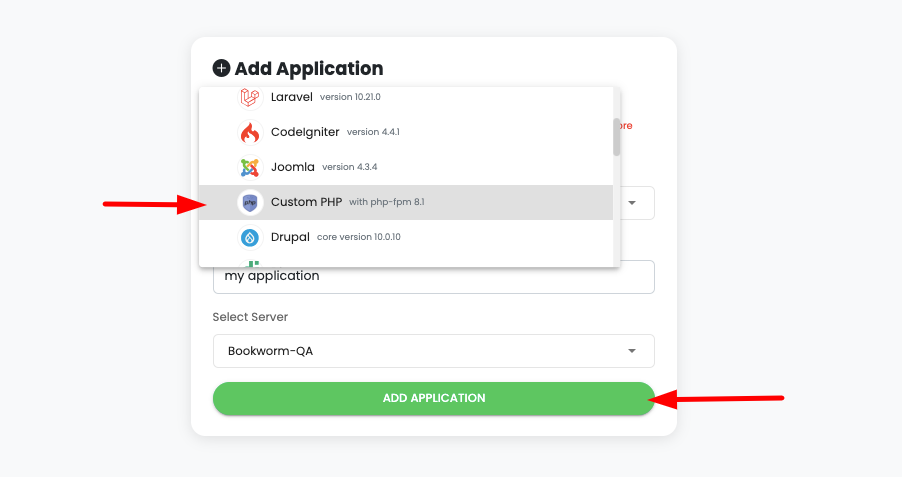
Step 1: Select Application or Tool
- Browse Available Options: Review all available applications and tools
- Select Application/Tool: Choose the application or tool that you want to add
- Applications are organized by category (Frameworks, Tools, Databases, etc.)
- Each option shows requirements and descriptions
- Review Requirements: Check if your server meets the requirements
Step 2: Configure Application Details
- Give Application Name: Enter a descriptive name for your application
- Use clear, meaningful names (e.g.,
my-wordpress-site,production-api) - Names help you identify applications in your dashboard
- Use clear, meaningful names (e.g.,
- Choose Server: Select the server on which you want to add the application
Server Selection
If Adding from Apps Page:
- Manual Selection Required: You need to explicitly select the server from the dropdown
- Server List: You'll see all your available servers
- Server Details: Each server shows its current status and resource usage
- Choose Wisely: Select the server that has sufficient resources
If Adding from Server Administration Page:
- Auto-Selected: The server is automatically selected for you
- No Selection Needed: You don't need to choose a server manually
- Convenient: Faster workflow when working with a specific server
Resource Considerations
Number of Applications
The number of applications you can add depends on:
-
Server Size: Larger servers can accommodate more applications
- Small Servers (2-4GB): Typically 1-2 applications
- Medium Servers (4-8GB): Can handle 2-4 applications
- Large Servers (8GB+): Can support 4+ applications
- Enterprise Servers (16GB+): Can run many applications
-
Size of Existing Applications:
- Applications with high resource usage (databases, heavy frameworks) consume more resources
- Lightweight applications (static sites, simple tools) use fewer resources
- Monitor your server's resource usage to understand capacity
-
Application Requirements:
- Each application has minimum resource requirements
- Some applications are more resource-intensive than others
- Check application requirements before adding
Best Practices for Resource Management
- Monitor Resource Usage: Regularly check CPU, memory, and storage usage
- Start Small: Begin with essential applications, add more as needed
- Optimize Applications: Optimize existing applications to free up resources
- Scale Server: Consider upgrading server size if you need more applications
- Balance Workload: Distribute resource-intensive applications across servers
Application Installation Process
Installation Timeline
Application Creation Time: Application creation will take around 2 minutes to get installed.
During this time:
- KloudBean sets up the application environment
- Installs required dependencies and packages
- Configures the application
- Sets up necessary services
- Prepares the application for use
What Happens During Installation
- Environment Setup: KloudBean creates the necessary environment for your application
- Dependency Installation: Required packages and dependencies are installed
- Configuration: Application is configured with default settings
- Service Activation: Application services are started
- Status Updates: You'll see real-time status updates during installation
After Installation
Once installation is complete:
- Application Ready: Your application will be ready to use
- Access Information: You'll receive access URLs and credentials
- Dashboard Access: Application appears in your dashboard
- Configuration: You can configure domains, SSL, and other settings
Deploying Your Code
After adding an application to your server, you'll need to deploy your code to it. KloudBean provides various methods for deploying your code to applications.
👉 To learn about how you can deploy your code to the application, review our comprehensive collection: Application Deployment
The Application Deployment collection includes guides for:
- Framework-Specific Deployment: Laravel, Node.js, React, Angular, Vue.js, Django, Flask, FastAPI, Next.js
- Deployment Methods: Git integration, manual upload, CI/CD pipelines
- Configuration Guides: Environment setup, database configuration, domain setup
- Best Practices: Security, performance optimization, monitoring
Managing Multiple Applications
Benefits of Multiple Applications
Running multiple applications on one server provides:
- Cost Efficiency: Maximize server resource utilization
- Simplified Management: Manage multiple applications from one server
- Resource Optimization: Share server resources efficiently
- Flexible Deployment: Deploy different types of applications as needed
Application Management
After adding applications:
- View All Applications: See all applications on your server in the dashboard
- Manage Individually: Each application can be managed independently
- Monitor Resources: Track resource usage per application
- Configure Separately: Set up domains, SSL, and settings for each application
Troubleshooting
Application Installation Issues
- Installation Fails: Check server resources and available space
- Long Installation: If installation takes longer than 5 minutes, contact support
- Error Messages: Review error messages and contact support if needed
Resource Limitations
- Cannot Add More Applications: Server may be at capacity
- Resource Warnings: Monitor resource usage and consider upgrading
- Performance Issues: Existing applications may need optimization
Server Selection Issues
- Server Not Available: Ensure server is in "Active" status
- Insufficient Resources: Choose a server with available resources
- Wrong Server Selected: Double-check server selection before confirming
Best Practices
- ✅ Plan Resource Usage: Understand your server's capacity before adding applications
- ✅ Start with Essential Apps: Add most important applications first
- ✅ Monitor Resources: Regularly check resource usage
- ✅ Optimize Applications: Keep applications optimized for better performance
- ✅ Use Appropriate Server Size: Ensure server size matches your needs
- ✅ Review Requirements: Check application requirements before adding
- ✅ Test After Installation: Verify applications work correctly after installation
Next Steps
After adding your application:
- Learn about Deploying Your Code
- Explore Application Management
- Review Server Management
- Understand Managing Domains and SSL