Starting Your Free Trial
Learn how to start your free trial on KloudBean and begin deploying your applications without any upfront commitment.
Overview
When you sign up with KloudBean and create your account, KloudBean automatically provides a free trial to every user. This trial allows you to explore the platform, deploy applications, and test all features before committing to a paid subscription.
Automatic Trial Enablement
How It Works
- Automatic Activation: The free trial is enabled automatically upon account creation
- No Manual Activation Required: You don't need to manually enable the trial
- Immediate Access: Start using KloudBean features right away
Trial Disabled Scenarios
In some cases, the trial may be automatically disabled if:
- The account appears suspicious or shows unusual activity patterns
- Multiple accounts are created from the same IP address
- Account verification fails or raises security concerns
If Your Trial is Disabled
If you are a legitimate user and your trial has been disabled:
- Contact Support: Reach out to KloudBean support team
- Available 24/7: Support is available via chat or email around the clock
- Quick Resolution: Support team will review your account and enable the trial if you're a legitimate user
- Average Response Time: Get assistance with an average response time of 2 minutes
Starting Your Free Trial
Step 1: Access Server Creation Page
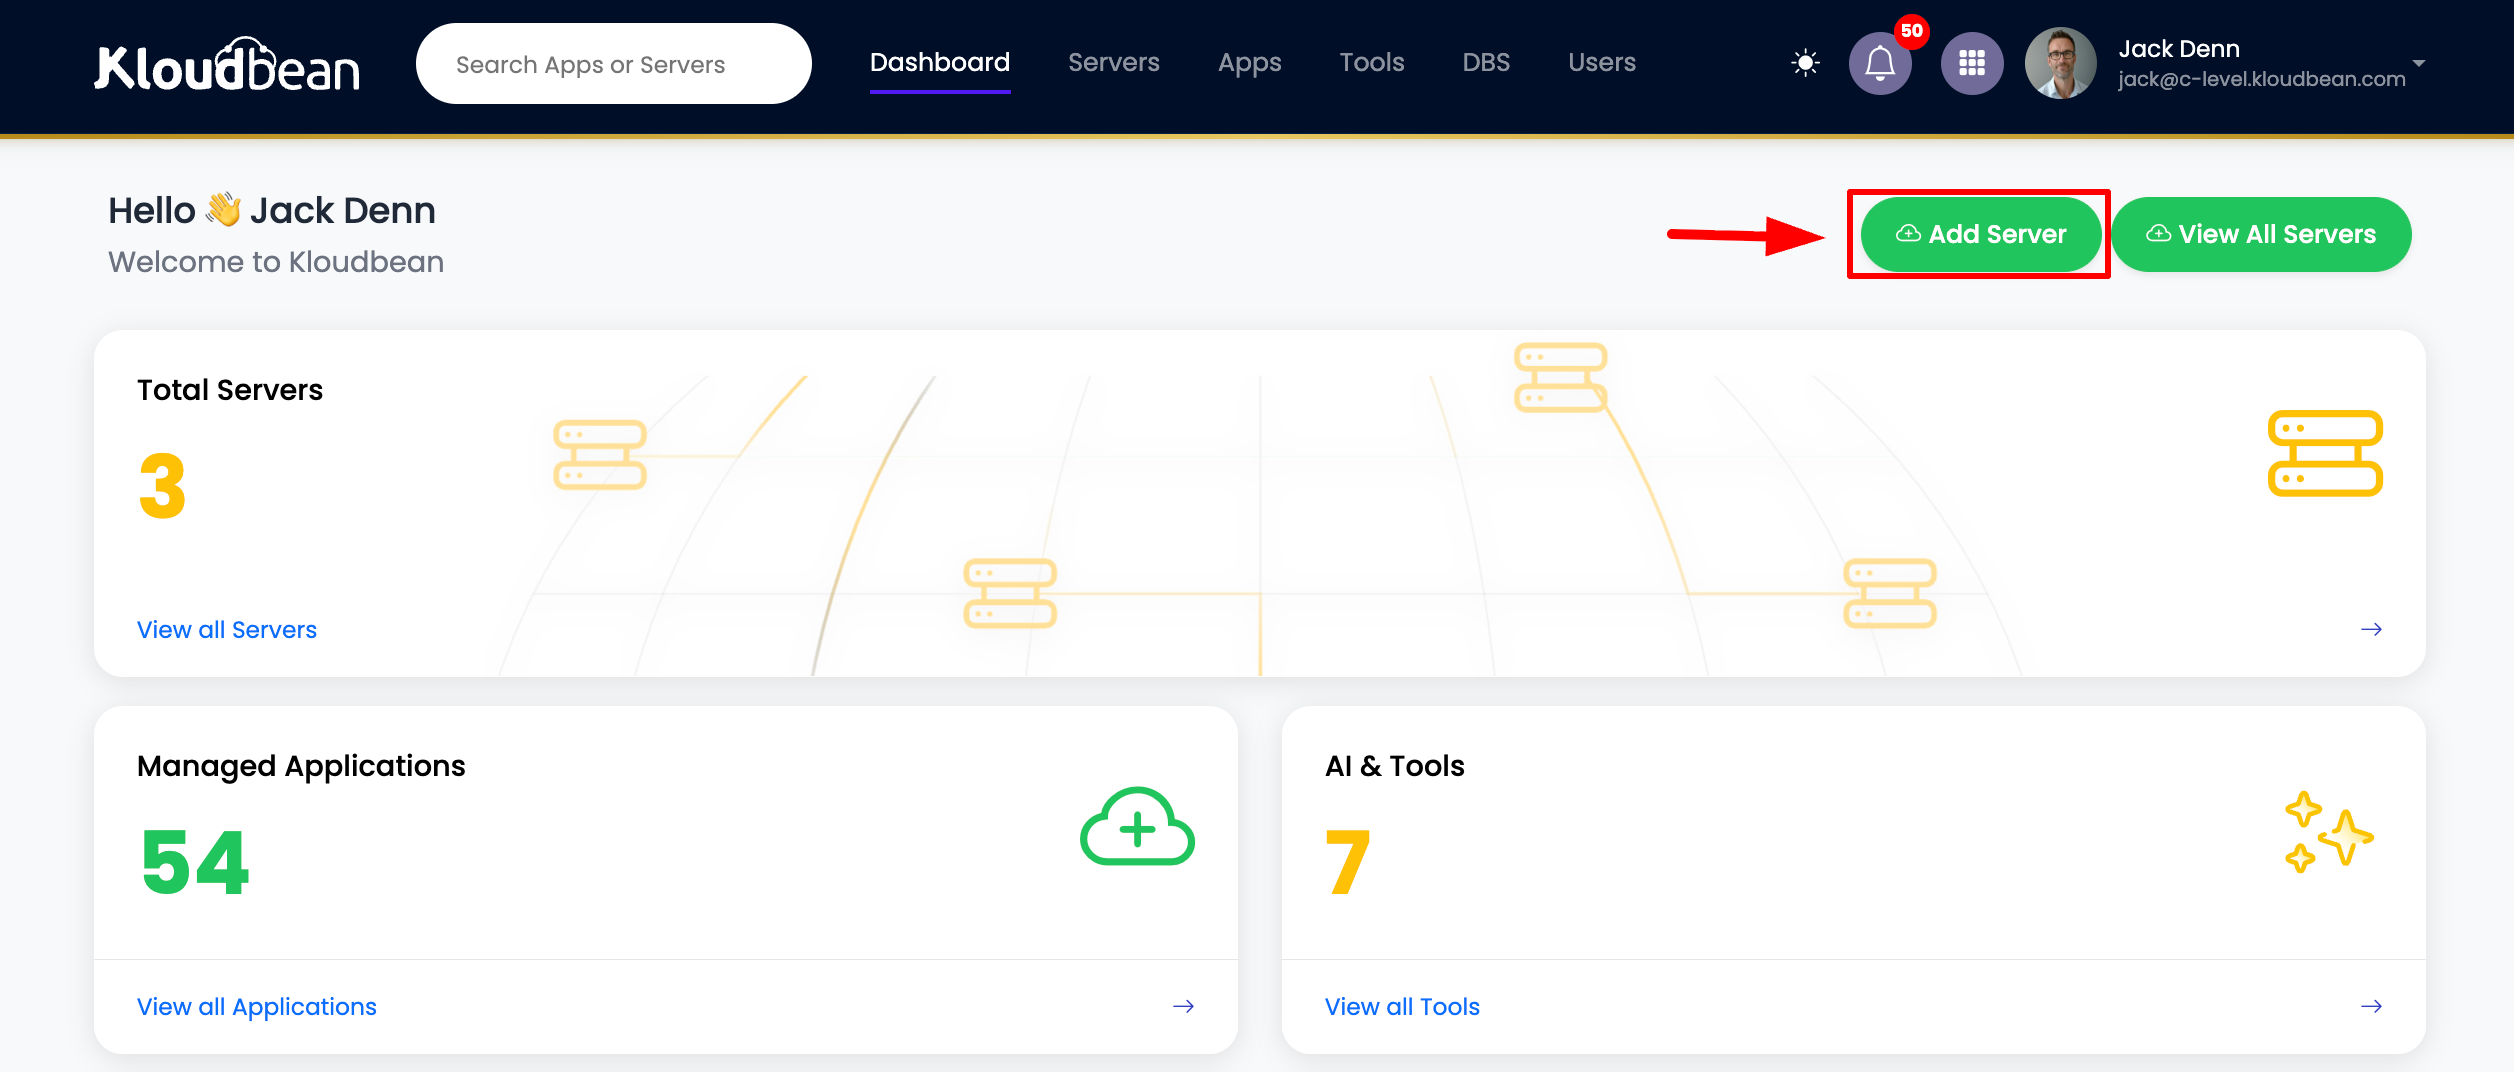
When you log in to KloudBean, the console will automatically take you to the server creation page. This is the starting point for your free trial.
If you miss this initial redirect or need to navigate there manually:
- Go to your Dashboard
- Click on Add Server button
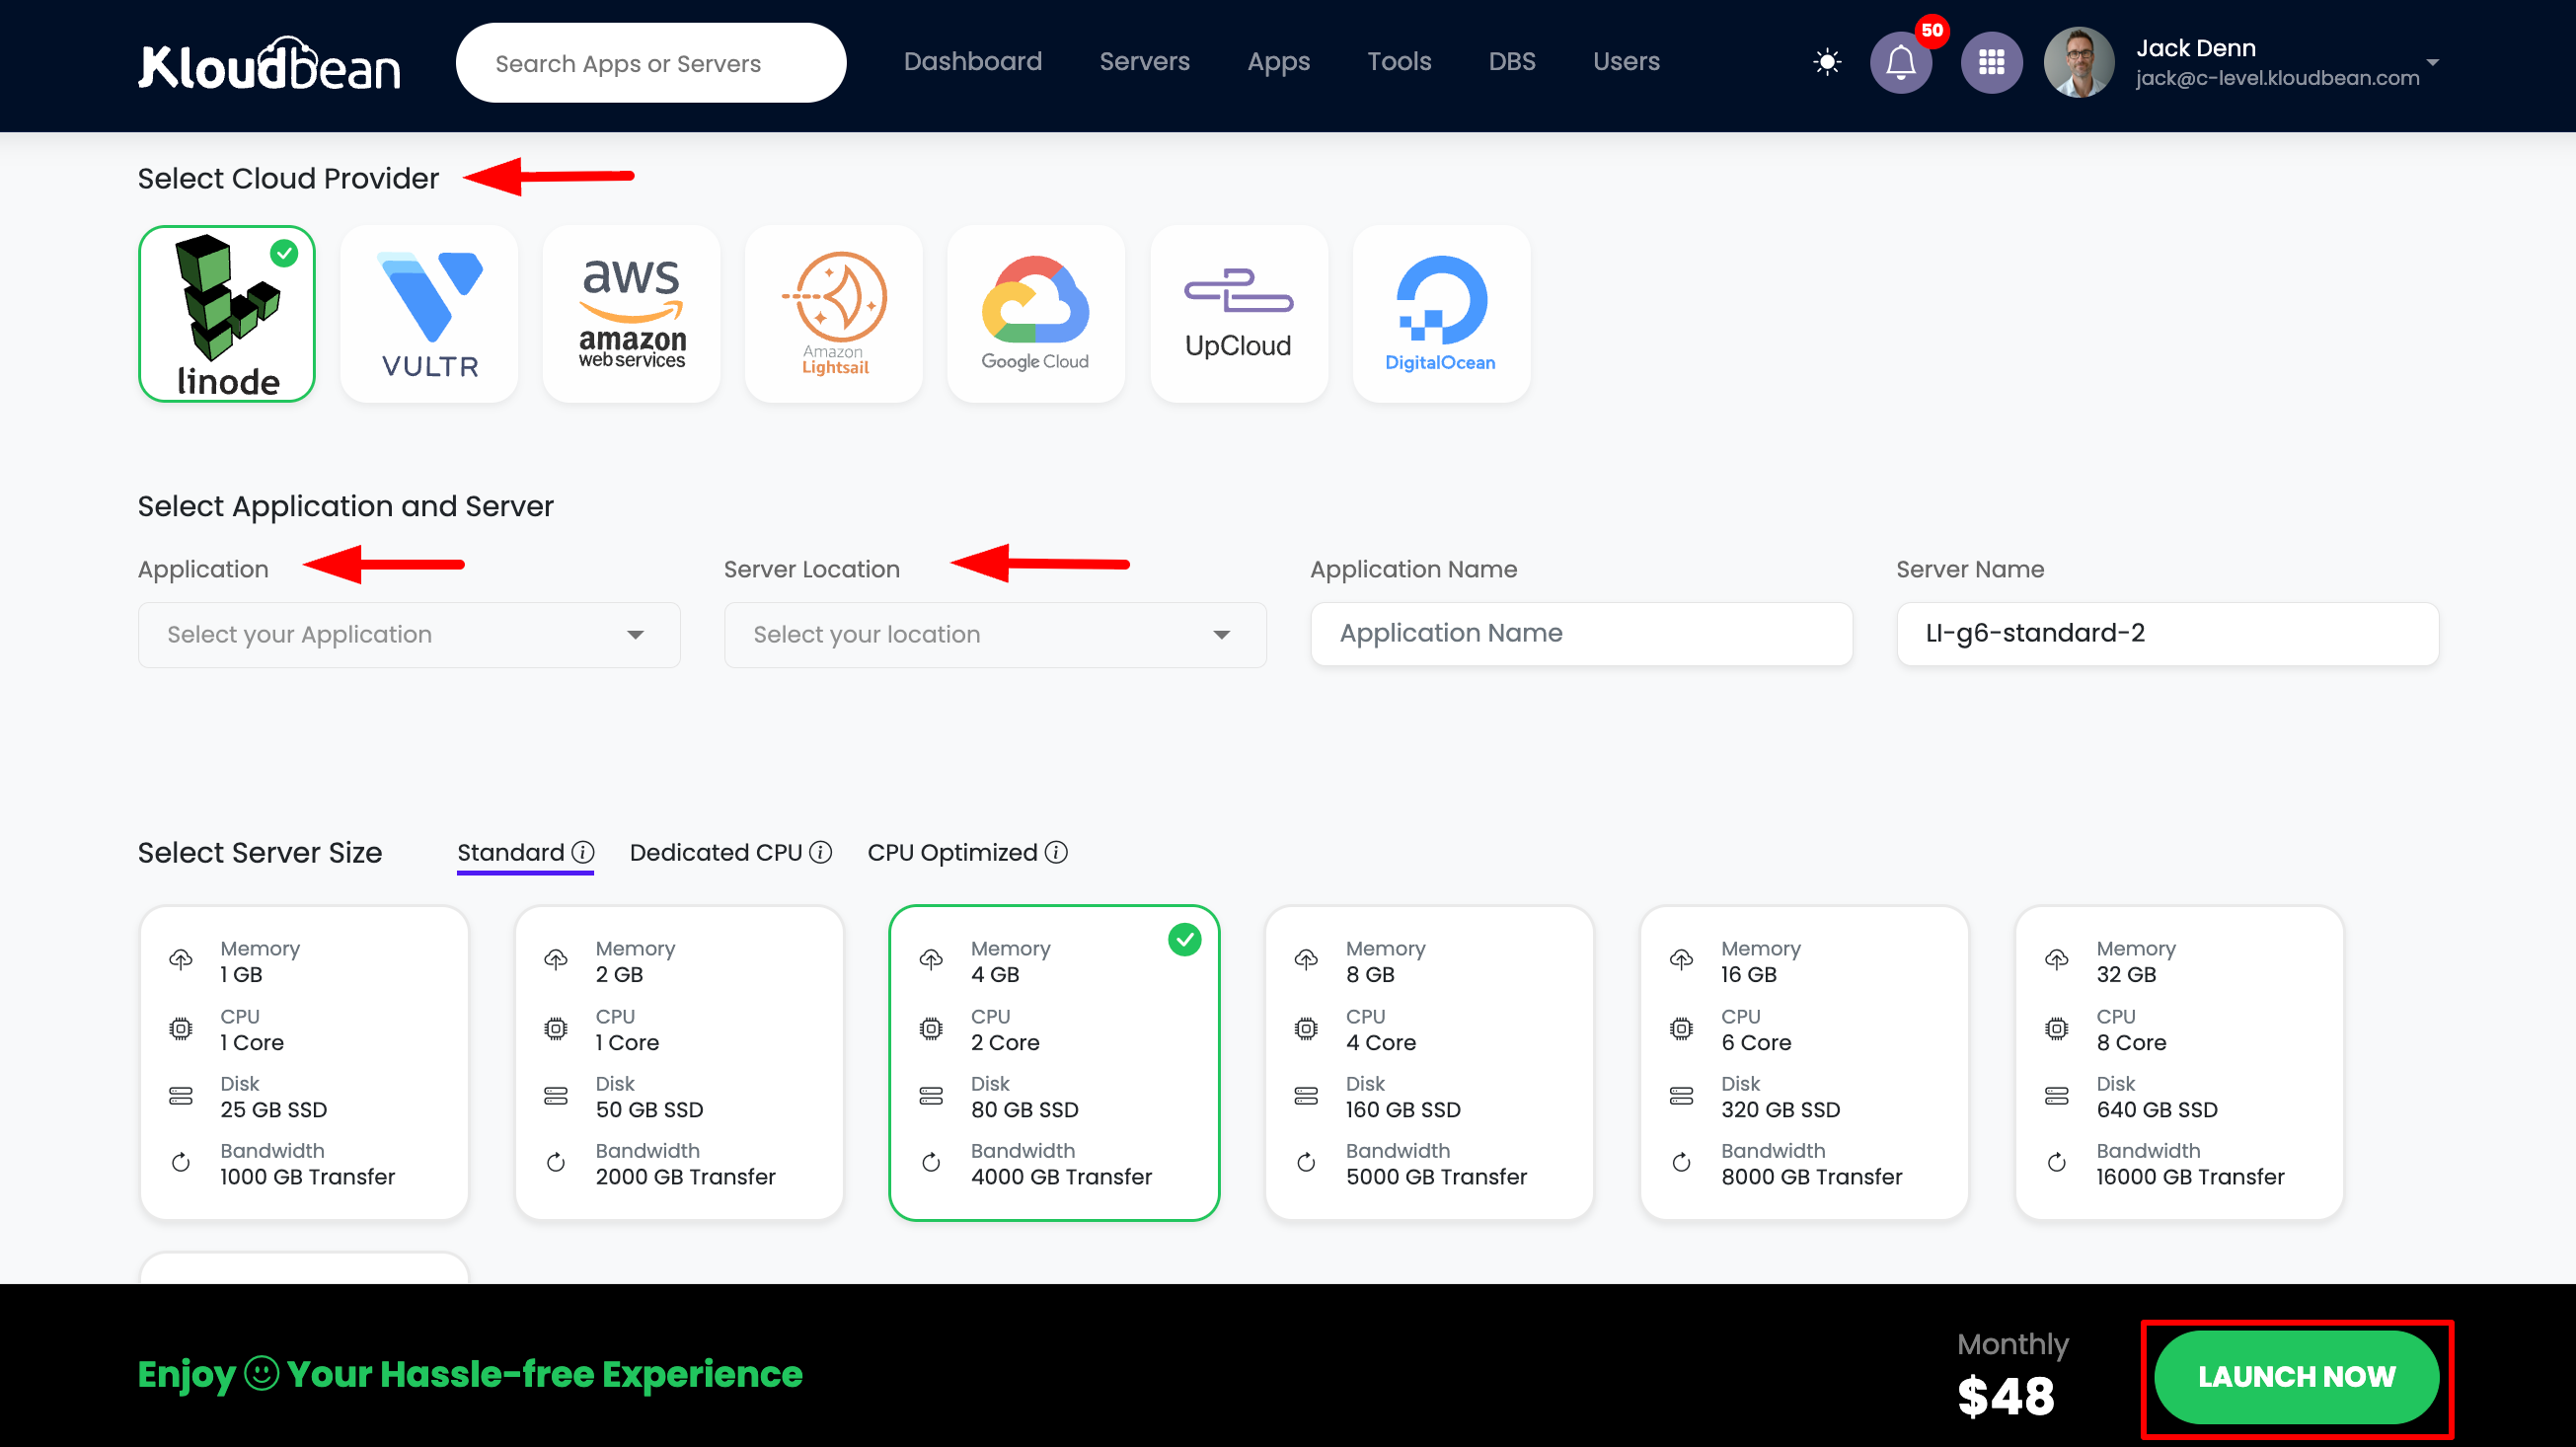
Step 2: Configure Your Server
Once you're on the server creation page, you'll need to configure several settings:
- Select Cloud Provider: Choose your preferred cloud provider (AWS, DigitalOcean, Linode, etc.)
- Choose Application: Select the application you want to deploy (WordPress, Laravel, Node.js, etc.)
- Select Server Location: Choose the geographic location for your server
- Enter Names:
- Application Name: Give your application a descriptive name
- Server Name: Provide a name for your server
- Select Server Size: Choose the appropriate server size based on your needs
- Launch Free Trial: Click the "Launch Free Trial" button
Step 3: Payment Card Validation
After clicking "Launch Free Trial", you'll be redirected to a Stripe payment session for card validation.
Card Details Required
- Enter your credit or debit card details
- Complete the payment form with valid card information
Security Hold
As a security measure, KloudBean will place a temporary $1 hold on your card:
- Purpose: This hold confirms user legitimacy and prevents fraudulent accounts
- Temporary: The $1 amount is a temporary authorization, not a charge
- Returned: The hold will be released and returned to your card within a few days
- No Charge: You are not charged this amount; it's only held temporarily
Automatic Subscription Setup
- Subscription Enabled: Once card validation is complete, your subscription will be enabled automatically
- Payment Timing: The subscription amount will be deducted after the trial period ends
- No Charges During Trial: You won't be charged during the free trial period
Step 4: Server Initiation
After completing the card validation process:
- Server Creation: Your server will begin the initialization process
- Ready in 5 Minutes: Your server will be ready to use within approximately 5 minutes
- Status Updates: You'll see real-time status updates during server creation
- Notification: You'll receive an email notification when your server is ready
Managing Your Trial
Trial Indicators
When your server is on trial, you'll see:
- Trial Tag: A visible "Trial" tag displayed on your server
- Remaining Days: The number of days remaining in your trial period
- Dashboard Display: Trial status is clearly shown in your dashboard
Trial Period Management
If You Delete Server Before Trial Ends
If you decide to delete your server before the trial period ends:
- Subscription Cancelled: Your subscription will be automatically deleted
- Hold Returned: The $1 temporary hold will be returned to your card
- No Charges: You won't be charged any subscription fees
- Clean Exit: You can leave without any financial commitment
Continuing After Trial
If you decide to continue using the server after the trial period:
- Automatic Billing: The subscription amount will be automatically deducted from your card
- Payment Processing: Payment is processed automatically at the end of the trial
- Seamless Transition: Your server continues running without interruption
Important Payment Warnings
Payment Failure Scenarios
If the subscription amount deduction fails after the trial ends:
- Email Notification: KloudBean will inform you via email about the payment failure
- Grace Period: KloudBean usually waits for some time for user response
- Payment Retry: The system may attempt to process payment again
- Server Deletion: If payment is not cleared within the grace period:
- Server is automatically deleted
- Data Loss: All data on the server will be permanently lost
- No Recovery: Deleted servers and data cannot be recovered
Best Practices
To avoid data loss:
- Keep Card Valid: Ensure your payment card remains valid and has sufficient funds
- Monitor Emails: Check your email regularly for payment notifications
- Update Payment Method: Update your card details if your card expires or changes
- Respond Promptly: Respond quickly to any payment-related emails from KloudBean
- Backup Data: Regularly backup your data to prevent loss
Trial Features
During your free trial, you have access to:
- Full Platform Access: All KloudBean features and capabilities
- Application Deployment: Deploy any supported application
- Server Management: Complete server management tools
- Database Creation: Set up and manage databases
- Domain Configuration: Configure custom domains
- Support Access: 24/7 support via chat and email
Next Steps
After starting your free trial:
- Deploy Your Application: Follow guides to deploy your first application
- Explore Features: Test various platform features
- Monitor Usage: Keep track of your trial period and usage
- Prepare for Continuation: Ensure your payment method is ready if you plan to continue
Troubleshooting
Trial Not Available
- Contact Support: Reach out to KloudBean support team 24/7
- Account Review: Support will review your account status
- Quick Resolution: Legitimate users will have trial enabled quickly
Payment Issues
- Card Declined: Ensure your card is valid and has sufficient funds
- Hold Not Released: Contact support if the $1 hold isn't released after a few days
- Payment Failed: Update your payment method and contact support if needed
Server Creation Issues
- Server Not Starting: Check server creation status in dashboard
- Longer Than 5 Minutes: Contact support if server takes significantly longer
- Error Messages: Review error messages and contact support for assistance
Next Steps
- Learn about Selecting Cloud Provider
- Explore Selecting Server Location
- Read about Selecting Server Size
- Understand Creating a New Server