Accessing Application Database
Learn how to access and manage your application database on KloudBean. This guide covers viewing database credentials, accessing databases through phpMyAdmin, and configuring public database access with IP whitelisting.
Overview
When you create a new app on your server, KloudBean by default creates a database as well, which you can very well use for your application. Database details and credentials are available in the application administration section, making it easy to connect your application to the database.
Database Access Methods
KloudBean provides multiple ways to access your database:
- phpMyAdmin: Web-based database management interface (default method)
- Direct Connection: Connect from your application using database credentials
- Public Access: Configure IP whitelisting for external database access (optional)
Prerequisites
Before accessing your application database, ensure you have:
- An Active KloudBean Application: Your application must be created and running
- Database Created: A database should be automatically created with your application
- Access to Application Dashboard: You need to be logged in to your KloudBean account
Viewing Database Credentials
Step 1: Navigate to Database Access Section
In order to view application database access credentials:
- Navigate to Application Administration: Log in to your KloudBean dashboard and open the application administration page for your desired application.
- Go to Access Section: Navigate to "Access" in the application settings menu.
- Open Database Access: Click on "Database Access" section within the Access menu.
Step 2: View Database Information
Here you will see all the database connection details:
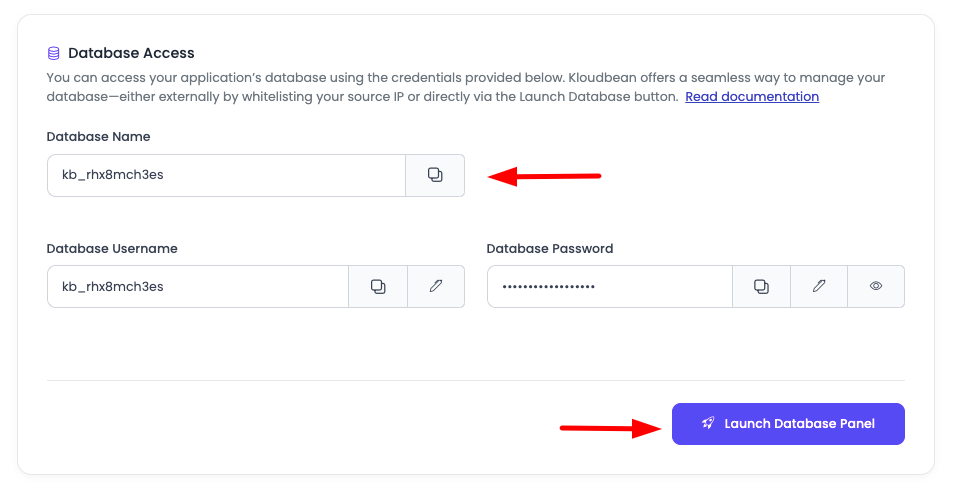
Database Information Displayed:
- Database Name: The name of your application's database
- Database User: The username for database access
- Password: The password for database authentication
- Launch Database Panel Button: A button to access the database using phpMyAdmin
Important: If you are deploying an application, you will update database credentials in your .env file by copying the values from here. These credentials are essential for your application to connect to the database.
Accessing Database via phpMyAdmin
Step 1: Launch phpMyAdmin
- Click "Launch Database Panel": In the Database Access section, click on the "Launch Database Panel" button.
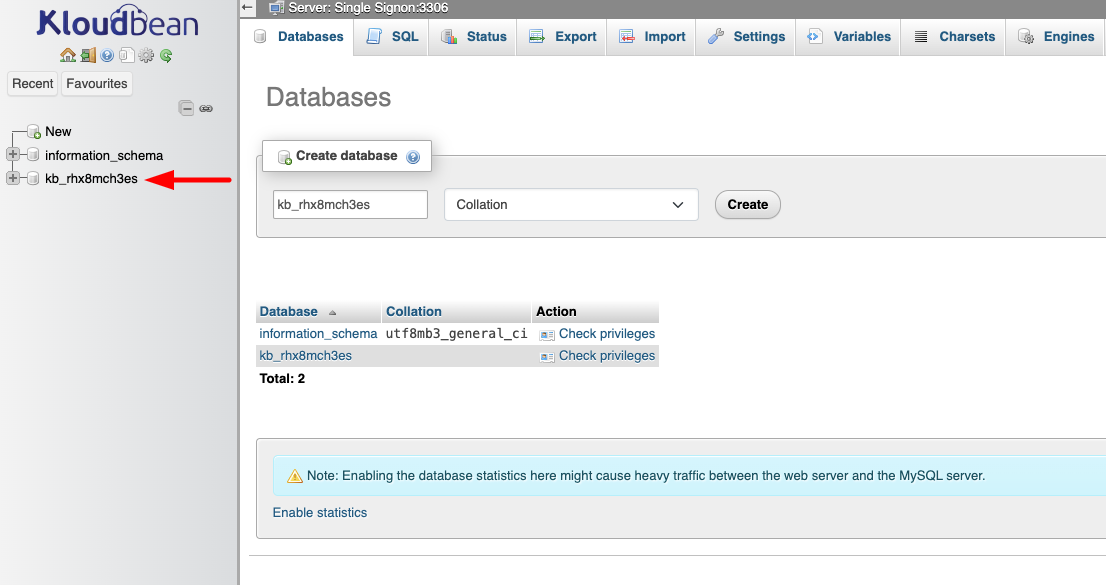
- SSO Authentication: It will perform an SSO (Single Sign-On) authentication with phpMyAdmin and will redirect you to phpMyAdmin.
- View Your Database: You will see your database in the phpMyAdmin interface.
Step 2: Manage Your Database
Here you can run queries and make changes to your database with ease. phpMyAdmin provides a user-friendly interface for:
- Browsing Data: View and edit table data
- Running Queries: Execute SQL queries directly
- Managing Tables: Create, modify, and delete tables
- Importing/Exporting: Import SQL files or export database backups
- Database Structure: View and modify database schema
Database Public Access Configuration
Overview
Database Public Access: By default, KloudBean keeps database public access disabled for security reasons. If you want to access the database from outside (external tools, remote applications, etc.), you have to whitelist IP addresses from where you want to access.
Why IP Whitelisting?
- Security: Restricts database access to specific, trusted IP addresses
- Protection: Prevents unauthorized access attempts from unknown locations
- Control: Gives you granular control over who can access your database
- Best Practice: Follows security best practices for database access
Step 1: Navigate to Database Access Rules
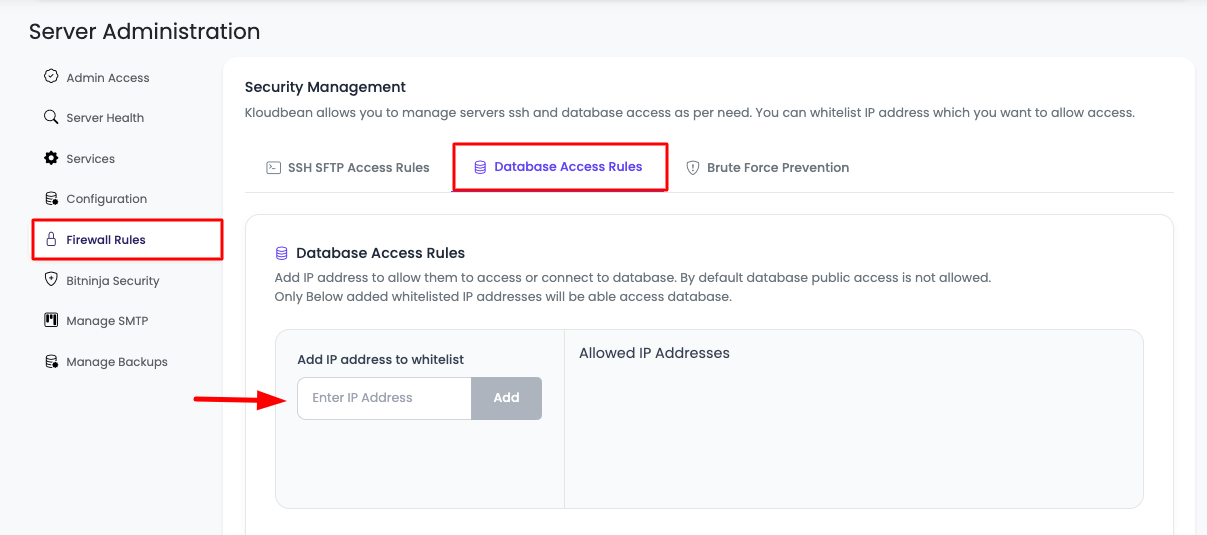
In order to enable access from a specific IP address:
- Navigate to Server Administration: Go to your server administration page.
- Access Firewall Settings: Navigate to "Firewall" in the server settings menu.
- Open Database Access Rules: Click on "Database Access Rules" section.
Step 2: Add IP Address
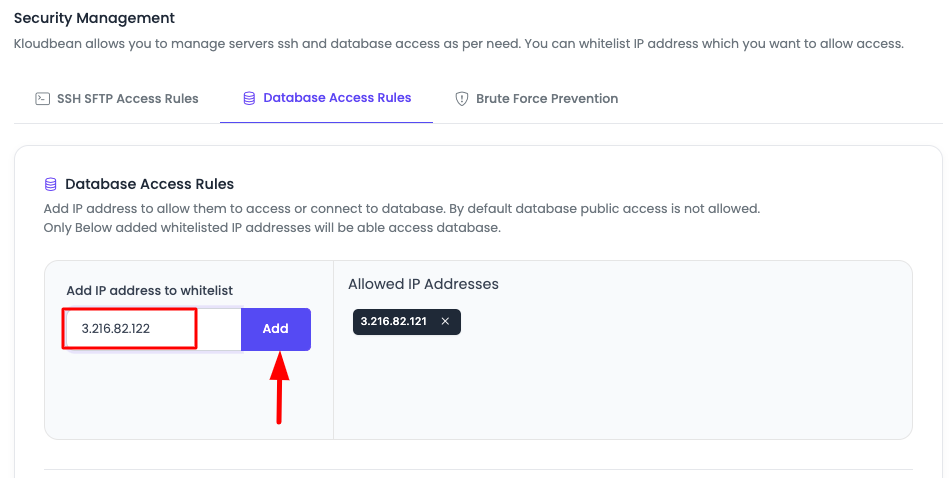
In the Database Access Rules section:
- View Options: You will see an option to add IP addresses.
- Enter IP Address: Paste your IP address in the provided field.
- Add IP: Click "Add" to add the IP address to the whitelist.
IP Address Format:
- Single IP:
192.168.1.100(specific IP address) - Multiple IPs: Add multiple IP addresses separately
Step 3: Save Changes
- Review Added IPs: Once the IP address is added, you are good to whitelist them.
- Click "Save Changes": Click on "Save Changes" to apply the whitelist configuration.
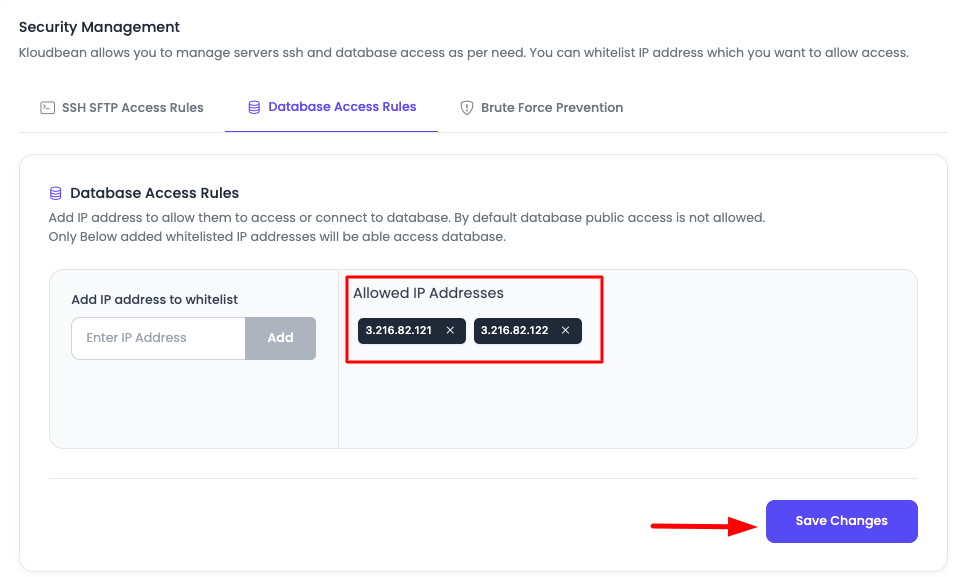
- Access Enabled: With this, your database will be accessible from that particular IP address(es).
Important Notes:
- Immediate Effect: Changes take effect immediately after saving
- Multiple IPs: You can whitelist multiple IP addresses
- Remove IPs: You can remove IP addresses from the whitelist at any time
- Security: Only whitelist IP addresses you trust
Using Database Credentials in Your Application
Updating Environment Variables
When deploying your application, you'll need to update database credentials in your .env file:
- Copy Credentials: Copy the database name, username, and password from the Database Access section
- Update .env File: Add or update these values in your application's
.envfile:
Example .env Configuration:
DB_CONNECTION=mysql
DB_HOST=localhost
DB_PORT=3306
DB_DATABASE=your_database_name
DB_USERNAME=your_database_user
DB_PASSWORD=your_database_password
- Application Connection: Your application will now be able to connect to the database using these credentials
Common Application Frameworks
Laravel
DB_CONNECTION=mysql
DB_HOST=127.0.0.1
DB_PORT=3306
DB_DATABASE=your_database_name
DB_USERNAME=your_database_user
DB_PASSWORD=your_database_password
WordPress
Update wp-config.php:
define('DB_NAME', 'your_database_name');
define('DB_USER', 'your_database_user');
define('DB_PASSWORD', 'your_database_password');
define('DB_HOST', 'localhost');
Node.js
DB_HOST=localhost
DB_PORT=3306
DB_NAME=your_database_name
DB_USER=your_database_user
DB_PASS=your_database_password
Database Management with phpMyAdmin
Common Operations
Once you're in phpMyAdmin, you can perform various database operations:
Running SQL Queries
- Click SQL Tab: Select the "SQL" tab in phpMyAdmin
- Enter Query: Type your SQL query
- Execute: Click "Go" to run the query
- View Results: See the query results displayed below
Example Queries:
-- View all tables
SHOW TABLES;

-- Select data
SELECT * FROM users LIMIT 10;

-- Update data
UPDATE users SET status = 'active' WHERE id = 1;
Browsing and Editing Data
- Select Database: Choose your database from the left sidebar
- Select Table: Click on a table name
- Browse Data: Click the "Browse" tab to view table data
- Edit Records: Click "Edit" on any row to modify data
- Add Records: Click "Insert" to add new records
Importing and Exporting
Export Database:
- Select your database
- Click "Export" tab
- Choose export method (Quick or Custom)
- Select format (SQL, CSV, etc.)
- Click "Go" to download
Import Database:
- Select your database
- Click "Import" tab
- Choose SQL file
- Click "Go" to import
Security Best Practices
Database Access Security
- Default Settings: Keep public access disabled unless necessary
- IP Whitelisting: Only whitelist trusted IP addresses
- Strong Passwords: Use strong, unique passwords for database users
- Regular Updates: Keep database software updated
- Monitor Access: Regularly review whitelisted IP addresses
- Remove Unused IPs: Remove IP addresses that are no longer needed
Application Security
- Environment Variables: Store database credentials in
.envfiles, not in code - Parameterized Queries: Use prepared statements to prevent SQL injection
- Limited Privileges: Grant only necessary privileges to database users
- Regular Backups: Backup your database regularly
- Connection Encryption: Use SSL/TLS for database connections when possible
Troubleshooting
Cannot Access phpMyAdmin
- Check Database Status: Verify that the database is created and active
- SSO Authentication: Ensure you're logged in to KloudBean
- Browser Issues: Try a different browser or clear browser cache
- Contact Support: If issues persist, contact KloudBean support
Database Connection Errors
- Verify Credentials: Double-check database name, username, and password
- Check Host: Ensure you're using the correct database host (usually
localhost) - Application Configuration: Verify your application's database configuration
- Database Service: Ensure the database service is running
IP Whitelisting Issues
- IP Address Format: Verify IP address is in correct format
- Save Changes: Ensure you clicked "Save Changes" after adding IP
- Firewall Rules: Check that firewall rules are properly configured
- Network Connectivity: Verify your IP address can reach the server
- Multiple IPs: If using multiple IPs, ensure all are whitelisted
Public Access Not Working
- IP Whitelisted: Verify your IP address is in the whitelist
- Correct IP: Ensure you're using the correct public IP address
- Network Changes: If your IP changes, update the whitelist
- Firewall: Check server firewall settings
Finding Your IP Address
To whitelist your IP address, you need to know your current public IP:
- Online Tools: Visit websites like
whatismyip.comoripify.org - Command Line: Use
curl ifconfig.meorcurl ipinfo.io/ip - Router Settings: Check your router's public IP address
- VPN Considerations: If using VPN, use the VPN's IP address
Best Practices
- Keep Public Access Disabled: Only enable when necessary
- Whitelist Specific IPs: Avoid using broad IP ranges unless necessary
- Regular Review: Periodically review and remove unused IP addresses
- Document Changes: Keep track of whitelisted IPs and their purposes
- Test Connections: Test database connections after whitelisting IPs
- Monitor Access: Monitor database access logs for suspicious activity
- Use Strong Passwords: Always use strong, unique database passwords
Next Steps
After successfully accessing and configuring your database:
- Learn about Managing Application Backups to backup your database
- Explore Security and Performance Settings to optimize your application
- Review Managing Files with FileManager to manage application files