Enabling CI/CD Auto Deployment
Learn how to enable automated deployments using KloudBean's CI/CD (Continuous Integration/Continuous Deployment) feature. This guide walks you through setting up webhook-based automated deployments that trigger builds and deployments automatically when you push code to your repository.
Overview
KloudBean's CI/CD auto deployment feature automates your deployment pipeline, eliminating the need for manual deployments. By configuring webhook-based automated deployment, your application will automatically build and deploy whenever you push changes to your connected Git repository.
Benefits of Webhook-Based Automated Deployment
Webhook-based deployment automation provides developers with enhanced control and security:
- Automatic Triggers: Deployments are triggered automatically when code is pushed to your repository, eliminating manual intervention
- Secure Authentication: Webhooks use secret keys for secure authentication, ensuring only authorized deployments are processed
- Event-Based Control: You have full control over which events trigger deployments (pushes, merges, pull requests, etc.)
- Developer Control: Developers maintain control over when deployments occur through their Git workflow, without needing to access the KloudBean dashboard
- Reduced Manual Errors: Automated deployments reduce the risk of human error associated with manual deployment processes
- Faster Time to Production: Code changes reach production faster with automatic deployment pipelines
- Build Queue Management: KloudBean intelligently manages build queues, preventing conflicts when multiple pushes occur
Prerequisites
Before enabling CI/CD auto deployment, ensure you have:
- Git Repository Connected: Your Git repository must be connected to your KloudBean application. If you haven't connected your repository yet, please review our guide on Connecting Git Repository
- Application Configured: Your application should be configured and running on KloudBean
- Appropriate Permissions: You need appropriate permissions to configure CI/CD settings in both KloudBean and your Git provider account
Important Note: Git Repository Connection Required
It is super important to note that in order to enable CI/CD or auto deployment features, you must have connected your repository in the Git deployment section first.
If you haven't connected your Git repository yet, the CI/CD feature will not be available. Once your Git repository is connected, you become eligible to enable CI/CD automated deployments.
Enabling Auto Deployment
Step 1: Access CI/CD Settings
To begin setting up automated deployment:
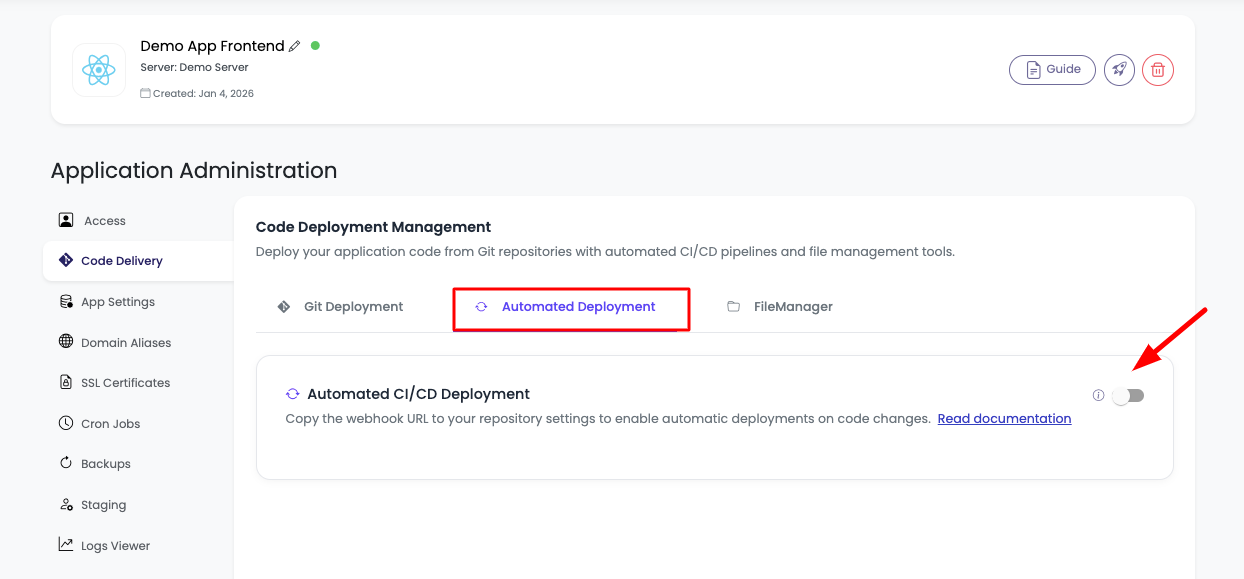
- Navigate to your application dashboard and open the application administration page.
- Go to the "Code Delivery" tab in the application settings.
- Locate the "Automated Deployment" section - this is where you'll configure your CI/CD settings.
Step 2: Enable Automated Deployment
Once you're in the Automated Deployment section:
- Navigate to the Automated Deployment tab within the Code Delivery section.
- Locate the toggle switch to enable webhook-based automated deployment.
- Click the toggle to enable automated deployment for your application.
KloudBean currently supports webhook-based deployment automation as this is the most secure approach to enable deployment triggers. Webhooks provide developers with complete control over when deployments occur, without worrying about manual triggers or unauthorized access. This method ensures that deployments only happen when specific events occur in your repository, giving you granular control over your deployment pipeline.
Step 3: Retrieve Webhook URL and Secret Key
After enabling automated deployment:
-
Webhook URL and Secret Key Generation: Once automated deployment is enabled, KloudBean will automatically generate:
- Webhook URL: A unique URL that your Git provider will use to notify KloudBean of repository events
- Secret Key: A secure authentication key that ensures only authorized webhook requests are processed
-
Copy These Values: You'll need to copy both the webhook URL and secret key to configure the webhook in your Git provider account.
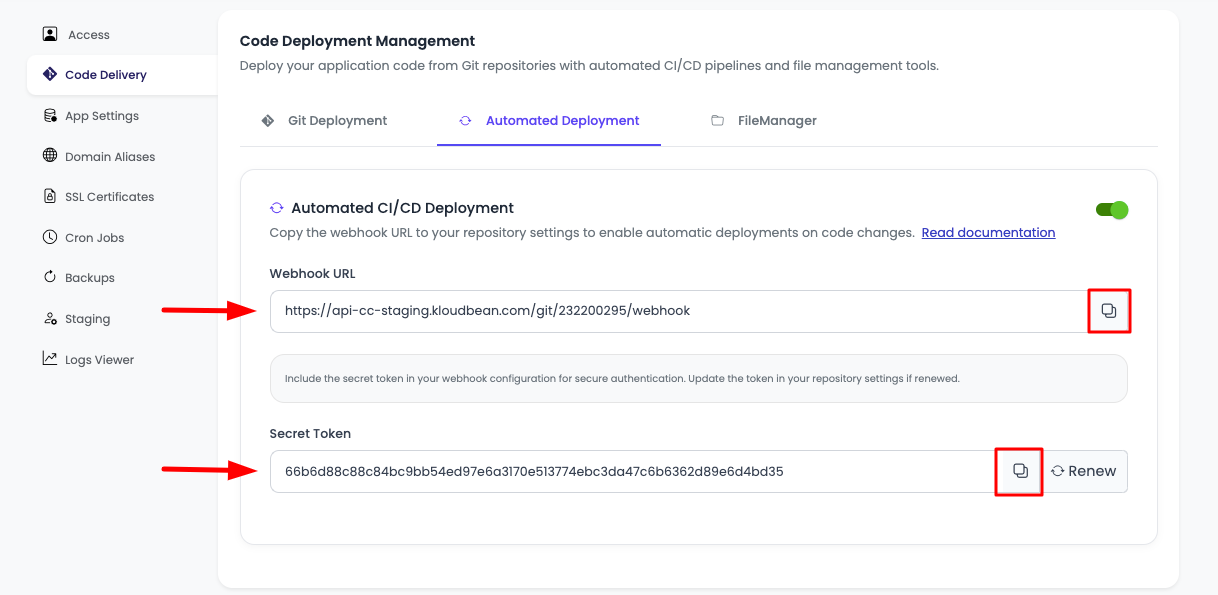
Security Note: Keep your secret key secure and never share it publicly. The secret key is used to verify that webhook requests are coming from your Git provider and not from unauthorized sources.
Step 4: Add Webhook to Your Git Provider
Now that you have your webhook URL and secret key, you need to configure the webhook in your Git provider account. The process varies slightly between GitHub and GitLab.
For GitHub
- Navigate to Your Repository: Go to your GitHub account and open the repository that is already connected to KloudBean.
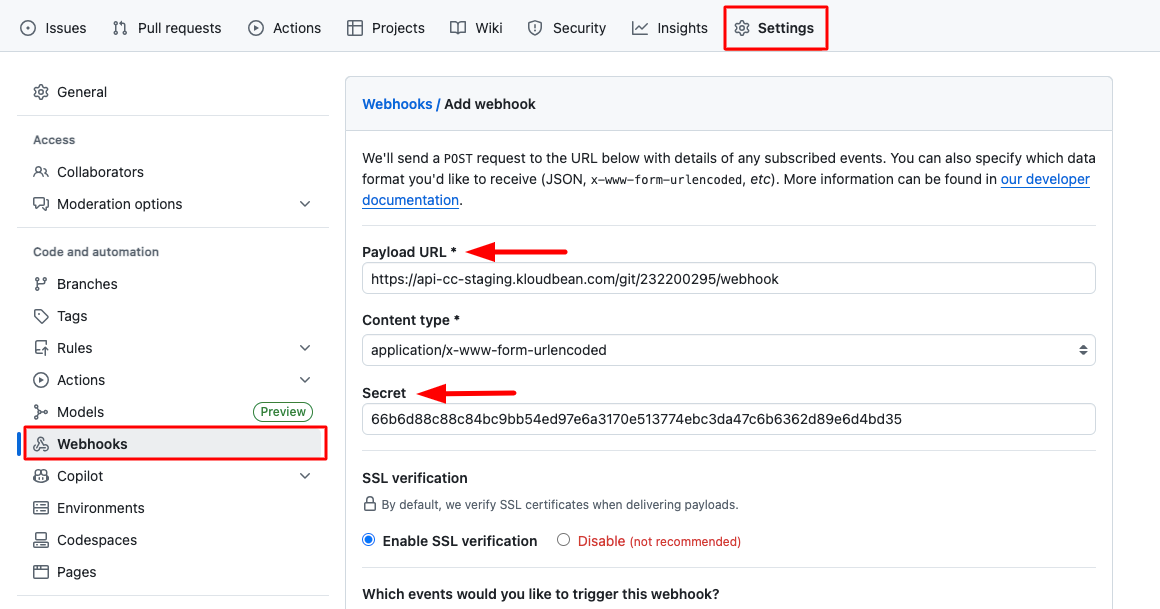
- Access Repository Settings: Click on "Settings" in the repository navigation menu.
- Open Webhooks Section: In the left sidebar, click on "Webhooks".
- Add New Webhook: Click on the "Add webhook" button to create a new webhook.
-
Configure Webhook:
- Payload URL: Paste the webhook URL you copied from KloudBean
- Content type: Select "application/json" (default)
- Secret: Paste the secret key you copied from KloudBean
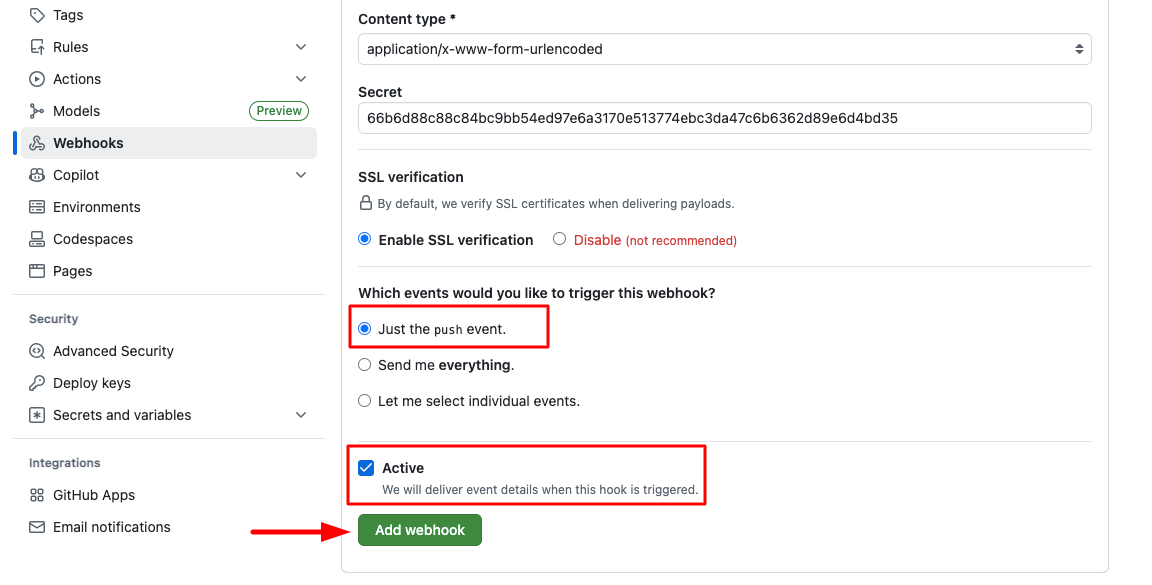
- Which events would you like to trigger this webhook?: This is a critical setting
-
Select Events: It is important to select the correct required events for your deployment strategy:
- For Production: Select events that trigger on approval or merge to the main branch (e.g., "Just the push event" or "Let me select individual events" → "Pushes" and "Pull request merges")
- For Development: You might want to trigger on all push events
- For Staging: Consider triggering on pull request events or specific branch pushes
Why Event Selection Matters:
- Production Safety: Selecting only merge events to the main branch ensures that only reviewed and approved code reaches production
- Prevent Unwanted Deployments: Proper event selection prevents deployments from feature branches or experimental code
- Workflow Control: Different event types allow you to control your deployment workflow based on your team's Git practices
- Resource Optimization: Selective event triggers prevent unnecessary builds and deployments
-
Activate Webhook: Make sure "Active" is selected (checked) to enable the webhook.
-
Save Configuration: Click "Add webhook" to save and activate your webhook.
- Verify Webhook: After adding the webhook, you can check webhook triggers and redelivery status:
- Click on your newly created webhook to view its details
- Navigate to "Recent deliveries" to see all webhook trigger attempts and their status
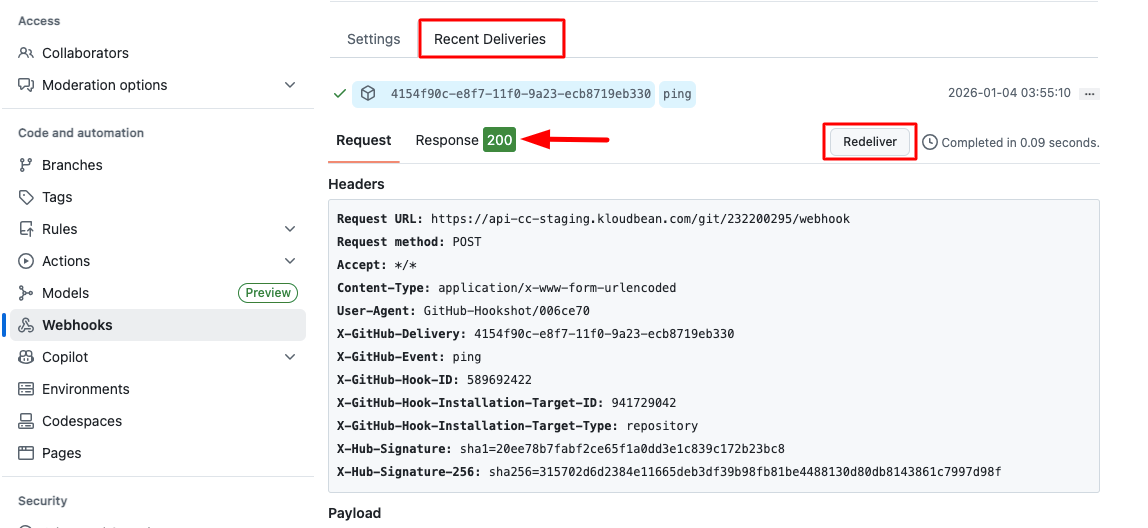
Webhook Status Monitoring: In the "Recent deliveries" section, you can:
- View the status of each webhook trigger (success, failure, or pending)
- See the payload sent to KloudBean
- Redeliver failed webhooks if needed
- Check response codes and error messages
Understanding Webhook Rejections: It is possible that the KloudBean system may reject your webhook in multiple scenarios:
- Invalid Secret and Authentication Failed: If the secret key doesn't match, KloudBean will reject the webhook for security reasons. Double-check that you've copied the secret key correctly.
- Suspicious Trigger Detection: KloudBean's security system may detect and block suspicious triggers to prevent unauthorized deployments or potential attacks.
- Build Already in Progress: If a build is already in progress and another push triggers a webhook, the new build will be shown in the build table but will be marked as "ignored" to prevent build conflicts and resource contention.
For GitLab
- Navigate to Your Repository: Go to your GitLab account and select the repository that is connected to KloudBean.
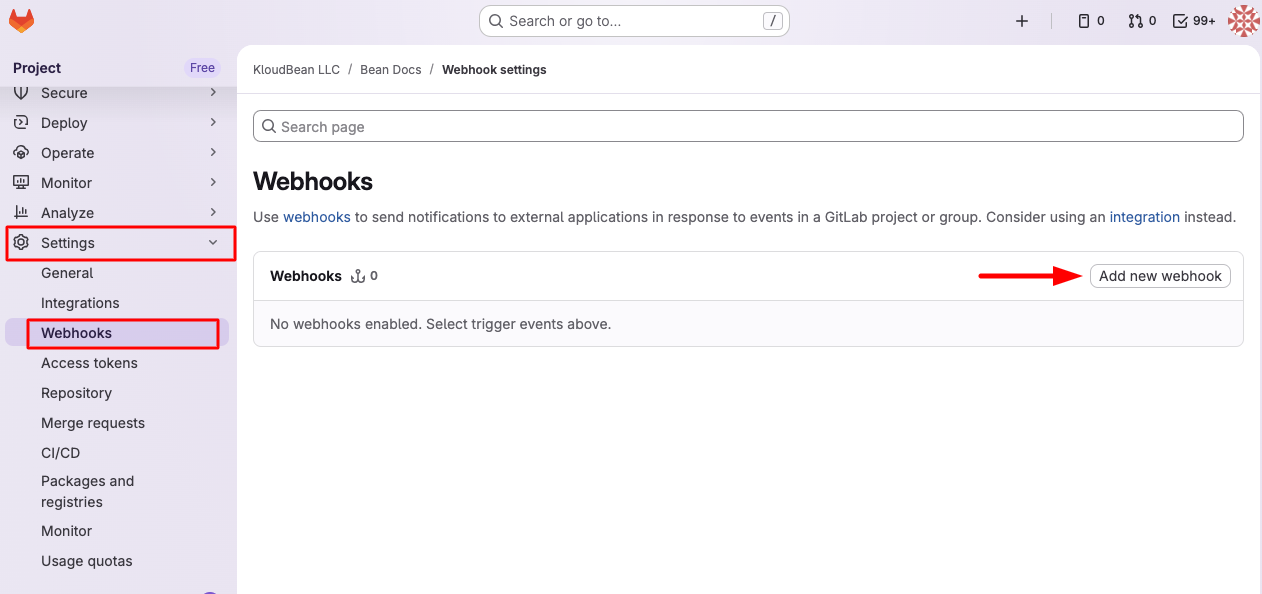
- Access Repository Settings: Click on "Settings" in the repository menu.
- Open Webhooks Section: In the left sidebar, navigate to "Webhooks".
- Add New Webhook: Click on "Add new webhook" button.
- Configure Webhook Details:
- URL: Paste the webhook URL you copied from KloudBean
- Secret token: Paste the secret key you copied from KloudBean

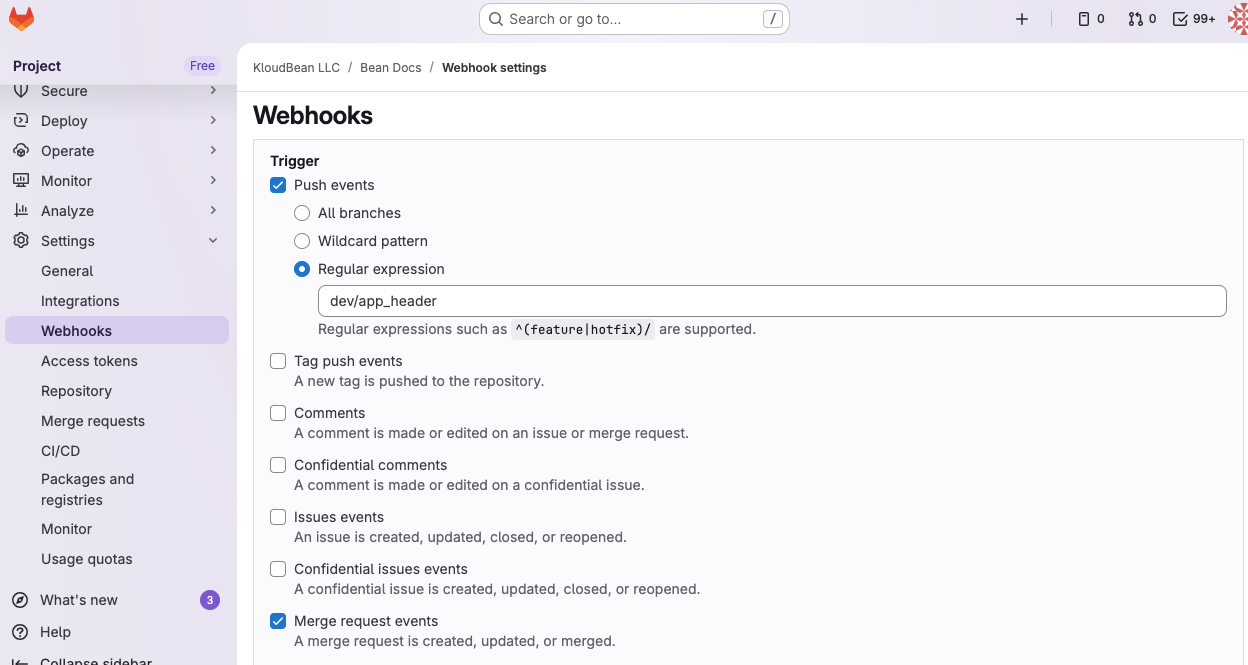
- Select Trigger Events: Make sure to select the correct event types that should trigger deployments:
- Push events: Triggers on code pushes
- Tag push events: Triggers when tags are pushed
- Merge request events: Triggers on merge request actions
- Issues events: Triggers on issue updates (typically not used for deployments)
- Enable SSL Verification (Recommended): Keep SSL verification enabled for secure connections.
- Save Webhook: Click "Add webhook" to save and activate your webhook configuration.
Monitoring Build and Deployment Status
After configuring your webhook, you can monitor all build and deployment activities in KloudBean:
Build & Deployment History
- Navigate to Git Deployment Section: In your application's Code Delivery tab, scroll down to the "Build & Deployment History" section.
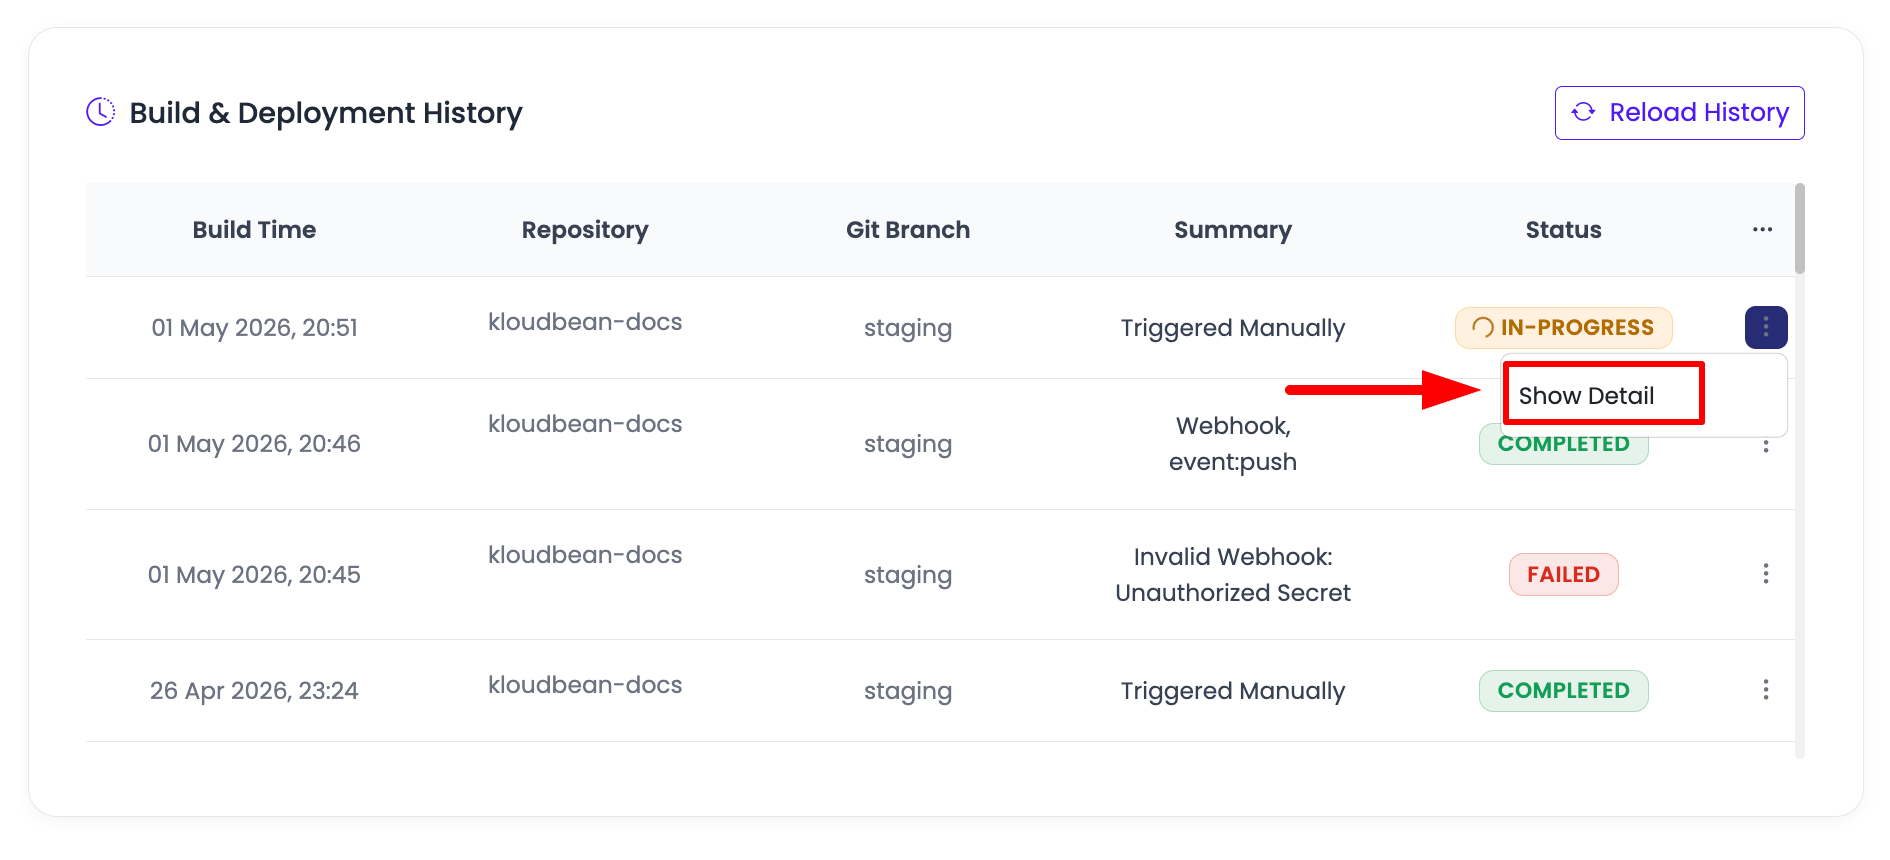
- View Historical Builds: This section displays all historical builds and their status.
Build Status Information
Each build entry shows comprehensive information:
- Build DateTime: When the build was triggered
- Repository URL: The Git repository that triggered the build
- Branch: The branch from which the code was deployed
- Trigger Summary: Details about what event triggered the build (push, merge, etc.)
- Status: Current state of the build process
Understanding Build Statuses
Builds can have the following statuses:
- In Progress: The build is currently executing. Your application is being built and deployed.
- Completed: The build has been successfully completed. Your application has been deployed with the latest code.
- Pending: The build has not been initiated due to any reason (e.g., waiting for resources, queued behind other builds).
- Failed: The build process failed due to an error in the code, build configuration, or deployment process. Check the build logs for details.
- Ignored: An unwanted event was pushed, but a build was already in progress. KloudBean ignores duplicate triggers to prevent build conflicts and ensure resource efficiency.
Changing Deployment Branch
If you want to change the branch that triggers deployments:
- Fetch Updated Branches: Click on the fetch icon next to the "Git Repository URL" field. This will fetch all updated branches from your repository.
- Select Desired Branch: Choose the branch you want to deploy from the updated branch list.
- Initiate Build: Click on "Pull & Deploy" to start the build process with the newly selected branch.
Changing the branch will update your deployment configuration, and future webhook triggers will deploy from the newly selected branch.
Best Practices for CI/CD Auto Deployment
- Branch Strategy: Use separate branches for different environments (development, staging, production) and configure webhooks accordingly
- Event Selection: Carefully select webhook events to ensure only appropriate code changes trigger deployments
- Production Safety: For production deployments, consider requiring pull request approvals or merge events only
- Monitor Builds: Regularly check the Build & Deployment History to ensure deployments are working as expected
- Secret Key Security: Never expose your webhook secret key in public repositories or share it insecurely
- Test Webhooks: Test your webhook configuration with a test push to ensure it's working correctly
- Build Optimization: Monitor build times and optimize your build process to reduce deployment duration
Troubleshooting
Webhook Not Triggering Deployments
- Check Webhook Configuration: Verify that the webhook URL and secret key are correctly configured in your Git provider
- Verify Event Selection: Ensure the correct events are selected in your webhook configuration
- Check Webhook Status: Review the "Recent deliveries" section in GitHub/GitLab to see if webhooks are being received
- Git Connection: Ensure your Git repository is properly connected in KloudBean
Build Failures
- Review Build Logs: Check the build logs in the Build & Deployment History section for error details
- Code Issues: Verify that your code doesn't have syntax errors or missing dependencies
- Build Configuration: Ensure your build commands and configuration are correct
- Environment Variables: Check that all required environment variables are properly configured
Build Status Issues
- Ignored Builds: If builds are being ignored, check if another build is already in progress
- Pending Status: If builds remain pending, check for resource constraints or system issues
- Authentication Errors: Verify that your webhook secret key matches between KloudBean and your Git provider
Next Steps
After successfully enabling CI/CD auto deployment:
- Learn about Connecting Git Repository if you haven't connected your repository yet
- Explore Managing Application Domains to configure custom domains
- Review Security and Performance Settings to optimize your application