Connecting to Server via SSH or SFTP
Learn how to securely connect to your KloudBean server using SSH or SFTP. This guide covers password-based authentication and the more secure SSH key authentication method, along with instructions for using common SSH/SFTP tools.
Overview
Once you have a server with KloudBean, KloudBean does not provide root access to the server. This is because KloudBean provides managed servers where all stack components and security are very carefully implemented and maintained by KloudBean. However, KloudBean provides a master user called admin user, which acts as a partial root user with access to all deployed applications.
Why Root Access is Not Provided
Root access is not provided for several important reasons:
- Server Stability: Root access allows users to make system-level changes that could unintentionally break the server or disturb critical services
- Security Risks: Root access increases the risk of security vulnerabilities if misused or compromised
- Managed Infrastructure: KloudBean maintains and manages the server infrastructure, ensuring optimal performance and security
- Stack Components: Critical stack components (web server, database, caching, etc.) are carefully configured and maintained by KloudBean
- Prevent Accidental Damage: Users can unintentionally modify critical system files, change permissions, or remove essential services
- Consistent Environment: Maintaining a managed environment ensures all servers have consistent, optimized configurations
Admin User Overview
The admin user is KloudBean's master user that provides:
- Partial Root Access: Acts as a partial root user with elevated privileges
- Application Access: Has access to all deployed applications on the server
- Server Management: Can manage server-level configurations and applications
- Security Consideration: If your apps are handled by different developers, avoid sharing this user. Instead, use application-specific SSH users for individual developers (see Enabling SSH Access for Application Users)
Prerequisites
Before connecting to your server, ensure you have:
- An Active KloudBean Server: Your server must be created and running
- SSH Client or SFTP Tool: Install an SSH client (OpenSSH, PuTTY) or SFTP tool (FileZilla, WinSCP) on your local machine
- Access to Server Dashboard: You need to be logged in to your KloudBean account
- IP Whitelisted: In order to connect to the server, you should have access (IP whitelisted) to connect. Review the Server SSH Access Control document to manage server SSH access and configure IP whitelisting
Getting Server Access Credentials
Step 1: Navigate to Admin Credentials
In order to get server access credentials:
- Navigate to Server Administration: Log in to your KloudBean dashboard and open the server administration page for your desired server.
- Go to Admin Access: Navigate to "Admin Access" in the server settings menu.
- Open Admin Credentials: Click on "Admin Credentials" tab within the Admin Access section.
Step 2: View Credentials
On this tab, you will see the following credentials:
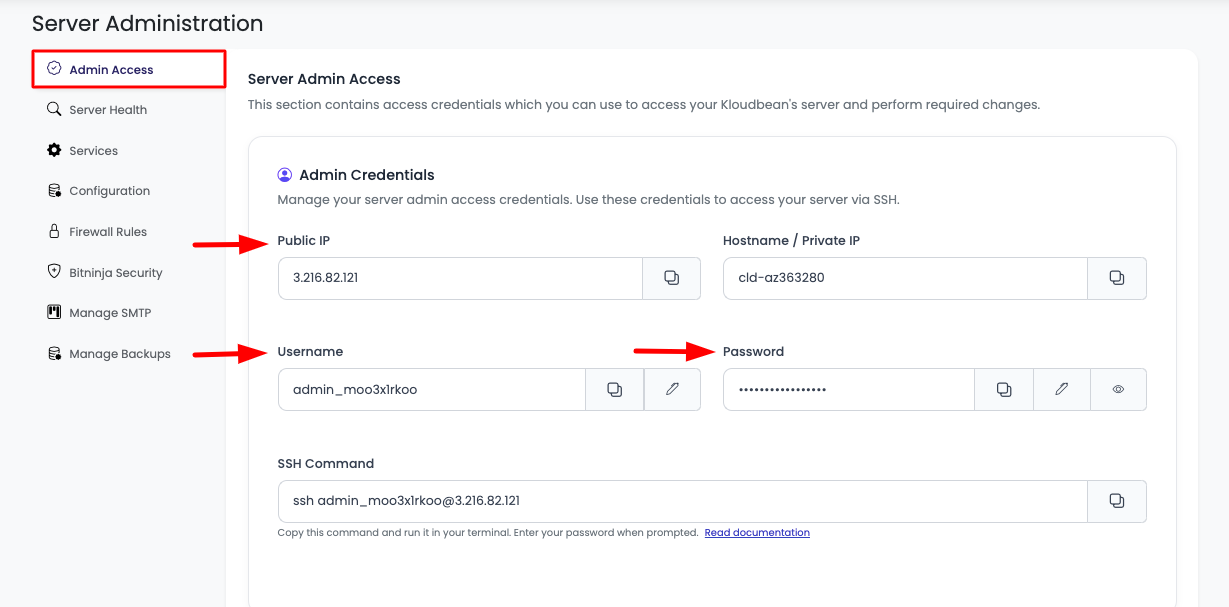
Credentials Displayed:
- Public IP: The public IP address of your server
- Hostname/Private IP: The hostname or private IP address
- Username: The admin username (typically starts with
admin_) - Password: The password for the admin user
You will use these credentials to access the server using SSH from terminal or any SSH tool like PuTTY.
Connecting via SSH with Password
Using SSH Command Line
If you are going to connect using SSH command, use the given command from the Admin Credentials section:

- Copy Command: Click on the copy button to copy the SSH command
- Paste in Terminal: Paste the command in your terminal or any shell tool
- Enter Password: It will prompt for password - enter the password from the credentials
- Connected: You are now connected to the server
Example: In this demo, we're going to access using the command ssh [email protected], copied by clicking on the copy button.
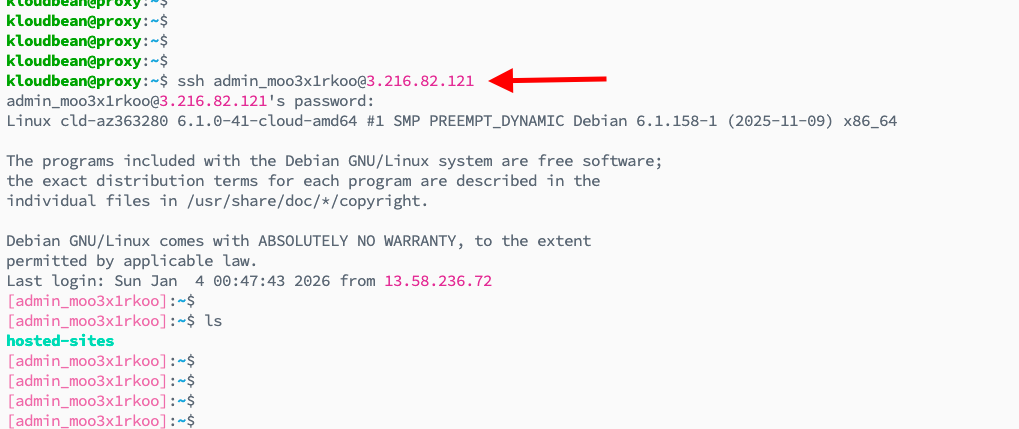
Paste it in the terminal to access it and give the password when prompted.
Using SSH/SFTP Tools
Similarly, you can use the same credentials to connect using any SSH/SFTP tool like PuTTY, FileZilla, WinSCP, etc.
Using PuTTY (Windows)
- Download and Install PuTTY: Get PuTTY from the official website
- Open PuTTY: Launch the PuTTY application
- Enter Connection Details:
- Host Name (or IP address): Enter the Public IP from credentials
- Port: 22 (default SSH port)
- Connection type: SSH
- Click "Open": Click the Open button to initiate connection
- Enter Credentials: When prompted:
- Username: Enter the admin username
- Password: Enter the admin password
- Connected: You're now connected to the server
Using FileZilla (Windows/Mac/Linux)
- Download and Install FileZilla: Get FileZilla from the official website
- Open FileZilla: Launch the FileZilla application
- Enter Connection Details:
- Host: Enter the Public IP from credentials (use
sftp://prefix) - Username: Enter the admin username
- Password: Enter the admin password
- Port: 22
- Host: Enter the Public IP from credentials (use
- Click "Quickconnect": Click the Quickconnect button
- Connected: You're now connected via SFTP
Using WinSCP (Windows)
- Download and Install WinSCP: Get WinSCP from the official website
- Open WinSCP: Launch the WinSCP application
- Create New Session:
- File protocol: SFTP
- Host name: Enter the Public IP from credentials
- Port number: 22
- User name: Enter the admin username
- Password: Enter the admin password
- Click "Login": Click the Login button
- Connected: You're now connected via SFTP
Using Terminal (Mac/Linux)
- Open Terminal: Launch your terminal application
- Use SSH Command:
ssh admin_username@server_ip - Enter Password: When prompted, enter the admin password
- Connected: You're now connected to the server
Connecting Using SSH Public Key (Passwordless)
Why Use SSH Keys Instead of Passwords?
KloudBean also offers the best and most secure way to connect to the server using server public key authentication. Here's why you should use SSH keys:
- Enhanced Security: SSH keys are cryptographically secure and much stronger than passwords
- No Password Transmission: Passwords are never transmitted over the network, eliminating password interception risks
- Resistance to Brute Force: SSH keys are virtually impossible to brute force, unlike passwords
- Convenience: Once set up, you can connect without entering a password each time
- Key Management: Easier to manage access - you can revoke keys without changing passwords
- Best Practice: Industry standard for secure server access
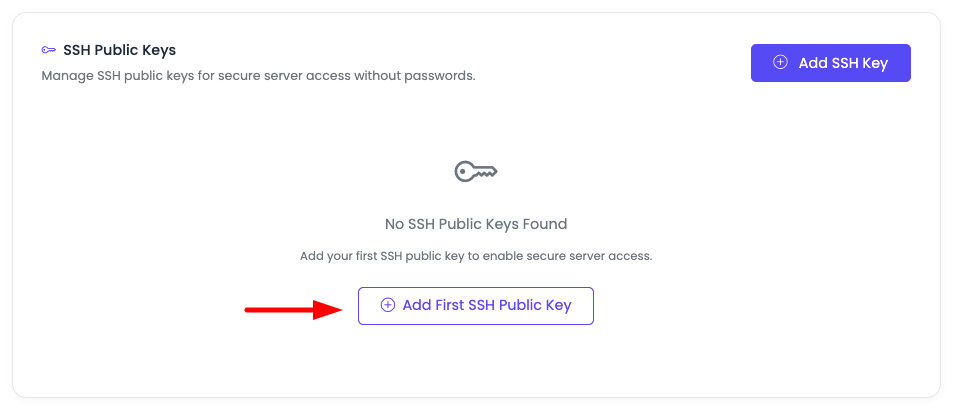
Step 1: Navigate to SSH Public Keys Section
To upload your public SSH key:
- Navigate to Admin Access: In your server administration page, go to "Admin Access" section
- Scroll to SSH Public Keys: Scroll a little down to find "SSH Public Keys" section
- Click "Add SSH Key": Click on "Add SSH Key" to upload your key
Step 2: Choose Key Option
Once you click, a prompt will open which will give you the following options:
- Add New Key: Upload a new SSH public key
- Select Existing Key: Use an existing key that's already uploaded to your KloudBean account
Step 3: Generate SSH Key (If Creating New)
If you are going to add a new key, first you should have an existing key, or you can create a new key on your local machine.
Generating SSH Keys
To generate a new key, use this command to generate an Ed25519 key:
ssh-keygen -t ed25519 -C "[email protected]"
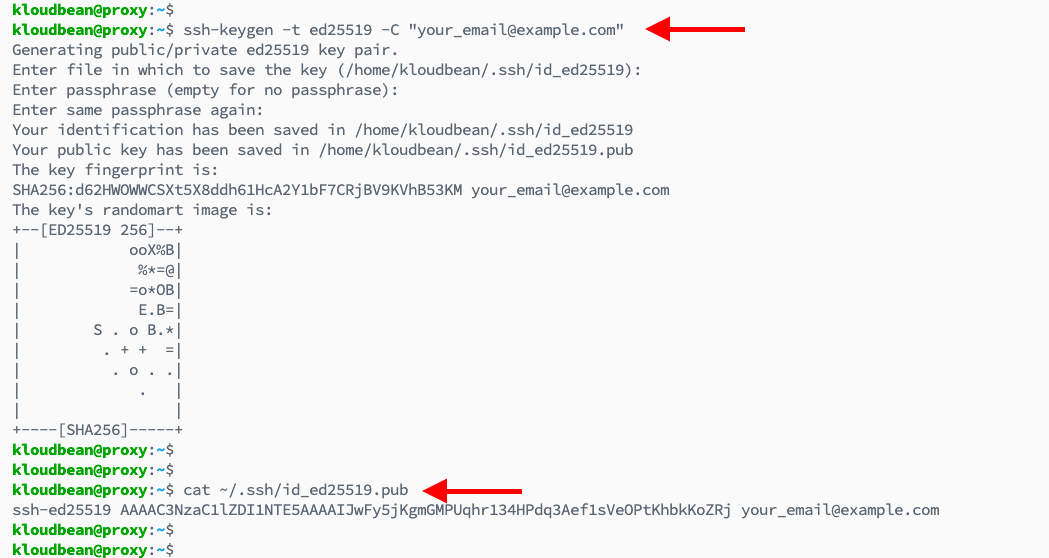
I'm going to create an Ed25519 key in this example.
Understanding SSH Key Types
You can also create RSA or DSA keys. Here's a brief explanation of key types:
Ed25519 Keys (Recommended):
- Algorithm: Ed25519 (Edwards-curve Digital Signature Algorithm)
- Key Size: 256 bits (equivalent to 3072-bit RSA)
- Security: Very secure and modern
- Performance: Fast generation and verification
- Command:
ssh-keygen -t ed25519 -C "[email protected]"
RSA Keys:
- Algorithm: RSA (Rivest-Shamir-Adleman)
- Key Size: 2048-bit (minimum) or 4096-bit (recommended)
- Security: Well-established and widely supported
- Compatibility: Best compatibility with older systems
- Command:
ssh-keygen -t rsa -b 4096 -C "[email protected]"
DSA Keys (Deprecated):
- Not Recommended: DSA keys are deprecated and should not be used
- Security: Considered insecure by modern standards
- Avoid: Use Ed25519 or RSA instead
Key Generation Process
- Run Key Generation Command: Execute the
ssh-keygencommand - Choose Location: Press Enter to use default location (
~/.ssh/id_ed25519) or specify a custom path - Set Passphrase (Optional): Enter a passphrase to protect your private key, or press Enter for no passphrase
- Key Generated: Your key pair will be generated:
- Private Key:
~/.ssh/id_ed25519(keep this secret!) - Public Key:
~/.ssh/id_ed25519.pub(this is what you upload)
- Private Key:
Step 4: Copy Public Key
Once the key is generated or you have copied an existing public key:
- Copy Public Key: Use this command to copy the public key content:
cat ~/.ssh/id_ed25519.pub - Copy Content: Copy the entire output (starts with
ssh-ed25519and ends with your email)
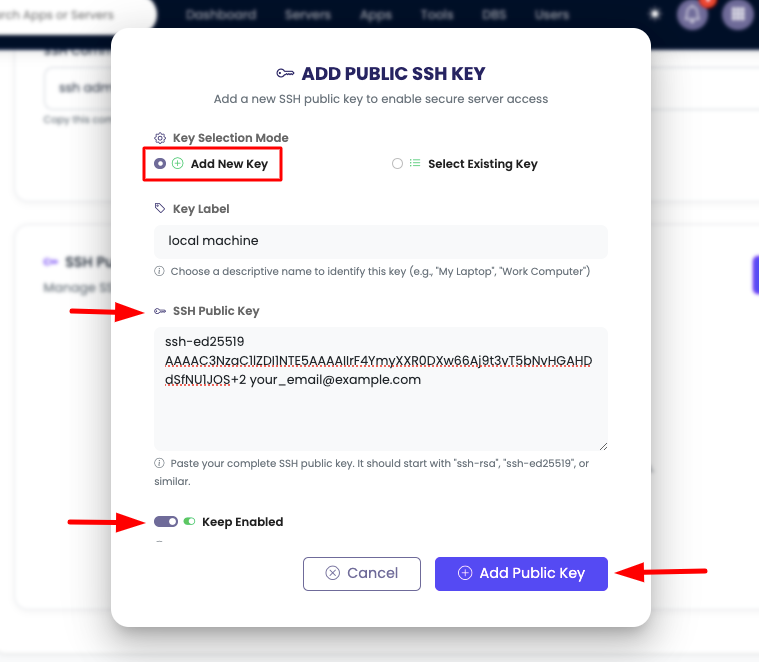
Step 5: Add Public Key to KloudBean
Get back to KloudBean's add key prompt and add the following fields:
- Add Key Label: Enter a descriptive label for this key (e.g., "My Laptop", "Work Computer")
- Paste SSH Public Key: Paste the public key content you copied
- Keep Enabled (Checked): Ensure the "Enabled" checkbox is checked
- Click "Add Public Key": Click the button to add the key
Step 6: Verify Key Added
After this, the key must be added successfully and you will see it in the list:
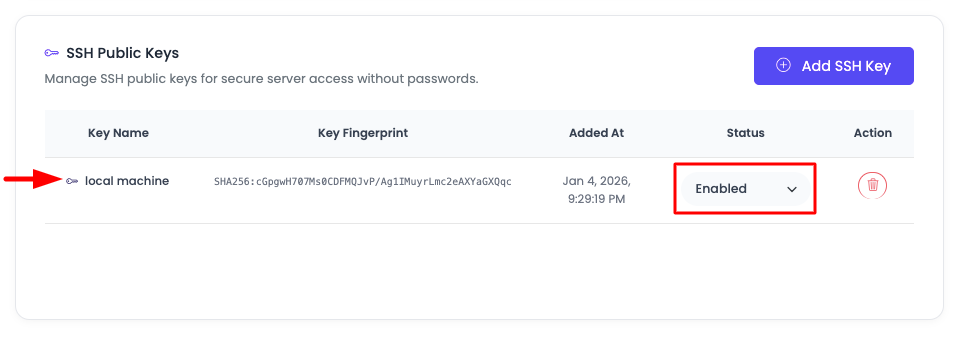
Here you will see your key along with:
- Key Label: The label you assigned
- Fingerprints: Cryptographic fingerprints for verification
- Enable/Disable Option: Toggle to enable or disable the key
- Delete Option: Option to remove the key
Once the key is added, you are now good to access the server using this key.
Step 7: Connect Using Private Key
Go to your source machine (local machine) and use the same credentials, but this time instead of password, provide the private key to connect to the server.
Using SSH Command
If you are planning to connect using SSH command, use this command:
ssh [email protected] -i ~/.ssh/id_ed25519
The key location could be different if you specified a custom path during key generation.
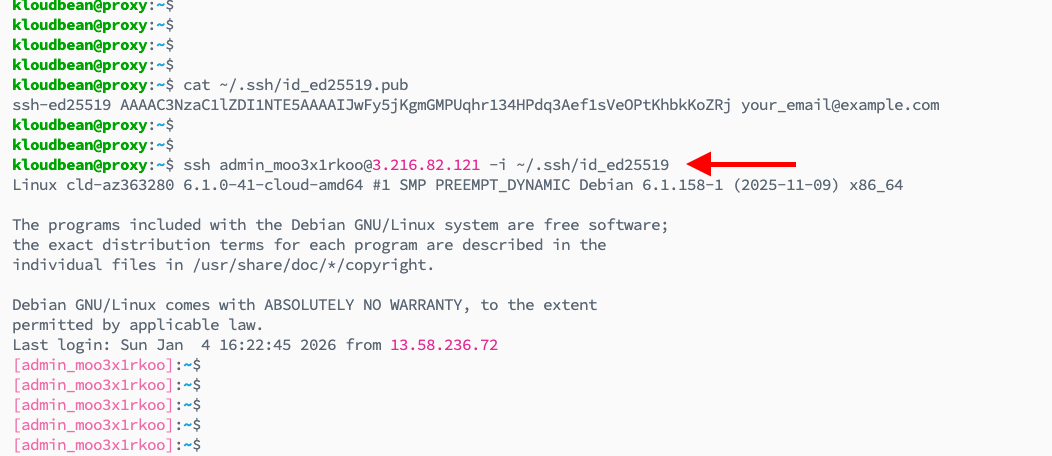
Congratulations! You are successfully connected to the server using a secure SSH public key method.
Using SSH/SFTP Tools with Keys
Similarly, you can connect using SSH/SFTP tools with your private key:
Using PuTTY with Key:
- Convert Key: Use PuTTYgen to convert your private key to
.ppkformat - Open PuTTY: Launch PuTTY
- Enter Connection Details: Enter hostname and port
- Load Private Key: In Connection → SSH → Auth, browse and select your
.ppkfile - Connect: Click Open and you'll be connected without password
Using FileZilla with Key:
- Open FileZilla: Launch FileZilla
- Edit → Settings: Go to Settings → Connection → SFTP
- Add Key File: Click "Add key file" and select your private key
- Enter Connection Details: Enter hostname, username, and port
- Connect: Click Quickconnect - no password needed
Using WinSCP with Key:
- Open WinSCP: Launch WinSCP
- Create New Session: Enter hostname, username, and port
- Advanced → Authentication: Go to Advanced → SSH → Authentication
- Private Key File: Browse and select your private key file
- Login: Click Login - authentication will use the key
Using Existing Keys on Other Servers
KloudBean also simplifies using the same keys to connect to other servers on your account with necessary permissions.
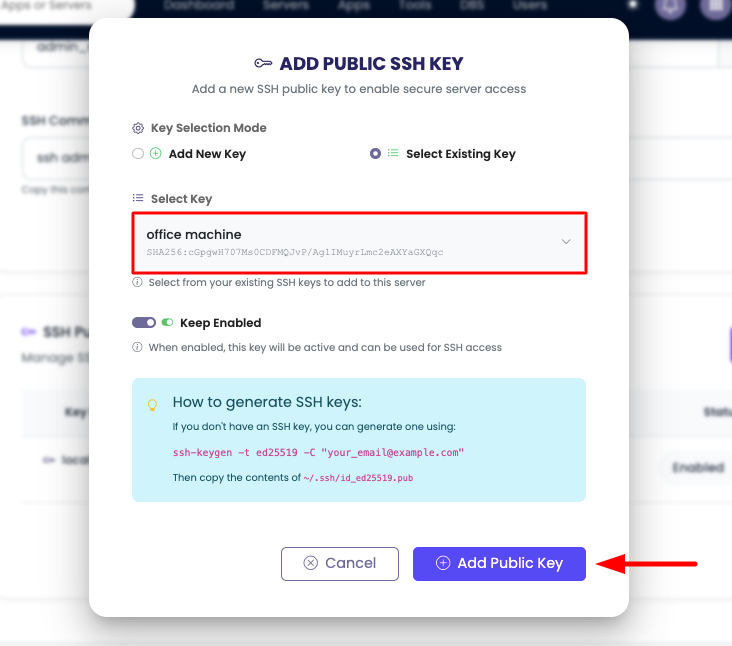
Step 1: Select Existing Key Option
- Click "Add SSH Key": In the SSH key prompt, click "Add SSH Key"
- Select "Select Existing Key": This time, you have to select the option "Select Existing Key"
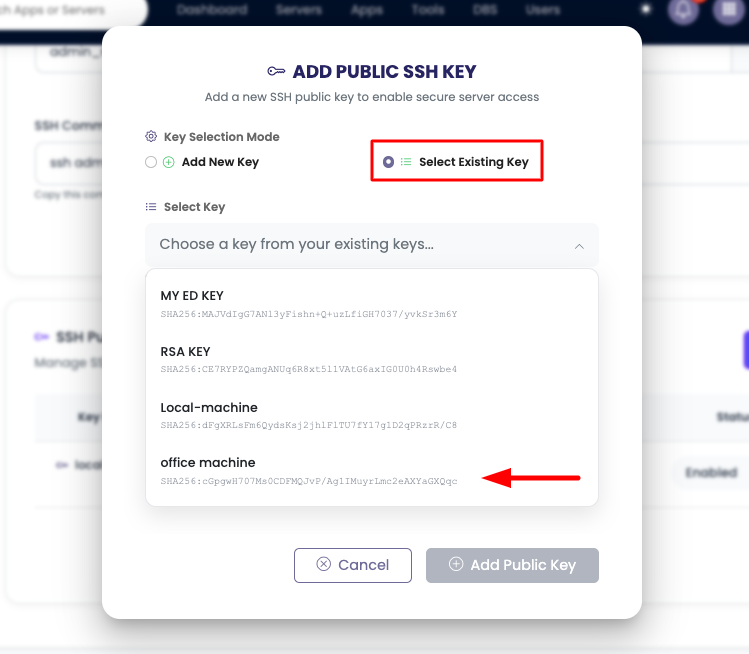
Step 2: Choose Key from Dropdown
- View Available Keys: Once you select this, you will see a dropdown with all available keys that you've previously added to your KloudBean account
- Select Key: You have to select the key from the dropdown
- Click "Add Public Key": Click "Add Public Key" to add the selected key to this server
Step 3: Verify Key Added
Once added, you should be able to connect to this server using this key as well.
Benefits of Using Existing Keys:
- Consistency: Use the same key across multiple servers
- Easier Management: Manage one key instead of multiple keys
- Quick Setup: Quickly add access to new servers
- Centralized Control: Manage all key access from one place
Security Best Practices
SSH Key Security
- Protect Private Keys: Never share your private key - keep it secure on your local machine
- Use Passphrases: Protect your private key with a strong passphrase
- Key Permissions: Ensure private key has correct permissions (600):
chmod 600 ~/.ssh/id_ed25519 - Regular Rotation: Periodically rotate SSH keys for enhanced security
- Remove Unused Keys: Delete keys that are no longer needed
Access Management
- Don't Share Admin Credentials: Avoid sharing admin user credentials with multiple developers
- Use Application-Specific Users: For developers working on specific apps, use application-specific SSH users
- Monitor Access: Regularly review who has access to your servers
- Revoke Access: Remove keys or change passwords when access is no longer needed
Troubleshooting
Connection Issues
- Verify Credentials: Double-check username, password, and IP address
- Check Network: Ensure your local machine can reach the server IP
- Firewall: Verify firewall rules allow SSH connections (port 22)
- Server Status: Confirm the server is running and accessible
SSH Key Issues
- Key Format: Ensure public key is in correct format (starts with key type, ends with comment)
- Key Permissions: Check that private key has correct permissions (600)
- Key Location: Verify the key path in your SSH command is correct
- Key Added: Confirm the public key is properly added in KloudBean
Authentication Failures
- Password Incorrect: Verify you're using the correct password from Admin Credentials
- Key Not Working: Ensure the public key matches the private key you're using
- Key Disabled: Check that the key is enabled in KloudBean
- Wrong Username: Verify you're using the correct admin username
Next Steps
After successfully connecting to your server:
- Learn about Monitoring Server Health to track server performance
- Explore Managing Server Packages and Services to manage server components
- Review Managing Server Backups to protect your server data