Enabling Server SMTP
Learn how to enable and configure SMTP (Simple Mail Transfer Protocol) on your KloudBean server. KloudBean simplifies the complex process of SMTP configuration, making it easy to connect and use your SMTP service.
Overview
If you are intended to enable server SMTP, which is a quite complicated process where you have to install and configure multiple components, KloudBean made it easy to connect and use your SMTP by preconfiguring the SMTP. All you have to do is to add your SMTP credentials.
What KloudBean Simplifies
Traditionally, setting up SMTP on a server requires:
- Installing mail server software (like Postfix)
- Configuring multiple components
- Setting up authentication
- Managing security settings
- Testing and troubleshooting
KloudBean handles all of this for you - the SMTP infrastructure is preconfigured and optimized. You simply need to provide your SMTP provider credentials, and KloudBean takes care of the rest.
Prerequisites
- An active KloudBean server
- SMTP provider credentials (Google, Mailgun, Maildrill, SendGrid, or custom SMTP)
- Access to server administration settings
Accessing SMTP Configuration
Step 1: Navigate to Manage SMTP
In order to connect your SMTP:
- Log in to your KloudBean dashboard
- Navigate to Server Administration: Open the server administration page for your desired server
- Go to "Manage SMTP" Tab: Click on the "Manage SMTP" tab in the server settings menu
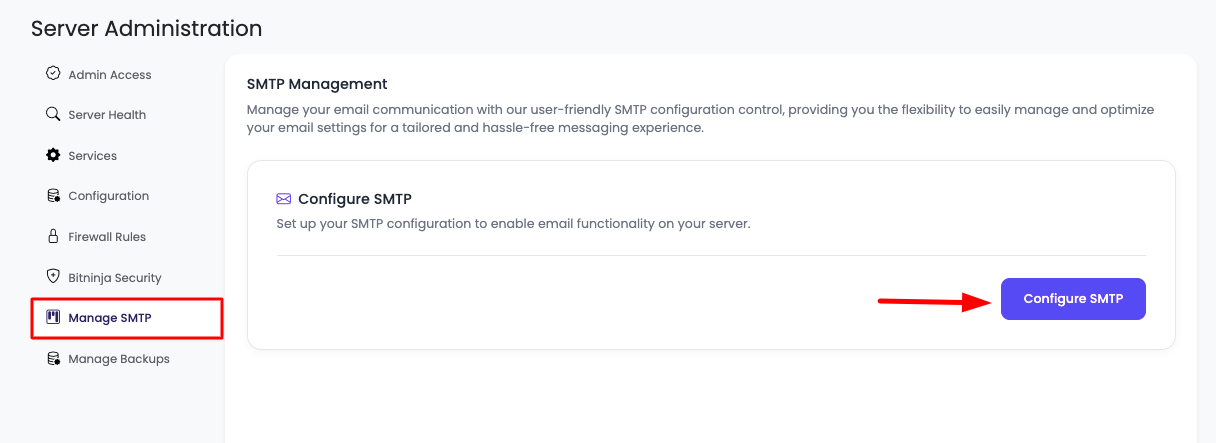
On this tab, you will see a button "Configure SMTP".
Configuring SMTP
Step 2: Select SMTP Provider
Once you click the "Configure SMTP" button, options will open to select your SMTP provider.
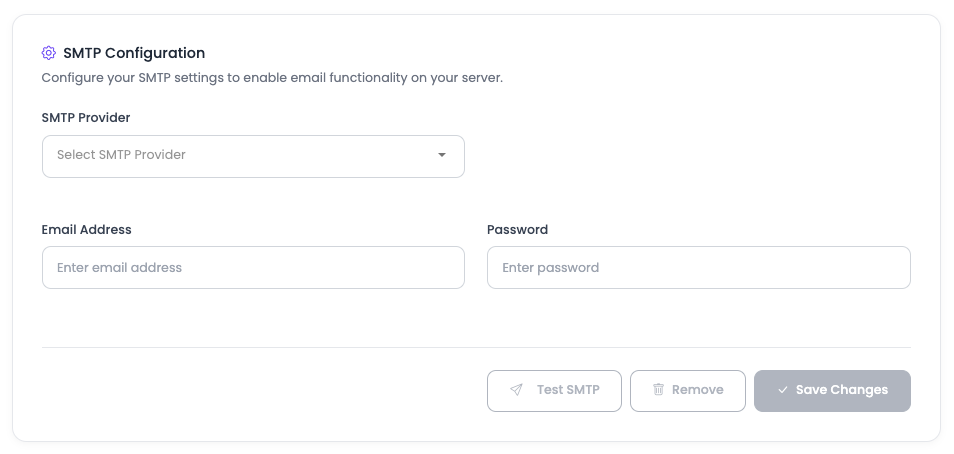
Available SMTP Providers:
- Google: Gmail SMTP service
- Mailgun: Transactional email service
- Maildrill: Email delivery service
- SendGrid: Email API service
- Custom SMTP: Use your own SMTP server
Step 3: Enter Credentials and Save
Select your provider, then add your username and password. Click "Save Changes", and your SMTP should be configured now in one step.
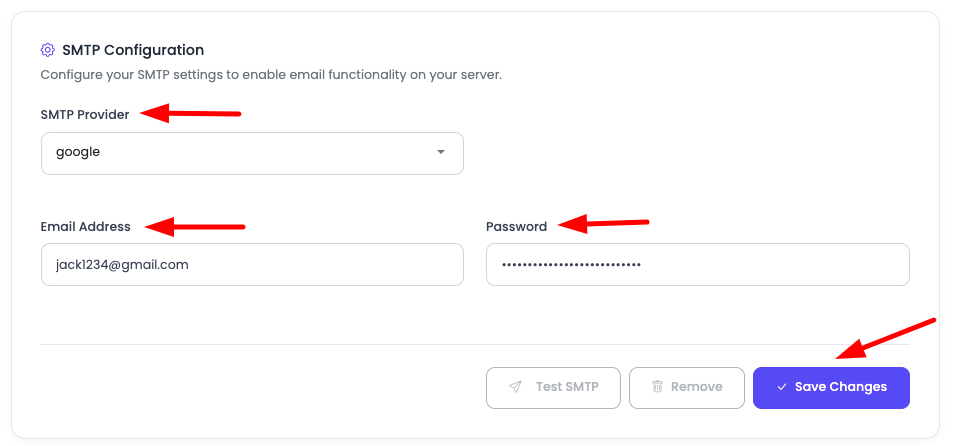
Configuration Process:
- Select Provider: Choose from the available SMTP providers
- Enter Username: Provide your SMTP username
- Enter Password: Provide your SMTP password
- Save Changes: Click the save button to apply configuration
That's it! KloudBean handles all the complex configuration automatically.
Testing SMTP Configuration
Step 4: Test Your SMTP
If your SMTP credentials are correct, you should be able to send an email. Here you have an option to test your SMTP.
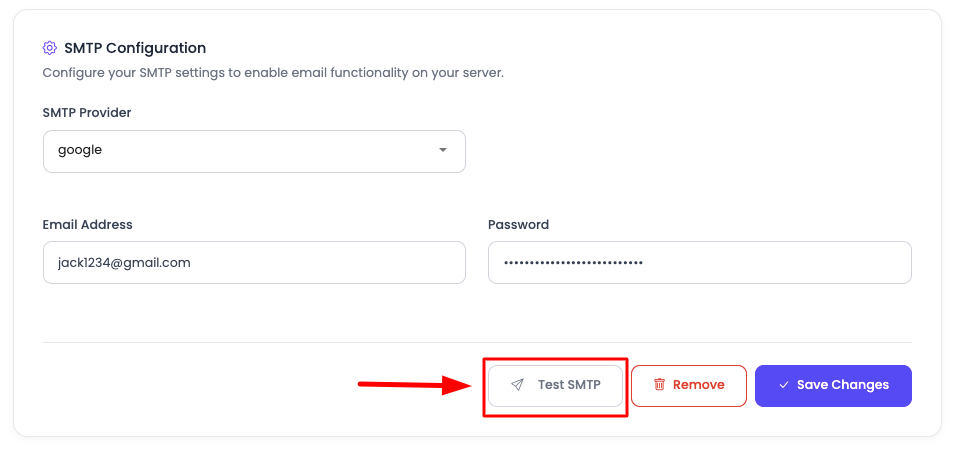
- Click "Test SMTP": Click on the "Test SMTP" button
- Confirm Email Addresses: This will open a prompt to confirm sender and receiver email addresses
- Fill Email Addresses: Enter the sender and receiver email addresses
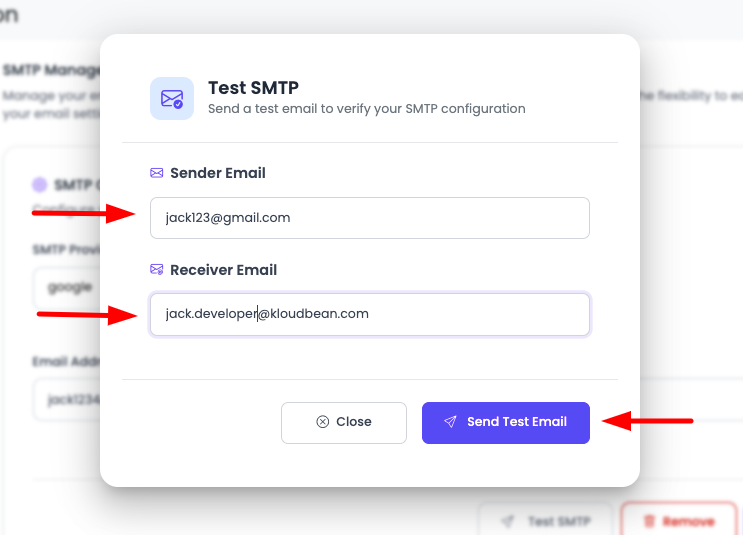
- Click "Send Test Email": Click the "Send Test Email" button
Verifying Test Email
If your credentials are correct, the email should be sent successfully to the receiver email address. Check your mailbox to confirm the test email was received.
What to Check:
- Inbox: Check the receiver's inbox (and spam folder)
- Sender Address: Verify the sender email address
- Email Content: Confirm the test email content
- Delivery Time: Note how quickly the email was delivered
Understanding Server-Level SMTP vs Application-Level Libraries
When Do You Need Server-Level SMTP?
Mostly there is confusion about this. But you only add server-level SMTP when your application code is dependent on server SMTP to send email.
There are 2 options for sending application emails:
- Using Server-Level SMTP (typically Postfix)
- Using Application-Level Libraries (PHP libraries, Python libraries, Node.js libraries)
Option 1: Server-Level SMTP (Postfix)
When to Use:
- Your application uses the server's mail function (like PHP's
mail()function) - You want to use system-level mail commands
- Your application relies on the server's mail service
- You need to send emails from command-line scripts
How It Works:
- SMTP is configured at the server level (Postfix)
- Applications use the server's mail service
- No SMTP credentials needed in application code
- Emails are sent through the configured SMTP provider
Example Use Cases:
- PHP applications using
mail()function - System cron jobs sending emails
- Command-line scripts sending notifications
- Applications that don't have SMTP libraries
Option 2: Application-Level Libraries
When to Use:
- Your application has built-in SMTP support
- You want direct control over email sending
- You're using frameworks with email libraries
- You need advanced email features (templates, attachments, etc.)
How It Works:
- SMTP credentials are configured in application code
- Application connects directly to SMTP provider
- No server-level SMTP configuration needed
- More control and flexibility
Example Use Cases:
- Laravel applications using Mail facade
- Node.js applications using Nodemailer
- Python applications using SMTP libraries
- Applications with advanced email requirements
Important Clarification
If your application does not use server-level SMTP, then you don't have to add this configuration and connect SMTP on server for sending email.
You can skip the server-level SMTP configuration entirely if:
- Your application uses its own SMTP libraries
- You configure SMTP directly in your application code
- Your framework handles email sending independently
Code Examples: Server-Level SMTP vs Application Libraries
PHP Examples
Using Server-Level SMTP (PHP mail() function)
When you configure SMTP at the server level, PHP applications can use the simple mail() function:
<?php
// Using server-level SMTP (Postfix)
// No SMTP configuration needed in code
// Server handles SMTP connection

$to = "[email protected]";
$subject = "Test Email";
$message = "This email is sent using server-level SMTP";
$headers = "From: [email protected]\r\n";
$headers .= "Reply-To: [email protected]\r\n";
$headers .= "Content-Type: text/html; charset=UTF-8\r\n";

// This uses the server's configured SMTP
if (mail($to, $subject, $message, $headers)) {
    echo "Email sent successfully using server SMTP";
} else {
    echo "Email sending failed";
}
?>
Benefits:
- Simple code, no SMTP library needed
- Uses server's preconfigured SMTP
- No credentials in application code
- Works with any PHP application
Using Application-Level SMTP (PHPMailer)
When using application-level libraries, you configure SMTP directly in your code:
<?php
// Using application-level SMTP library (PHPMailer)
// SMTP credentials configured in application code
// Direct connection to SMTP provider

require 'vendor/autoload.php';

use PHPMailer\PHPMailer\PHPMailer;
use PHPMailer\PHPMailer\Exception;

$mail = new PHPMailer(true);

try {
    // SMTP Configuration in application code
    $mail->isSMTP();
    $mail->Host = 'smtp.gmail.com';
    $mail->SMTPAuth = true;
    $mail->Username = '[email protected]';
    $mail->Password = 'your-app-password';
    $mail->SMTPSecure = PHPMailer::ENCRYPTION_STARTTLS;
    $mail->Port = 587;

    // Email content
    $mail->setFrom('[email protected]', 'Your Name');
    $mail->addAddress('[email protected]', 'Recipient Name');
    $mail->Subject = 'Test Email';
    $mail->Body = 'This email is sent using application-level SMTP library';
    $mail->isHTML(true);

    $mail->send();
    echo "Email sent successfully using PHPMailer";
} catch (Exception $e) {
    echo "Email sending failed: {$mail->ErrorInfo}";
}
?>
Benefits:
- More control over email sending
- Advanced features (attachments, HTML, etc.)
- Can use different SMTP providers per application
- Better error handling
Python Examples
Using Server-Level SMTP (subprocess with mail command)
#!/usr/bin/env python3
# Using server-level SMTP via system mail command
# Server handles SMTP connection

import subprocess

def send_email_server_level(to, subject, message):
    """
    Send email using server's mail service (Postfix)
    Server SMTP must be configured
    """
    try:
        # Use system mail command
        process = subprocess.Popen(
            ['mail', '-s', subject, to],
            stdin=subprocess.PIPE,
            stdout=subprocess.PIPE,
            stderr=subprocess.PIPE
        )
        process.communicate(input=message.encode())

        if process.returncode == 0:
            print("Email sent successfully using server SMTP")
            return True
        else:
            print("Email sending failed")
            return False
    except Exception as e:
        print(f"Error: {e}")
        return False

# Usage
send_email_server_level(
    "[email protected]",
    "Test Email",
    "This email is sent using server-level SMTP"
)
Using Application-Level SMTP (smtplib)
#!/usr/bin/env python3
# Using application-level SMTP library
# SMTP credentials configured in application code

import smtplib
from email.mime.text import MIMEText
from email.mime.multipart import MIMEMultipart

def send_email_app_level(smtp_host, smtp_port, username, password,
                         from_email, to_email, subject, body):
    """
    Send email using application-level SMTP library
    Direct connection to SMTP provider
    """
    try:
        # Create message
        msg = MIMEMultipart()
        msg['From'] = from_email
        msg['To'] = to_email
        msg['Subject'] = subject
        msg.attach(MIMEText(body, 'html'))

        # Connect to SMTP server
        server = smtplib.SMTP(smtp_host, smtp_port)
        server.starttls()  # Enable encryption
        server.login(username, password)

        # Send email
        text = msg.as_string()
        server.sendmail(from_email, to_email, text)
        server.quit()

        print("Email sent successfully using application SMTP")
        return True
    except Exception as e:
        print(f"Error sending email: {e}")
        return False

# Usage - SMTP credentials in code
send_email_app_level(
    smtp_host='smtp.gmail.com',
    smtp_port=587,
    username='[email protected]',
    password='your-app-password',
    from_email='[email protected]',
    to_email='[email protected]',
    subject='Test Email',
    body='<h1>This email is sent using application-level SMTP</h1>'
)
Using Python with SendGrid (Application-Level):
#!/usr/bin/env python3
# Using SendGrid API (Application-Level)
# No server SMTP configuration needed

import sendgrid
from sendgrid.helpers.mail import Mail

def send_email_sendgrid(api_key, from_email, to_email, subject, content):
    """
    Send email using SendGrid API
    Application-level, no server SMTP needed
    """
    try:
        sg = sendgrid.SendGridAPIClient(api_key=api_key)

        message = Mail(
            from_email=from_email,
            to_emails=to_email,
            subject=subject,
            html_content=content
        )

        response = sg.send(message)
        print(f"Email sent successfully. Status: {response.status_code}")
        return True
    except Exception as e:
        print(f"Error sending email: {e}")
        return False

# Usage
send_email_sendgrid(
    api_key='your-sendgrid-api-key',
    from_email='[email protected]',
    to_email='[email protected]',
    subject='Test Email',
    content='<h1>This email uses SendGrid API</h1>'
)
Node.js Examples
Using Server-Level SMTP (child_process with mail command)
// Using server-level SMTP via system mail command
// Server handles SMTP connection

const { exec } = require('child_process');

function sendEmailServerLevel(to, subject, message) {
    /**
     * Send email using server's mail service (Postfix)
     * Server SMTP must be configured
     */
    const command = `echo "${message}" | mail -s "${subject}" ${to}`;

    exec(command, (error, stdout, stderr) => {
        if (error) {
            console.error(`Error: ${error.message}`);
            return false;
        }
        if (stderr) {
            console.error(`Stderr: ${stderr}`);
            return false;
        }
        console.log("Email sent successfully using server SMTP");
        return true;
    });
}

// Usage
sendEmailServerLevel(
    "[email protected]",
    "Test Email",
    "This email is sent using server-level SMTP"
);
Using Application-Level SMTP (Nodemailer)
// Using application-level SMTP library (Nodemailer)
// SMTP credentials configured in application code

const nodemailer = require('nodemailer');

async function sendEmailAppLevel(smtpConfig, emailData) {
    /**
     * Send email using application-level SMTP library
     * Direct connection to SMTP provider
     */
    try {
        // Create transporter with SMTP configuration
        const transporter = nodemailer.createTransport({
            host: smtpConfig.host,           // e.g., 'smtp.gmail.com'
            port: smtpConfig.port,            // e.g., 587
            secure: smtpConfig.secure,         // true for 465, false for other ports
            auth: {
                user: smtpConfig.username,   // SMTP username
                pass: smtpConfig.password     // SMTP password
            }
        });

        // Send email
        const info = await transporter.sendMail({
            from: emailData.from,             // Sender address
            to: emailData.to,                 // Recipient address
            subject: emailData.subject,       // Subject line
            html: emailData.html,            // HTML body
            text: emailData.text             // Plain text body
        });

        console.log("Email sent successfully:", info.messageId);
        return true;
    } catch (error) {
        console.error("Error sending email:", error);
        return false;
    }
}

// Usage - SMTP credentials in code
sendEmailAppLevel(
    {
        host: 'smtp.gmail.com',
        port: 587,
        secure: false,
        username: '[email protected]',
        password: 'your-app-password'
    },
    {
        from: '[email protected]',
        to: '[email protected]',
        subject: 'Test Email',
        html: '<h1>This email is sent using Nodemailer</h1>',
        text: 'This email is sent using Nodemailer'
    }
);
Using Node.js with SendGrid (Application-Level):
// Using SendGrid API (Application-Level)
// No server SMTP configuration needed

const sgMail = require('@sendgrid/mail');

async function sendEmailSendGrid(apiKey, emailData) {
    /**
     * Send email using SendGrid API
     * Application-level, no server SMTP needed
     */
    try {
        sgMail.setApiKey(apiKey);

        const msg = {
            to: emailData.to,
            from: emailData.from,
            subject: emailData.subject,
            html: emailData.html,
            text: emailData.text
        };

        await sgMail.send(msg);
        console.log("Email sent successfully using SendGrid");
        return true;
    } catch (error) {
        console.error("Error sending email:", error);
        return false;
    }
}

// Usage
sendEmailSendGrid(
    'your-sendgrid-api-key',
    {
        from: '[email protected]',
        to: '[email protected]',
        subject: 'Test Email',
        html: '<h1>This email uses SendGrid API</h1>',
        text: 'This email uses SendGrid API'
    }
);
Choosing the Right Approach
Use Server-Level SMTP When:
- ✅ Your application uses simple mail functions (
mail()in PHP, system mail commands) - ✅ You want centralized email configuration
- ✅ You have multiple applications on the same server using server mail
- ✅ You prefer simpler application code without SMTP libraries
- ✅ You're using cron jobs or system scripts to send emails
Use Application-Level Libraries When:
- ✅ Your application framework has built-in email support (Laravel, Django, Express)
- ✅ You need advanced email features (templates, attachments, tracking)
- ✅ You want direct control over email sending
- ✅ Different applications need different SMTP providers
- ✅ You prefer keeping SMTP configuration in application code
Summary
Key Points:
- Server-Level SMTP: Configure in KloudBean dashboard → affects all applications using server mail service
- Application-Level SMTP: Configure in your application code → each application manages its own SMTP
- You Don't Need Both: Choose one approach based on your application's needs
- If your application doesn't use server-level SMTP: You don't need to configure SMTP in KloudBean dashboard
Decision Flow:
- Does your application use
mail()function or system mail commands? → Configure Server SMTP - Does your application use SMTP libraries (PHPMailer, Nodemailer, smtplib)? → Configure in Application Code
- Not sure? → Check your application code to see how it sends emails
Troubleshooting
Emails Not Sending (Server-Level SMTP)
- Verify Credentials: Check SMTP username and password are correct
- Test SMTP: Use the "Test SMTP" function in KloudBean dashboard
- Check Logs: Review server mail logs for errors
- Firewall: Ensure SMTP ports (587, 465) are not blocked
Emails Not Sending (Application-Level)
- Verify SMTP Settings: Check SMTP host, port, and credentials in code
- Test Connection: Test SMTP connection from application
- Check Application Logs: Review application error logs
- Provider Limits: Check if SMTP provider has rate limits
Authentication Failures
- Credentials: Verify username and password are correct
- App Passwords: For Gmail, use app-specific passwords
- Special Characters: Check for special characters in passwords
- Account Status: Verify SMTP account is active and not locked
Next Steps
After configuring server SMTP:
- Learn about Enabling BitNinja Security to protect your server
- Explore Managing Server Backups to protect your server data
- Review Monitoring Server Health to track server performance