Server SSH Access Control
Learn how to manage SSH access control for your KloudBean server by configuring IP whitelisting and managing brute force prevention. This guide covers access control options, IP whitelisting, and protecting your server from brute force attacks.
Overview
KloudBean provides an easy way to control your server SSH access. Note that by default, SSH access is allowed from anywhere, but you can disable public access and select the option to whitelist only required IP addresses. This security feature ensures that only authorized IP addresses can connect to your server via SSH, providing an additional layer of protection against unauthorized access attempts.
Why SSH Access Control is Important
SSH access control provides several security benefits:
- Enhanced Security: Restricts SSH access to trusted IP addresses only
- Prevent Unauthorized Access: Blocks connection attempts from unknown or untrusted IP addresses
- Reduce Attack Surface: Limits the number of potential entry points for attackers
- Brute Force Protection: Automatically blocks IPs attempting brute force attacks
- Compliance: Helps meet security compliance requirements
- Access Control: Gives you granular control over who can access your server
- Audit Trail: Makes it easier to track and monitor server access
Prerequisites
Before configuring SSH access control, ensure you have:
- An Active KloudBean Server: Your server must be created and running
- Access to Server Dashboard: You need to be logged in to your KloudBean account
- Know Your IP Address: You need to know the IP address(es) you want to whitelist
- Appropriate Permissions: You need permissions to modify server firewall settings
Accessing SSH Access Control Settings
Step 1: Navigate to SSH/SFTP Access Rules
In order to manage SSH access:
- Navigate to Server Administration: Log in to your KloudBean dashboard and open the server administration page for your desired server.
- Go to Firewall Rules: Navigate to "Firewall Rules" in the server settings menu.
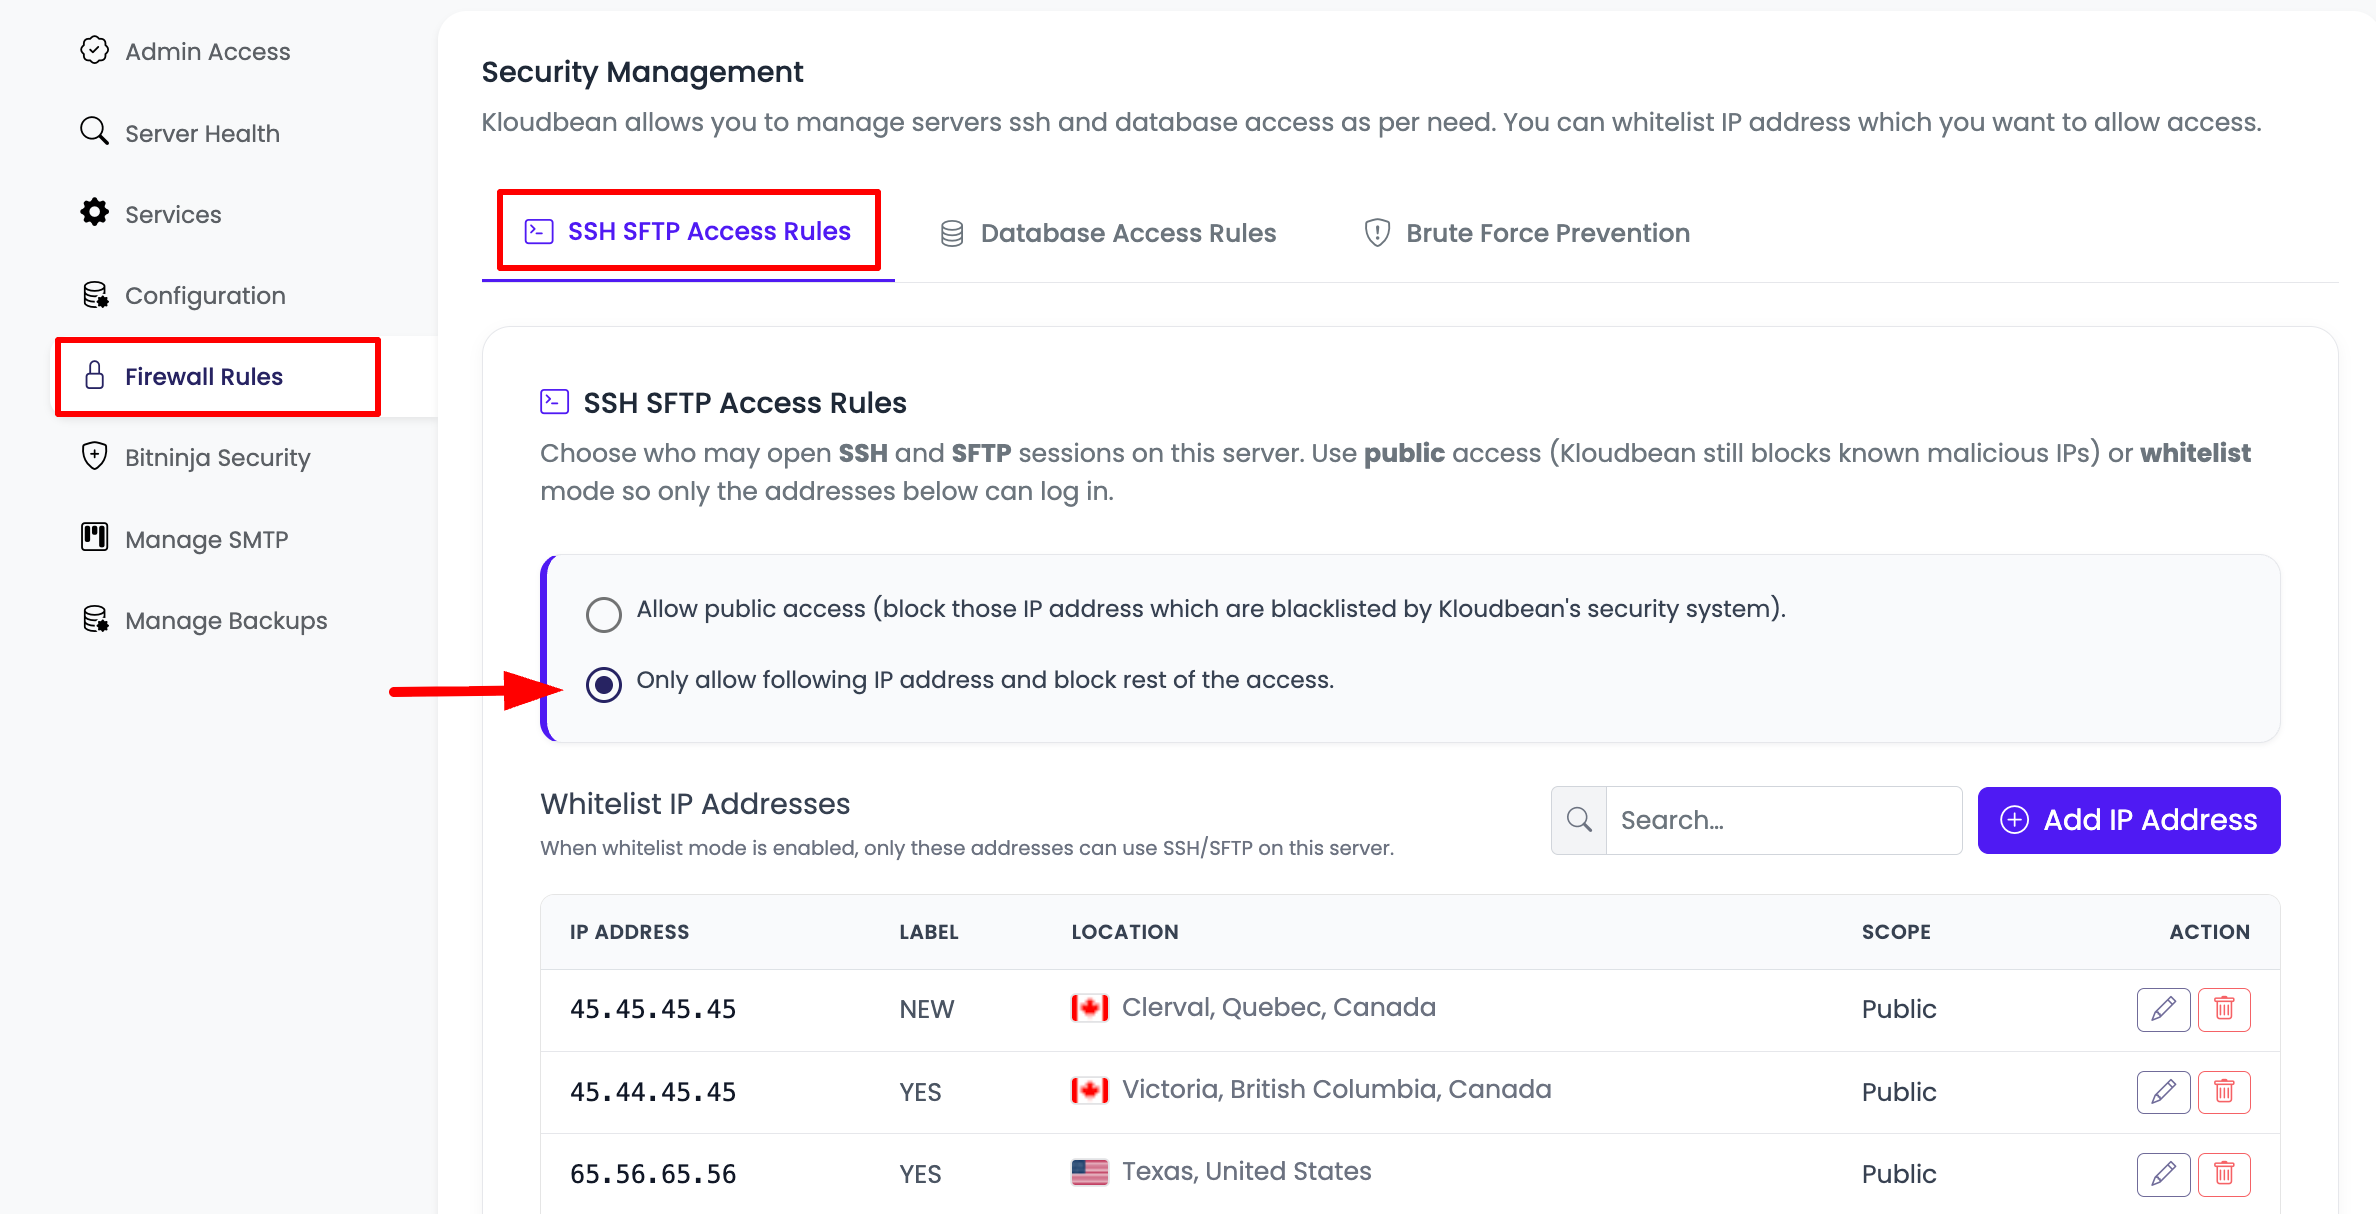
- Open SSH/SFTP Access Rules: Click on "SSH SFTP Access Rules" section within the Firewall Rules.
Configuring SSH Access Control
Access Control Options
Here you will see two options for controlling SSH access:
Option 1: Allow Public Access (Default)
"Allow public access (block those IP addresses which are blacklisted by KloudBean's security system)"
- Default State: This is by default selected
- What It Means: Your server is accessible from anywhere, except suspicious IPs or brute force IPs
- Automatic Protection: KloudBean's security system automatically blocks known malicious IPs
- Use Case: Suitable when you need access from multiple locations or dynamic IPs
- Security: Provides basic protection through KloudBean's automated blacklist system
How It Works:
- All IP addresses can attempt to connect
- KloudBean's security system monitors connection attempts
- Suspicious IPs and brute force IPs are automatically blacklisted
- Legitimate connections from non-blacklisted IPs are allowed
Option 2: Only Allow Whitelisted IPs
"Only allow following IP addresses and block rest of the access"
- What It Does: This option blocks all access except the IPs you whitelist
- Maximum Security: Provides the highest level of access control
- Use Case: Best for production servers or when you have a fixed set of IPs that need access
- Manual Management: You must explicitly add each IP address that needs access
How It Works:
- Only whitelisted IP addresses can connect
- All other IP addresses are automatically blocked
- You have full control over which IPs can access your server
- Provides maximum security by default-deny approach
Step 2: Configure Access Control

-
Select Access Option: Choose between:
- Allow Public Access: For open access with automatic blacklisting
- Only Allow Whitelisted IPs: For restricted access with IP whitelisting
-
Add IP Addresses (if using whitelist option):
- Enter IP Address: Add the IP addresses you want to whitelist
- Click "Add" Button: Click on the "Add" button to add the IP to the list
-
Review IP List: Once you click on the add button, the IP will be added to the list
-
Save Changes: In order to save it, click the "Save Changes" button. This will whitelist the IP in the firewall.
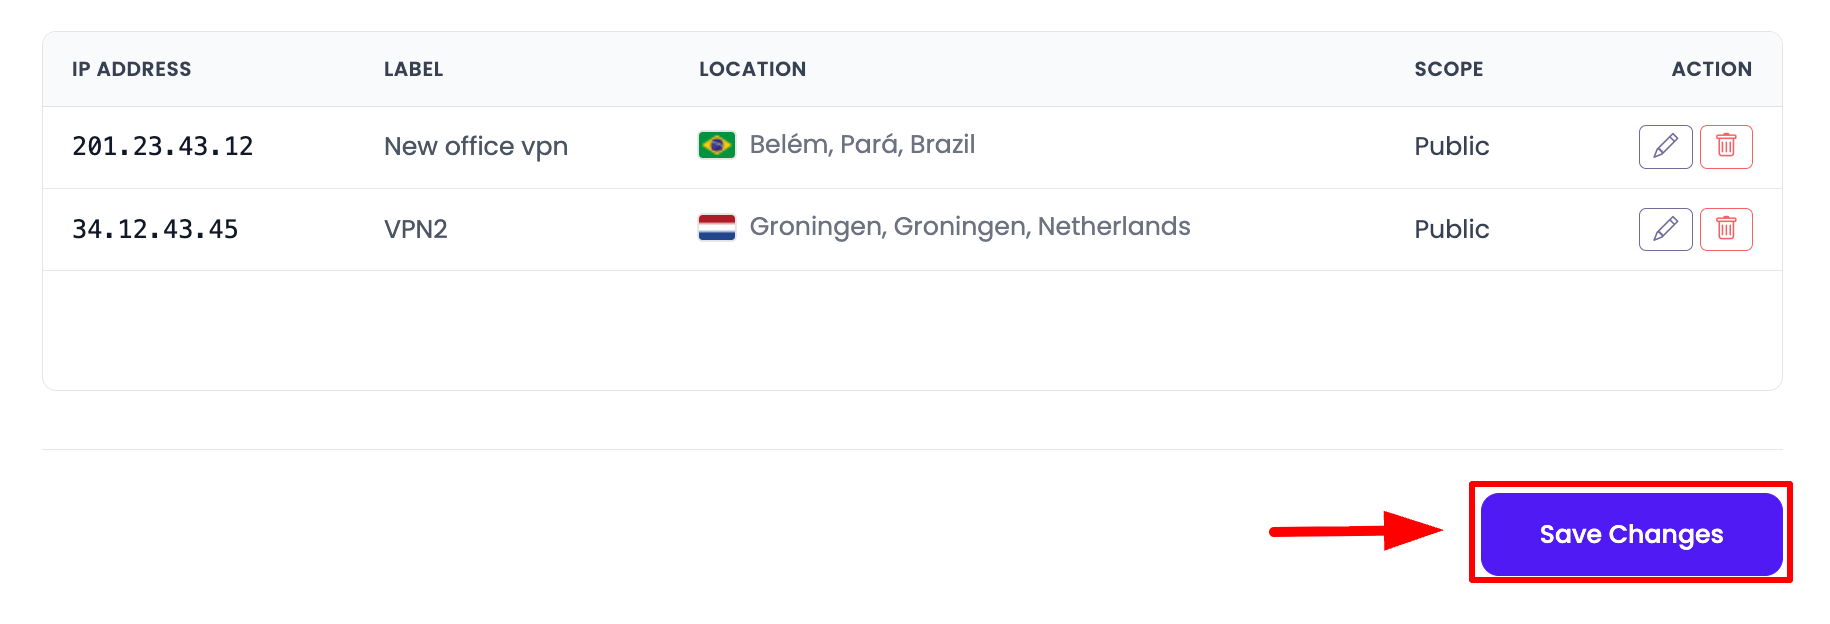
After this, you should be able to access the server from this particular IP only (if you selected the whitelist option).
Brute Force Prevention
Overview
KloudBean has a system which detects brute force access attempts and automatically blocks IP addresses. This is an automated KloudBean system which detects suspicious and failed attempts of brute force attacks.
How Brute Force Prevention Works
- Automatic Detection: KloudBean's security system automatically detects brute force attempts
- Automatic Blocking: If a password fails 3 times, the IP address is automatically blocked
- Block Duration: The IP is blocked for the next 24 hours
- Automatic Unblocking: After 24 hours, the IP is automatically unblocked
- Manual Management: You can also explicitly block or unblock IP addresses if required
Accessing Brute Force Prevention Settings
To manage brute force prevention:
- Navigate to Firewall Rules: From server administration, go to "Firewall Rules"
- Open Brute Force Prevention Tab: Go to the tab "Brute Force Prevention"
Viewing Blocked IPs
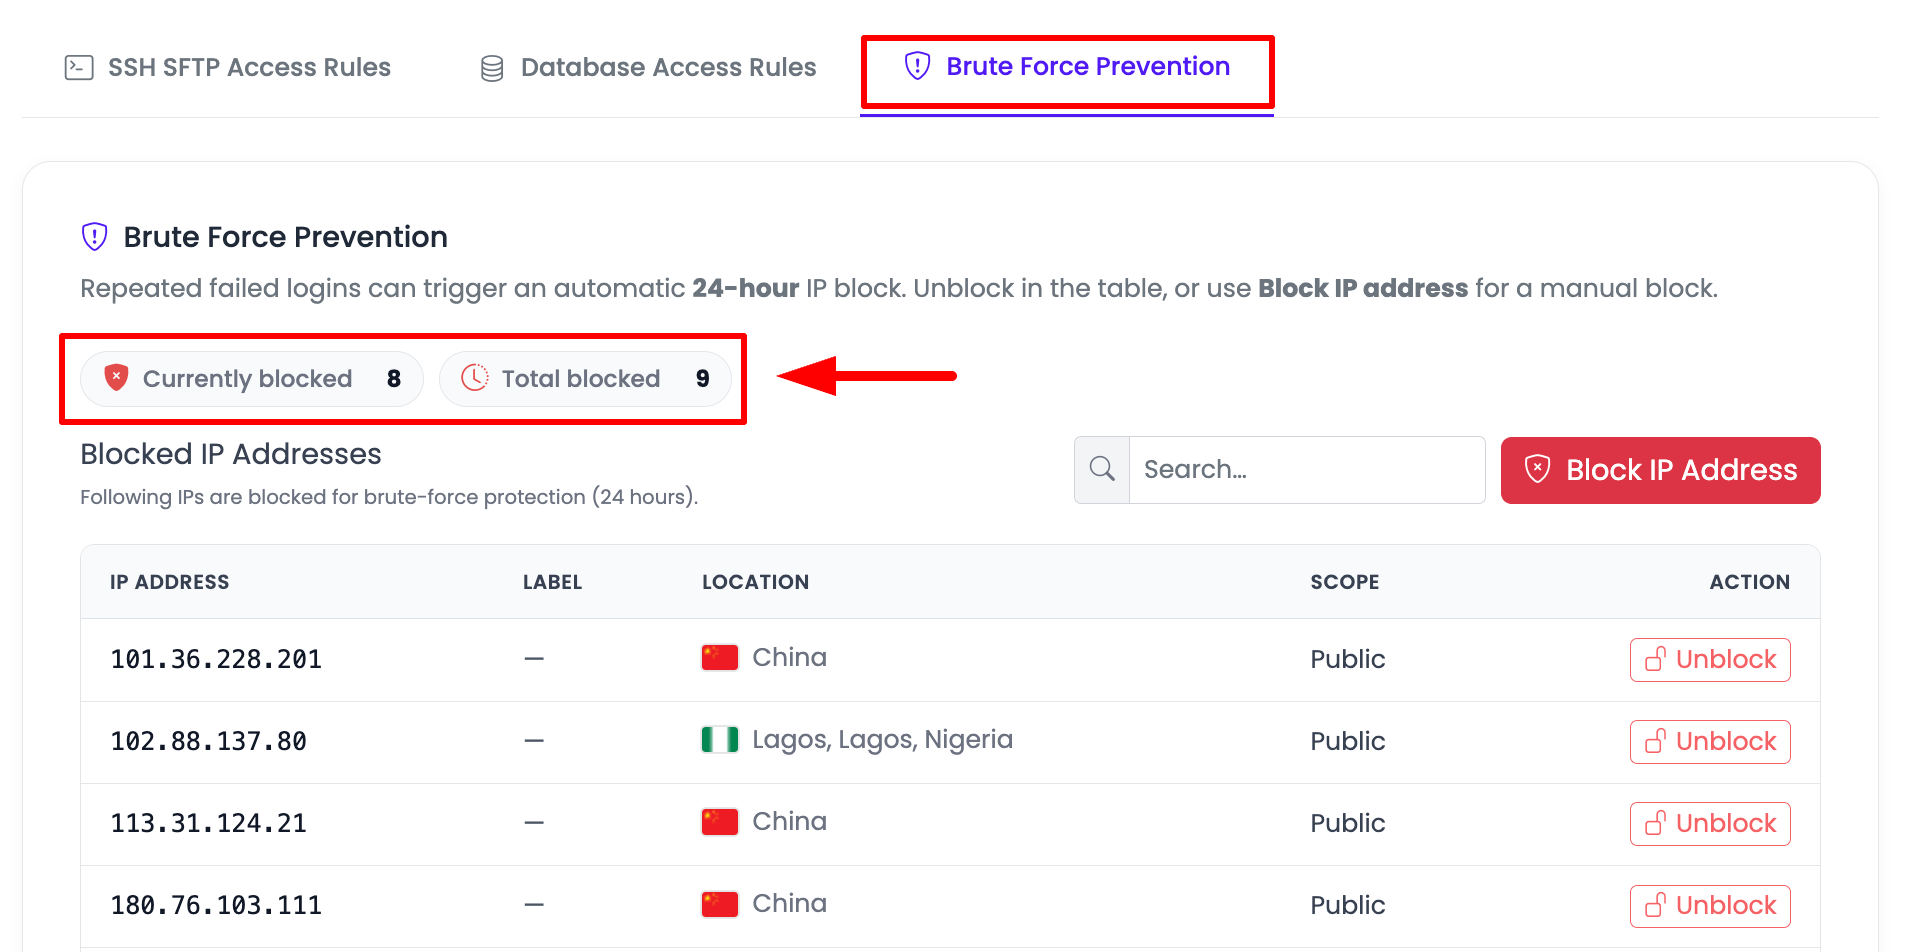
The Brute Force Prevention section will show you:
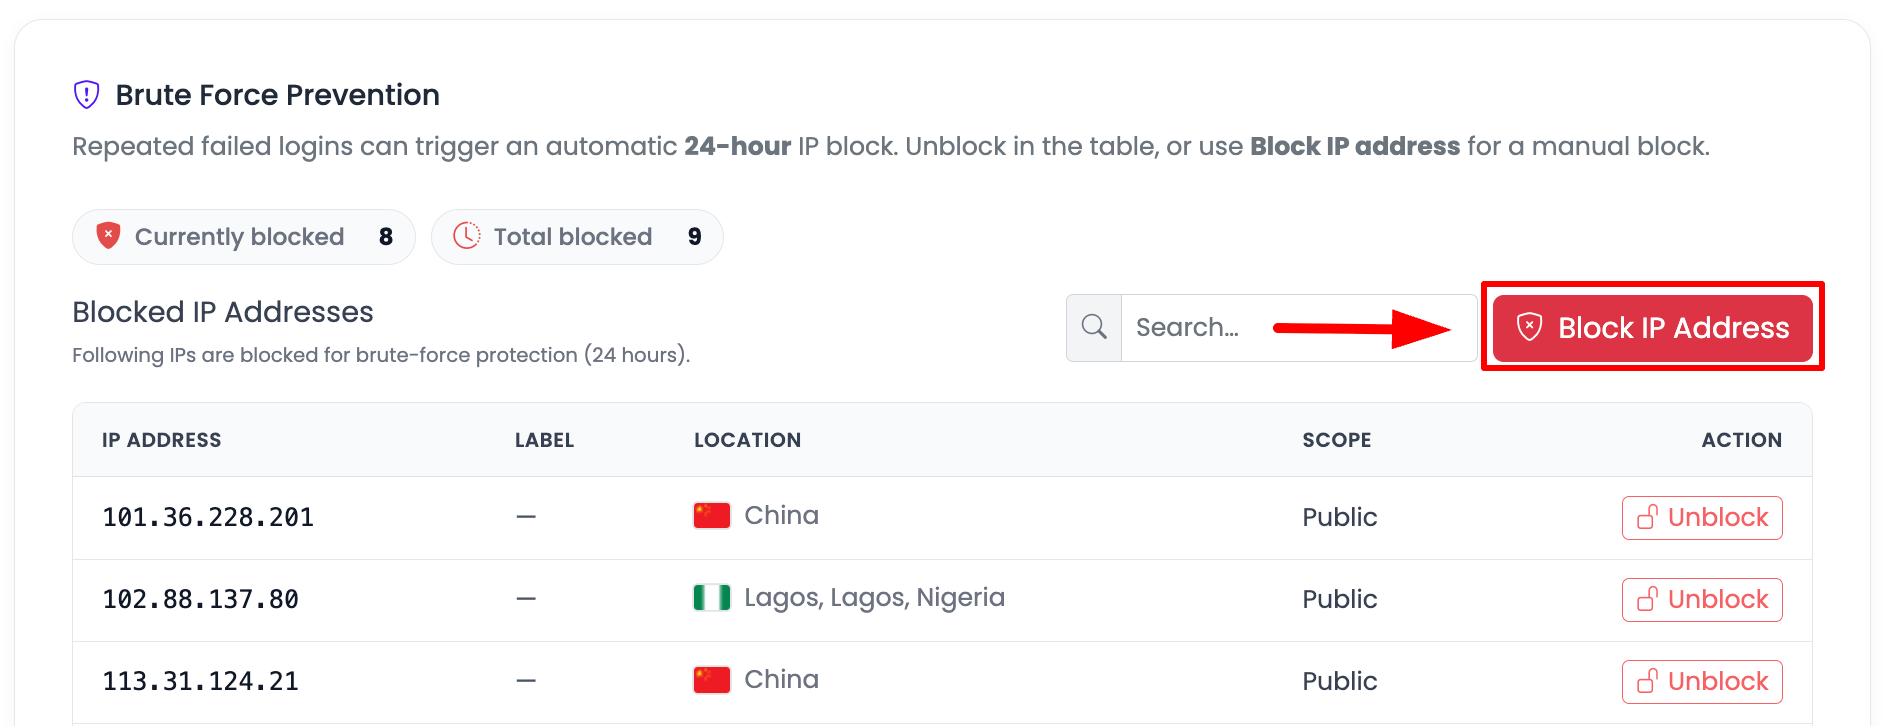
- Current Blocked: Currently blocked IP addresses (active blocks)
- Total Blocked: Total blocked IPs in the last 24 hours (excluding the ones which are now unlocked after 24 hours)
Explicitly Blocking IP Addresses
You can explicitly block any IP address if required:
- Navigate to Block Section: On the Brute Force Prevention section, find the option to block IPs
- Enter IP Address: Paste the IP address in the "Add IP Address to Block" field
- Click "Add" Button: Click the "Add" button
- Confirm Action: A prompt will appear for confirmation - confirm it
- IP Blocked: The IP will be blocked and added to the blocked list
Use Cases for Manual Blocking:
- Block known malicious IPs
- Block IPs that have been attempting unauthorized access
- Temporarily block IPs for security reasons
- Block IPs from specific regions if not needed
Unblocking IP Addresses
If you have not whitelisted your IP explicitly and made wrong attempts, then you will have been blocked. In order to unblock your IP, you can see the blocked IP address list, find your IP, and unblock it.
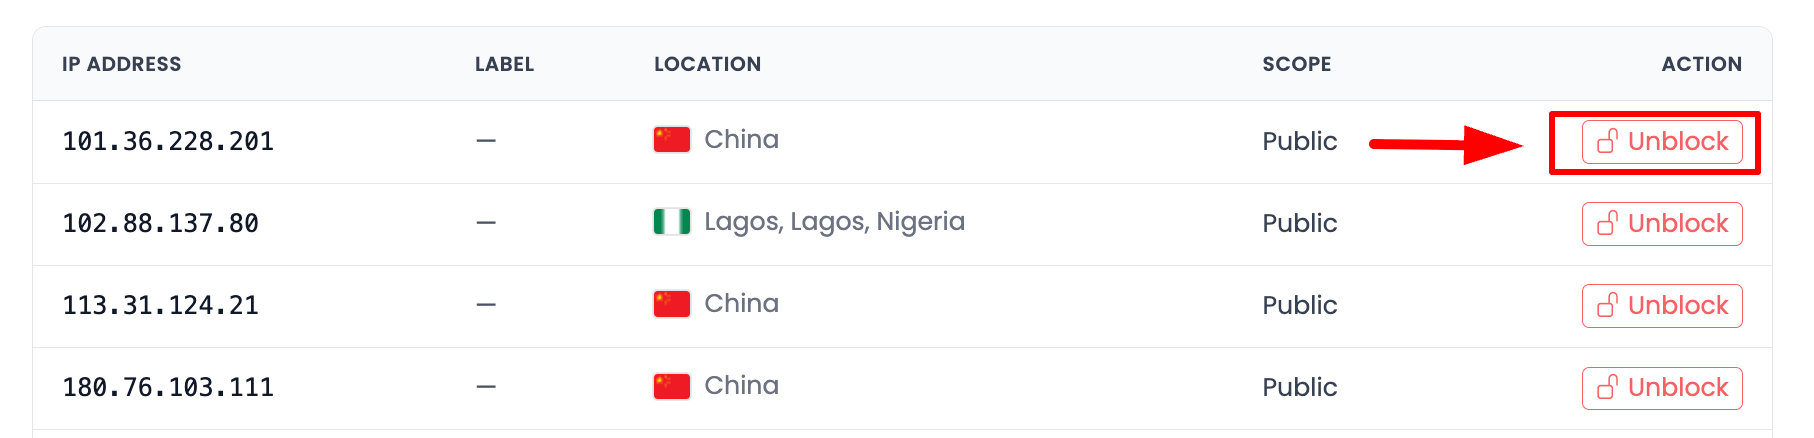
How to Unblock an IP Address
This is how you can unblock a required IP address:
- View Blocked IP List: From the IP list, find the IP address you want to unblock
- Click Cross Icon: Click on the cross icon (×) to remove the IP from the blocked list
- Confirm Action: Upon prompt, confirm this action
- IP Unblocked: This will unblock that particular IP address
Important Notes:
- Immediate Effect: Unblocking takes effect immediately
- Reconnection: You can reconnect from that IP after unblocking
- Prevent Future Blocks: Consider whitelisting your IP to prevent future automatic blocks
- Wrong Attempts: Be careful with password attempts to avoid automatic blocking
Understanding Access Control Modes
Public Access Mode (Default)
When to Use:
- Development environments
- When you need access from multiple locations
- When you have dynamic IP addresses
- When convenience is prioritized over strict security
Benefits:
- Easy access from anywhere
- Automatic protection against known malicious IPs
- No manual IP management required
- Suitable for teams with changing IPs
Considerations:
- Less secure than whitelist mode
- Relies on KloudBean's automated blacklist
- May still allow some unauthorized access attempts
Whitelist Mode (Restricted)
When to Use:
- Production servers
- When you have fixed IP addresses
- Maximum security requirements
- Compliance requirements
Benefits:
- Maximum security - only whitelisted IPs can access
- Full control over access
- Prevents all unauthorized access attempts
- Best for sensitive environments
Considerations:
- Requires manual IP management
- Must update whitelist when IPs change
- Can lock you out if you forget to whitelist your IP
- Less convenient for dynamic IPs
Best Practices
Access Control Best Practices
- Production Servers: Use whitelist mode for production servers
- Development Servers: Public access mode is acceptable for development
- Regular Review: Periodically review whitelisted IPs and remove unused ones
- Document IPs: Keep track of which IP belongs to whom and why
- Backup Access: Always have at least one alternative way to access your server
- Test Before Locking: Test your IP whitelist before enabling restricted mode
Brute Force Prevention Best Practices
- Whitelist Your IP: Whitelist your IP to prevent accidental blocking
- Use SSH Keys: Use SSH key authentication instead of passwords to avoid brute force issues
- Strong Passwords: If using passwords, use strong, unique passwords
- Monitor Blocked IPs: Regularly review blocked IPs to identify attack patterns
- Manual Blocks: Manually block IPs that show persistent malicious behavior
- Unblock Carefully: Only unblock IPs you trust
IP Management
- Label Clearly: Use descriptive labels for each IP address
- Update Regularly: Update IPs when they change (especially for dynamic IPs)
- Remove Unused IPs: Remove IP addresses when access is no longer needed
- VPN Consideration: Consider using a VPN with a static IP for consistent access
- Multiple IPs: Keep track of all IPs that need access
Troubleshooting
Cannot Connect After Enabling Whitelist
- IP Not Whitelisted: Verify your IP is in the whitelist
- Correct IP: Ensure you're using your public IP, not private IP
- Save Changes: Make sure you clicked "Save Changes" after adding IPs
- Wait for Update: Allow a few minutes for firewall rules to update
- Test IP: Verify your current IP using online tools
IP Blocked by Brute Force Prevention
- Check Blocked List: View the blocked IP list in Brute Force Prevention
- Unblock Your IP: If your IP is blocked, unblock it using the cross icon
- Whitelist Your IP: Consider whitelisting your IP to prevent future blocks
- Wait 24 Hours: If you don't manually unblock, wait 24 hours for automatic unblocking
- Use SSH Keys: Switch to SSH key authentication to avoid password-based blocks
Wrong Password Attempts
- Be Careful: Enter passwords carefully to avoid failed attempts
- Use SSH Keys: Prefer SSH key authentication over passwords
- Password Manager: Use a password manager to avoid typos
- Test Locally: Test your password locally before attempting server connection
Access Denied Errors
- IP Whitelisted: Verify your IP is in the whitelist (if using whitelist mode)
- Not Blocked: Check that your IP is not in the blocked list
- Correct IP: Ensure you're using your public IP, not private IP
- VPN/IP Changes: Check if your IP has changed (especially for dynamic IPs)
- Firewall Rules: Verify firewall rules are properly configured and saved
Security Considerations
Multi-Layer Security
SSH access control is one security layer. Also consider:
- SSH Key Authentication: Use SSH keys instead of passwords (see Connecting to Server via SSH or SFTP)
- Strong Passwords: If using password authentication, use strong, unique passwords
- Regular Updates: Keep server software updated
- Monitor Logs: Regularly review SSH access logs
- Two-Factor Authentication: Enable 2FA if available
Brute Force Protection
- Automatic System: KloudBean's automated system provides continuous protection
- 24-Hour Blocks: Automatic blocks last 24 hours, providing time-based protection
- Manual Override: You can manually block or unblock IPs as needed
- Monitoring: Regularly check blocked IPs to identify attack patterns
Next Steps
After configuring SSH access control:
- Learn about Connecting to Server via SSH or SFTP to connect to your server
- Explore Monitoring Server Health to track server performance
- Review Managing Server Backups to protect your server data