Configuring Bucket Public Access
Learn how to configure your S3 bucket for public access, allowing anyone to read objects without authentication. This is useful for hosting public assets like images, CSS files, PDFs, and other static content.
Overview
Default Bucket Access
By default, when you create a bucket, its access is private. You can only access objects with authentication. This ensures your data is secure and protected from unauthorized access.
Why Make a Bucket Public?
However, if your bucket contains public data like images, CSS files, PDFs, or other static assets that need to be accessible to users or applications, you may want to make it public. Making a bucket public allows:
- Public Asset Hosting: Serve images, videos, and media files directly to users
- Static Content Delivery: Host CSS, JavaScript, fonts, and other static assets for web applications
- Public Documentation: Share PDFs, documentation, and public resources
- CDN Distribution: Enable content delivery through CDN without authentication overhead
- Simplified Access: Eliminate the need for authentication tokens for public content
- Direct URL Access: Allow direct access to objects via URLs without API calls
Important: Only make buckets public if they contain non-sensitive, public data. Never make buckets public if they contain personal information, private documents, or sensitive data.
Configuring Public Access
Step 1: Access Public Access Settings
Navigate to the "Object Storage Administration" page → "Settings".
On this page, you will see the "Public Access Settings" section where there will be:
- Public Access: Which is disabled
- Public Domain: Which is empty
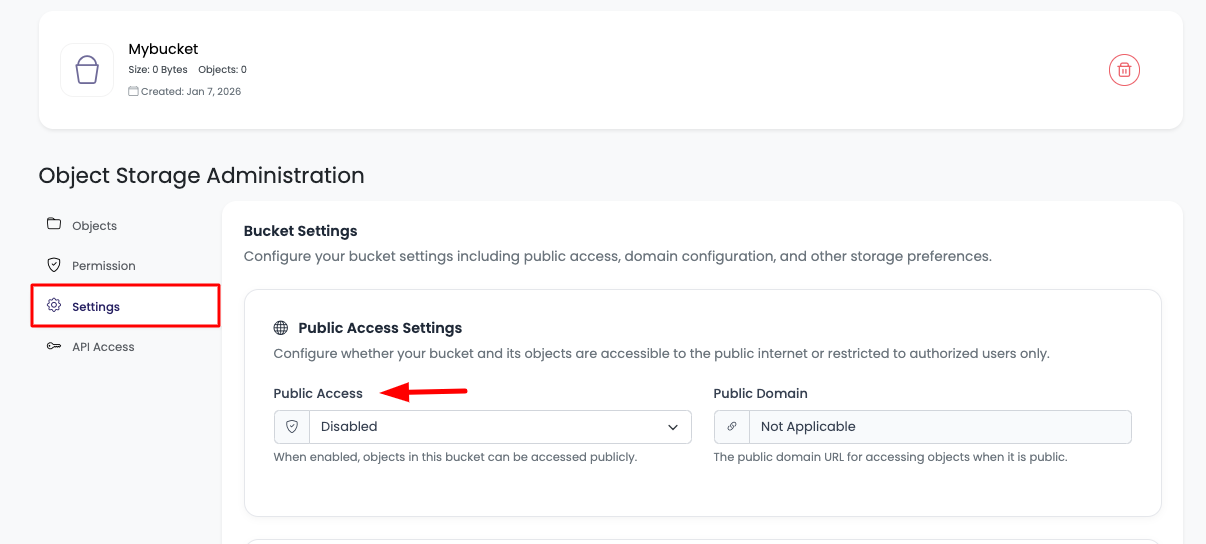
This means the bucket is private at the moment.
Step 2: Enable Public Access
If you wish to make it public, click on the dropdown and select "Enabled" from the options.
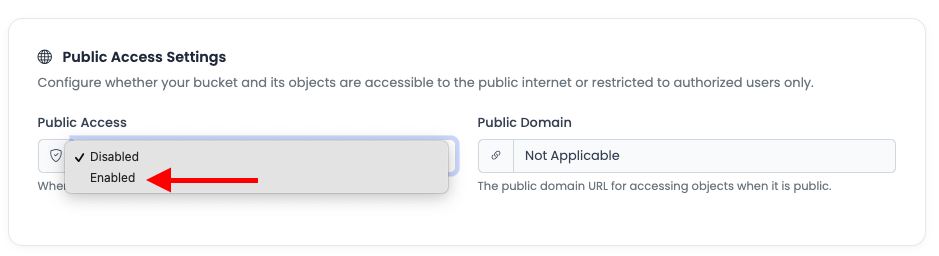
Once you select it, it will take a few seconds to make your bucket public.
Step 3: Public Access Enabled
Once it is complete, you will see it is public now, and your data will be accessible publicly without authentication.
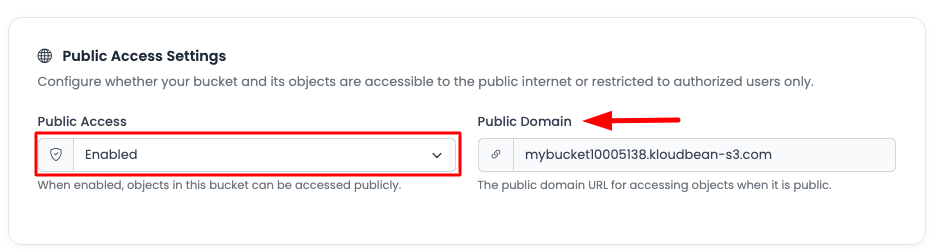
Here you will also see that Public Domain is now added. This will be your domain or base URL for the objects in the bucket.
Understanding Public Domain
Public Domain URL
Once public access is enabled, KloudBean automatically generates a public domain for your bucket. This domain serves as the base URL for accessing objects in your bucket.
Public URL Format:
https://your-public-domain.kloudbean.com/object-path
Using Public Domain
You can use the public domain to:
- Direct Object Access: Access objects directly via URLs
- Embed in Applications: Use URLs in HTML, CSS, or JavaScript
- Share Publicly: Share direct links to public objects
- CDN Integration: Use with CDN services for faster delivery
Example:
If your public domain is my-bucket.kloudbean.com and you have an object named image.jpg, you can access it at:
https://my-bucket.kloudbean.com/image.jpg
Security Considerations
Before Making Bucket Public
Warning: Making a bucket public means:
- Anyone can access objects via direct URLs if they know the URL
- Objects are discoverable if URLs are shared or indexed
- No authentication required for access
- Consider security implications carefully
Appropriate Use Cases
✅ Safe to Make Public:
- Static website assets (images, CSS, JS)
- Public media files (videos, images for public use)
- Public documentation and PDFs
- CDN-distributed content
- Public downloads and resources
❌ Never Make Public:
- Sensitive data or personal information
- Private documents or files
- Authentication-required content
- Financial or confidential data
- User-uploaded private content
- Backup files or archives
Disabling Public Access
If you need to make your bucket private again:
- Navigate to "Object Storage Administration" → "Settings"
- Go to "Public Access Settings" section
- Click on the Public Access dropdown
- Select "Disabled" from the options
- Wait a few seconds for the change to take effect
Once disabled, your bucket will return to private access, and objects will require authentication to access.
Best Practices
- Review Content: Always review bucket contents before making it public
- Use HTTPS: Ensure public domain uses HTTPS for secure access
- Monitor Usage: Monitor public access and bandwidth usage
- Organize Buckets: Use separate buckets for public and private content
- Regular Audits: Periodically review public buckets to ensure they still need to be public
- Document Purpose: Document why a bucket is public for future reference
- Use CDN: Consider using a CDN for better performance of public content
- Set Appropriate Headers: Ensure objects have correct Content-Type headers
Troubleshooting
Public Access Not Working
- Check Settings: Verify public access is enabled in settings
- Wait for Propagation: Allow a few seconds for changes to take effect
- Refresh Page: Refresh the page to see updated status
- Check Public Domain: Verify the public domain is displayed
- Test URL: Try accessing an object via the public domain URL
Cannot Access Objects Publicly
- Verify Public Access: Ensure public access is enabled
- Check Object Path: Verify the object path in the URL is correct
- Clear Cache: Clear browser cache and try again
- Check Object Exists: Verify the object exists in the bucket
- Review Permissions: Check if object-level permissions are blocking access
Public Domain Not Showing
- Wait for Activation: Public domain may take a few seconds to generate
- Refresh Page: Refresh the page to see the public domain
- Check Status: Verify public access status shows as enabled
- Contact Support: If public domain doesn't appear after several minutes, contact support
Next Steps
- Learn about Uploading Objects to your bucket
- Explore Updating Object Permissions for granular control
- Review Accessing and Downloading Objects for accessing your public content