Creating API Access Key
Learn how to create API access keys for programmatic access to your S3-compatible storage on KloudBean. These keys allow you to integrate S3 storage into your applications using standard S3 protocols.
Overview
Why You Need API Access Keys
In order to integrate S3 storage in your app, you might need API access or token-based access to object storage. KloudBean provided storage is fully S3 compatible, which means you can use the same S3 protocol to manage your objects through API.
Key Features
- S3 Compatible: Fully compatible with AWS S3 protocol and SDKs
- Multiple Keys: You have the option to create as many keys as you want
- Secure Storage: Keep keys in a secure place
- Flexible Permissions: Set read-only, write-only, or read & write permissions
- IP Restrictions: Optionally restrict access by IP addresses
Prerequisites
- An existing S3 bucket on KloudBean
- Access to bucket administration
- Understanding of API key security best practices
Important Security Considerations
Security Best Practices:
- Keep Keys Secret: Never share or commit keys to version control
- Store Securely: Keep keys in a secure place (password manager, environment variables)
- Use Least Privilege: Grant minimum necessary permissions
- Rotate Regularly: Regularly rotate API keys
- Monitor Usage: Monitor API key usage
- Revoke Unused Keys: Remove unused or compromised keys
Creating API Access Key
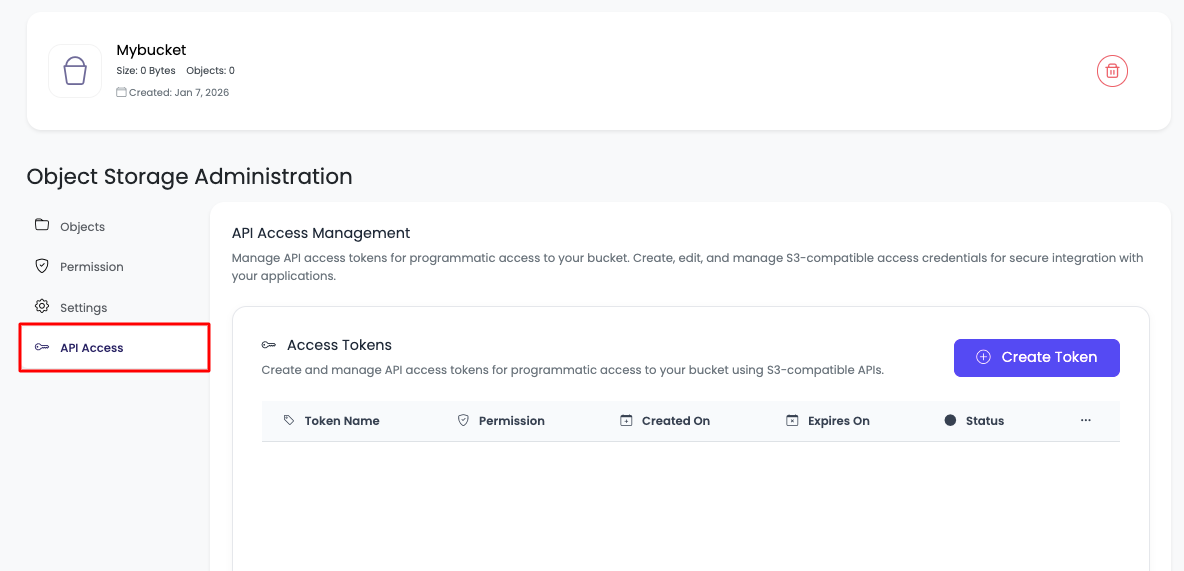
Step 1: Access API Access Tab
In order to create an API token or API key, navigate to "Object Storage Administration" → "API access" tab.
On this tab, you will see that currently there is no token added.
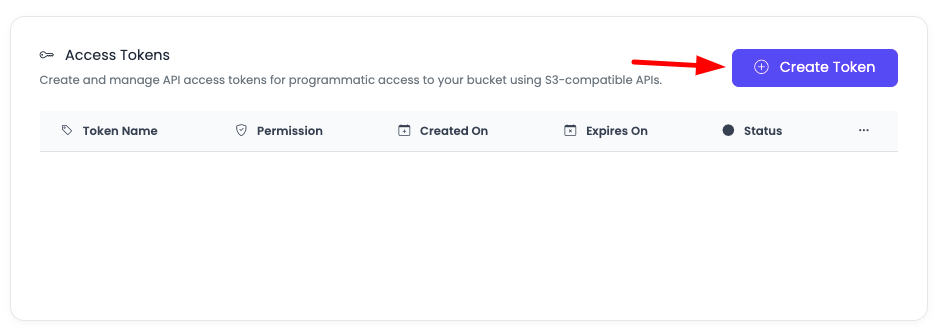
Step 2: Create New Token
Click on "Add token" to create a new token.
Step 3: Configure Token
Once you click, a prompt will open to add the fields:
- Token Name: Enter a descriptive name for your token (e.g., "production-app", "backup-script")
- Permission: Select permission level:
- Read only: Can only read/download objects
- Write only: Can only upload/modify objects
- Read & Write: Can read, upload, modify, and delete objects
- Allowed IP Addresses (optional): Restrict access to specific IP addresses
- Disallowed IP Addresses (optional): Block access from specific IP addresses
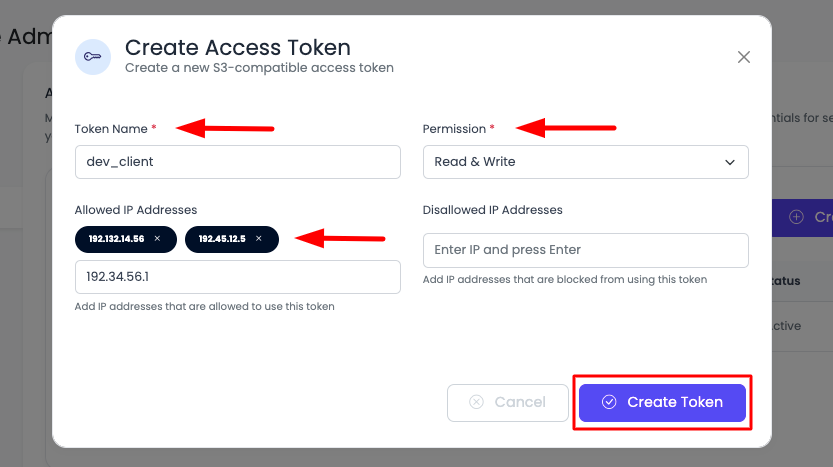
Add these details and click "Create token".
Step 4: Token Created
Once you click, your token is created and will be shown immediately on screen. Make sure to copy the details—you can copy them later as well.
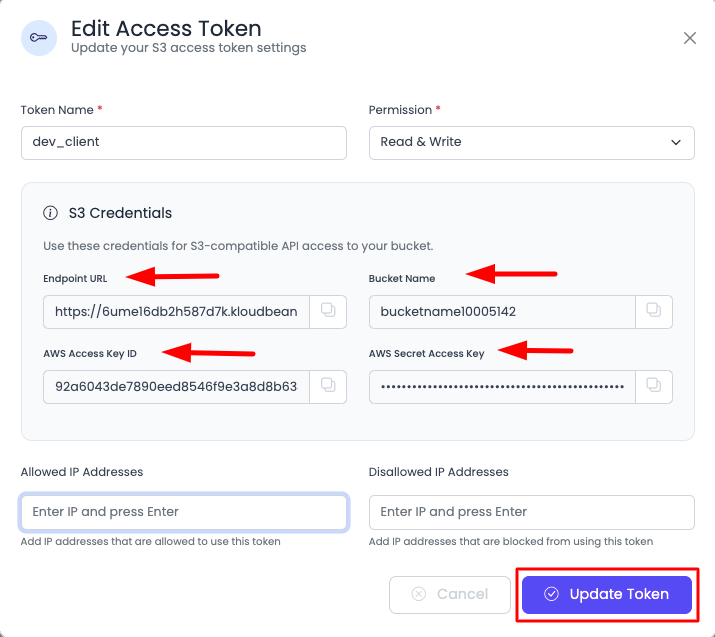
The details will contain:
S3 Credentials:
- Endpoint URL: The S3 endpoint URL for API requests
- Bucket Name: Your bucket name
- AWS Access Key ID: Your access key identifier
- AWS Secret Access Key: Your secret access key (keep this secure!)
Managing API Keys
Editing Token Settings
You can edit your token and make changes like:
- Token name
- Allowed IP Addresses
- Disallowed IP Addresses
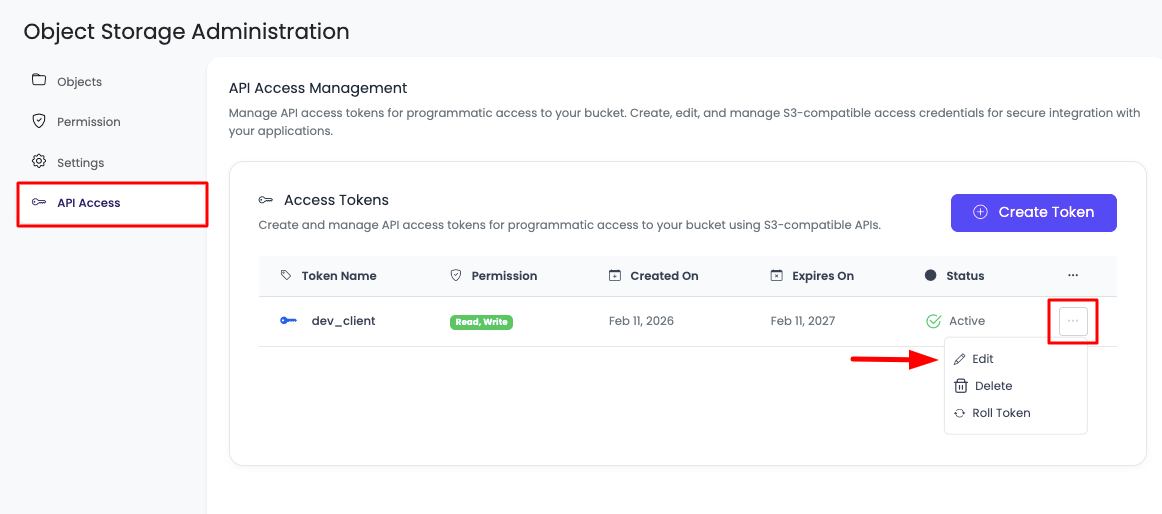
In order to edit your token (like token name, Allowed IP Addresses, Disallowed IP Addresses), click on the three-dotted menu and update and save it.
You cannot change the permission level or regenerate the Access Key ID.
If you need different permissions, create a new token.
If you want a new secret, use Roll Token to rotate the Access Key Secret.
Rolling API Token
For better security, you can rotate your API token secret. It is always a good practice to rotate tokens periodically.
To rotate your token:
- Click the three-dotted menu for the token.
- Select "Roll Token".
- Confirm the action in the confirmation dialog.
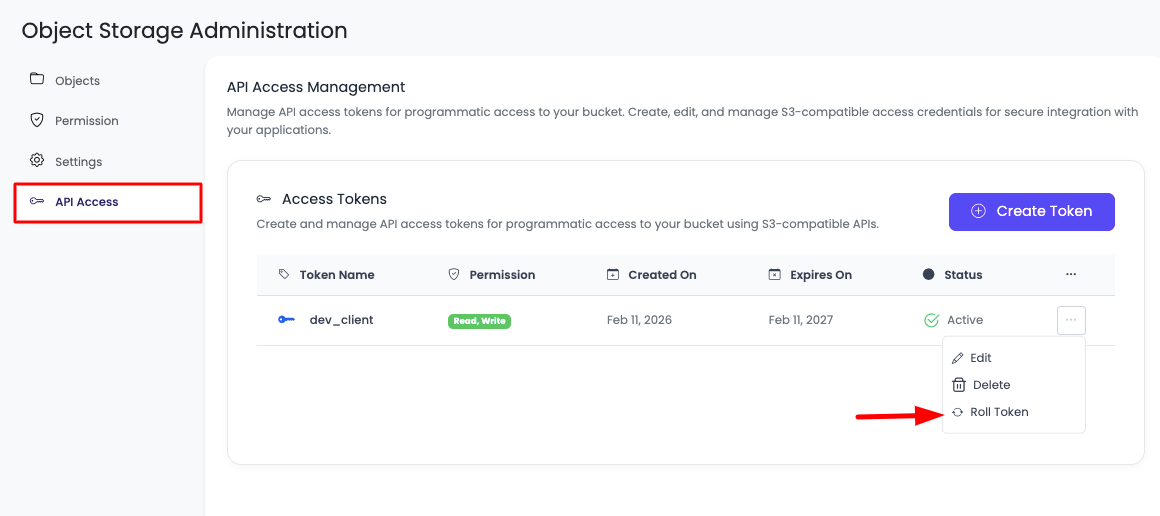
Once confirmed, your token is rotated. This means your old Access Secret will no longer work.
- Your Access Key ID remains the same.
- Only the Access Key Secret is rotated.
- After rotation, update the new secret in your application immediately.
If you continue using the old secret, your app may break due to invalid credentials.
Using Your API Keys
Understanding Your Credentials
When you create a token, you receive these credentials:
- Endpoint URL: The S3 API endpoint (e.g.,
https://s3.kloudbean.com) - Bucket Name: Your bucket name (e.g.,
my-bucket) - AWS Access Key ID: Your public access key identifier
- AWS Secret Access Key: Your private secret key (keep this secret!)
Path-Style Endpoint (Required)
KloudBean S3 supports path-style endpoint bucket usage only.
You must use path-style endpoint configuration.
Virtual-hosted-style bucket domains are not supported with KloudBean S3.
Node.js (AWS SDK v3)
import { S3Client } from "@aws-sdk/client-s3";

const s3Client = new S3Client({
  region: "auto",
  endpoint: "https://your-endpoint-url",
  credentials: {
    accessKeyId: "your-access-key-id",
    secretAccessKey: "your-secret-access-key",
  },
  forcePathStyle: true, // Required for KloudBean S3
});
Node.js (AWS SDK v2)
const AWS = require("aws-sdk");

const s3 = new AWS.S3({
  endpoint: "https://your-endpoint-url",
  accessKeyId: "your-access-key-id",
  secretAccessKey: "your-secret-access-key",
  s3ForcePathStyle: true, // Required for KloudBean S3
  signatureVersion: "v4",
});
Laravel (Flysystem / AWS S3 Driver)
// config/filesystems.php
's3' => [
    'driver' => 's3',
    'key' => env('ACCESS_KEY_ID'),
    'secret' => env('SECRET_ACCESS_KEY'),
    'region' => 'auto',
    'bucket' => env('S3_BUCKET_NAME'),
    'endpoint' => env('S3_KB_ENDPOINT'),
    'use_path_style_endpoint' => true,
],
Python (boto3)
import boto3
from botocore.config import Config

s3_client = boto3.client(
    "s3",
    endpoint_url="https://your-kb-endpoint-url",
    aws_access_key_id="your-access-key-id",
    aws_secret_access_key="your-secret-access-key",
    config=Config(s3={"addressing_style": "path"}),
)
.NET (AWS SDK for .NET)
using Amazon.S3;
using Amazon.S3.Model;

var config = new AmazonS3Config
{
    ServiceURL = "https://your-kb-endpoint-url",
    ForcePathStyle = true
};

var s3Client = new AmazonS3Client("your-access-key-id", "your-secret-access-key", config);
Quick Start Guide
Here's a simple guide on how to use these credentials in your code or test them in the shell.
Testing in Shell (AWS CLI)
Install AWS CLI
First, install AWS CLI if you haven't already:
# On macOS
brew install awscli

# On Linux
sudo apt-get install awscli

# On Windows
# Download from https://aws.amazon.com/cli/
Configure Credentials
Set your credentials as environment variables:
export AWS_ACCESS_KEY_ID="your-access-key-id"
export AWS_SECRET_ACCESS_KEY="your-secret-access-key"
export AWS_ENDPOINT_URL="your-kb-endpoint-url"
Test Connection
Test your connection by listing bucket contents:
aws s3 ls s3://your-bucket-name --endpoint-url=$AWS_ENDPOINT_URL
Upload a File
aws s3 cp local-file.txt s3://your-bucket-name/ --endpoint-url=$AWS_ENDPOINT_URL
Download a File
aws s3 cp s3://your-bucket-name/file.txt ./downloaded-file.txt --endpoint-url=$AWS_ENDPOINT_URL
Using in Python
Install boto3
First, install the boto3 library:
pip install boto3
Basic Example
import boto3

# Your credentials from KloudBean
ENDPOINT_URL = "your-kb-endpoint-url"
BUCKET_NAME = "your-kb-bucket-name"
ACCESS_KEY_ID = "your-access-key-id"
SECRET_ACCESS_KEY = "your-secret-access-key"

# Create S3 client
s3_client = boto3.client(
    's3',
    endpoint_url=ENDPOINT_URL,
    aws_access_key_id=ACCESS_KEY_ID,
    aws_secret_access_key=SECRET_ACCESS_KEY
)

# List objects in bucket
print("Listing objects in bucket:")
response = s3_client.list_objects_v2(Bucket=BUCKET_NAME)
if 'Contents' in response:
    for obj in response['Contents']:
        print(f"  - {obj['Key']}")

# Upload a file
print("\nUploading file...")
s3_client.upload_file('local-file.txt', BUCKET_NAME, 'uploaded-file.txt')
print("File uploaded successfully!")

# Download a file
print("\nDownloading file...")
s3_client.download_file(BUCKET_NAME, 'uploaded-file.txt', 'downloaded-file.txt')
print("File downloaded successfully!")
Using Environment Variables (Recommended)
For better security, use environment variables:
import os
import boto3

# Get credentials from environment variables
s3_client = boto3.client(
    's3',
    endpoint_url=os.getenv('AWS_ENDPOINT_URL'),
    aws_access_key_id=os.getenv('AWS_ACCESS_KEY_ID'),
    aws_secret_access_key=os.getenv('AWS_SECRET_ACCESS_KEY')
)

# Use the client
bucket_name = os.getenv('BUCKET_NAME')
s3_client.list_objects_v2(Bucket=bucket_name)
Using in Node.js
Install AWS SDK
First, install the AWS SDK:
npm install aws-sdk
Basic Example
const AWS = require('aws-sdk');

// Your credentials from KloudBean
const ENDPOINT_URL = "your-endpoint-url";
const BUCKET_NAME = "your-bucket-name";
const ACCESS_KEY_ID = "your-access-key-id";
const SECRET_ACCESS_KEY = "your-secret-access-key";

// Create S3 client
const s3 = new AWS.S3({
  endpoint: ENDPOINT_URL,
  accessKeyId: ACCESS_KEY_ID,
  secretAccessKey: SECRET_ACCESS_KEY
});

// List objects in bucket
console.log("Listing objects in bucket:");
s3.listObjectsV2({ Bucket: BUCKET_NAME }, (err, data) => {
  if (err) {
    console.error("Error:", err);
  } else {
    data.Contents.forEach(obj => {
      console.log(`  - ${obj.Key}`);
    });
  }
});

// Upload a file
const fs = require('fs');
const fileContent = fs.readFileSync('local-file.txt');

const uploadParams = {
  Bucket: BUCKET_NAME,
  Key: 'uploaded-file.txt',
  Body: fileContent
};

s3.upload(uploadParams, (err, data) => {
  if (err) {
    console.error("Upload error:", err);
  } else {
    console.log("File uploaded successfully!");
  }
});

// Download a file
const downloadParams = {
  Bucket: BUCKET_NAME,
  Key: 'uploaded-file.txt'
};

s3.getObject(downloadParams, (err, data) => {
  if (err) {
    console.error("Download error:", err);
  } else {
    fs.writeFileSync('downloaded-file.txt', data.Body);
    console.log("File downloaded successfully!");
  }
});
Using Environment Variables (Recommended)
For better security, use environment variables:
require('dotenv').config();
const AWS = require('aws-sdk');

// Get credentials from environment variables
const s3 = new AWS.S3({
  endpoint: process.env.AWS_ENDPOINT_URL,
  accessKeyId: process.env.AWS_ACCESS_KEY_ID,
  secretAccessKey: process.env.AWS_SECRET_ACCESS_KEY
});

// Use the client
const bucketName = process.env.BUCKET_NAME;
s3.listObjectsV2({ Bucket: bucketName }, (err, data) => {
  // Handle response
});
Create a .env file:
AWS_ENDPOINT_URL=your-endpoint-url
BUCKET_NAME=your-bucket-name
AWS_ACCESS_KEY_ID=your-access-key-id
AWS_SECRET_ACCESS_KEY=your-secret-access-key
Best Practices
Security
- Never Commit Keys: Never commit API keys to Git repositories
- Use Environment Variables: Store keys in environment variables, not in code
- Rotate Regularly: Create new keys periodically and revoke old ones
- Limit Permissions: Only grant the minimum permissions needed
- Use IP Restrictions: Use IP restrictions when possible for additional security
Code Organization
- Separate Configuration: Keep credentials in separate config files
- Use .env Files: Use
.envfiles for local development (add to.gitignore) - Document Usage: Document which keys are used for which purposes
- Monitor Usage: Regularly check API key usage in KloudBean dashboard
Troubleshooting
Connection Errors
- Check Endpoint URL: Verify the endpoint URL is correct
- Check Credentials: Ensure Access Key ID and Secret Access Key are correct
- Check Permissions: Verify the token has the required permissions
- Check IP Restrictions: If IP restrictions are set, ensure your IP is allowed
Access Denied Errors
- Check Permissions: Verify the token permission level (read-only, write-only, read & write)
- Check Bucket Name: Ensure the bucket name is correct
- Check Object Path: Verify the object path/key is correct
- Check Token Status: Ensure the token is active and not revoked
Cannot List Objects
- Read Permission: Ensure token has read permission
- Bucket Access: Verify you're using the correct bucket name
- Endpoint Configuration: Check that endpoint URL is properly configured
Next Steps
- Learn about Uploading Objects to your bucket
- Explore Accessing and Downloading Objects
- Review Managing Bucket Permissions for team access