GitLab
Learn how to deploy and use GitLab on KloudBean. KloudBean provides self-hosted GitLab, giving you the flexibility of having your dedicated server to run your GitLab without any dependencies on cloud-based GitLab.
Overview
KloudBean provides self-hosted GitLab, where you have flexibility like having your dedicated server to run your GitLab without any dependencies on cloud-based GitLab.
Why Self-Hosted GitLab?
Security Benefits:
- Data Control: Complete control over your source code and sensitive data
- No Third-Party Access: Your code never leaves your infrastructure
- Custom Security Policies: Implement your own security policies and compliance requirements
- Audit Trails: Full control over logging and audit trails
- Network Isolation: Keep your code repositories within your private network
- Compliance: Meet strict security and compliance requirements
Region-Based Compliance:
- Data Residency: Keep your code and data in specific geographic regions
- Regulatory Compliance: Meet regional data protection regulations (GDPR, CCPA, etc.)
- Sovereignty Requirements: Meet data sovereignty requirements for government and enterprise
- Local Regulations: Comply with country-specific regulations
- Data Localization: Ensure data stays within required geographic boundaries
- Custom Compliance: Implement custom compliance frameworks
Additional Benefits:
- Cost Control: Predictable costs without per-user licensing
- Customization: Full control over GitLab configuration and features
- Performance: Optimized performance for your specific use case
- Integration: Seamless integration with your existing infrastructure
- No Vendor Lock-in: Complete independence from cloud providers
Important: Dedicated Server Requirement
For GitLab, KloudBean only recommends to have a dedicated server for it, so you do not have option to launch it on any existing server.
Why Dedicated Server:
- Resource Requirements: GitLab requires significant CPU, memory, and disk resources
- Performance: Dedicated resources ensure optimal GitLab performance
- Isolation: Complete isolation prevents resource conflicts
- Stability: Ensures stable and reliable GitLab operation
- Security: Better security with dedicated infrastructure
What This Means:
- New Server Only: You must launch a new server for GitLab
- No Shared Resources: Cannot install GitLab on existing servers with other applications
- Dedicated Instance: Each GitLab instance requires its own dedicated server
Prerequisites
- An active KloudBean account
- Understanding of Git and version control concepts
- (Optional) Basic knowledge of CI/CD pipelines
Launching GitLab
Method: Launching GitLab on New Instance
In order to launch your first GitLab instance, navigate to dashboard or server page from top header menu, click on "Add server".
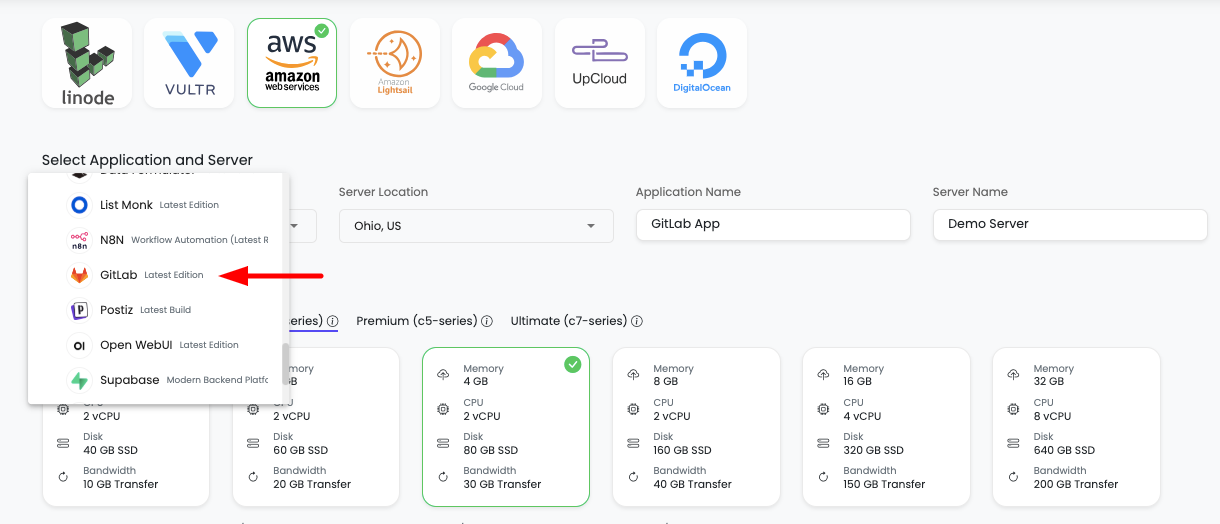
Step 1: Server Provision Screen
On server provision screen:
- Select GitLab as your application: Choose "GitLab" from the application selection
- Select cloud provider: Choose your preferred cloud provider (AWS, DigitalOcean, etc.)
- Select server location: Choose the geographic location for your server
- Select server size: Choose appropriate server size based on your expected workload
- Minimum Recommended: 4GB RAM for small teams
- Recommended: 8GB+ RAM for medium teams
- Large Teams: 16GB+ RAM for large organizations
- Optionally give app name and server name: Provide custom names for easier identification
Step 2: Launch Server
Click on "Launch server" and after payment your server creation will be started.
What Happens Next:
- Server provisioning begins
- GitLab installation and configuration starts automatically
- Database setup and optimization occurs
- Your GitLab instance will be ready in 5-10 minutes
Important: GitLab takes a while 5-10 minutes to initiate and get to ready, you have to hold until it is fully accessible.
Initialization Process:
- GitLab package installation
- Database initialization
- Service configuration and optimization
- Network and security setup
- Admin account creation
Accessing GitLab
Step 1: Navigate to Tools Section
In order to access your GitLab UI, navigate to Tools section, here your GitLab app will be listed.
Click on it and you will be in application administration page.
Step 2: Get Access URL and Credentials
On "Access" tab you will see access URL along with admin username and password for root user.
Access Options:
- Copy URL: Copy this URL and paste in browser to access it
- Visit Button: Directly click on "Visit" button to open GitLab in new tab
It will prompt to enter access username and password.
Step 3: Get Admin Credentials
Admin Access Credentials:
On Access tab scroll down to "Application Admin Access".
Here you will find:
- Admin username: Username for GitLab root user (usually "root")
- Admin password: Password for GitLab root user
Use these credentials to login to your GitLab account.
Important Notes:
- Root User: The root user has full administrative access
- First Login: You may be prompted to change the root password on first login
- Security: Use a strong password and enable 2FA after first login
- Access: Keep these credentials secure
Congratulations!
Congrats, your GitLab is ready to use!
Next Steps:
- Change root password on first login
- Enable two-factor authentication (2FA)
- Create your first project
- Set up SSH keys for Git operations
- Configure CI/CD pipelines
GitLab Usage Guide
Creating Your First Project
- Log in to GitLab with your root credentials
- Click "New project" or the "+" icon in the top navigation
- Choose project creation method:
- Create blank project: Start from scratch
- Import project: Import from another Git repository
- Create from template: Use a project template
- Fill in project details:
- Project name: Name of your project
- Project slug: URL-friendly name (auto-generated)
- Visibility level: Private, Internal, or Public
- Initialize repository: Add README, .gitignore, or license
- Click "Create project"
Managing Repositories
Cloning a Repository:
# Clone via HTTPS
git clone https://your-gitlab.kloudbeansite.com/username/project.git

# Clone via SSH (recommended)
git clone [email protected]:username/project.git
Creating a New Repository:
# Initialize local repository
git init
git add .
git commit -m "Initial commit"

# Add remote
git remote add origin https://your-gitlab.kloudbeansite.com/username/project.git

# Push to GitLab
git push -u origin main
Working with Branches
Creating and Managing Branches:
# Create new branch
git checkout -b feature-branch

# Push branch to GitLab
git push -u origin feature-branch

# Switch branches
git checkout main

# Merge branch
git merge feature-branch
In GitLab UI:
- Navigate to Repository → Branches
- Create, view, and manage branches
- Set default branch
- Protect branches with rules
Merge Requests
Creating a Merge Request:
- Push your branch to GitLab
- Click "Create merge request" button that appears
- Fill in details:
- Title: Descriptive title
- Description: What changes were made and why
- Assignee: Assign reviewers
- Milestone: Link to milestone (optional)
- Labels: Add relevant labels
- Click "Create merge request"
Reviewing Merge Requests:
- View changes: See all code changes
- Add comments: Comment on specific lines
- Approve: Approve the merge request
- Merge: Merge when ready
Issue Tracking
Creating Issues:
- Navigate to Issues in your project
- Click New issue
- Fill in:
- Title: Issue title
- Description: Detailed description
- Assignee: Assign to team member
- Labels: Add labels (bug, feature, etc.)
- Milestone: Link to milestone
- Click Create issue
Managing Issues:
- Boards: Use Kanban boards to track issues
- Milestones: Group issues by milestones
- Time Tracking: Track time spent on issues
- Due Dates: Set due dates for issues
User Management
Adding Users:
- Navigate to Admin Area (wrench icon) → Users
- Click New user
- Fill in user details:
- Name: User's full name
- Username: Unique username
- Email: User's email address
- Password: Set initial password
- Click Create user
Managing Permissions:
- User Roles: Admin, Developer, Reporter, Guest
- Project Access: Grant access to specific projects
- Group Access: Add users to groups
SSH Keys Setup
Generating SSH Key:
# Generate SSH key
ssh-keygen -t ed25519 -C "[email protected]"

# Or use RSA
ssh-keygen -t rsa -b 4096 -C "[email protected]"
Adding SSH Key to GitLab:
-
Copy your public key:
cat ~/.ssh/id_ed25519.pub -
In GitLab:
- Go to User Settings → SSH Keys
- Paste your public key
- Add a title
- Click Add key
Testing SSH Connection:
ssh -T [email protected]
Project Settings
General Settings:
- Project name and description
- Visibility level: Private, Internal, Public
- Default branch: Set default branch name
- Project avatar: Upload project logo
Repository Settings:
- Default branch protection: Protect default branch
- Push rules: Configure push rules
- Deploy tokens: Create deploy tokens
- Repository cleanup: Clean up repository
CI/CD Settings:
- CI/CD configuration file: Set CI/CD file location
- Runners: Configure GitLab Runners
- Variables: Set CI/CD variables
- Auto DevOps: Enable/disable Auto DevOps
GitLab Runner Guide
What is GitLab Runner?
GitLab Runner is a lightweight, highly-scalable agent that runs your CI/CD jobs and sends the results back to GitLab. It's used to execute the jobs defined in your .gitlab-ci.yml file.
Key Features:
- Executes CI/CD Jobs: Runs pipelines defined in your projects
- Multiple Executors: Supports Docker, Shell, Kubernetes, and more
- Scalable: Can run multiple jobs in parallel
- Flexible: Can be installed on any machine
Installing GitLab Runner
For any dependent packages if needed like GitLab Runner, you can reach out to KloudBean support team.
Contact KloudBean Support:
- Via Chat: Use the chat feature in KloudBean dashboard
- Via Email: Send email with your requirements
- Provide Details:
- What you need (GitLab Runner)
- Your server details
- Your use case
KloudBean Support Will:
- Review your requirements
- Install and configure GitLab Runner
- Set up necessary permissions
- Provide configuration guidance
Manual Installation (Reference)
If you need to install GitLab Runner manually, here's a reference guide:
On Linux (Ubuntu/Debian):
# Download and install GitLab Runner
curl -L "https://packages.gitlab.com/install/repositories/runner/gitlab-runner/script.deb.sh" | sudo bash
sudo apt-get install gitlab-runner

# Register runner
sudo gitlab-runner register
On macOS:
# Install via Homebrew
brew install gitlab-runner

# Register runner
gitlab-runner register
On Windows:
- Download installer from GitLab Runner releases
- Run the installer
- Register the runner
Registering GitLab Runner
Get Registration Token:
- In GitLab, navigate to your project
- Go to Settings → CI/CD → Runners
- Expand "Runners" section
- Copy the registration token
Register Runner:
# Register runner
sudo gitlab-runner register

# You'll be prompted for:
# - GitLab URL: https://your-gitlab.kloudbeansite.com
# - Registration token: (paste token from GitLab)
# - Description: (optional description)
# - Tags: (optional tags)
# - Executor: docker, shell, etc.
Configuring GitLab Runner
Runner Configuration File (usually /etc/gitlab-runner/config.toml):
concurrent = 4
check_interval = 0

[session_server]
  session_timeout = 1800

[[runners]]
  name = "my-runner"
  url = "https://your-gitlab.kloudbeansite.com"
  token = "your-runner-token"
  executor = "docker"
  [runners.docker]
    tls_verify = false
    image = "alpine:latest"
    privileged = false
    disable_entrypoint_overwrite = false
    oom_kill_disable = false
    disable_cache = false
    volumes = ["/cache"]
    shm_size = 0
Using GitLab Runner
Once registered, the runner will automatically:
- Pick up jobs: Automatically pick up jobs from GitLab
- Execute pipelines: Run jobs defined in
.gitlab-ci.yml - Report results: Send results back to GitLab
- Display logs: Show job logs in GitLab UI
Runner Status:
- Active: Runner is active and ready
- Online: Runner is online and connected
- Offline: Runner is offline or disconnected
- Paused: Runner is paused
Managing Runners:
- View runners: Settings → CI/CD → Runners
- Enable/Disable: Toggle runner status
- Edit tags: Modify runner tags
- Remove runner: Delete runner
Setting Up GitLab Pipelines
What are GitLab Pipelines?
GitLab CI/CD Pipelines are a series of jobs that get executed in GitLab when code is pushed or merged. Pipelines are defined in a .gitlab-ci.yml file in your repository root.
Pipeline Components:
- Stages: Groups of jobs that run in sequence
- Jobs: Individual tasks that run in a stage
- Artifacts: Files created by jobs
- Variables: Environment variables for jobs
Creating .gitlab-ci.yml
Create a .gitlab-ci.yml file in your repository root:
# Define stages
stages:
  - build
  - test
  - deploy

# Build stage
build:
  stage: build
  script:
    - echo "Building application..."
    - npm install
    - npm run build
  artifacts:
    paths:
      - dist/
    expire_in: 1 week
  only:
    - main
    - develop

# Test stage
test:
  stage: test
  script:
    - echo "Running tests..."
    - npm test
  coverage: '/Coverage: \d+\.\d+%/'
  only:
    - main
    - develop

# Deploy stage
deploy:
  stage: deploy
  script:
    - echo "Deploying application..."
    - ./deploy.sh
  environment:
    name: production
    url: https://your-app.com
  only:
    - main
  when: manual
Basic Pipeline Example
Simple Node.js Pipeline:
image: node:16

stages:
  - install
  - test
  - build
  - deploy

cache:
  paths:
    - node_modules/

install_dependencies:
  stage: install
  script:
    - npm install
  only:
    changes:
      - package.json
      - package-lock.json

run_tests:
  stage: test
  script:
    - npm test
  coverage: '/Coverage: \d+\.\d+%/'

build_app:
  stage: build
  script:
    - npm run build
  artifacts:
    paths:
      - dist/
    expire_in: 1 week

deploy_production:
  stage: deploy
  script:
    - echo "Deploying to production..."
    - npm run deploy
  only:
    - main
  when: manual
Python Pipeline Example
image: python:3.9

stages:
  - test
  - build
  - deploy

before_script:
  - pip install -r requirements.txt

test:
  stage: test
  script:
    - pytest --cov=./ --cov-report=xml
  coverage: '/TOTAL.*\s+(\d+%)$/'
  artifacts:
    reports:
      coverage_report:
        coverage_format: cobertura
        path: coverage.xml

build:
  stage: build
  script:
    - python setup.py build
  artifacts:
    paths:
      - dist/

deploy:
  stage: deploy
  script:
    - echo "Deploying Python application..."
  only:
    - main
Docker Pipeline Example
image: docker:latest

services:
  - docker:dind

stages:
  - build
  - push
  - deploy

variables:
  DOCKER_DRIVER: overlay2
  DOCKER_TLS_CERTDIR: "/certs"

build_image:
  stage: build
  script:
    - docker build -t my-app:$CI_COMMIT_SHA .
    - docker tag my-app:$CI_COMMIT_SHA my-app:latest
  only:
    - main

push_image:
  stage: push
  script:
    - docker login -u $CI_REGISTRY_USER -p $CI_REGISTRY_PASSWORD $CI_REGISTRY
    - docker push my-app:$CI_COMMIT_SHA
    - docker push my-app:latest
  only:
    - main

deploy:
  stage: deploy
  script:
    - echo "Deploying Docker container..."
    - docker-compose up -d
  only:
    - main
Pipeline Variables
Setting Variables:
- Project Variables: Settings → CI/CD → Variables
- Group Variables: Group → Settings → CI/CD → Variables
- Instance Variables: Admin Area → Settings → CI/CD → Variables
Using Variables:
deploy:
  script:
    - echo "Deploying to $ENVIRONMENT"
    - curl -X POST $DEPLOY_WEBHOOK_URL
  variables:
    ENVIRONMENT: production
Protected Variables:
- Masked: Hide variable values in logs
- Protected: Only available in protected branches/tags
- Expanded: Expand variable values
Pipeline Scheduling
Scheduled Pipelines:
- Navigate to CI/CD → Schedules
- Click New schedule
- Fill in:
- Description: Schedule description
- Interval: Cron expression (e.g.,
0 2 * * *for daily at 2 AM) - Target branch: Branch to run pipeline on
- Active: Enable/disable schedule
- Click Save pipeline schedule
Example Schedule:
- Daily at 2 AM:
0 2 * * * - Every Monday at 9 AM:
0 9 * * 1 - Every hour:
0 * * * *
Pipeline Artifacts
Defining Artifacts:
build:
  script:
    - npm run build
  artifacts:
    paths:
      - dist/
      - build/
    expire_in: 1 week
    name: "build-$CI_COMMIT_REF_NAME"
Downloading Artifacts:
- In GitLab UI: CI/CD → Pipelines → Download artifacts
- Via API: Use GitLab API to download artifacts
- In Jobs: Artifacts from previous jobs are available
Pipeline Environments
Defining Environments:
deploy_staging:
  stage: deploy
  script:
    - ./deploy.sh staging
  environment:
    name: staging
    url: https://staging.example.com

deploy_production:
  stage: deploy
  script:
    - ./deploy.sh production
  environment:
    name: production
    url: https://example.com
  only:
    - main
Environment Features:
- Deployment tracking: Track deployments to environments
- Rollback: Rollback to previous deployment
- Environment URLs: Access deployed applications
- Protected environments: Restrict access to environments
Pipeline Best Practices
Optimization:
- Use caching: Cache dependencies to speed up pipelines
- Parallel jobs: Run independent jobs in parallel
- Conditional jobs: Use
only/exceptto control when jobs run - Artifact expiration: Set appropriate artifact expiration
Security:
- Use protected variables: Store secrets in protected variables
- Mask sensitive data: Mask sensitive values in logs
- Limit access: Restrict who can trigger pipelines
- Review changes: Review pipeline changes before merging
Maintainability:
- Use includes: Reuse pipeline configurations
- Documentation: Document complex pipelines
- Test locally: Test pipelines locally before pushing
- Version control: Keep pipeline files in version control
Best Practices
Security
- Strong Passwords: Use strong passwords for all accounts
- Two-Factor Authentication: Enable 2FA for all users
- SSH Keys: Use SSH keys instead of passwords for Git operations
- Access Control: Implement proper access controls and permissions
- Regular Updates: Keep GitLab updated to latest version
- Backup Regularly: Regular backups of GitLab data
Performance
- Resource Allocation: Allocate sufficient resources for GitLab
- Monitor Performance: Monitor server performance regularly
- Optimize Pipelines: Optimize CI/CD pipelines for faster execution
- Use Caching: Use caching in pipelines to speed up builds
Backup and Recovery
- Regular Backups: Set up automated backups
- Test Restores: Regularly test backup restoration
- Offsite Backups: Store backups in multiple locations
- Documentation: Document backup and recovery procedures
Troubleshooting
Access Issues
Cannot Access GitLab:
- Check Initialization: Wait for GitLab to fully initialize (5-10 minutes)
- Verify URL: Check that the URL is correct
- Check Credentials: Verify admin credentials are correct
- Network Issues: Check network connectivity
Performance Issues
Slow Performance:
- Check Resources: Monitor server CPU, memory, and disk usage
- Increase Resources: Consider upgrading server size
- Optimize Configuration: Review GitLab configuration
- Check Logs: Review GitLab logs for errors
Pipeline Issues
Pipelines Not Running:
- Check Runners: Verify GitLab Runners are registered and active
- Check Configuration: Verify
.gitlab-ci.ymlsyntax is correct - Check Permissions: Verify user has permissions to run pipelines
- Review Logs: Check pipeline logs for errors
Runner Issues
Runner Not Picking Up Jobs:
- Check Status: Verify runner is online and active
- Check Tags: Ensure job tags match runner tags
- Check Permissions: Verify runner has necessary permissions
- Review Logs: Check runner logs for errors
Next Steps
After setting up GitLab:
- Learn about Connecting Git Repository for application deployments
- Explore CI/CD Auto Deployment for automated deployments
- Review GitLab Official Documentation for advanced features
- Check GitLab CI/CD Documentation for pipeline configuration
- Explore other AI & Tools available on KloudBean