Supabase
Learn how to deploy and use Supabase on KloudBean. KloudBean provides self-hosted Supabase, giving you the flexibility of having your dedicated server to run your Supabase without any dependency on cloud-based Supabase.
Overview
KloudBean provides self-hosted Supabase, where you have flexibility like having your dedicated server to run your Supabase without any dependency on cloud-based Supabase.
KloudBean Advantages:
- Optimized Instance: KloudBean provides you an optimized instance for your Supabase deployment
- Optimized Database: Dedicated optimized database for your Supabase instance
- Optimized Setup: Optimized setup where your Supabase runs seamlessly and powerfully
- Production Ready: The environment is production ready where it has all the security on it
- Scalable Solution: You are having a scalable solution with KloudBean, as your workflows increase you can increase server size anytime
Important Limitation
You can have only one Supabase instance on a single server. This is to get the maximum performance and security. KloudBean does not allow adding multiple Supabase on same server. If you are in need of multiple Supabase, you have to launch separate instance for each.
Why This Limitation:
- Maximum Performance: One instance per server ensures optimal resource allocation
- Security: Isolated instances provide better security
- Resource Management: Prevents resource conflicts and competition
- Stability: Ensures stable and reliable Supabase operation
If You Need Multiple Instances:
- Separate Servers: Launch a separate server for each Supabase instance
- Resource Allocation: Each instance gets dedicated server resources
- Isolation: Complete isolation between instances
- Scalability: Scale each instance independently
Prerequisites
- An active KloudBean account
- Understanding of Supabase concepts
- (For existing server) Server size of 4GB or higher
Launching Supabase
There are two ways to launch Supabase on KloudBean:
- Launching Supabase on New Instance: Create a new server dedicated to Supabase
- Launching Supabase on Existing Instance: Add Supabase to an existing server (4GB+ required)
Method 1: Launching Supabase on New Instance
In order to launch your first Supabase instance, navigate to dashboard or server page from top header menu, click on "Add server".
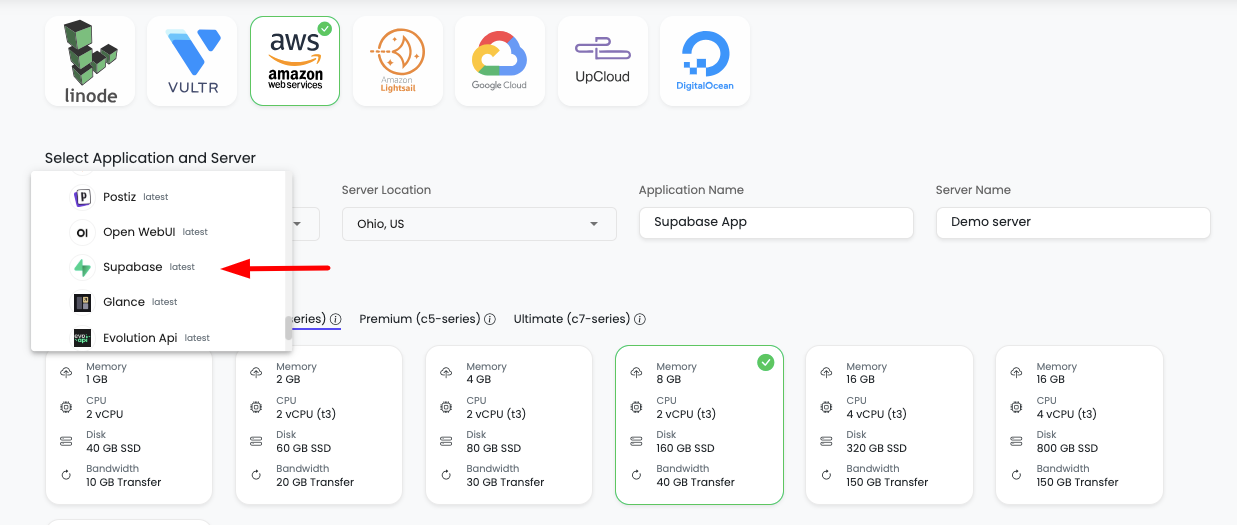
Step 1: Server Provision Screen
On server provision screen:
- Select Supabase as your application: Choose "Supabase" from the application selection
- Select cloud provider: Choose your preferred cloud provider (AWS, DigitalOcean, etc.)
- Select server location: Choose the geographic location for your server
- Select server size: Choose appropriate server size based on your expected workload
- Optionally give app name and server name: Provide custom names for easier identification
Step 2: Launch Server
Click on "Launch server" and after payment your server creation will be started.
What Happens Next:
- Server provisioning begins
- Supabase installation and configuration starts automatically
- Database setup and optimization occurs
- Your Supabase instance will be ready in a few minutes
Method 2: Launching Supabase on Existing Instance
If you already have a server with KloudBean (size 4GB+) and wish to launch Supabase on that same server, then you don't have to launch new server, you can just add new tool.
Step 1: Add Tool
- Navigate to tool from header menu or dashboard
- Click on "Add tool"
- Select tool: Choose "Supabase" from the available tools
- Select server: Choose the existing server where you want to install Supabase (must be 4GB+)
- Launch it: Click to start the installation
Server Size Requirement:
- Minimum: 4GB server size required
- Why: Supabase requires sufficient resources for optimal performance
- Check: Verify your server size before attempting installation
Step 2: Installation Process
It will take a couple of minutes to install and configure your Supabase instance.
Installation Process:
- Supabase package installation
- Database setup and configuration
- Service configuration and optimization
- Network and security setup
Once installation is done, you will be able to view your Supabase in tools page.
Step 3: Access Tools Page
From here click on "Tools" and you will see tool listed there.
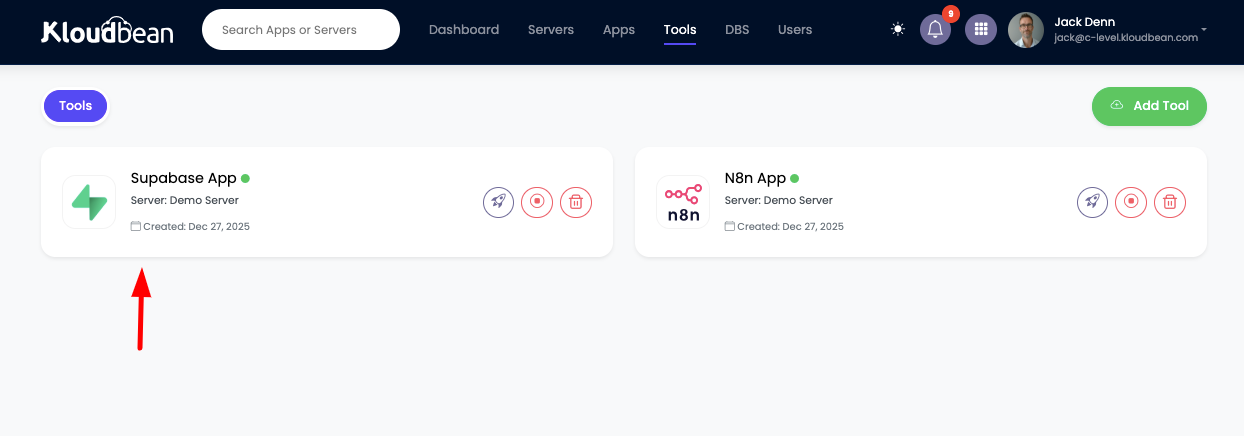
Tools Page Features:
- List of all installed tools on your server
- Tool status and health indicators
- Quick access to tool administration
- Resource usage information
Accessing Supabase
Step 1: Navigate to Application Administration
In order to access it, click on it and you will be in "Application Administration".
Step 2: Get Access URL
In access tab you will see access URL.

Access Options:
- Copy URL: Copy this URL and paste in browser to access it
- Visit Button: Directly click on "Visit" button to open Supabase in new tab
It will prompt to enter access username and password.
Step 3: Get Admin Credentials
Admin Access Credentials:
On Access tab scroll down to "Application Admin Access".
Here you will find:
- Admin username: Username for Supabase admin access
- Admin password: Password for Supabase admin access

Use these credentials to login to your Supabase account.
Congratulations!
Congrats, your Supabase is ready to use!
Next Steps:
- Start creating your first project
- Set up your database schema
- Configure authentication
- Set up storage buckets
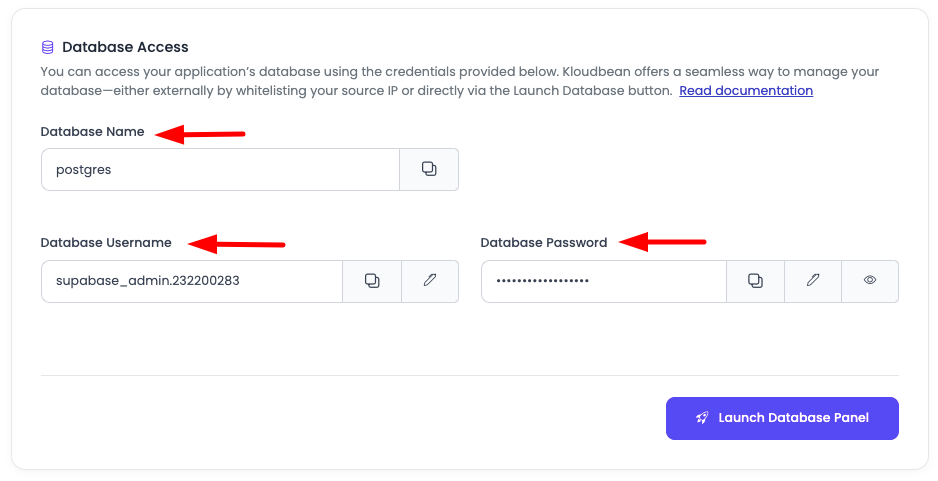
Accessing Database
Database Access Credentials
You can access PostgreSQL database by using the credentials in access tab.
Scroll down to the section "Database Access".
Here you will see:
- Database name: Name of your PostgreSQL database
- Database username: Username for database access
- Database password: Password for database access
Using Database Credentials
Connection Methods:
- psql Command Line: Connect using PostgreSQL command-line client
- Database Clients: Use tools like pgAdmin, DBeaver, or TablePlus
- Application Connection: Use connection string in your applications
- Migration Tools: Use credentials for database migrations
Connection String Format:
postgresql://[username]:[password]@[host]:[port]/[database]
Security Notes:
- Keep Credentials Secure: Never expose credentials in code or version control
- Use Environment Variables: Store credentials in environment variables
- Limit Access: Only share credentials with authorized team members
- Regular Rotation: Consider rotating passwords periodically
Supabase Configurations
Accessing Configuration Settings
If you want to perform actions like:
- Update Supabase env variables: Modify environment variables
- Stop Supabase: Stop the Supabase service
- Restart Supabase: Restart the Supabase service
- Getting access keys: Retrieve API keys and credentials
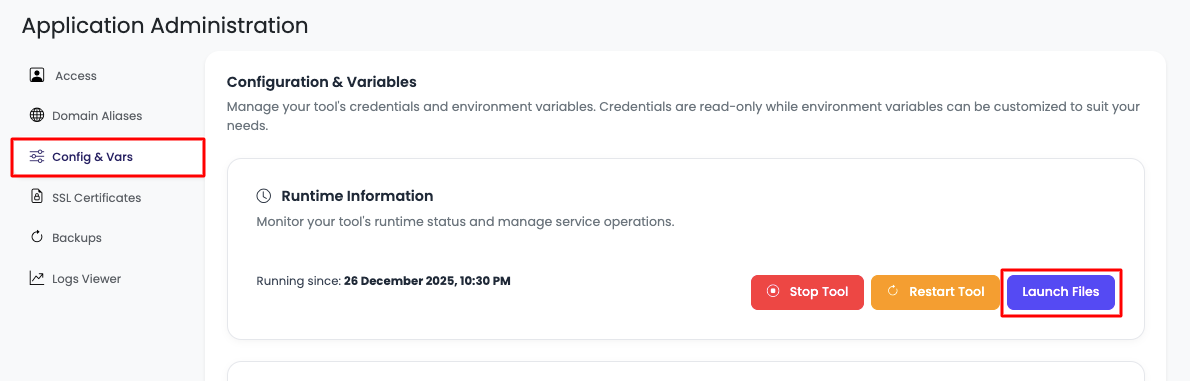
In order to do this, navigate to "Config & Vars" section.
Available Options
Here you will see option to:
- Stop tool: Temporarily stop the Supabase service
- Restart tool: Restart Supabase to apply configuration changes
- Open FileManager: Access file manager for managing files
- Credentials and access keys: View all API keys and connection strings
- Environment variables: Manage environment variables
Getting Supabase SERVICE and ANON KEY
Accessing Credentials
On this tab scroll down to the section "Credentials".
This is where you will see all the config information including:
- HOST URL: Your Supabase instance URL
- ANON_KEY: Anonymous/public API key (safe for client-side use)
- SERVICE_KEY: Service role key (server-side only, bypasses RLS)
- POSTGRES_CONN_URI: PostgreSQL connection string
- SUPAVISOR_POOLER_CONN: Connection pooler connection string
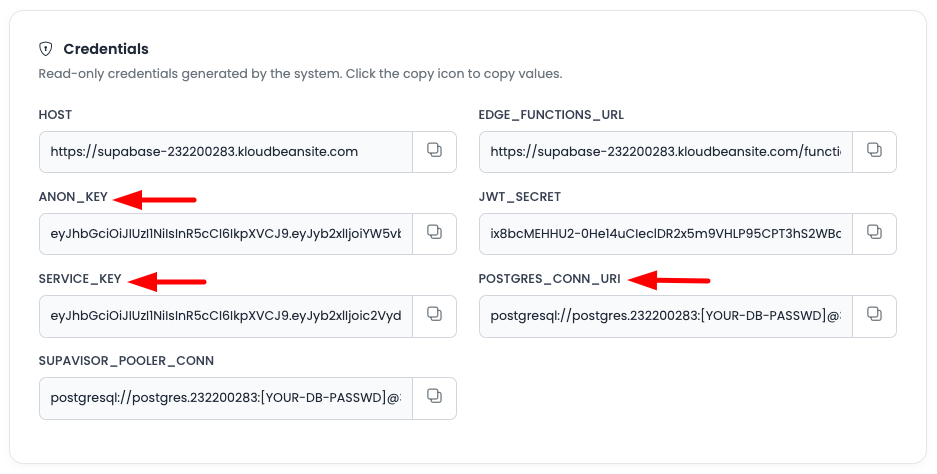
You will use this information in your application.
Using Supabase Keys in Your Application
Consolidated Guide on How and Where to Use These Keys in Your Node.js Code
Most developers use Cursor or other AI tools to develop applications. Here's a comprehensive guide on how to integrate Supabase keys into your Node.js application.
Step 1: Install Supabase Client Library
Install the Supabase JavaScript client:
npm install @supabase/supabase-js
Step 2: Create Supabase Client Configuration
Create a configuration file (e.g., supabase.js or lib/supabase.js):
import { createClient } from '@supabase/supabase-js'

// Get these values from KloudBean Supabase Config & Vars -> Credentials
const supabaseUrl = process.env.NEXT_PUBLIC_SUPABASE_URL || 'YOUR_HOST_URL'
const supabaseAnonKey = process.env.NEXT_PUBLIC_SUPABASE_ANON_KEY || 'YOUR_ANON_KEY'

// Create Supabase client for client-side operations (uses ANON_KEY)
export const supabase = createClient(supabaseUrl, supabaseAnonKey)

// For server-side operations (uses SERVICE_KEY - keep this secret!)
const supabaseServiceKey = process.env.SUPABASE_SERVICE_ROLE_KEY || 'YOUR_SERVICE_KEY'

// Create admin client for server-side operations
export const supabaseAdmin = createClient(supabaseUrl, supabaseServiceKey)
Step 3: Environment Variables Setup
Create a .env.local file (for Next.js) or .env file:
# Supabase Configuration
# Get these from KloudBean: Config & Vars -> Credentials

# Public URL (safe to expose in client-side code)
NEXT_PUBLIC_SUPABASE_URL=https://your-supabase-instance.kloudbeansite.com

# Anonymous Key (safe for client-side, respects Row Level Security)
NEXT_PUBLIC_SUPABASE_ANON_KEY=your-anon-key-here

# Service Role Key (SERVER-SIDE ONLY - never expose to client!)
# This key bypasses Row Level Security - use only in server-side code
SUPABASE_SERVICE_ROLE_KEY=your-service-key-here

# Database Connection (for direct database access if needed)
DATABASE_URL=your-postgres-connection-uri-here
Important Security Notes:
- ✅ ANON_KEY: Safe to use in client-side code (browser, React, Vue, etc.)
- ❌ SERVICE_KEY: NEVER expose in client-side code - server-side only!
- ✅ HOST URL: Safe to expose in client-side code
Step 4: Client-Side Usage Examples
Using Supabase in React/Next.js Client Components:
'use client' // Next.js client component

import { supabase } from '@/lib/supabase'
import { useEffect, useState } from 'react'

export default function MyComponent() {
  const [data, setData] = useState([])
  const [loading, setLoading] = useState(true)

  useEffect(() => {
    // Fetch data using ANON_KEY (client-side)
    async function fetchData() {
      const { data, error } = await supabase
        .from('your_table')
        .select('*')
        .limit(10)

      if (error) {
        console.error('Error fetching data:', error)
      } else {
        setData(data)
      }
      setLoading(false)
    }

    fetchData()
  }, [])

  // Insert data
  async function handleInsert() {
    const { data, error } = await supabase
      .from('your_table')
      .insert([
        { column1: 'value1', column2: 'value2' }
      ])

    if (error) {
      console.error('Error inserting:', error)
    } else {
      console.log('Inserted:', data)
    }
  }

  // Update data
  async function handleUpdate(id) {
    const { error } = await supabase
      .from('your_table')
      .update({ column1: 'new_value' })
      .eq('id', id)

    if (error) {
      console.error('Error updating:', error)
    }
  }

  // Delete data
  async function handleDelete(id) {
    const { error } = await supabase
      .from('your_table')
      .delete()
      .eq('id', id)

    if (error) {
      console.error('Error deleting:', error)
    }
  }

  if (loading) return <div>Loading...</div>

  return (
    <div>
      <h1>My Data</h1>
      <ul>
        {data.map((item) => (
          <li key={item.id}>{item.name}</li>
        ))}
      </ul>
      <button onClick={handleInsert}>Insert</button>
    </div>
  )
}
Step 5: Server-Side Usage Examples
Using Supabase in Next.js API Routes or Server Actions:
// app/api/users/route.js (Next.js App Router)
import { supabaseAdmin } from '@/lib/supabase'
import { NextResponse } from 'next/server'

export async function GET(request) {
  try {
    // Use SERVICE_KEY for server-side operations
    // This bypasses Row Level Security - use carefully!
    const { data, error } = await supabaseAdmin
      .from('users')
      .select('*')

    if (error) {
      return NextResponse.json({ error: error.message }, { status: 500 })
    }

    return NextResponse.json({ data })
  } catch (error) {
    return NextResponse.json({ error: 'Internal server error' }, { status: 500 })
  }
}

// Server Action example (Next.js App Router)
'use server'

import { supabaseAdmin } from '@/lib/supabase'

export async function createUser(userData) {
  const { data, error } = await supabaseAdmin
    .from('users')
    .insert([userData])
    .select()
    .single()

  if (error) {
    throw new Error(error.message)
  }

  return data
}
Step 6: Authentication Examples
User Authentication with Supabase:
import { supabase } from '@/lib/supabase'

// Sign up new user
async function signUp(email, password) {
  const { data, error } = await supabase.auth.signUp({
    email: email,
    password: password,
  })
  return { data, error }
}

// Sign in existing user
async function signIn(email, password) {
  const { data, error } = await supabase.auth.signInWithPassword({
    email: email,
    password: password,
  })
  return { data, error }
}

// Sign out
async function signOut() {
  const { error } = await supabase.auth.signOut()
  return { error }
}

// Get current user
async function getCurrentUser() {
  const { data: { user } } = await supabase.auth.getUser()
  return user
}

// Listen to auth state changes
supabase.auth.onAuthStateChange((event, session) => {
  console.log('Auth event:', event)
  console.log('Session:', session)
})
Step 7: Real-time Subscriptions
Subscribe to Real-time Changes:
import { supabase } from '@/lib/supabase'
import { useEffect } from 'react'

export default function RealtimeComponent() {
  useEffect(() => {
    // Subscribe to changes in a table
    const channel = supabase
      .channel('table-changes')
      .on('postgres_changes',
        {
          event: '*', // Listen to all events (INSERT, UPDATE, DELETE)
          schema: 'public',
          table: 'your_table'
        },
        (payload) => {
          console.log('Change received!', payload)
          // Handle the change (update UI, etc.)
        }
      )
      .subscribe()

    // Cleanup subscription on unmount
    return () => {
      supabase.removeChannel(channel)
    }
  }, [])

  return <div>Listening to real-time changes...</div>
}
Step 8: Storage Operations
File Upload and Management:
import { supabase } from '@/lib/supabase'

// Upload file
async function uploadFile(file, bucketName, filePath) {
  const { data, error } = await supabase.storage
    .from(bucketName)
    .upload(filePath, file)

  return { data, error }
}

// Download file
async function downloadFile(bucketName, filePath) {
  const { data, error } = await supabase.storage
    .from(bucketName)
    .download(filePath)

  return { data, error }
}

// Get public URL
function getPublicUrl(bucketName, filePath) {
  const { data } = supabase.storage
    .from(bucketName)
    .getPublicUrl(filePath)

  return data.publicUrl
}

// List files in bucket
async function listFiles(bucketName, folderPath = '') {
  const { data, error } = await supabase.storage
    .from(bucketName)
    .list(folderPath)

  return { data, error }
}
Quick Reference: Key Usage
| Key | Where to Use | Security |
|---|---|---|
| HOST URL | Client & Server | ✅ Safe to expose |
| ANON_KEY | Client-side code | ✅ Safe for browser (respects RLS) |
| SERVICE_KEY | Server-side only | ❌ Never expose to client (bypasses RLS) |
| POSTGRES_CONN_URI | Direct DB access | ❌ Server-side only |
Updating Environment Variables
Accessing Environment Variables Section
Now if you wish to update any env variable or add new variable, scroll down to "Environment Variables" section.
In this section you will see currently added vars.
Adding New Environment Variables
In order to add new var click on "Add variables".
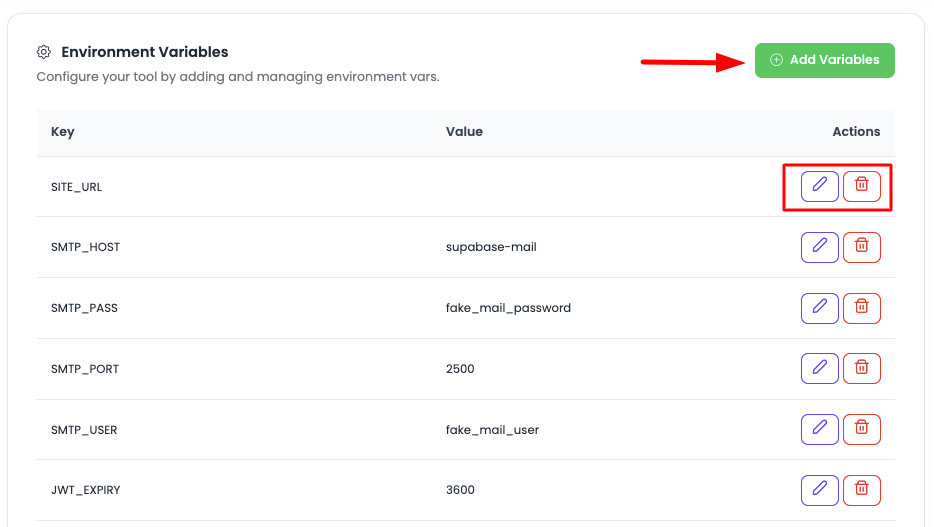
Once you click, you will have option to add variables, there will be 2 fields, Key and Value. Add them.
Adding Multiple Variables:
- Add Field: If you wish to add more variable, click on "Add field"
- Add as Many: Add as many vars you want to add
- Key-Value Pairs: Each variable requires a Key and Value
Updating Variables
Once you have added all the required variables, click on "Update changes" and it will update all the variable.
Important: Once added, make sure to restart the Supabase application, only after restarting these variables will be reflected.
Important Environment Variables
Most Commonly Used Variables
Here are the most commonly used Supabase environment variables that developers typically need to configure:
Site URL and API Configuration
SITE_URL
- Purpose: The URL of your frontend application
- Usage: Used for authentication redirects and email links
- Example:
SITE_URL=https://your-app.com - When to Use: Required for authentication flows and email verification
- Important: Must match your actual frontend URL
SMTP Configuration
SMTP_ADMIN_EMAIL
- Purpose: Admin email address for sending emails
- Usage: Email address used as sender for system emails
- Example:
[email protected] - When to Use: Required for sending authentication emails, password resets, etc.
SMTP_HOST
- Purpose: SMTP server hostname
- Usage: Your SMTP server address
- Example:
SMTP_HOST=smtp.gmail.comorSMTP_HOST=smtp.sendgrid.net - When to Use: Required for email functionality
SMTP_PORT
- Purpose: SMTP server port
- Usage: SMTP server port (usually 587 for TLS, 465 for SSL, 25 for unencrypted)
- Example:
SMTP_PORT=587 - When to Use: Required when configuring SMTP
SMTP_USER
- Purpose: SMTP authentication username
- Usage: Your SMTP account username/email
- Example:
[email protected] - When to Use: Required for SMTP authentication
SMTP_PASS
- Purpose: SMTP authentication password
- Usage: Your SMTP account password or app password
- Example:
SMTP_PASS=your-smtp-password - When to Use: Required for SMTP authentication
SMTP_SENDER_NAME
- Purpose: Display name for email sender
- Usage: Name shown in "From" field of emails
- Example:
SMTP_SENDER_NAME=Your App Name - When to Use: Recommended for better email presentation
Authentication Configuration
AUTH_EXTERNAL_ Variables*
- Purpose: Configure OAuth providers (Google, GitHub, etc.)
- Usage: Set up social authentication providers
- Examples:
AUTH_EXTERNAL_GOOGLE_ENABLED=trueAUTH_EXTERNAL_GOOGLE_CLIENT_ID=your-client-idAUTH_EXTERNAL_GOOGLE_SECRET=your-client-secret
- When to Use: When you want to enable social login
ENABLE_SIGNUP
- Purpose: Enable or disable user signup
- Usage: Control whether new users can register
- Example:
ENABLE_SIGNUP=true - When to Use: Set to
falseto disable public signups
Database Configuration
DB_POOL
- Purpose: Database connection pool size
- Usage: Number of database connections to maintain
- Example:
DB_POOL=10 - When to Use: Adjust based on your application's database load
POSTGRES_PASSWORD
- Purpose: PostgreSQL database password
- Usage: Database password (managed by KloudBean)
Storage Configuration
STORAGE_BACKEND
- Purpose: Storage backend type
- Usage: Configure storage backend (usually 'file' for local storage)
- Example:
STORAGE_BACKEND=file - When to Use: When configuring custom storage backends
STORAGE_FILE_SIZE_LIMIT
- Purpose: Maximum file size for uploads
- Usage: Set maximum file size in bytes
- Example:
STORAGE_FILE_SIZE_LIMIT=52428800(50MB) - When to Use: To limit file upload sizes
Security Configuration
JWT_SECRET
- Purpose: Secret key for JWT token signing
- Usage: Used to sign and verify JWT tokens
- Example:
JWT_SECRET=your-secret-key - When to Use: Required for authentication (usually auto-generated)
JWT_EXPIRY
- Purpose: JWT token expiration time
- Usage: How long JWT tokens remain valid
- Example:
JWT_EXPIRY=3600(1 hour in seconds) - When to Use: To customize token expiration
Email Templates
MAILER_TEMPLATES_ Variables*
- Purpose: Customize email templates
- Usage: Override default email templates
- Examples:
MAILER_TEMPLATES_INVITE=path/to/templateMAILER_TEMPLATES_CONFIRMATION=path/to/template
- When to Use: When you need custom email templates
Using Custom Email Templates
Overview
Supabase uses GoTrue for authentication, which includes default email templates for various authentication flows. If you wish to customize these email templates to match your brand identity, you can configure custom email templates instead of using the default GoTrue templates.
Template Storage Options
You can place your custom email templates in any storage location that provides public HTTP access. Here are the recommended options:
Option 1: Supabase Storage Bucket
Using Supabase's built-in storage:
- Create a public bucket in your Supabase instance
- Upload your HTML email templates to the bucket
- Ensure the bucket has public access enabled
- Use the public URL of your templates
Advantages:
- Integrated with your Supabase instance
- Easy to manage through Supabase dashboard
- No external dependencies
Option 2: KloudBean S3 Object Storage
Using KloudBean's S3-compatible storage:
- Create a bucket in KloudBean S3 Object Storage
- Upload your HTML email templates to the bucket
- Configure the bucket for public access
- Use the public URL of your templates
Advantages:
- Free storage option with KloudBean
- S3-compatible API
- Reliable and scalable
For detailed instructions on uploading objects to KloudBean S3 storage, refer to the Uploading Objects to S3 Storage guide.
Option 3: External Storage
Any publicly accessible HTTP location:
- Your own web server
- CDN (CloudFront, Cloudflare, etc.)
- GitHub Pages
- Any other service providing public HTTP access
Requirements:
- Templates must be accessible via HTTP/HTTPS
- URLs must return valid HTML content
- Templates should be accessible 24/7
Important Considerations
Note that during Supabase restart, if the URL returns 5XX, then Supabase will not use these templates. Instead, it will fallback to the default template. So make sure templates are accessible before you restart Supabase.
Configuring Custom Email Templates
Step 1: Prepare Your Templates
Create HTML email templates for each authentication flow you want to customize:
- Invite Template (
invite.html): For user invitations - Confirmation Template (
confirm.html): For email confirmation - Recovery Template (
recovery.html): For password recovery - Magic Link Template (
magic.html): For magic link authentication
Template Requirements:
- Must be valid HTML
- Should include placeholders for dynamic content (Supabase will inject these)
- Should be responsive and email-client compatible
- Must be publicly accessible via HTTP/HTTPS
Step 2: Upload Templates to Storage
Upload your HTML templates to your chosen storage location (Supabase bucket, KloudBean S3, or external storage) and ensure they are publicly accessible.
Example Template URLs:
https://my-templates-bucket.s3.amazonaws.com/invite.html
https://my-supabase-bucket.supabase.co/storage/v1/object/public/templates/confirm.html
https://cdn.example.com/emails/recovery.html
Step 3: Access Config & Vars Section
Navigate to your Supabase instance in KloudBean dashboard:
- Go to Application Administration
- Click on Config & Vars tab
- Scroll down to Environment Variables section
Step 4: Add or Update Template Variables
Add or update the following environment variables with your template URLs:
Required Variables:
| Variable | Description | Example Value |
|---|---|---|
MAILER_TEMPLATES_INVITE | URL for user invitation emails | https://my-templates-bucket/invite.html |
MAILER_TEMPLATES_CONFIRMATION | URL for email confirmation emails | https://my-templates-bucket/confirm.html |
MAILER_TEMPLATES_RECOVERY | URL for password recovery emails | https://my-templates-bucket/recovery.html |
MAILER_TEMPLATES_MAGIC_LINK | URL for magic link authentication emails | https://my-templates-bucket/magic.html |
Configuration Steps:
- Click on Add variables button
- For each template type, add:
- Key: The variable name (e.g.,
MAILER_TEMPLATES_INVITE) - Value: The full public URL to your HTML template
- Key: The variable name (e.g.,
- Click Add field to add more variables
- Once all variables are added, click Update changes
Example Configuration:
MAILER_TEMPLATES_INVITE: https://my-templates-bucket.s3.amazonaws.com/invite.html
MAILER_TEMPLATES_CONFIRMATION: https://my-templates-bucket.s3.amazonaws.com/confirm.html
MAILER_TEMPLATES_RECOVERY: https://my-templates-bucket.s3.amazonaws.com/recovery.html
MAILER_TEMPLATES_MAGIC_LINK: https://my-templates-bucket.s3.amazonaws.com/magic.html
Step 5: Restart Supabase
After adding or updating email template variables, you must restart your Supabase instance for the changes to take effect. The templates will not be used until Supabase is restarted.
To restart Supabase:
- In Config & Vars section, click on Restart tool button
- Wait for the restart process to complete
- Verify that Supabase is running properly
Verification:
- Check that Supabase status shows as "Running"
- Test an authentication flow (e.g., sign up) to verify custom templates are being used
- Check email delivery to ensure templates are rendering correctly
Template Variables and Placeholders
GoTrue provides specific placeholders that you can use in your custom templates. These will be replaced with actual values when emails are sent:
Common Placeholders:
{{ .ConfirmationURL }}- URL for email confirmation{{ .Email }}- User's email address{{ .Token }}- Authentication token{{ .TokenHash }}- Hashed token{{ .SiteURL }}- Your site URL{{ .RedirectTo }}- Redirect URL after action
Template Example Structure:
<!DOCTYPE html>
<html>
<head>
    <meta charset="UTF-8">
    <title>Confirm Your Email</title>
</head>
<body>
    <h1>Welcome!</h1>
    <p>Please confirm your email address by clicking the link below:</p>
    <a href="{{ .ConfirmationURL }}">Confirm Email</a>
    <p>If you didn't request this, please ignore this email.</p>
</body>
</html>
For a complete list of available placeholders and template structure, refer to the GoTrue documentation or Supabase's official documentation on custom email templates.
Troubleshooting Custom Templates
Templates Not Being Used:
- Verify template URLs are accessible
- Check that Supabase was restarted after adding variables
- Verify template URLs return valid HTML (not 404 or 5XX errors)
- Check browser console or Supabase logs for errors
Templates Returning Errors:
- Ensure templates are publicly accessible
- Verify URLs are correct and complete (including
https://) - Check that storage bucket has public read access
- Test URLs directly in browser before configuring
Fallback to Default Templates:
- If templates are unavailable during restart, Supabase will use default templates
- Verify template URLs are accessible 24/7
- Consider using CDN for better availability
- Monitor template URL status regularly
Complete Environment Variables Reference
For a complete list of all available Supabase environment variables, their descriptions, default values, and usage instructions, please refer to the official Supabase documentation:
🔗 Supabase Official Environment Variables Documentation
The official documentation includes:
- Complete list of all environment variables
- Detailed descriptions and use cases
- Default values for each variable
- Configuration examples
- Best practices and recommendations
- Security considerations
- Advanced configuration options
When to Consult Official Documentation:
- When you need variables not listed here
- For advanced configuration options
- To understand variable interactions
- For latest updates and new variables
- For troubleshooting configuration issues
Migrating Supabase to KloudBean
Migration Overview
In order to migrate Supabase to KloudBean, you will have to migrate following components, depending upon which you need:
- Database (PostgreSQL): Migrate your database schema and data
- Storage: Migrate your file storage buckets and objects
- Functions: Migrate your Edge Functions
Component 1: Database Migration
Migrating database is a little technical and trickier process.
Step 1: Get Source Database Connection String
a) Get database connection string from your current Supabase provider.
From Supabase Cloud Dashboard:
- Log in to your Supabase Cloud project
- Navigate to Settings → Database
- Scroll down to Connection string section
- Copy the connection string (URI format or individual parameters)
You may need to use the connection pooler URL for better performance.
Connection String Format:
postgresql://postgres:[YOUR-PASSWORD]@db.[PROJECT-REF].supabase.co:5432/postgres
Alternative: Get Individual Parameters:
- Host:
db.[PROJECT-REF].supabase.co - Port:
5432 - Database:
postgres - Username:
postgres - Password: Your database password (found in Settings → Database)
Step 2: Get KloudBean Database Connection String
b) Get KloudBean connection string from "Credentials" section and get password from "Access" → "Database Access".
From KloudBean:
- Navigate to your Supabase instance → Config & Vars → Credentials
- Copy the POSTGRES_CONN_URI (this is your connection string)
- Navigate to Access → Database Access
- Note down:
- Database name
- Database username
- Database password
Connection String Format:
postgresql://[username]:[password]@[host]:[port]/[database]
Step 3: Install PostgreSQL Client
On any VM, remote or local, you should have PostgreSQL client installed and version should be supported with the version you have currently on Supabase instance.
Install PostgreSQL Client:
On Ubuntu/Debian:
sudo apt update
sudo apt install postgresql-client
On macOS:
brew install postgresql
On Windows:
- Download and install from PostgreSQL official website
Verify Installation:
psql --version
Step 4: Create Database Dump
On your VM/local take database dumps (guide with commands to take dumps).
Create Full Database Dump:
# Basic dump command
pg_dump -h [SOURCE-HOST] \
        -p [SOURCE-PORT] \
        -U [SOURCE-USERNAME] \
        -d [SOURCE-DATABASE] \
        -F c \
        -f supabase_dump.dump

# Example with Supabase Cloud
pg_dump -h db.abcdefghijklmnop.supabase.co \
        -p 5432 \
        -U postgres \
        -d postgres \
        -F c \
        -f supabase_dump.dump

# You will be prompted for password
Alternative: Dump to SQL File:
# Dump to SQL format (plain text)
pg_dump -h [SOURCE-HOST] \
        -p [SOURCE-PORT] \
        -U [SOURCE-USERNAME] \
        -d [SOURCE-DATABASE] \
        -f supabase_dump.sql

# Example
pg_dump -h db.abcdefghijklmnop.supabase.co \
        -p 5432 \
        -U postgres \
        -d postgres \
        -f supabase_dump.sql
Dump Specific Schema Only:
# Dump only public schema
pg_dump -h [SOURCE-HOST] \
        -p [SOURCE-PORT] \
        -U [SOURCE-USERNAME] \
        -d [SOURCE-DATABASE] \
        -n public \
        -F c \
        -f supabase_public_schema.dump
Dump Specific Tables:
# Dump specific tables
pg_dump -h [SOURCE-HOST] \
        -p [SOURCE-PORT] \
        -U [SOURCE-USERNAME] \
        -d [SOURCE-DATABASE] \
        -t table1 \
        -t table2 \
        -F c \
        -f supabase_tables.dump
Dump with Data Only (No Schema):
# Data only
pg_dump -h [SOURCE-HOST] \
        -p [SOURCE-PORT] \
        -U [SOURCE-USERNAME] \
        -d [SOURCE-DATABASE] \
        -a \
        -F c \
        -f supabase_data_only.dump
Dump Schema Only (No Data):
# Schema only
pg_dump -h [SOURCE-HOST] \
        -p [SOURCE-PORT] \
        -U [SOURCE-USERNAME] \
        -d [SOURCE-DATABASE] \
        -s \
        -F c \
        -f supabase_schema_only.dump
Step 5: Load Dump to KloudBean Database
Once dumps are taken, load these dumps to KloudBean database of your Supabase (commands to load from dumps).
Restore from Custom Format Dump (.dump):
# Restore from custom format dump
pg_restore -h [TARGET-HOST] \
           -p [TARGET-PORT] \
           -U [TARGET-USERNAME] \
           -d [TARGET-DATABASE] \
           --clean \
           --if-exists \
           -v \
           supabase_dump.dump

# Example with KloudBean
pg_restore -h your-supabase-host.kloudbeansite.com \
           -p 5432 \
           -U your_username \
           -d your_database \
           --clean \
           --if-exists \
           -v \
           supabase_dump.dump
Restore from SQL File:
# Restore from SQL file
psql -h [TARGET-HOST] \
     -p [TARGET-PORT] \
     -U [TARGET-USERNAME] \
     -d [TARGET-DATABASE] \
     -f supabase_dump.sql

# Example
psql -h your-supabase-host.kloudbeansite.com \
     -p 5432 \
     -U your_username \
     -d your_database \
     -f supabase_dump.sql
Restore with Connection String:
# Using connection string directly
pg_restore -d "postgresql://[username]:[password]@[host]:[port]/[database]" \
           --clean \
           --if-exists \
           -v \
           supabase_dump.dump

# Example
pg_restore -d "postgresql://postgres:password@host:5432/postgres" \
           --clean \
           --if-exists \
           -v \
           supabase_dump.dump
Restore Specific Schema:
# Restore specific schema
pg_restore -h [TARGET-HOST] \
           -p [TARGET-PORT] \
           -U [TARGET-USERNAME] \
           -d [TARGET-DATABASE] \
           -n public \
           --clean \
           --if-exists \
           supabase_dump.dump
Important Notes:
- --clean: Drops database objects before recreating them
- --if-exists: Use IF EXISTS when dropping objects (prevents errors)
- -v: Verbose mode (shows progress)
- Connection: Ensure you can connect to KloudBean database before restoring
Step 6: Verify Migration
Once dumps are completed, you will be able to see all the data in your Supabase UI.
Verification Steps:
- Access KloudBean Supabase Dashboard: Log in to your Supabase instance
- Check Tables: Navigate to Table Editor and verify all tables exist
- Check Data: Verify data in key tables
- Check Relationships: Verify foreign keys and relationships
- Check Functions: Verify stored procedures and functions
- Check Policies: Verify Row Level Security policies
Common Issues:
- Connection Errors: Verify credentials and network access
- Permission Errors: Ensure user has necessary permissions
- Version Mismatch: Ensure PostgreSQL versions are compatible
- Encoding Issues: Check character encoding matches
Component 2: Storage Migration
You have to download all the objects and then create same buckets in your new Supabase instance by going to storage tab and then upload your objects in it.
Step 1: Download Objects from Source
From Supabase Cloud:
- Navigate to Storage in your Supabase Cloud dashboard
- For each bucket:
- Click on the bucket name
- Download all files/folders
- Or use Supabase Storage API to download programmatically
Using Supabase Storage API (programmatic download):
import { createClient } from '@supabase/supabase-js'

const supabase = createClient(
  'https://your-project.supabase.co',
  'your-anon-key'
)

// List all buckets
const { data: buckets } = await supabase.storage.listBuckets()

// Download files from each bucket
for (const bucket of buckets) {
  const { data: files } = await supabase.storage
    .from(bucket.name)
    .list('', {
      limit: 1000,
      offset: 0,
    })

  // Download each file
  for (const file of files) {
    const { data } = await supabase.storage
      .from(bucket.name)
      .download(file.name)

    // Save file locally
    // ... save logic
  }
}
Step 2: Create Buckets in KloudBean
In KloudBean Supabase:
- Navigate to Storage tab in your Supabase dashboard
- Click New bucket
- Create buckets with the same names as your source buckets
- Configure bucket settings (public/private, file size limits, etc.)
Step 3: Upload Objects
Upload your objects:
- Navigate to each bucket in KloudBean Supabase
- Click Upload button
- Select files or drag and drop
- Wait for upload to complete
Using Supabase Storage API (programmatic upload):
import { createClient } from '@supabase/supabase-js'

const supabase = createClient(
  'https://your-kloudbean-supabase.kloudbeansite.com',
  'your-anon-key'
)

// Upload file to bucket
const { data, error } = await supabase.storage
  .from('bucket-name')
  .upload('path/to/file.jpg', file)

if (error) {
  console.error('Upload error:', error)
} else {
  console.log('Upload successful:', data)
}
Component 3: Function Migration
To migrate function, you have to download your function on your local then upload them to KloudBean using FileManager.
Step 1: Access FileManager
In "Config & Vars section", there is a button to "launch Files".
Click on it and it will open FileManager.
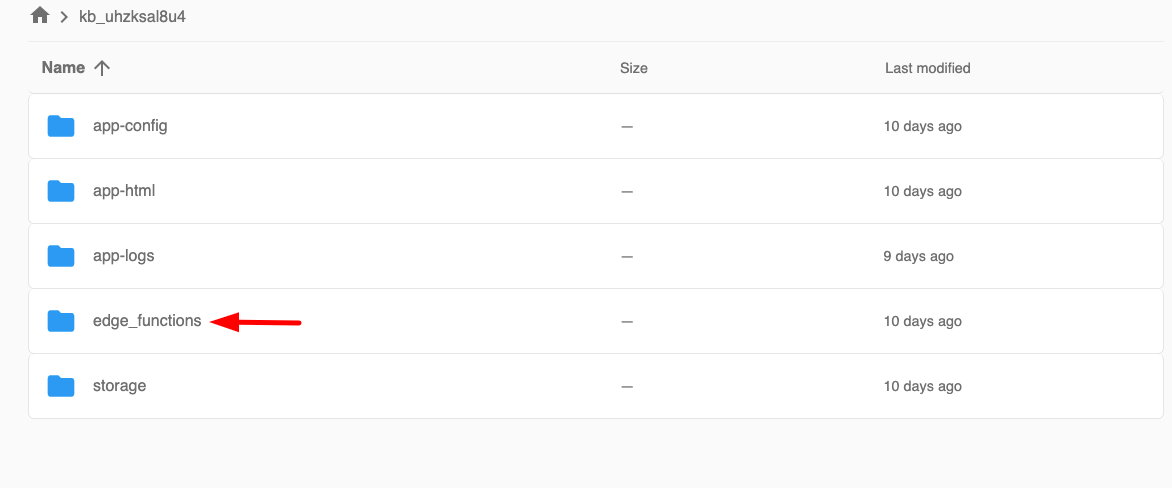
Step 2: Navigate to Edge Functions Folder
Once opened you will see a folder "edge_functions", this is where you will upload your function.
This folder will hold all your functions.
Step 3: Upload Functions
Open this folder and upload your functions in it by click upload button or drag drop.
Make sure to add folder of your function just like in this example "my_new_function" is created.
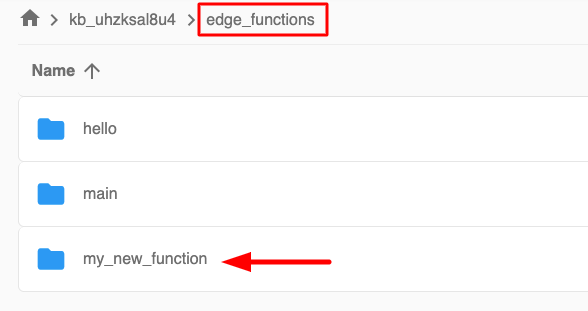
Function Structure:
edge_functions/
  └── my_new_function/
      ├── index.ts (or index.js)
      └── ... other files
Upload Process:
- Create Function Folder: Create a folder with your function name
- Upload Files: Upload all function files into the folder
- Main File: Ensure
index.tsorindex.jsis the entry point - Dependencies: Include
package.jsonif your function has dependencies
Step 4: Access Your Functions
Once uploaded, now you should be able to access the functions using the URL available in "config & vars" → Credentials → EDGE_FUNCTIONS_URL.
Function URL Format:
https://[EDGE_FUNCTIONS_URL]/functions/v1/[function-name]
Example:
https://supabase-232200283.kloudbeansite.com/functions/v1/hello
Replace "hello" with your function name.
Testing Your Function:
# Using curl
curl https://supabase-232200283.kloudbeansite.com/functions/v1/my_new_function \
  -H "Authorization: Bearer YOUR_ANON_KEY" \
  -H "Content-Type: application/json" \
  -d '{"key": "value"}'
From Your Application:
// Call Edge Function from your app
const { data, error } = await supabase.functions.invoke('my_new_function', {
  body: { key: 'value' }
})
Best Practices
Security
- Never Expose SERVICE_KEY: Keep service role key server-side only
- Use ANON_KEY in Client: Safe for client-side code
- Enable Row Level Security: Always enable RLS on your tables
- Secure Credentials: Store all keys in environment variables
- Regular Updates: Keep Supabase updated to latest version
Performance
- Connection Pooling: Use connection pooler for better performance
- Index Optimization: Create proper indexes on frequently queried columns
- Query Optimization: Optimize your database queries
- Storage Optimization: Compress files before uploading when possible
Migration
- Test First: Always test migrations in staging first
- Backup Before Migration: Create backups before migrating
- Verify After Migration: Thoroughly verify data after migration
- Document Process: Document your migration process for future reference
Troubleshooting
Database Migration Issues
Connection Errors:
- Verify credentials are correct
- Check network/firewall settings
- Ensure PostgreSQL client version is compatible
Permission Errors:
- Verify user has necessary permissions
- Check database user roles
- Ensure proper schema access
Storage Migration Issues
Upload Failures:
- Check file size limits
- Verify bucket permissions
- Check network connectivity
Function Migration Issues
Function Not Working:
- Verify function structure is correct
- Check function logs for errors
- Ensure dependencies are installed
- Verify function URL is correct
Next Steps
After setting up Supabase:
- Learn about Supabase Authentication
- Explore Supabase Storage
- Review Supabase Edge Functions
- Check Supabase Official Documentation for advanced features
- Explore other AI & Tools available on KloudBean