OpenWebUI
Learn how to deploy and use OpenWebUI on KloudBean. KloudBean provides self-hosted OpenWebUI, giving you the flexibility of having your dedicated server to run your OpenWebUI without any dependencies on cloud-based services.
Overview
OpenWebUI is an extensible, feature-rich, and user-friendly self-hosted web interface for LLM (Large Language Model) applications. KloudBean provides self-hosted OpenWebUI, where you have flexibility like having your dedicated server to run your OpenWebUI without any dependencies on cloud-based services.
Key Features:
- Modern Chat Interface: User-friendly chat UI for interacting with AI models
- Multiple Model Support: Support for various LLM providers (OpenAI, Anthropic, local models, etc.)
- Conversation Management: Save and manage conversations
- User Management: Multi-user support with role-based access
- Customization: Customize interface and settings
- API Access: RESTful API for integration
- Self-Hosted: Complete control over your data and infrastructure
Prerequisites
- An active KloudBean account
- Understanding of LLM concepts
- (Optional) API keys for LLM providers (OpenAI, Anthropic, etc.)
- (For DeepSeek model) Server size of 16GB or higher
Launching OpenWebUI
There are two ways to launch OpenWebUI on KloudBean:
- Launching OpenWebUI on New Instance: Create a new server dedicated to OpenWebUI
- Launching OpenWebUI on Existing Instance: Add OpenWebUI to an existing server
Method 1: Launching OpenWebUI on New Instance
In order to launch your first OpenWebUI instance, navigate to dashboard or server page from top header menu, click on "Add server".
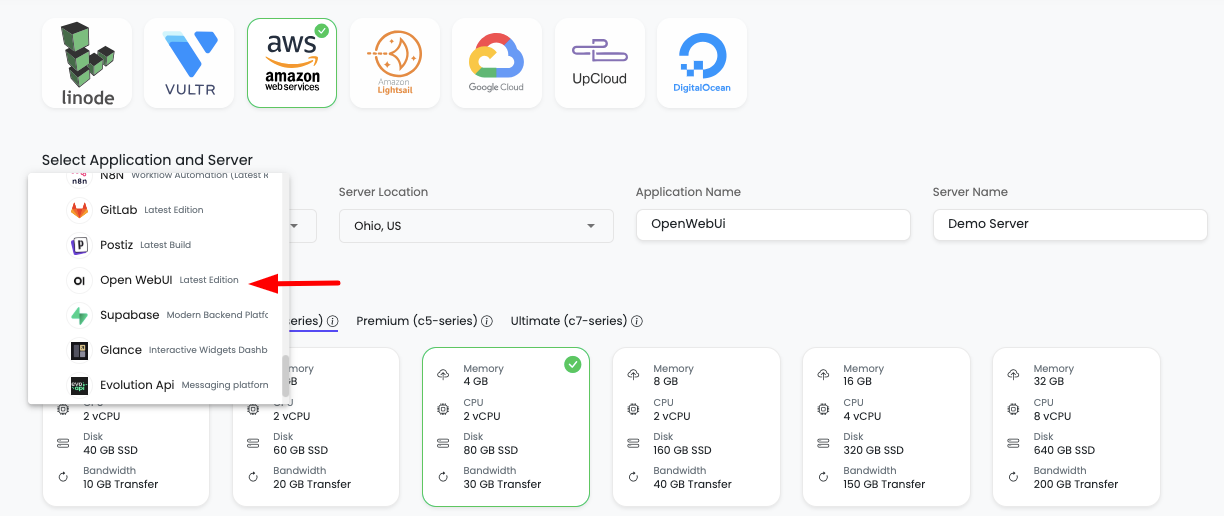
Step 1: Server Provision Screen
On server provision screen:
- Select OpenWebUI as your application: Choose "OpenWebUI" from the application selection
- Select cloud provider: Choose your preferred cloud provider (AWS, DigitalOcean, etc.)
- Select server location: Choose the geographic location for your server
- Select server size: Choose appropriate server size based on your expected workload
- Minimum: 2GB RAM for basic usage
- Recommended: 4GB+ RAM for better performance
- For DeepSeek Model: 16GB+ RAM required (see below)
- Optionally give app name and server name: Provide custom names for easier identification
Step 2: Launch Server
Click on "Launch server" and after payment your server creation will be started.
What Happens Next:
- Server provisioning begins
- OpenWebUI installation and configuration starts automatically
- Service configuration and optimization occurs
- Your OpenWebUI instance will be ready in a few minutes
Method 2: Launching OpenWebUI on Existing Instance
If you already have a server with KloudBean and wish to launch OpenWebUI on that same server, then you don't have to launch new server, you can just add new tool.
Step 1: Add Tool
- Navigate to tool from header menu or dashboard
- Click on "Add tool"
- Select tool: Choose "OpenWebUI" from the available tools
- Select server: Choose the existing server where you want to install OpenWebUI
- Launch it: Click to start the installation
Step 2: Installation Process
It will take a couple of minutes to install and configure your OpenWebUI instance.
Installation Process:
- OpenWebUI package installation
- Service configuration and optimization
- Network and security setup
Once installation is done, you will be able to view your OpenWebUI in tools page.
Step 3: Access Tools Page
In order to access your OpenWebUI UI, navigate to Tools section, here your OpenWebUI app will be listed.
Click on it and you will be in application administration page.
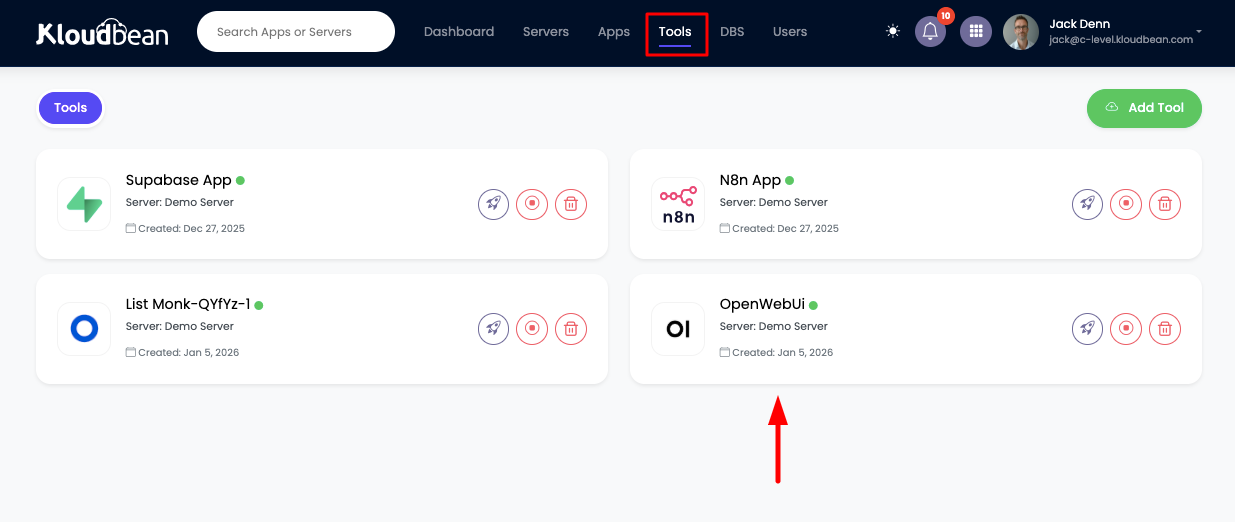
Tools Page Features:
- List of all installed tools on your server
- Tool status and health indicators
- Quick access to tool administration
- Resource usage information
Accessing OpenWebUI
Step 1: Navigate to Application Administration
In order to access it, click on it and you will be in "Application Administration".
Step 2: Get Access URL
In access tab you will see access URL.
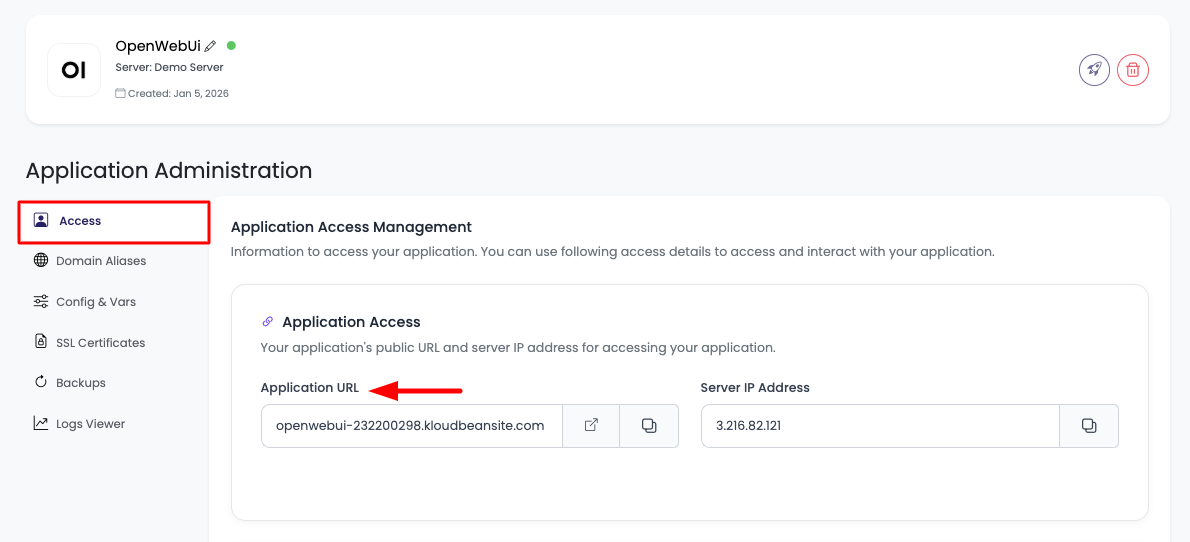
Access Options:
- Copy URL: Copy this URL and paste in browser to access it
- Visit Button: Directly click on "Visit" button to open OpenWebUI in new tab
Step 3: Create Admin Account
Create your admin user and then login using this user, and you are good to go.
First-Time Setup:
- Access the URL: Open the OpenWebUI URL in your browser
- Create Admin Account: You'll be prompted to create the first admin account
- Fill in Details:
- Username: Choose a username
- Email: Enter your email address
- Password: Set a strong password
- Create Account: Click to create your admin account
- Login: Log in with your newly created admin credentials
Congratulations!
Congrats, your OpenWebUI is ready to use!
Next Steps:
- Configure API keys for LLM providers
- Set up your first chat
- Customize settings
- Add models (including KloudBean's DeepSeek model)
OpenWebUI Basic Usage Guide
Creating Your First Chat
- Log in to OpenWebUI with your admin credentials
- Click "New Chat" button (usually in the top left or center)
- Select a Model: Choose from available models
- Start Conversation: Type your message and press Enter
- Chat History: Your conversations are automatically saved
Managing Conversations
Viewing Conversations:
- Sidebar: All your conversations are listed in the sidebar
- Search: Use the search bar to find specific conversations
- Rename: Click on conversation name to rename it
- Delete: Click the delete icon to remove conversations
Organizing Conversations:
- Folders: Create folders to organize conversations
- Tags: Add tags to categorize conversations
- Archive: Archive old conversations
Chat Features
Basic Chat Operations:
- Send Messages: Type and press Enter or click Send
- Edit Messages: Click edit icon to modify your messages
- Regenerate Response: Click regenerate to get a new response
- Copy Response: Click copy icon to copy AI responses
- Delete Messages: Click delete icon to remove messages
Advanced Features:
- System Prompts: Set system prompts for context
- Temperature Settings: Adjust creativity/randomness
- Max Tokens: Set maximum response length
- Stop Sequences: Define stop sequences
Settings and Customization
Accessing Settings:
- Click on your profile (usually top right)
- Select "Settings"
- Configure options:
- Appearance: Theme, language, etc.
- Models: Manage available models
- API Keys: Configure API keys
- Preferences: Chat preferences and defaults
Customization Options:
- Theme: Light, dark, or auto
- Language: Interface language
- Font Size: Adjust text size
- Layout: Customize interface layout
Adding API Keys and Platform Keys
Adding OpenAI API Key
To connect OpenAI models to OpenWebUI:
-
Get OpenAI API Key:
- Go to OpenAI Platform
- Navigate to API Keys section
- Click Create new secret key
- Copy the API key (you won't see it again!)
-
Add to OpenWebUI:
- In OpenWebUI, go to Settings → Models or API Keys
- Find OpenAI section
- Click Add API Key or Configure
- Paste your OpenAI API key
- Click Save
-
Verify Connection:
- Go to New Chat
- Check if OpenAI models (GPT-3.5, GPT-4, etc.) appear in model list
- Select a model and test with a simple message
Adding Anthropic (Claude) API Key
To connect Anthropic Claude models:
-
Get Anthropic API Key:
- Go to Anthropic Console
- Navigate to API Keys
- Click Create Key
- Copy the API key
-
Add to OpenWebUI:
- In OpenWebUI, go to Settings → Models or API Keys
- Find Anthropic section
- Click Add API Key or Configure
- Paste your Anthropic API key
- Click Save
-
Verify Connection:
- Check if Claude models appear in model list
- Test with a conversation
Adding Other Platform Keys
OpenWebUI supports many other platforms:
Google (Gemini):
- Get API key from Google AI Studio
- Add to OpenWebUI Settings → Models → Google
- Configure and save
OpenRouter:
- Get API key from OpenRouter
- Add to OpenWebUI Settings → Models → OpenRouter
- Configure and save
- Access multiple models through OpenRouter
Local Models (Ollama):
- Install Ollama on your server (if not already installed)
- In OpenWebUI Settings → Models → Ollama
- Set Ollama Base URL (usually
http://localhost:11434) - Configure and save
- Pull models using Ollama CLI
Other Providers:
- Cohere: Add Cohere API key
- Hugging Face: Configure Hugging Face models
- Replicate: Add Replicate API key
- Custom Endpoints: Configure custom API endpoints
Managing API Keys
Best Practices:
- Keep Keys Secure: Never share API keys publicly
- Rotate Keys: Regularly rotate API keys for security
- Monitor Usage: Track API usage and costs
- Set Limits: Configure usage limits if available
- Test First: Test with small requests before heavy usage
KloudBean's OpenRouter DeepSeek Model
Overview
You can also use KloudBean provided OpenRouter DeepSeek. Just install it and it will start showing in your OpenWebUI models list. This will be your private model.
What is DeepSeek:
- Private Model: Your own private instance of DeepSeek
- No API Costs: No per-request charges
- Full Control: Complete control over the model
- High Performance: Optimized for performance
- Privacy: Your data stays on your infrastructure
Requirements
To use this model, make sure you have 16GB+ instance.
Server Size Requirements:
- Minimum: 16GB RAM required
- Why: DeepSeek model requires significant memory
- Recommended: 16GB+ for optimal performance
- Check: Verify your server size before installing
Installing DeepSeek Model
Installation Process:
-
Ensure Server Size: Verify your server has 16GB+ RAM
-
Contact KloudBean Support (if needed):
- Via Chat: Use chat feature in KloudBean dashboard
- Via Email: Send email with your request
- Provide Details:
- Your server details
- Request to install DeepSeek model
- Confirmation of 16GB+ server size
-
KloudBean Support Will:
- Review your server configuration
- Install and configure DeepSeek model
- Set up necessary integrations
- Verify model is accessible
-
Automatic Integration:
- Once installed, DeepSeek will automatically appear in your OpenWebUI models list
- No additional configuration needed
- Ready to use immediately
Using DeepSeek Model
After Installation:
- Open OpenWebUI: Access your OpenWebUI interface
- Check Models List: DeepSeek should appear in your available models
- Select DeepSeek: Choose DeepSeek from the model dropdown
- Start Chatting: Begin using DeepSeek for your conversations
Model Features:
- High Quality: High-quality responses
- Fast Responses: Optimized for speed
- Private: Your conversations stay private
- No Limits: No API rate limits
- Full Control: Complete control over model usage
Benefits:
- Cost Savings: No per-request API costs
- Privacy: Complete data privacy
- Performance: Optimized performance
- Reliability: No dependency on external APIs
- Customization: Can be customized for your needs
Troubleshooting DeepSeek
If DeepSeek Doesn't Appear:
- Check Server Size: Verify server has 16GB+ RAM
- Check Installation: Contact KloudBean support to verify installation
- Refresh Models: Try refreshing the models list in OpenWebUI
- Check Logs: Review OpenWebUI logs for errors
Performance Issues:
- Check Resources: Monitor server CPU and memory usage
- Increase Server Size: Consider upgrading if needed
- Contact Support: Reach out to KloudBean support for optimization
Advanced Features
User Management
Adding Users:
- Go to Admin → Users
- Click Add User
- Fill in user details:
- Username: User's username
- Email: User's email
- Password: Set initial password
- Role: Admin or User
- Click Create User
Managing Users:
- Edit Users: Modify user details and permissions
- Delete Users: Remove users
- Reset Passwords: Reset user passwords
- Manage Roles: Assign admin or user roles
API Integration
OpenWebUI provides REST API:
# Create chat
curl -X POST https://your-openwebui.kloudbeansite.com/api/v1/chats \
  -H "Authorization: Bearer your-api-key" \
  -H "Content-Type: application/json" \
  -d '{
    "message": "Hello, how are you?",
    "model": "gpt-4"
  }'
API Features:
- Chat Endpoints: Create and manage chats
- Model Endpoints: List and manage models
- User Endpoints: Manage users (admin only)
- Webhook Support: Configure webhooks for events
Customization
Interface Customization:
- Themes: Customize appearance
- Layouts: Adjust interface layout
- Shortcuts: Configure keyboard shortcuts
- Preferences: Set default preferences
Model Configuration:
- Default Models: Set default model per user
- Model Parameters: Configure model-specific settings
- Custom Prompts: Set custom system prompts
- Temperature: Adjust creativity settings
Best Practices
Security
- Strong Passwords: Use strong passwords for admin accounts
- API Key Security: Never expose API keys in code or logs
- User Management: Implement proper user access controls
- Regular Updates: Keep OpenWebUI updated to latest version
- Backup Data: Regular backups of conversation data
Performance
- Resource Allocation: Allocate sufficient resources for OpenWebUI
- Model Selection: Choose appropriate models for your use case
- Caching: Enable caching when possible
- Monitor Usage: Monitor API usage and costs
Cost Management
- API Usage: Monitor API usage to control costs
- Model Selection: Use cost-effective models when appropriate
- Rate Limiting: Implement rate limiting if needed
- Private Models: Consider KloudBean's DeepSeek for cost savings
Privacy
- Data Control: Your data stays on your infrastructure
- No Third-Party Access: No data sharing with external services
- Compliance: Meet data privacy and compliance requirements
- Audit Trails: Maintain logs for audit purposes
Troubleshooting
Access Issues
Cannot Access OpenWebUI:
- Check URL: Verify the access URL is correct
- Check Service: Verify OpenWebUI service is running
- Check Network: Check network connectivity
- Review Logs: Check application logs for errors
Model Connection Issues
Models Not Appearing:
- Check API Keys: Verify API keys are correctly configured
- Check Settings: Review model settings in OpenWebUI
- Test Connection: Test API key connection
- Refresh Models: Try refreshing the models list
API Errors:
- Verify API Keys: Check API keys are valid and active
- Check Quotas: Verify API quotas haven't been exceeded
- Review Logs: Check error logs for details
- Contact Provider: Contact API provider if issues persist
DeepSeek Issues
DeepSeek Not Appearing:
- Check Server Size: Verify server has 16GB+ RAM
- Check Installation: Contact KloudBean support to verify installation
- Refresh Models: Try refreshing models list
- Check Logs: Review OpenWebUI logs
Performance Issues
Slow Responses:
- Check Resources: Monitor server CPU and memory
- Check Model: Verify model is appropriate for server size
- Optimize Settings: Adjust model parameters
- Upgrade Server: Consider upgrading server size if needed
Next Steps
After setting up OpenWebUI:
- Explore OpenWebUI Official Documentation for advanced features
- Learn about OpenWebUI GitHub Repository for latest updates
- Review OpenWebUI Community for tips and support
- Explore other AI & Tools available on KloudBean
- Learn about Application Management for managing your OpenWebUI instance