Langflow
Learn how to deploy and use Langflow on KloudBean. KloudBean provides self-hosted Langflow, giving you the flexibility of having your dedicated server to run your Langflow without any dependencies on cloud-based Langflow.
Overview
Langflow is a visual framework for building LLM (Large Language Model) applications with an intuitive drag-and-drop interface. KloudBean provides self-hosted Langflow, where you have flexibility like having your dedicated server to run your Langflow without any dependencies on cloud-based Langflow.
Key Features:
- Visual Flow Builder: Drag-and-drop interface for building AI workflows
- LLM Integration: Connect multiple LLM providers (OpenAI, Anthropic, etc.)
- Custom Components: Build custom components for your specific needs
- Templates: Use pre-built templates to get started quickly
- API Endpoints: Generate API endpoints from your flows
- Self-Hosted: Complete control over your data and infrastructure
Why Self-Hosted Langflow?
Security Benefits:
- Data Control: Complete control over your AI workflows and sensitive data
- No Third-Party Access: Your workflows and data never leave your infrastructure
- Custom Security Policies: Implement your own security policies and compliance requirements
- Audit Trails: Full control over logging and audit trails
- Network Isolation: Keep your AI workflows within your private network
- Compliance: Meet strict security and compliance requirements
- API Key Security: Your API keys stay on your infrastructure, not shared with third parties
Region-Based Compliance:
- Data Residency: Keep your AI workflows and data in specific geographic regions
- Regulatory Compliance: Meet regional data protection regulations (GDPR, CCPA, etc.)
- Sovereignty Requirements: Meet data sovereignty requirements for government and enterprise
- Local Regulations: Comply with country-specific regulations
- Data Localization: Ensure data stays within required geographic boundaries
- Custom Compliance: Implement custom compliance frameworks
- Workflow Privacy: Your AI workflows remain private and localized
Additional Benefits:
- Cost Control: Predictable costs without per-request licensing
- Customization: Full control over Langflow configuration and features
- Performance: Optimized performance for your specific use case
- Integration: Seamless integration with your existing infrastructure
- No Vendor Lock-in: Complete independence from cloud providers
- Offline Capability: Work with local models without internet dependency
Prerequisites
- An active KloudBean account
- Understanding of LLM concepts and workflows
- (Optional) API keys for LLM providers (OpenAI, Anthropic, etc.)
Launching Langflow
There are two ways to launch Langflow on KloudBean:
- Launching Langflow on New Instance: Create a new server dedicated to Langflow
- Launching Langflow on Existing Instance: Add Langflow to an existing server
Method 1: Launching Langflow on New Instance
In order to launch your first Langflow instance, navigate to dashboard or server page from top header menu, click on "Add server".
Step 1: Server Provision Screen
On server provision screen:
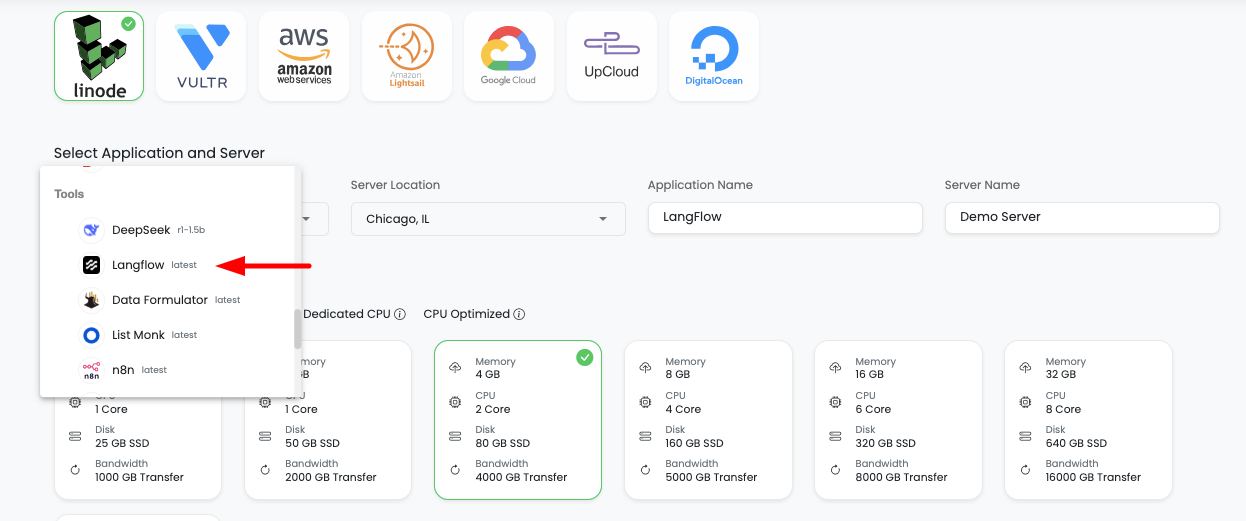
- Select Langflow as your application: Choose "Langflow" from the application selection
- Select cloud provider: Choose your preferred cloud provider (AWS, DigitalOcean, etc.)
- Select server location: Choose the geographic location for your server
- Select server size: Choose appropriate server size based on your expected workload
- Optionally give app name and server name: Provide custom names for easier identification
Step 2: Launch Server
Click on "Launch server" and after payment your server creation will be started.
What Happens Next:
- Server provisioning begins
- Langflow installation and configuration starts automatically
- Service configuration and optimization occurs
- Your Langflow instance will be ready in a few minutes
Method 2: Launching Langflow on Existing Instance
If you already have a server with KloudBean and wish to launch Langflow on that same server, then you don't have to launch new server, you can just add new tool.
Step 1: Add Tool
- Navigate to tool from header menu or dashboard
- Click on "Add tool"
- Select tool: Choose "Langflow" from the available tools
- Select server: Choose the existing server where you want to install Langflow
- Launch it: Click to start the installation
Step 2: Installation Process
It will take a couple of minutes to install and configure your Langflow instance.
Installation Process:
- Langflow package installation
- Service configuration and optimization
- Network and security setup
Once installation is done, you will be able to view your Langflow in tools page.
Step 3: Access Tools Page
In order to access your Langflow UI, navigate to Tools section, here your Langflow app will be listed.
Click on it and you will be in application administration page.
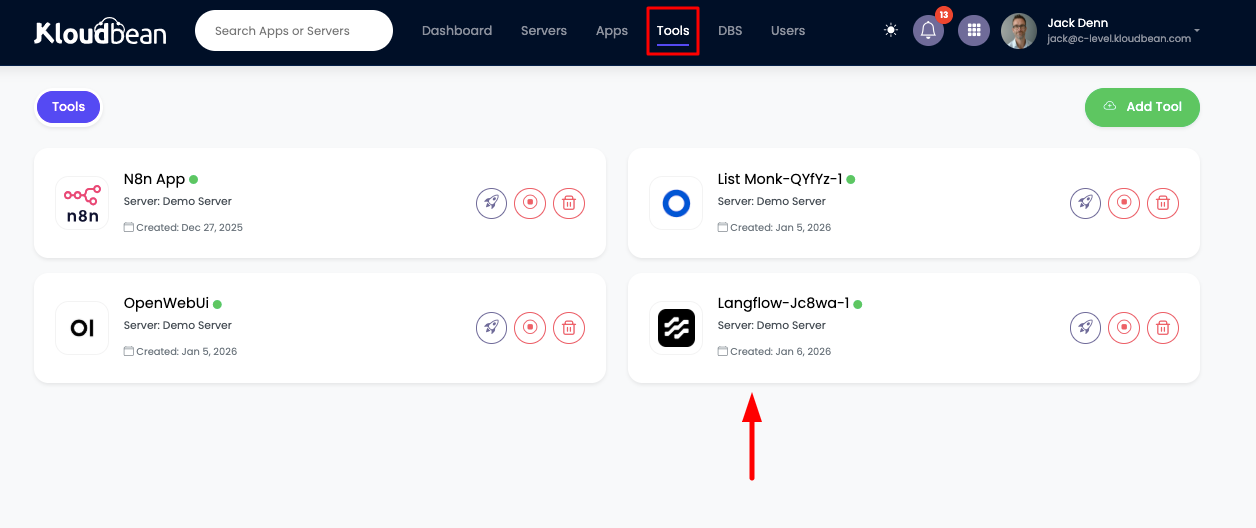
Tools Page Features:
- List of all installed tools on your server
- Tool status and health indicators
- Quick access to tool administration
- Resource usage information
Accessing Langflow
Step 1: Navigate to Application Administration
In order to access it, click on it and you will be in "Application Administration".
Step 2: Get Access URL
In access tab you will see access URL.
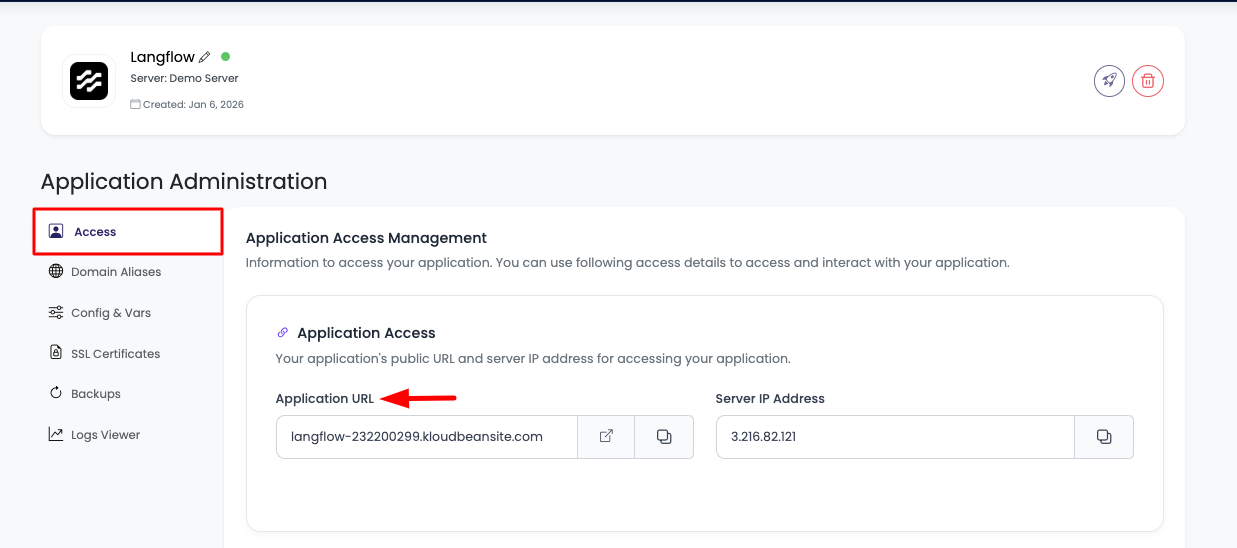
Access Options:
- Copy URL: Copy this URL and paste in browser to access it
- Visit Button: Directly click on "Visit" button to open Langflow in new tab
Step 3: Get Admin Credentials
Admin Access:
In "Application Administration" scroll down to section "Application Admin Access" to get admin access username and password.

Here you will find:
- Admin username: Username for Langflow admin access
- Admin password: Password for Langflow admin access
Use these credentials to login to your Langflow account.
Congratulations!
Congrats, your Langflow is ready to use!
Next Steps:
- Log in with admin credentials
- Create your first flow
- Configure API keys for LLM providers
- Explore templates and components
Langflow Configurations
Accessing Configuration Settings
If you want to perform actions like:
- Update Langflow env variables: Modify environment variables
- Stop Langflow: Stop the Langflow service
- Restart Langflow: Restart the Langflow service
In order to do this, navigate to "Config & Vars" section.
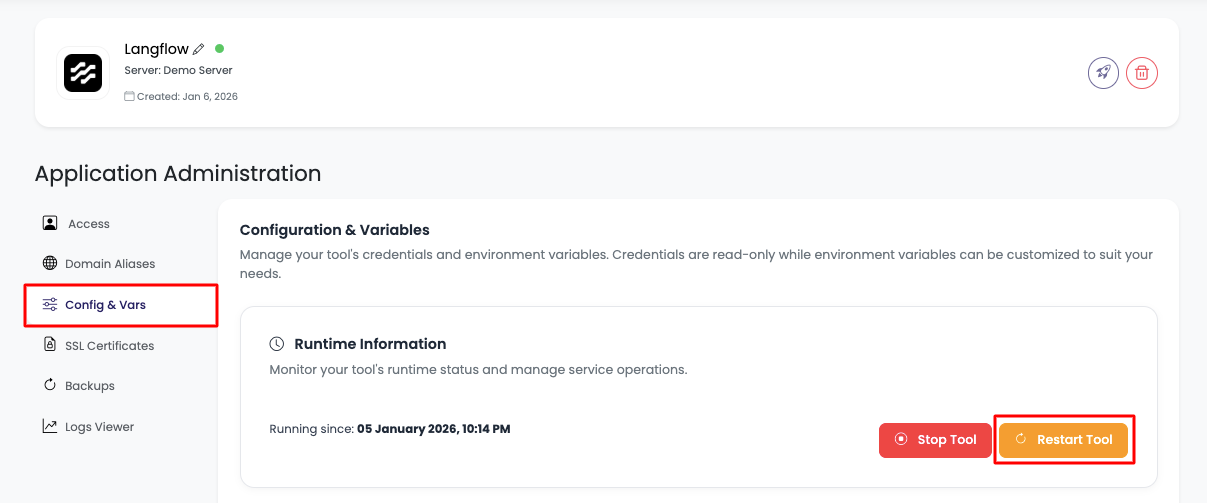
Available Options
Here you will see option to:
- Stop tool: Temporarily stop the Langflow service
- Restart tool: Restart Langflow to apply configuration changes
- Environment variables: Manage environment variables
Updating Environment Variables
Accessing Environment Variables Section
Now if you wish to update any env variable or add new variable, scroll down to "Environment Variables" section.
In this section you will see currently added vars.
Adding New Environment Variables
In order to add new var click on "Add variables".
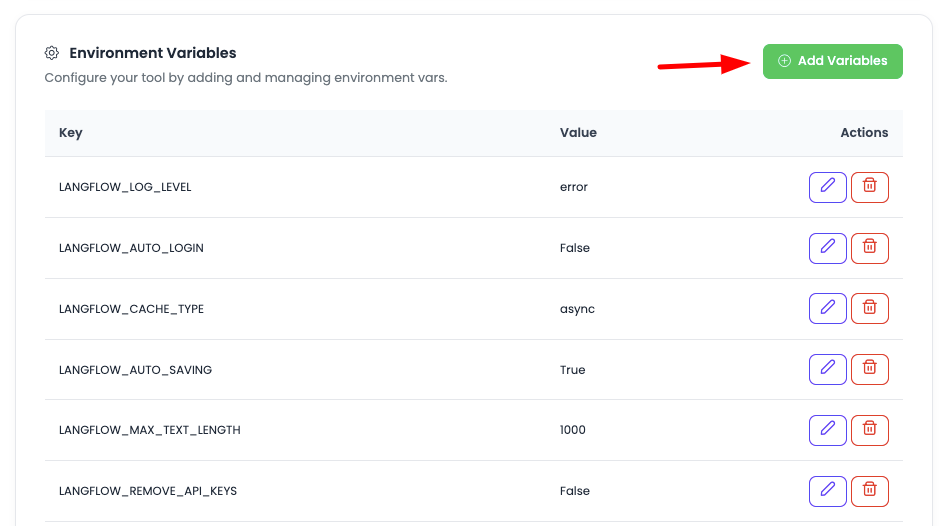
Once you click, you will have option to add variables, there will be 2 fields, Key and Value. Add them.
Adding Multiple Variables:
- Add Field: If you wish to add more variable, click on "Add field"
- Add as Many: Add as many vars you want to add
- Key-Value Pairs: Each variable requires a Key and Value
Updating Variables
Once you have added all the required variables, click on "Update changes" and it will update all the variable.
Important: Once added, make sure to restart the Langflow application, only after restarting these variables will be reflected.
Important Environment Variables
Most Commonly Used Variables
Here are the most commonly used Langflow environment variables that developers typically need to configure:
Application Configuration
LANGFLOW_LOG_LEVEL
- Purpose: Sets the logging level for Langflow
- Usage: Control the verbosity of logs
- Example:
LANGFLOW_LOG_LEVEL=infoorLANGFLOW_LOG_LEVEL=error - When to Use: Adjust based on your debugging needs
- Options:
debug,info,warning,error,critical
SMTP Configuration
LANGFLOW_SMTP_HOST
- Purpose: SMTP server hostname for sending emails
- Usage: Set your SMTP server address
- Example:
LANGFLOW_SMTP_HOST=smtp.gmail.comorLANGFLOW_SMTP_HOST=smtp.sendgrid.net - When to Use: Required for email functionality (notifications, alerts)
- Common Providers:
- Gmail:
smtp.gmail.com - SendGrid:
smtp.sendgrid.net - Mailgun:
smtp.mailgun.org - AWS SES:
email-smtp.region.amazonaws.com
- Gmail:
LANGFLOW_SMTP_PORT
- Purpose: SMTP server port
- Usage: Set SMTP server port (usually 587 for TLS, 465 for SSL)
- Example:
LANGFLOW_SMTP_PORT=587 - When to Use: Required when configuring SMTP
- Common Ports:
- 587: TLS (recommended)
- 465: SSL
- 25: Unencrypted (not recommended)
LANGFLOW_SMTP_USER
- Purpose: SMTP authentication username
- Usage: Set your SMTP account username/email
- Example:
[email protected] - When to Use: Required for SMTP authentication
LANGFLOW_SMTP_PASSWORD
- Purpose: SMTP authentication password
- Usage: Set your SMTP account password or app password
- Example:
LANGFLOW_SMTP_PASSWORD=your-smtp-password - When to Use: Required for SMTP authentication
- Security: Keep this secure and never expose in code
LANGFLOW_SMTP_FROM
- Purpose: Default sender email address
- Usage: Set the default "from" email address
- Example:
[email protected] - When to Use: Required for sending emails
- Important: Must be a valid email address from your domain
LANGFLOW_SMTP_TLS
- Purpose: Enable or disable TLS encryption for SMTP
- Usage: Set to
trueto enable TLS encryption - Example:
LANGFLOW_SMTP_TLS=true - When to Use: Required when using port 587 (TLS)
- Security: Always enable TLS for secure email transmission
Authentication Configuration
LANGFLOW_AUTO_LOGIN
- Purpose: Enable or disable automatic login
- Usage: Set to
trueto enable automatic login - Example:
LANGFLOW_AUTO_LOGIN=false - When to Use: Set to
falsefor production environments requiring authentication
LANGFLOW_SUPERUSER
- Purpose: Create a superuser account
- Usage: Set superuser credentials
- Example:
LANGFLOW_SUPERUSER=admin:password - When to Use: For initial admin account creation
LANGFLOW_SUPERUSER_PASSWORD
- Purpose: Superuser password
- Usage: Set superuser password
- Example:
LANGFLOW_SUPERUSER_PASSWORD=secure-password - When to Use: When creating superuser account
API Keys Configuration
LANGFLOW_OPENAI_API_KEY
- Purpose: OpenAI API key for using OpenAI models
- Usage: Set your OpenAI API key
- Example:
LANGFLOW_OPENAI_API_KEY=sk-your-openai-key - When to Use: When you want to use OpenAI models in your flows
- Security: Keep this secure and never expose in code
LANGFLOW_ANTHROPIC_API_KEY
- Purpose: Anthropic API key for using Claude models
- Usage: Set your Anthropic API key
- Example:
LANGFLOW_ANTHROPIC_API_KEY=your-anthropic-key - When to Use: When you want to use Anthropic Claude models
- Security: Keep this secure and never expose in code
LANGFLOW_GOOGLE_API_KEY
- Purpose: Google API key for using Google models (Gemini)
- Usage: Set your Google API key
- Example:
LANGFLOW_GOOGLE_API_KEY=your-google-key - When to Use: When you want to use Google Gemini models
Performance Configuration
LANGFLOW_WORKERS
- Purpose: Number of worker processes
- Usage: Set the number of workers for handling requests
- Example:
LANGFLOW_WORKERS=4 - When to Use: Adjust based on your server capacity and expected load
LANGFLOW_TIMEOUT
- Purpose: Request timeout in seconds
- Usage: Set timeout for API requests
- Example:
LANGFLOW_TIMEOUT=300 - When to Use: Adjust based on your flow complexity
Security Configuration
LANGFLOW_CORS_ORIGINS
- Purpose: Allowed CORS origins
- Usage: Set allowed origins for CORS
- Example:
LANGFLOW_CORS_ORIGINS=https://yourdomain.com,https://app.yourdomain.com - When to Use: When you need to allow cross-origin requests
- Security: Only add trusted domains
LANGFLOW_DISABLE_TELEMETRY
- Purpose: Disable telemetry data collection
- Usage: Set to
trueto disable telemetry - Example:
LANGFLOW_DISABLE_TELEMETRY=true - When to Use: For privacy compliance or to disable data collection
Complete Environment Variables Reference
For a complete list of all available Langflow environment variables, their descriptions, default values, and usage instructions, please refer to the official Langflow documentation:
🔗 Langflow Official Environment Variables Documentation
The official documentation includes:
- Complete list of all environment variables
- Detailed descriptions and use cases
- Default values for each variable
- Configuration examples
- Best practices and recommendations
- Security considerations
- Advanced configuration options
When to Consult Official Documentation:
- When you need variables not listed here
- For advanced configuration options
- To understand variable interactions
- For latest updates and new variables
- For troubleshooting configuration issues
Basic Usage Guide
Creating Your First Flow
- Log in to Langflow with your admin credentials
- Click "New Flow" or the "+" button
- Add Components: Drag components from the sidebar onto the canvas
- Connect Components: Connect components to create your workflow
- Configure Components: Click on components to configure their settings
- Test Flow: Click "Run" to test your flow
- Save Flow: Click "Save" to save your flow
Common Components
LLM Components:
- OpenAI: Connect to OpenAI models (GPT-3.5, GPT-4, etc.)
- Anthropic: Connect to Anthropic Claude models
- Google: Connect to Google Gemini models
- Local Models: Connect to local LLM models
Data Processing:
- Text Input: Input text for processing
- Text Output: Output processed text
- Data Transformers: Transform and process data
- Conditional Logic: Add decision points in flows
Templates:
- Chatbot Template: Pre-built chatbot flow
- Content Generation: Template for content generation
- Data Analysis: Template for data analysis
- Document Processing: Template for document processing
Managing Flows
Flow Management:
- Save Flows: Save your flows for later use
- Load Flows: Load saved flows
- Export Flows: Export flows as JSON
- Import Flows: Import flows from JSON
- Share Flows: Share flows with team members
Version Control:
- Version History: Track changes to flows
- Revert Changes: Revert to previous versions
- Compare Versions: Compare different versions
API Endpoints
Generating API Endpoints:
- Create Your Flow: Build your flow in Langflow
- Deploy Flow: Click "Deploy" to create API endpoint
- Get API URL: Copy the generated API URL
- Use API: Call the API endpoint from your applications
API Usage Example:
curl -X POST https://your-langflow.kloudbeansite.com/api/v1/run/your-flow-id \
  -H "Content-Type: application/json" \
  -d '{
    "input": "Your input text here"
  }'
Best Practices
Security
- Strong Secret Keys: Use strong, random secret keys
- API Key Security: Never expose API keys in code or logs
- CORS Configuration: Only allow trusted domains
- Authentication: Enable authentication for production
- Regular Updates: Keep Langflow updated to latest version
Performance
- Resource Allocation: Allocate sufficient resources for Langflow
- Worker Configuration: Configure appropriate number of workers
- Timeout Settings: Set appropriate timeout values
- Flow Optimization: Optimize flows for better performance
Development
- Test Flows: Always test flows before deployment
- Version Control: Use version control for flows
- Documentation: Document complex flows
- Error Handling: Implement proper error handling
Cost Management
- API Usage: Monitor API usage to control costs
- Model Selection: Use cost-effective models when appropriate
- Caching: Implement caching when possible
- Rate Limiting: Use rate limiting to control costs
Troubleshooting
Access Issues
Cannot Access Langflow:
- Check URL: Verify the access URL is correct
- Check Service: Verify Langflow service is running
- Check Network: Check network connectivity
- Review Logs: Check application logs for errors
Configuration Issues
Variables Not Applied:
- Restart Service: Restart Langflow after changing variables
- Check Syntax: Verify variable names and values are correct
- Check Logs: Review logs for configuration errors
SMTP Not Working:
- Check Settings: Verify all SMTP variables are set correctly
- Test Connection: Test SMTP connection with credentials
- Check Ports: Verify SMTP ports are not blocked
Flow Issues
Flows Not Running:
- Check Components: Verify all components are properly configured
- Check API Keys: Verify API keys are valid and active
- Review Logs: Check flow execution logs for errors
- Test Components: Test individual components
Performance Issues
Slow Performance:
- Check Resources: Monitor server CPU and memory usage
- Optimize Flows: Simplify complex flows
- Adjust Workers: Increase number of workers if needed
- Check Network: Verify network connectivity
Next Steps
After setting up Langflow:
- Explore Langflow Official Documentation for advanced features
- Learn about Langflow Components for building flows
- Review Langflow Templates for pre-built solutions
- Check Langflow GitHub Repository for latest updates
- Explore other AI & Tools available on KloudBean
- Learn about Application Management for managing your Langflow instance