Listmonk
Learn how to deploy and use Listmonk on KloudBean. KloudBean provides self-hosted Listmonk, giving you the flexibility of having your dedicated server to run your Listmonk without any dependency on cloud-based Listmonk.
Overview
KloudBean provides self-hosted Listmonk, where you have flexibility like having your dedicated server to run your Listmonk without any dependency on cloud-based Listmonk.
KloudBean Advantages:
- Optimized Instance: KloudBean provides you an optimized instance for your Listmonk deployment
- Optimized Database: Dedicated optimized database for your Listmonk instance
- Optimized Setup: Optimized setup where your Listmonk runs seamlessly and powerfully
- Production Ready: The environment is production ready where it has all the security on it
- Scalable Solution: You are having a scalable solution with KloudBean, as your users and campaigns increase you can increase server size anytime
Important Limitation
You can have only one Listmonk instance on a single server. This is to get the maximum performance and security. KloudBean does not allow adding multiple Listmonk on same server. If you are in need of multiple Listmonk, you have to launch separate instance for each.
Why This Limitation:
- Maximum Performance: One instance per server ensures optimal resource allocation
- Security: Isolated instances provide better security
- Resource Management: Prevents resource conflicts and competition
- Stability: Ensures stable and reliable Listmonk operation
If You Need Multiple Instances:
- Separate Servers: Launch a separate server for each Listmonk instance
- Resource Allocation: Each instance gets dedicated server resources
- Isolation: Complete isolation between instances
- Scalability: Scale each instance independently
Prerequisites
- An active KloudBean account
- Understanding of email marketing concepts
- (For existing server) Server size of 2GB or higher
Launching Listmonk
There are two ways to launch Listmonk on KloudBean:
- Launching Listmonk on New Instance: Create a new server dedicated to Listmonk
- Launching Listmonk on Existing Instance: Add Listmonk to an existing server (2GB+ required)
Method 1: Launching Listmonk on New Instance
In order to launch your first Listmonk instance, navigate to dashboard or server page from top header menu, click on "Add server".
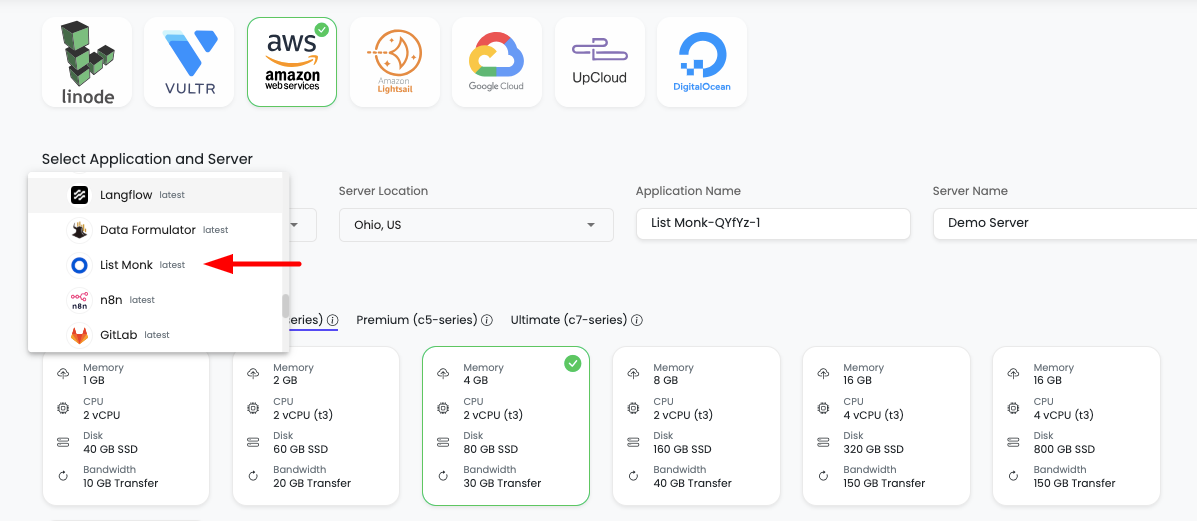
Step 1: Server Provision Screen
On server provision screen:
- Select Listmonk as your application: Choose "Listmonk" from the application selection
- Select cloud provider: Choose your preferred cloud provider (AWS, DigitalOcean, etc.)
- Select server location: Choose the geographic location for your server
- Select server size: Choose appropriate server size based on your expected workload
- Optionally give app name and server name: Provide custom names for easier identification
Step 2: Launch Server
Click on "Launch server" and after payment your server creation will be started.
What Happens Next:
- Server provisioning begins
- Listmonk installation and configuration starts automatically
- Database setup and optimization occurs
- Your Listmonk instance will be ready in a few minutes
Method 2: Launching Listmonk on Existing Instance
If you already have a server with KloudBean (size 2GB+) and wish to launch Listmonk on that same server, then you don't have to launch new server, you can just add new tool.
Step 1: Add Tool
- Navigate to tool from header menu or dashboard
- Click on "Add tool"
- Select tool: Choose "Listmonk" from the available tools
- Select server: Choose the existing server where you want to install Listmonk (must be 2GB+)
- Launch it: Click to start the installation
Server Size Requirement:
- Minimum: 2GB server size required
- Why: Listmonk requires sufficient resources for optimal performance
- Check: Verify your server size before attempting installation
Step 2: Installation Process
It will take a couple of minutes to install and configure your Listmonk instance.
Installation Process:
- Listmonk package installation
- Database setup and configuration
- Service configuration and optimization
- Network and security setup
Once installation is done, you will be able to view your Listmonk in tools page.
Step 3: Access Tools Page
From here click on "Tools" and you will see tool listed there.
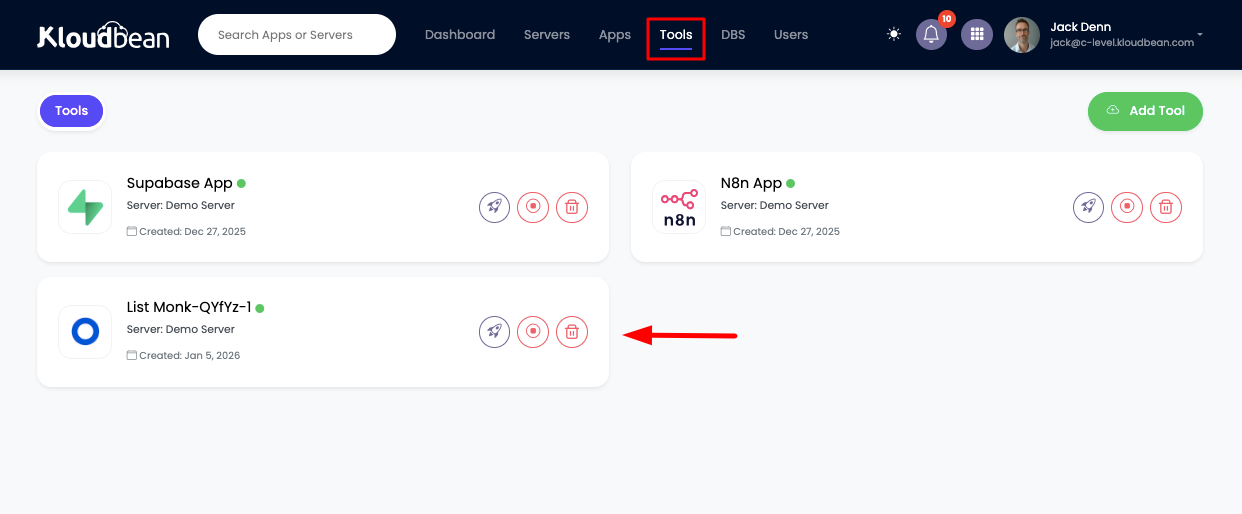
Tools Page Features:
- List of all installed tools on your server
- Tool status and health indicators
- Quick access to tool administration
- Resource usage information
Accessing Listmonk
Step 1: Navigate to Application Administration
In order to access it, click on it and you will be in "Application Administration".
Step 2: Get Access URL
In access tab you will see access URL.
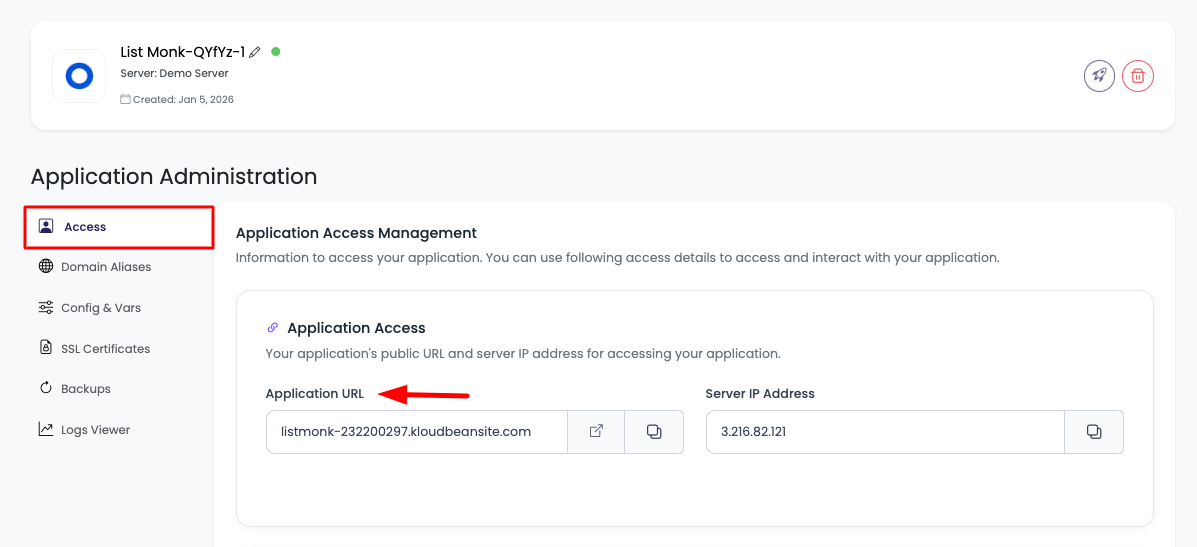
Access Options:
- Copy URL: Copy this URL and paste in browser to access it
- Visit Button: Directly click on "Visit" button to open Listmonk in new tab
It will prompt to enter access username and password.
Step 3: Get Admin Credentials
Admin Access Credentials:
On Access tab scroll down to "Application Admin Access".
Here you will find:
- Admin username: Username for Listmonk admin access
- Admin password: Password for Listmonk admin access
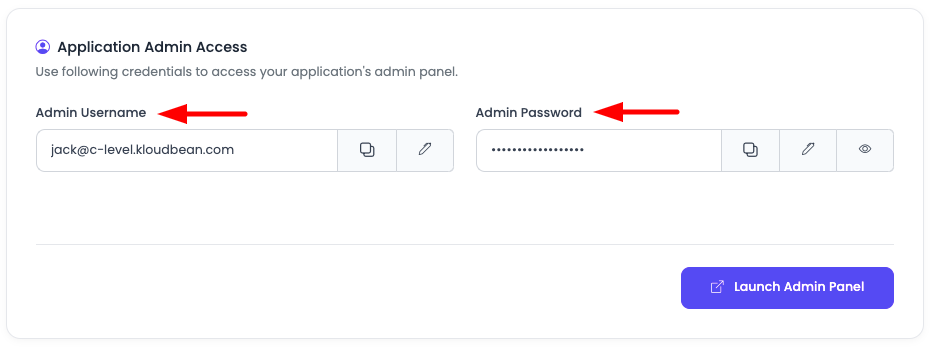
Use these credentials to login to your Listmonk account.
Congratulations!
Congrats, your Listmonk is ready to use!
Next Steps:
- Start creating your first mailing list
- Set up your first campaign
- Configure SMTP settings
- Import subscribers
Listmonk Configurations
Accessing Configuration Settings
If you want to perform actions like:
- Update Listmonk env variables: Modify environment variables
- Stop Listmonk: Stop the Listmonk service
- Restart Listmonk: Restart the Listmonk service
In order to do this, navigate to "Config & Vars" section.
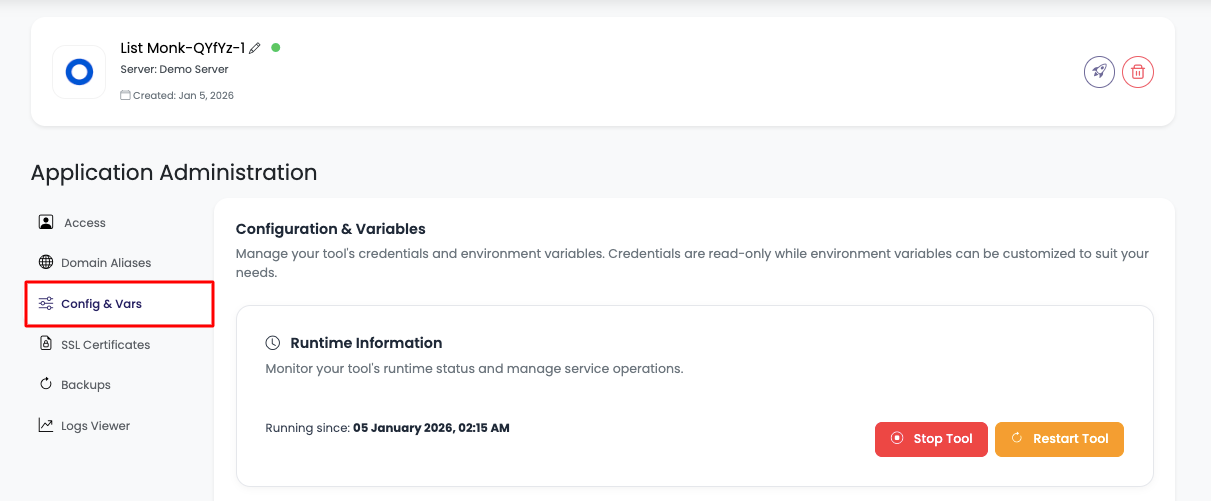
Available Options
Here you will see option to:
- Stop tool: Temporarily stop the Listmonk service
- Restart tool: Restart Listmonk to apply configuration changes
- Credentials and access keys: View all API keys and connection strings
- Environment variables: Manage environment variables
Updating Environment Variables
Accessing Environment Variables Section
Now if you wish to update any env variable or add new variable, scroll down to "Environment Variables" section.
In this section you will see currently added vars.
Adding New Environment Variables
In order to add new var click on "Add variables".
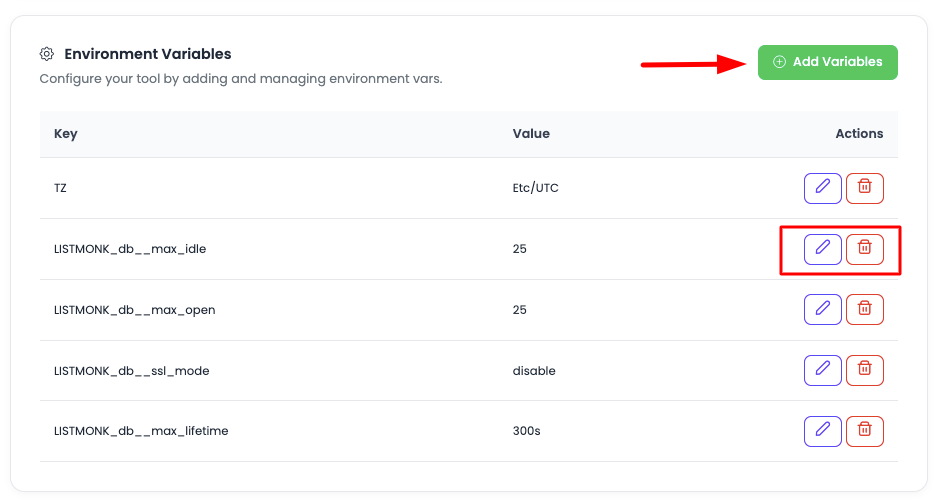
Once you click, you will have option to add variables, there will be 2 fields, Key and Value. Add them.
Adding Multiple Variables:
- Add Field: If you wish to add more variable, click on "Add field"
- Add as Many: Add as many vars you want to add
- Key-Value Pairs: Each variable requires a Key and Value
Updating Variables
Once you have added all the required variables, click on "Update changes" and it will update all the variable.
Important: Once added, make sure to restart the Listmonk application, only after restarting these variables will be reflected.
Important Environment Variables
Most Commonly Used Variables
Here are the most commonly used Listmonk environment variables that developers typically need to configure:
Site URL Configuration
LISTMONK_app__site_name
- Purpose: Sets the name of your Listmonk site
- Usage: Display name for your Listmonk instance
- Example:
LISTMONK_app__site_name=My Newsletter - When to Use: To customize the site name shown in the interface
LISTMONK_app__site_url
- Purpose: The public URL of your Listmonk instance
- Usage: Used for generating links in emails and public pages
- Example:
LISTMONK_app__site_url=https://listmonk.yourdomain.com - When to Use: Required for proper email links and public page URLs
- Important: Must match your actual domain configuration
LISTMONK_app__check_updates
- Purpose: Enable or disable update checking
- Usage: Control whether Listmonk checks for updates
- Example:
LISTMONK_app__check_updates=true - When to Use: Set to
falseto disable update checks
SMTP Configuration
LISTMONK_smtp__host
- Purpose: Specifies the SMTP server address for sending emails
- Usage: Set your SMTP server hostname
- Example:
LISTMONK_smtp__host=smtp.gmail.comorLISTMONK_smtp__host=smtp.sendgrid.net - When to Use: Required for sending emails through Listmonk
- Common Providers:
- Gmail:
smtp.gmail.com - SendGrid:
smtp.sendgrid.net - Mailgun:
smtp.mailgun.org - AWS SES:
email-smtp.region.amazonaws.com
- Gmail:
LISTMONK_smtp__port
- Purpose: Defines the port for the SMTP server
- Usage: Set SMTP server port (usually 587 for TLS, 465 for SSL, 25 for unencrypted)
- Example:
LISTMONK_smtp__port=587 - When to Use: Required when configuring SMTP
- Common Ports:
- 587: TLS (recommended)
- 465: SSL
- 25: Unencrypted (not recommended)
LISTMONK_smtp__user
- Purpose: Sets the username for SMTP authentication
- Usage: Set your SMTP account username/email
- Example:
[email protected] - When to Use: Required for SMTP authentication
LISTMONK_smtp__password
- Purpose: Sets the password for SMTP authentication
- Usage: Set your SMTP account password or app password
- Example:
LISTMONK_smtp__password=your-smtp-password - When to Use: Required for SMTP authentication
- Security: Keep this secure and never expose in code
LISTMONK_smtp__from
- Purpose: Specifies the default 'From' email address for outgoing emails
- Usage: Set the default sender email address
- Example:
[email protected] - When to Use: Required for sending emails
- Important: Must be a valid email address from your domain
LISTMONK_smtp__from_name
- Purpose: Sets the default 'From' name for outgoing emails
- Usage: Display name shown in the "From" field
- Example:
LISTMONK_smtp__from_name=Your Company Name - When to Use: Recommended for better email presentation
LISTMONK_smtp__tls_enabled
- Purpose: Enable or disable TLS encryption
- Usage: Set to
trueto enable TLS encryption - Example:
LISTMONK_smtp__tls_enabled=true - When to Use: Required when using port 587 (TLS)
- Security: Always enable TLS for secure email transmission
LISTMONK_smtp__ssl_enabled
- Purpose: Enable or disable SSL encryption
- Usage: Set to
trueto enable SSL encryption - Example:
LISTMONK_smtp__ssl_enabled=false - When to Use: Required when using port 465 (SSL)
Use either TLS or SSL, not both.
LISTMONK_smtp__max_conns
- Purpose: Maximum number of concurrent SMTP connections
- Usage: Set the maximum concurrent connections to SMTP server
- Example:
LISTMONK_smtp__max_conns=10 - When to Use: Adjust based on your SMTP provider's limits
LISTMONK_smtp__max_msg_retries
- Purpose: Maximum number of retry attempts for failed email sends
- Usage: Set how many times to retry failed email sends
- Example:
LISTMONK_smtp__max_msg_retries=3 - When to Use: To handle temporary SMTP failures
Email Configuration
LISTMONK_app__enable_public_sub_page
- Purpose: Enable or disable public subscription page
- Usage: Control whether public subscription page is available
- Example:
LISTMONK_app__enable_public_sub_page=true - When to Use: Set to
falseto disable public subscription page
LISTMONK_app__enable_public_archive
- Purpose: Enable or disable public campaign archive
- Usage: Control whether public campaign archive is available
- Example:
LISTMONK_app__enable_public_archive=true - When to Use: Set to
falseto disable public archive
LISTMONK_app__bounce_webhooks_enabled
- Purpose: Enable bounce webhooks
- Usage: Enable webhook notifications for email bounces
- Example:
LISTMONK_app__bounce_webhooks_enabled=true - When to Use: When you need to receive bounce notifications via webhooks
LISTMONK_app__bounce_webhooks_secret
- Purpose: Secret key for bounce webhooks
- Usage: Set secret key for validating bounce webhooks
- Example:
LISTMONK_app__bounce_webhooks_secret=your-secret-key - When to Use: Required when
LISTMONK_app__bounce_webhooks_enabled=true
Performance Configuration
LISTMONK_app__batch_size
- Purpose: Number of emails to send in each batch
- Usage: Set batch size for email sending
- Example:
LISTMONK_app__batch_size=1000 - When to Use: Adjust based on your SMTP provider's limits and server capacity
LISTMONK_app__concurrency
- Purpose: Number of concurrent email sending workers
- Usage: Set number of concurrent workers for sending emails
- Example:
LISTMONK_app__concurrency=10 - When to Use: Adjust based on your server capacity and SMTP provider limits
LISTMONK_app__message_rate
- Purpose: Maximum number of messages to send per second
- Usage: Rate limit for email sending
- Example:
LISTMONK_app__message_rate=100 - When to Use: To control sending rate and avoid overwhelming SMTP server
Security Configuration
LISTMONK_app__privacy__individual_tracking
- Purpose: Enable or disable individual email tracking
- Usage: Control whether to track individual email opens/clicks
- Example:
LISTMONK_app__privacy__individual_tracking=true - When to Use: Set to
falsefor privacy compliance (GDPR, etc.)
LISTMONK_app__privacy__unsubscribe_header
- Purpose: Enable unsubscribe header in emails
- Usage: Control whether to include List-Unsubscribe header
- Example:
LISTMONK_app__privacy__unsubscribe_header=true - When to Use: Required for email compliance (CAN-SPAM, GDPR)
Environment Variable Naming Convention
Important: Listmonk uses a specific naming convention for environment variables:
- Format:
LISTMONK_[section]__[key] - Double Underscore: Use double underscore (
__) to separate nested configuration - Lowercase: Keys are typically lowercase
- Examples:
- ✅
LISTMONK_smtp__from - ✅
LISTMONK_smtp__host - ❌
LISTMONK_smtp_from(missing double underscore) - ❌
listmonk_smtp__host(missing LISTMONK_ prefix)
- ✅
Complete Environment Variables Reference
For a complete list of all available Listmonk environment variables, their descriptions, default values, and usage instructions, please refer to the official Listmonk documentation:
🔗 Listmonk Official Configuration Documentation
The official documentation includes:
- Complete list of all environment variables
- Detailed descriptions and use cases
- Default values for each variable
- Configuration examples
- Best practices and recommendations
- Security considerations
- Advanced configuration options
When to Consult Official Documentation:
- When you need variables not listed here
- For advanced configuration options
- To understand variable interactions
- For latest updates and new variables
- For troubleshooting configuration issues
Best Practices
SMTP Configuration
- Use TLS: Always use TLS (port 587) for secure email transmission
- Test Connection: Test SMTP connection before sending campaigns
- Monitor Limits: Be aware of your SMTP provider's sending limits
- Use App Passwords: For Gmail, use app passwords instead of regular passwords
- Verify DNS: Set up SPF, DKIM, and DMARC records for better deliverability
Security
- Strong Passwords: Use strong, unique passwords for admin accounts
- Secure Credentials: Never expose SMTP passwords or database credentials
- Environment Variables: Store sensitive data in environment variables
- Regular Updates: Keep Listmonk updated to latest version
- Backup Regularly: Regular backups of database and configuration
Performance
- Batch Size: Adjust batch size based on your SMTP provider's limits
- Concurrency: Set appropriate concurrency based on server capacity
- Rate Limiting: Use rate limiting to avoid overwhelming SMTP server
- Monitor Resources: Monitor server resources during large campaigns
Email Deliverability
- SPF Records: Set up SPF records in your DNS
- DKIM Records: Configure DKIM for email authentication
- DMARC Policy: Set up DMARC policy for email security
- Warm-up: Gradually increase sending volume for new domains
- List Hygiene: Regularly clean your subscriber lists
Troubleshooting
SMTP Issues
Emails Not Sending:
- Check SMTP Settings: Verify SMTP host, port, username, and password
- Test Connection: Test SMTP connection using email client
- Check Logs: Review Listmonk logs for SMTP errors
- Verify Credentials: Ensure SMTP credentials are correct
- Check Provider Limits: Verify you haven't exceeded SMTP provider limits
Authentication Errors:
- Verify Credentials: Check SMTP username and password
- App Passwords: For Gmail, ensure you're using app passwords
- TLS/SSL: Verify TLS/SSL settings match your SMTP provider requirements
Database Issues
Connection Errors:
- Verify Credentials: Check database credentials
- Check Connection: Test database connection
- Review Logs: Check error logs for database errors
- KloudBean Support: Contact KloudBean support if database is managed
Performance Issues
Slow Campaign Sending:
- Check Resources: Monitor server CPU and memory usage
- Adjust Batch Size: Reduce batch size if server is overloaded
- Adjust Concurrency: Reduce concurrent workers
- Check SMTP Limits: Verify SMTP provider rate limits
Next Steps
After setting up Listmonk:
- Learn about Listmonk Features for managing campaigns
- Explore Listmonk API Documentation for integrations
- Review Email Marketing Best Practices for effective campaigns
- Check Listmonk Official Documentation for advanced features
- Explore other AI & Tools available on KloudBean