n8n
Learn how to deploy and use n8n workflow automation on KloudBean. KloudBean provides self-hosted n8n, giving you the flexibility of having your dedicated server to run your n8n workflows without any dependency on cloud-based n8n.
Overview
KloudBean provides self-hosted n8n, where you have flexibility like having your dedicated server to run your n8n workflow without any dependency on cloud-based n8n.
KloudBean Advantages:
- Optimized Instance: KloudBean provides you an optimized instance for your n8n workflows
- Optimized Database: Dedicated optimized database for your n8n instance
- Optimized Setup: Optimized setup where your n8n runs seamlessly and strongly
- Multiple Instances: Option to launch multiple n8n instances on the same server
- Scalable Solution: As your workflows increase, you can increase server size anytime
Multiple Instances
You have the option to launch multiple n8n instances on the same server, but how many instances you should launch is depending on server size you selected and how much heavy workload you are using.
Considerations:
- Server Size: Larger servers can handle more instances
- Workload Intensity: Heavy workloads require more resources per instance
- Resource Allocation: Each instance consumes CPU, memory, and disk resources
- Performance: Too many instances on a small server can degrade performance
Best Practices:
- Start Small: Begin with one instance and scale as needed
- Monitor Resources: Watch server resource usage before adding more instances
- Workload Assessment: Evaluate your workflow complexity and resource needs
- Scale Server: Increase server size if you need more instances
Scalability
You are having a scalable solution with KloudBean, as your workflows increase you can increase server size anytime.
Scaling Benefits:
- Flexible Growth: Start small and scale up as needed
- No Migration: Scale without migrating to a new server
- Resource On-Demand: Add resources when workflows grow
- Cost Effective: Pay only for what you need, when you need it
Prerequisites
- An active KloudBean account
- Understanding of workflow automation concepts
- (Optional) Basic knowledge of n8n workflows
Launching n8n
There are two ways to launch n8n on KloudBean:
- Launching n8n on New Instance: Create a new server dedicated to n8n
- Launching n8n on Existing Instance: Add n8n to an existing server
Method 1: Launching n8n on New Instance
In order to launch your first n8n instance, navigate to dashboard or server page from top header menu, click on "Add server".
Step 1: Server Provision Screen
On server provision screen:
- Select n8n as your application: Choose "n8n" from the application selection
- Select cloud provider: Choose your preferred cloud provider (AWS, DigitalOcean, etc.)
- Select server location: Choose the geographic location for your server
- Select server size: Choose appropriate server size based on your expected workload
- Optionally give app name and server name: Provide custom names for easier identification
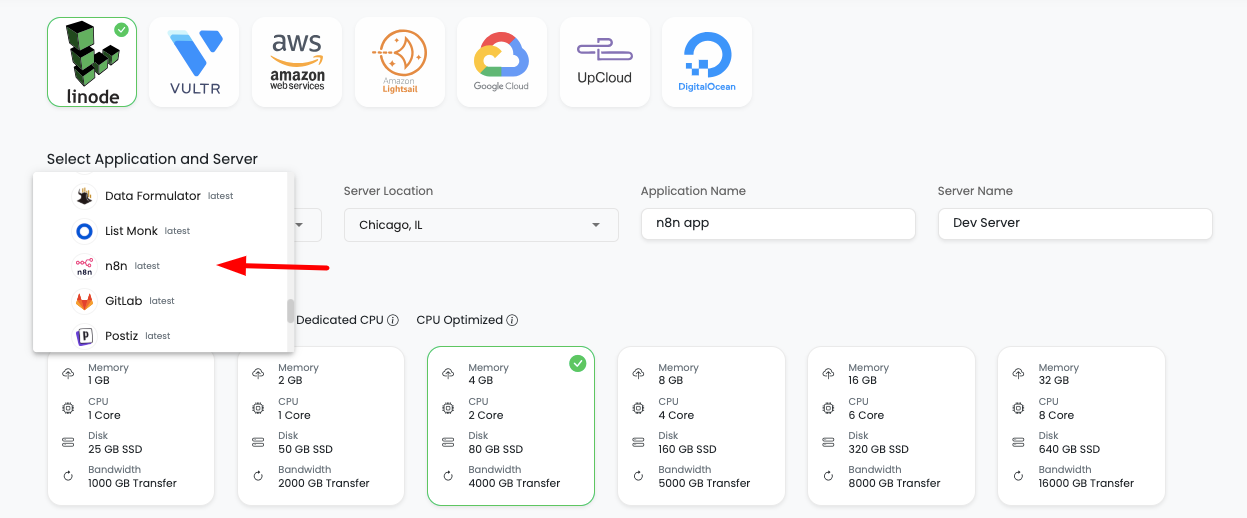
Step 2: Launch Server
Click on "Launch server" and after payment your server creation will be started.
What Happens Next:
- Server provisioning begins
- n8n installation and configuration starts automatically
- Database setup and optimization occurs
- Your n8n instance will be ready in a few minutes
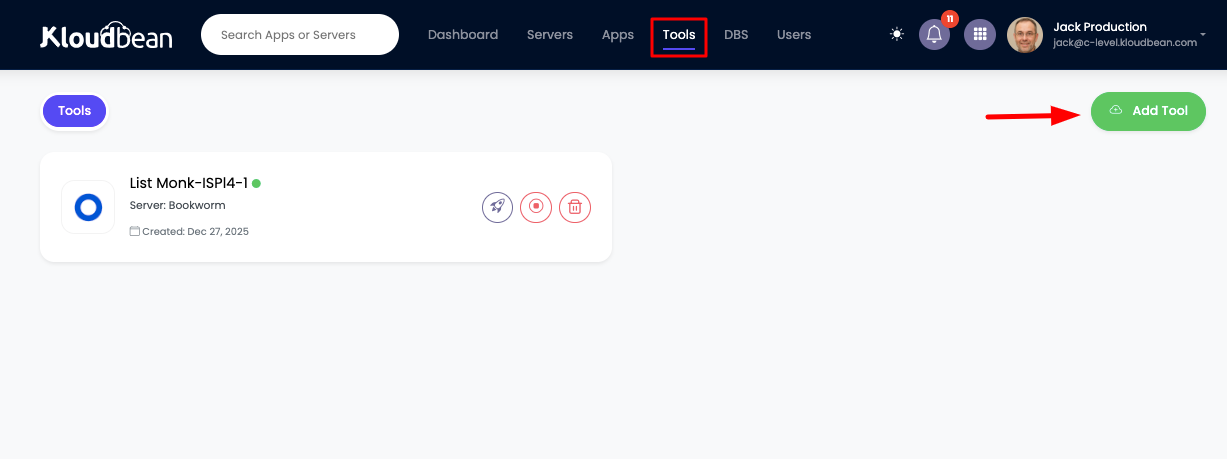
Method 2: Launching n8n on Existing Instance
If you already have a server with KloudBean and wish to launch n8n on that same server, then you don't have to launch new server, you can just add new tool.
Step 1: Add Tool
- Navigate to tool from header menu or dashboard
- Click on "Add tool"
- Select tool: Choose "n8n" from the available tools
- Select server: Choose the existing server where you want to install n8n
- Launch it: Click to start the installation
Step 2: Installation Process
It will take a couple of minutes to install and configure your n8n instance.
Installation Process:
- n8n package installation
- Database setup and configuration
- Service configuration and optimization
- Network and security setup
Once installation is done, you will be able to view your new n8n app in tools page.
Step 3: Access Tools Page
From here click on "Tools" and you will see tool listed there.
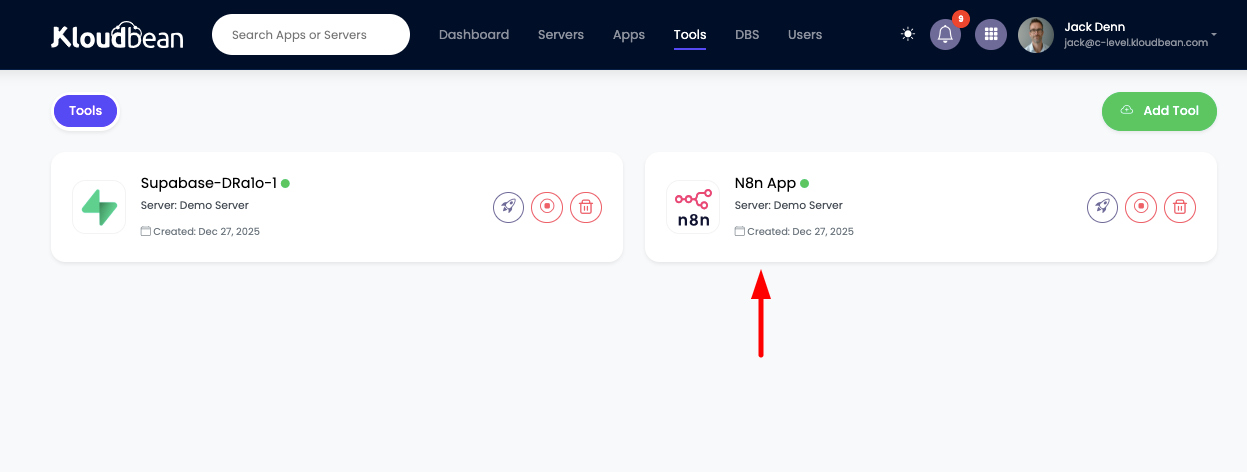
Tools Page Features:
- List of all installed tools on your server
- Tool status and health indicators
- Quick access to tool administration
- Resource usage information
Accessing n8n
Step 1: Navigate to Application Administration
In order to access it, click on it and you will be in "Application Administration".
Step 2: Get Access URL
In access tab you will see access URL.
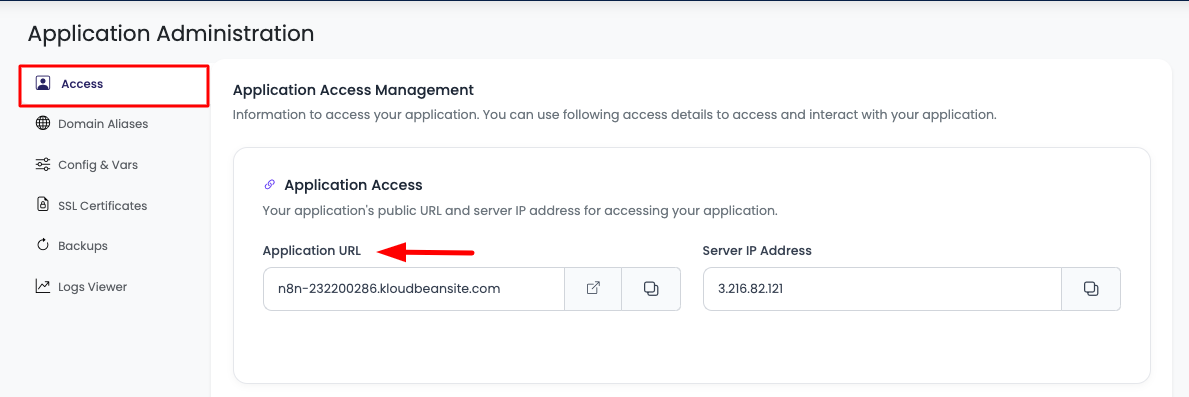
Access Options:
- Copy URL: Copy this URL and paste in browser to access it
- Visit Button: Directly click on "Visit" button to open n8n in new tab
Step 3: Set Up Admin Account
Access the URL and setup your admin account immediately.
"Set up owner account" => Add:
- Email: Your email address for the admin account
- First Name: Your first name
- Last Name: Your last name
- Password: Secure password for your admin account
Proceed with the admin account setup.
Important Notes:
- Immediate Setup: Set up your admin account immediately after first access
- Secure Password: Use a strong, unique password
- Email Verification: Your email will be used for account recovery
- Admin Access: This account will have full administrative access
Congratulations!
Congrats, your n8n is ready to use!
Next Steps:
- Start creating your first workflow
- Explore n8n's node library
- Connect your first service or API
- Set up webhooks for automation
Updating n8n Configurations
Accessing Configuration Settings
If you want to perform actions like:
- Update n8n env variables: Modify environment variables
- Stop n8n: Stop the n8n service
- Restart n8n: Restart the n8n service
In order to do this, navigate to "Config & Vars" section.
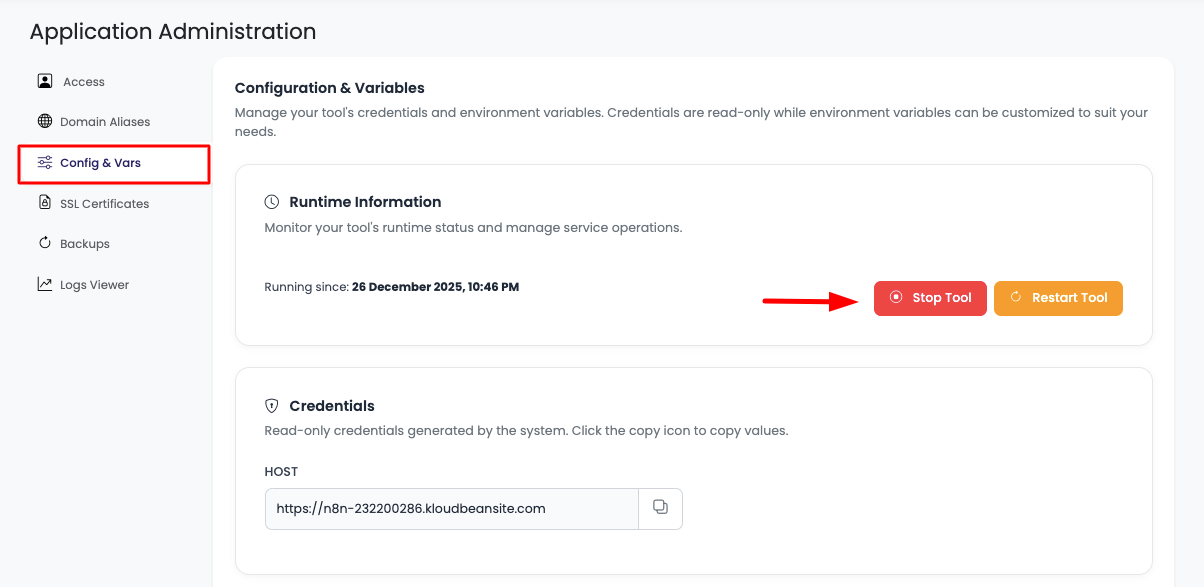
Service Control
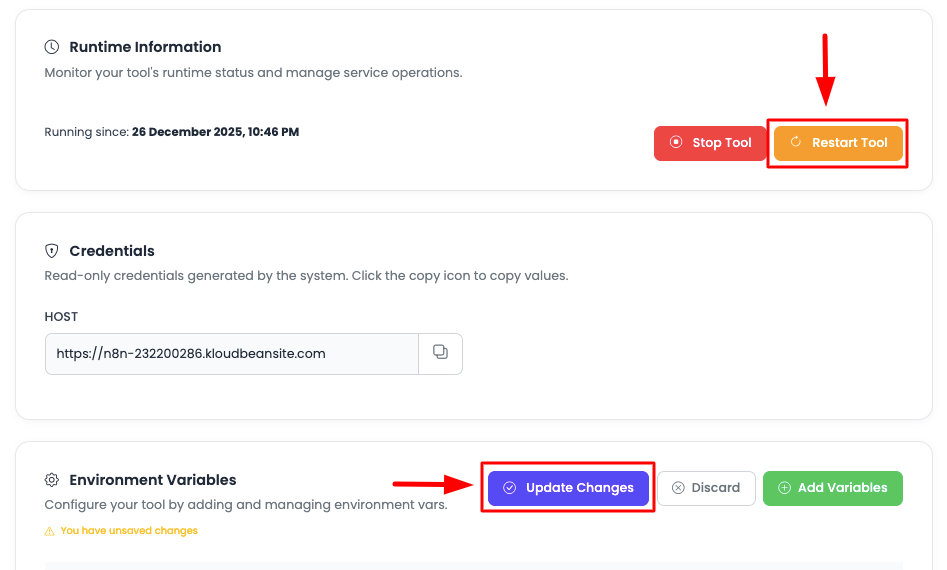
Here you will see option to stop tool or restart tool.
Available Actions:
- Stop Tool: Temporarily stop the n8n service
- Restart Tool: Restart n8n to apply configuration changes
- Service Status: View current service status
Important Notes:
- Restart Required: Environment variable changes require a restart to take effect
- Service Interruption: Stopping the service will interrupt all running workflows
- Best Practice: Restart during low-activity periods
Environment Variables
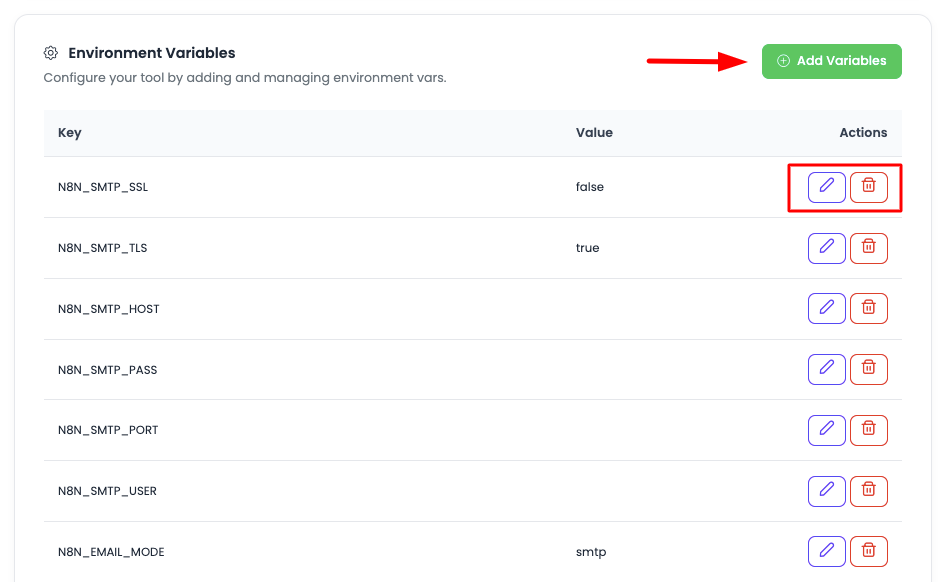
Now if you wish to update any env variable or add new variable, scroll down to "Environment Variables" section.
In this section you will see currently added vars.
Adding New Environment Variables
In order to add new var click on "Add variables".
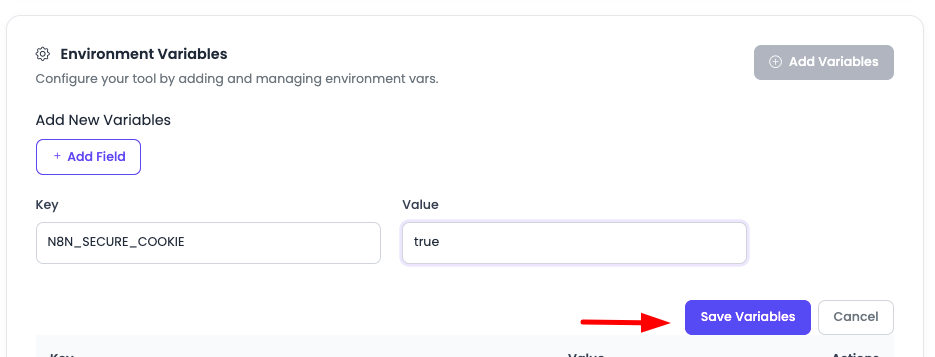
Once you click, you will have option to add variables, there will be 2 fields, Key and Value. Add them.
Adding Multiple Variables:
- Add Field: If you wish to add more variable, click on "Add field"
- Add as Many: Add as many vars you want to add
- Key-Value Pairs: Each variable requires a Key and Value
Updating Variables
Once you have added all the required variables, click on "Update changes" and it will update all the variable.
Important: Once added, make sure to restart the n8n application, only after restarting these variables will be reflected.
Important: n8n Variable Naming Convention
When adding n8n variable, note that all n8n vars starts with prefix N8N_, make sure to add like this.
Examples:
- ✅
N8N_BASIC_AUTH_ACTIVE=true - ✅
N8N_HOST=your-domain.com - ❌
BASIC_AUTH_ACTIVE=true(Missing N8N_ prefix) - ❌
HOST=your-domain.com(Missing N8N_ prefix)
Variable like n8n port this user cannot change as it is controlled by KloudBean.
KloudBean-Controlled Variables:
- N8N_PORT: Port is managed by KloudBean (cannot be changed)
- Database Connection: Database settings are optimized by KloudBean
- Network Configuration: Network settings are managed automatically
Updating n8n Version
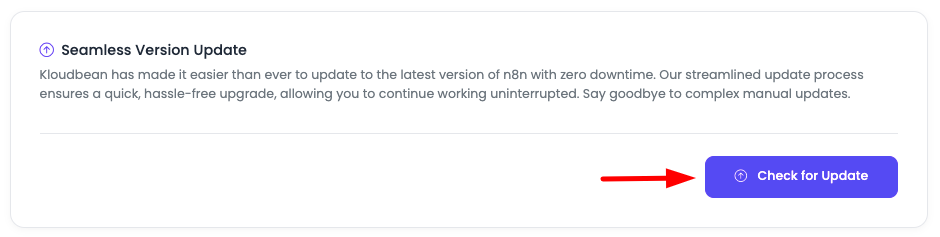
Seamless Version Update
On KloudBean it's a seamless and one-step process to update n8n instance.
KloudBean has made it easier than ever to update to the latest version of n8n with zero downtime. Our streamlined update process ensures a quick, hassle-free upgrade, allowing you to continue working uninterrupted. Say goodbye to complex manual updates.
Step 1: Access Version Update Section
On Application Administration page, on access tab scroll down to section "Seamless Version Update".
Step 2: Check for Updates
Here in order to update, click on "Check for update".
If new update is available, then a prompt will open with the information of current version and the latest stable available version.
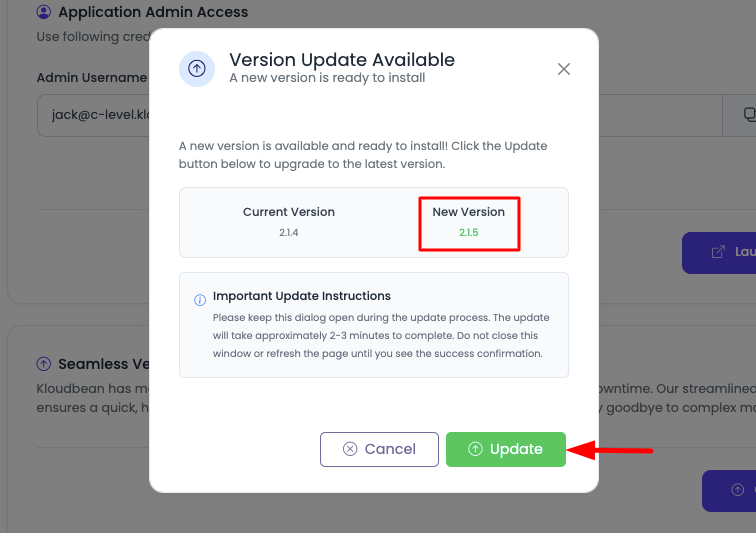
Update Prompt Information:
- Current Version: Shows your current n8n version
- Latest Version: Shows the latest stable version available
- Version Details: Displays version information and changes
- Update Button: Option to proceed with the update
Step 3: Review and Update
Review carefully and click update button.
Update Process:
- Duration: It will take about a minute to update n8n version
- Stay on Screen: Until then don't close your app, stay on same screen, until version is updated
- Zero Downtime: Update happens seamlessly without service interruption
- Automatic: The update process is fully automated
Important Warnings:
Be careful while upgrading: Make sure your existing workflows are compatible with the new version, do some R&D before upgrading.
Pre-Update Checklist:
- Review Changelog: Check n8n release notes for breaking changes
- Test Workflows: Verify your critical workflows are compatible
- Backup Workflows: Export important workflows before updating
- Check Dependencies: Verify node dependencies and integrations
- Review Documentation: Check n8n documentation for version-specific changes
Compatibility Considerations:
- Node Changes: Some nodes may be deprecated or changed
- API Changes: API endpoints may have changed
- Workflow Format: Workflow format may have changed
- Credential Changes: Credential storage format may have changed
Best Practices:
- Test in Staging: If possible, test the new version in a staging environment first
- Read Release Notes: Always read the release notes before updating
- Update Gradually: Consider updating to intermediate versions if jumping multiple versions
- Monitor After Update: Monitor your workflows after updating to ensure everything works
Already on Latest Version
If you are already on the latest version, then it will show you that you are already on the latest version and will show you current version.
What You'll See:
- Current Version: Your current n8n version number
- Status Message: "You are already on the latest version"
- No Update Available: No update button will be shown
Regular Checks:
- Periodic Updates: Check for updates periodically to stay current
- Security Updates: Keep updated for security patches
- Feature Access: Get access to new features and improvements
- Bug Fixes: Benefit from bug fixes and stability improvements
Update Benefits
Why Update:
- New Features: Access to latest features and capabilities
- Security Patches: Important security updates and fixes
- Performance Improvements: Better performance and optimization
- Bug Fixes: Resolution of known issues and bugs
- Compatibility: Better compatibility with integrations and services
KloudBean Update Advantages:
- Zero Downtime: Updates happen without service interruption
- One-Click Process: Simple, streamlined update process
- Automatic: Fully automated update process
- Safe: Tested and verified update process
- Quick: Updates complete in about a minute
Important Environment Variables
Most Commonly Used Variables
Here are the most commonly used n8n environment variables that developers typically need to configure:
Authentication Variables
N8N_BASIC_AUTH_ACTIVE
- Purpose: Enable or disable basic authentication
- Usage: Set to
trueto enable basic authentication for n8n access - Example:
N8N_BASIC_AUTH_ACTIVE=true - When to Use: Always enable in production environments
N8N_BASIC_AUTH_USER
- Purpose: Username for basic authentication
- Usage: Set the username for accessing n8n interface
- Example:
N8N_BASIC_AUTH_USER=admin - When to Use: Required when
N8N_BASIC_AUTH_ACTIVE=true
N8N_BASIC_AUTH_PASSWORD
- Purpose: Password for basic authentication
- Usage: Set a secure password for basic authentication
- Example:
N8N_BASIC_AUTH_PASSWORD=your-secure-password - When to Use: Required when
N8N_BASIC_AUTH_ACTIVE=true
Site URL and Protocol Variables
N8N_HOST
- Purpose: The hostname or domain where n8n is accessible
- Usage: Set your domain name for n8n instance
- Example:
N8N_HOST=n8n.yourdomain.com - When to Use: Required for proper webhook URLs and email links
- Important: Must match your actual domain configuration
N8N_PROTOCOL
- Purpose: The protocol used to access n8n (http or https)
- Usage: Set to
httpsfor secure connections,httpfor development - Example:
N8N_PROTOCOL=https - When to Use: Always use
httpsin production - Important: Must match your SSL certificate configuration
N8N_WEBHOOK_URL
- Purpose: Custom webhook URL base (optional)
- Usage: Override default webhook URL generation
- Example:
N8N_WEBHOOK_URL=https://n8n.yourdomain.com/ - When to Use: When you need custom webhook URLs
SMTP Configuration Variables
N8N_EMAIL_MODE
- Purpose: Enable email sending functionality
- Usage: Set to
smtpto enable SMTP email sending - Example:
N8N_EMAIL_MODE=smtp - When to Use: When you need n8n to send emails (notifications, alerts)
N8N_SMTP_HOST
- Purpose: SMTP server hostname
- Usage: Set your SMTP server address
- Example:
N8N_SMTP_HOST=smtp.gmail.com - When to Use: Required when
N8N_EMAIL_MODE=smtp
N8N_SMTP_PORT
- Purpose: SMTP server port
- Usage: Set SMTP server port (usually 587 for TLS, 465 for SSL)
- Example:
N8N_SMTP_PORT=587 - When to Use: Required when
N8N_EMAIL_MODE=smtp
N8N_SMTP_USER
- Purpose: SMTP authentication username
- Usage: Set your SMTP account username/email
- Example:
[email protected] - When to Use: Required when
N8N_EMAIL_MODE=smtp
N8N_SMTP_PASS
- Purpose: SMTP authentication password
- Usage: Set your SMTP account password or app password
- Example:
N8N_SMTP_PASS=your-smtp-password - When to Use: Required when
N8N_EMAIL_MODE=smtp
N8N_SMTP_SENDER
- Purpose: Default sender email address
- Usage: Set the default "from" email address
- Example:
[email protected] - When to Use: Recommended when using SMTP
Execution and Performance Variables
N8N_EXECUTIONS_DATA_PRUNE
- Purpose: Automatically prune old execution data
- Usage: Set to
trueto enable automatic cleanup - Example:
N8N_EXECUTIONS_DATA_PRUNE=true - When to Use: To manage database size and improve performance
N8N_EXECUTIONS_DATA_MAX_AGE
- Purpose: Maximum age of execution data in hours
- Usage: Set how long to keep execution data (in hours)
- Example:
N8N_EXECUTIONS_DATA_MAX_AGE=168(7 days) - When to Use: When
N8N_EXECUTIONS_DATA_PRUNE=true
N8N_EXECUTIONS_DATA_SAVE_ON_ERROR
- Purpose: Save execution data only on errors
- Usage: Set to
trueto save data only when workflows fail - Example:
N8N_EXECUTIONS_DATA_SAVE_ON_ERROR=true - When to Use: To reduce database usage while keeping error logs
N8N_EXECUTIONS_DATA_SAVE_ON_SUCCESS
- Purpose: Save execution data on successful runs
- Usage: Set to
never,always, ormanual - Example:
N8N_EXECUTIONS_DATA_SAVE_ON_SUCCESS=never - When to Use: To control database storage for successful executions
Security Variables
N8N_ENCRYPTION_KEY
- Purpose: Encryption key for sensitive data
- Usage: Set a secure random string for encrypting credentials
- Example:
N8N_ENCRYPTION_KEY=your-random-encryption-key - When to Use: Required for secure credential storage
- Important: Generate a strong, random key and keep it secure
N8N_USER_MANAGEMENT_DISABLED
- Purpose: Disable user management features
- Usage: Set to
trueto disable user management - Example:
N8N_USER_MANAGEMENT_DISABLED=false - When to Use: When you want to manage users through n8n interface
Timezone and Localization
N8N_TIMEZONE
- Purpose: Set timezone for n8n instance
- Usage: Set your preferred timezone
- Example:
N8N_TIMEZONE=America/New_York - When to Use: To ensure correct time handling in workflows
Database Variables (Advanced)
KloudBean manages database configuration automatically. These variables are typically not needed, but listed for reference.
DB_TYPE
- Purpose: Database type (postgresdb, mysqldb, etc.)
- Usage: Set database type (managed by KloudBean)
- Example:
DB_TYPE=postgresdb
DB_POSTGRESDB_HOST
- Purpose: PostgreSQL host address
- Usage: Database host (managed by KloudBean)
DB_POSTGRESDB_DATABASE
- Purpose: Database name
- Usage: Database name (managed by KloudBean)
DB_POSTGRESDB_USER
- Purpose: Database username
- Usage: Database user (managed by KloudBean)
DB_POSTGRESDB_PASSWORD
- Purpose: Database password
- Usage: Database password (managed by KloudBean)
Complete Environment Variables Reference
For a complete list of all available n8n environment variables, their descriptions, default values, and usage instructions, please refer to the official n8n documentation:
🔗 n8n Official Environment Variables Documentation
The official documentation includes:
- Complete list of all environment variables
- Detailed descriptions and use cases
- Default values for each variable
- Configuration examples
- Best practices and recommendations
- Security considerations
- Advanced configuration options
When to Consult Official Documentation:
- When you need variables not listed here
- For advanced configuration options
- To understand variable interactions
- For latest updates and new variables
- For troubleshooting configuration issues
Best Practices
Environment Variable Management
- Use N8N_ Prefix: Always prefix custom n8n variables with
N8N_ - Restart After Changes: Always restart n8n after changing environment variables
- Secure Values: Never expose sensitive values in logs or documentation
- Test Changes: Test configuration changes in a staging environment first
Security
- Enable Authentication: Always enable basic authentication in production
- Use HTTPS: Always use HTTPS protocol in production
- Strong Passwords: Use strong, unique passwords for admin accounts
- Encryption Key: Set a secure encryption key for credential storage
Performance
- Prune Execution Data: Enable automatic pruning to manage database size
- Monitor Resources: Monitor server resources when running multiple instances
- Optimize Workflows: Design efficient workflows to reduce resource usage
Scalability
- Start Small: Begin with one instance and scale as needed
- Monitor Growth: Watch workflow growth and resource usage
- Scale Server: Increase server size when workflows grow
- Multiple Instances: Add instances only when server resources allow
Troubleshooting
Configuration Issues
Variables Not Applied:
- Solution: Restart n8n service after adding/changing variables
- Check: Verify variable names start with
N8N_prefix - Verify: Check variable values are correct
SMTP Not Working:
- Check: Verify all SMTP variables are set correctly
- Test: Test SMTP connection with credentials
- Verify: Ensure
N8N_EMAIL_MODE=smtpis set
Webhook URLs Incorrect:
- Check: Verify
N8N_HOSTandN8N_PROTOCOLare set correctly - Verify: Ensure domain DNS is configured properly
- Test: Test webhook URL accessibility
Service Issues
Service Won't Start:
- Check: Review environment variables for errors
- Verify: Check server resources (CPU, memory, disk)
- Contact: Reach out to KloudBean support if issues persist
High Resource Usage:
- Monitor: Check resource consumption in server health
- Optimize: Review and optimize workflows
- Scale: Consider increasing server size or reducing instances
Next Steps
After setting up n8n:
- Learn about Creating Your First Workflow in n8n
- Explore other AI & Tools available on KloudBean
- Review Application Management for managing your n8n instance
- Check n8n Official Documentation for advanced workflow creation