Updating Application Pool
Learn how to add and manage applications in your virtual load balancer's application pool. If you have created FLB already, that means your default virtual load balancer has been created already but as of now, no app is added in the pool.
Overview
If you have created FLB already, that means your default virtual load balancer has been created already but as of now, no app is added in the pool.
What is Application Pool:
- Applications Collection: The application pool contains all applications that receive traffic from the virtual load balancer
- Traffic Distribution: Load balancer distributes traffic among applications in the pool
- Health Monitoring: KloudBean monitors the health of applications in the pool
- Dynamic Management: Applications can be added or removed from the pool anytime
Default Virtual Load Balancer:
- Automatically Created: Created automatically when FLB is launched
- Empty Pool Initially: Starts with an empty application pool
- Ready for Apps: Ready to add applications immediately
- No Traffic Initially: Won't route traffic until applications are added
Why Update Application Pool:
- Add Applications: Add new applications to receive traffic
- Remove Applications: Remove applications that no longer need traffic
- Load Distribution: Distribute traffic across multiple applications
- High Availability: Ensure multiple applications are available for redundancy
- Maintenance: Remove applications temporarily for maintenance
Prerequisites
- Active Flexible Load Balancer: You must have an existing Flexible Load Balancer
- Virtual Load Balancer: Default or custom virtual load balancer created
- Applications Available: Applications deployed on servers (can be added to pool)
Accessing Application Pool
Step 1: Open Load Balancer Administration
In order to add apps, first open your load balancer administration page by clicking on the FLB from list page.
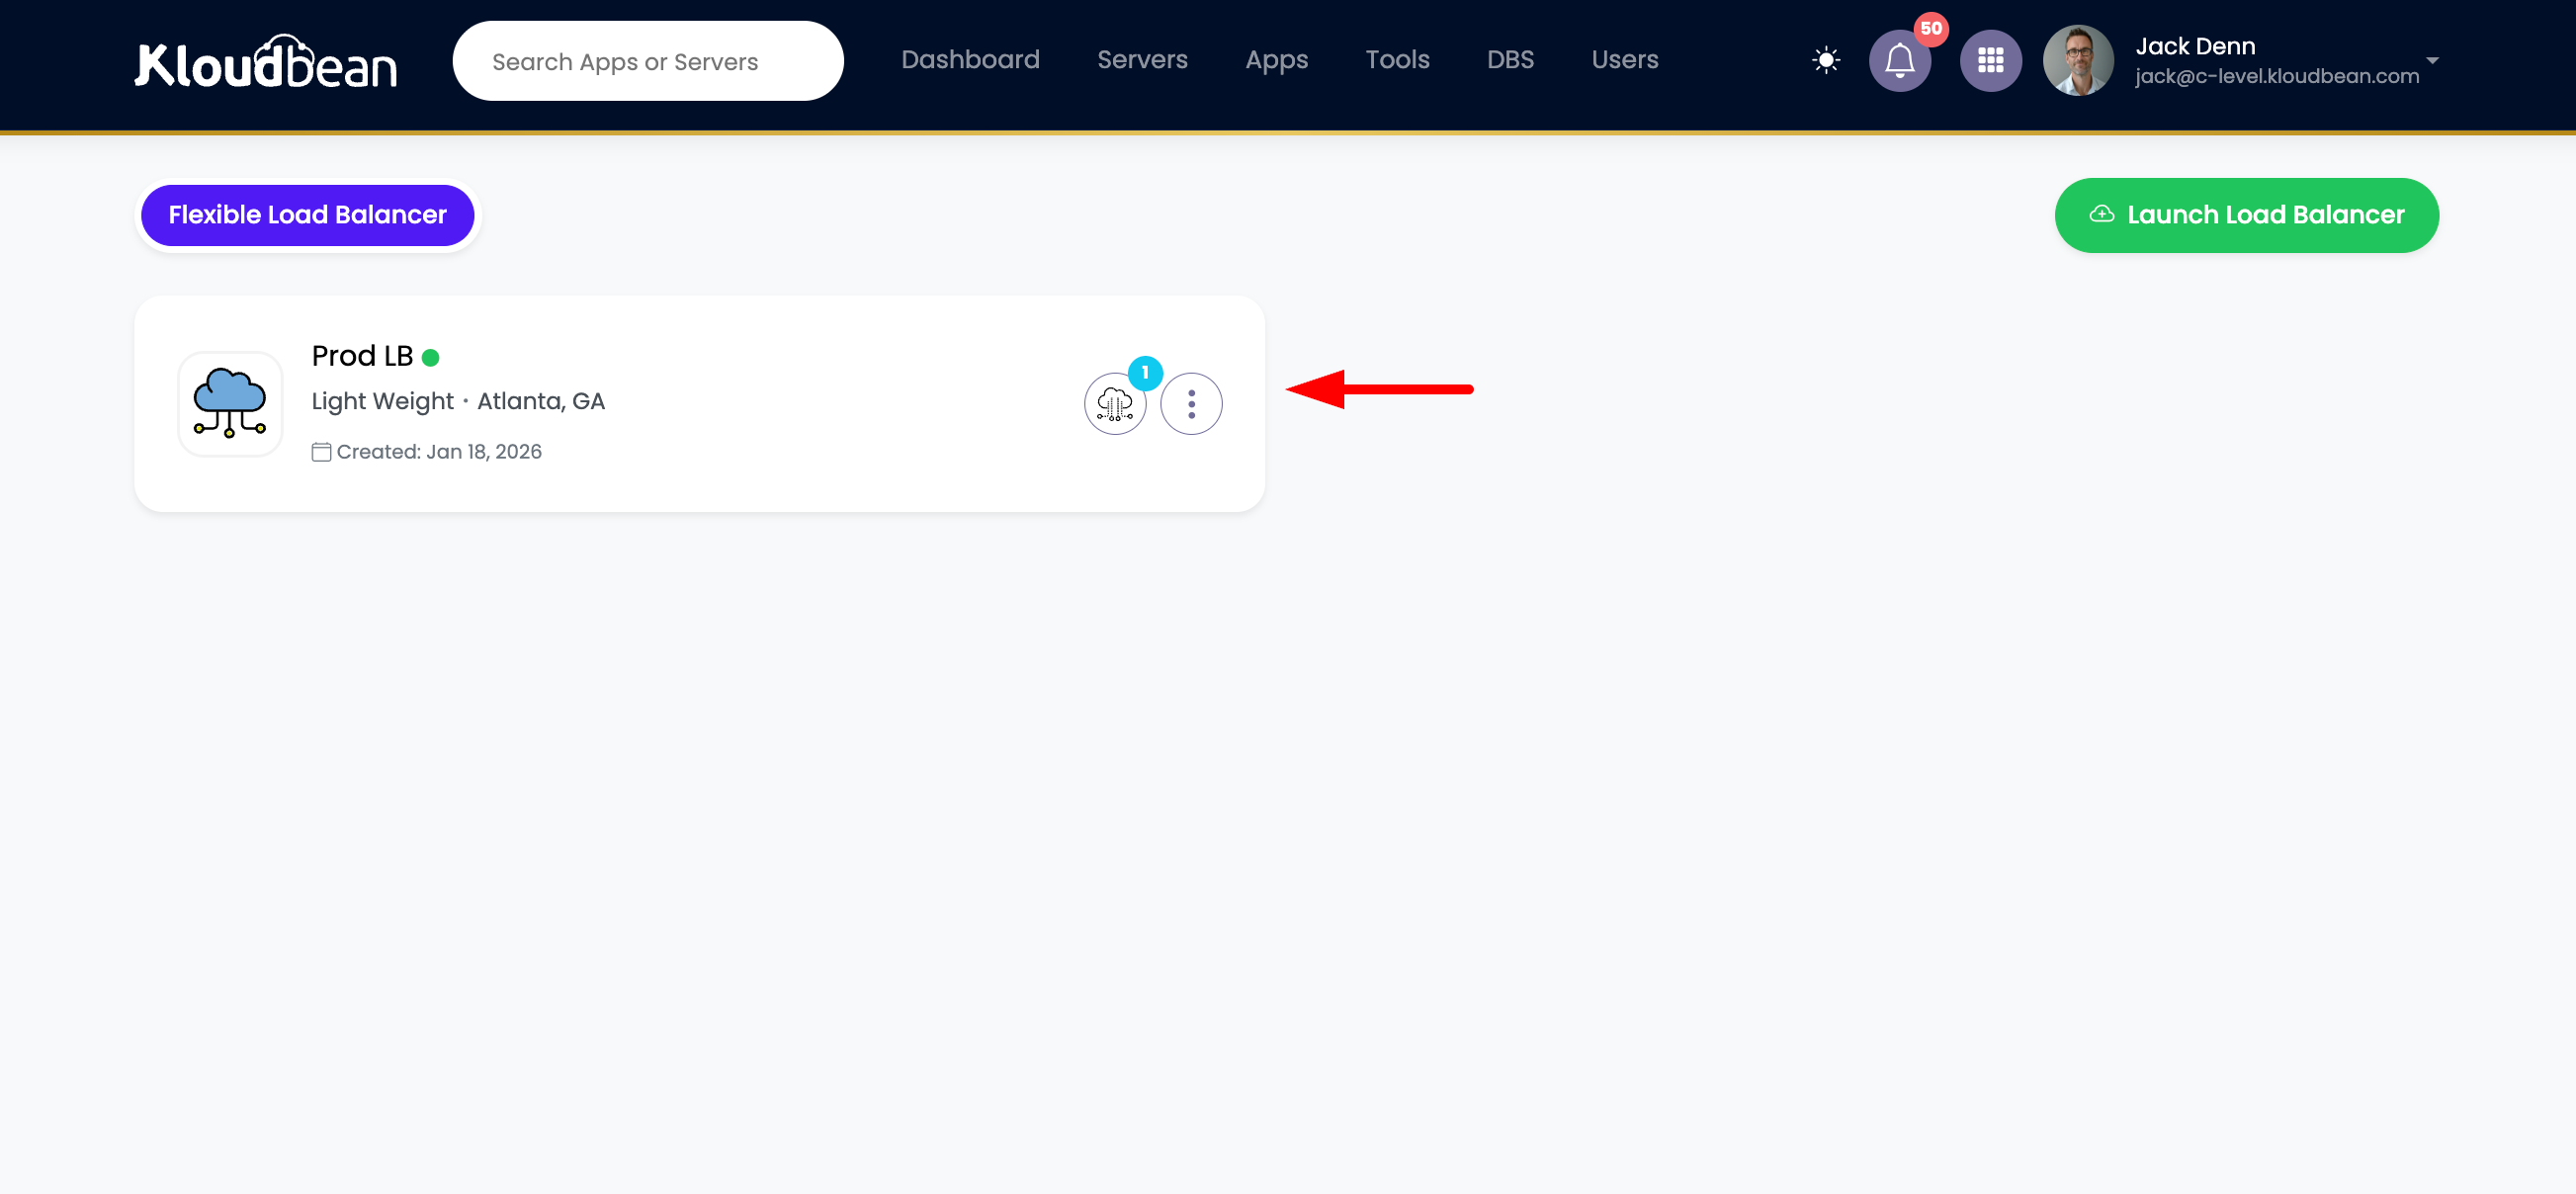
Access Steps:
- Log in to KloudBean Dashboard: Access your KloudBean account
- Navigate to Flexible Load Balancers: Go to Flexible Load Balancers section
- View FLB List: See all your Flexible Load Balancers
- Click on FLB: Click on your Flexible Load Balancer card
- Load Balancer Administration: It will take you to "Load balancer administration"
What You'll See:
- Load Balancer Details: Overview of your FLB
- Tabs: Various tabs for different settings
- Virtual LBs Tab: Tab to access virtual load balancers
- Configuration Options: Various configuration options available
Step 2: Navigate to Virtual Load Balancers
Click on "Virtual LBs" tab, where you will see default or other created virtual load balancers.

Virtual LBs Tab:
- All Virtual Load Balancers: Where you will see default or other created virtual load balancers
- Default vLB: The default virtual load balancer created automatically
- Custom vLBs: Any additional virtual load balancers you've created
- vLB Status: Status of each virtual load balancer
- Quick Actions: Quick access to vLB management
What You'll See:
- Default Virtual Load Balancer: Usually named "Default" or similar
- Additional vLBs: Any other virtual load balancers you've created
- Status Indicators: Active/Inactive status for each vLB
- Application Count: Number of applications in each vLB's pool
Step 3: Open Virtual Load Balancer
Click on it and scroll down to "Applications Pool" section.
Virtual Load Balancer Page:
- vLB Details: Full details of the virtual load balancer
- Sections: Various sections with different information
- Applications Pool Section: Scroll down to "Applications Pool" section
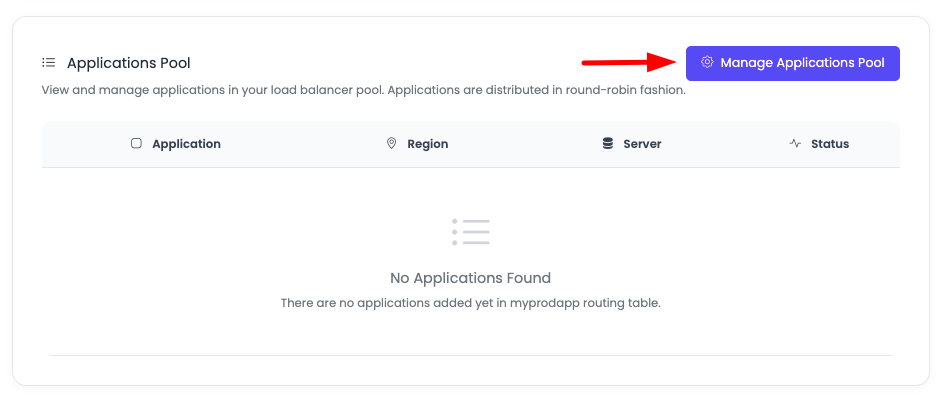
Applications Pool Section:
- Current Applications: On this section you will see currently added apps, or no app
- Empty Pool: If no apps are added, pool will be empty
- Manage Button: In order to add app click on "Manage Application Pool"
- Application List: List of applications currently in the pool (if any)
What You'll See:
- Application Count: Number of applications in pool
- Application Status: Health status of each application
- Manage Button: Button to manage the application pool
- Empty State: Message indicating no applications if pool is empty
Managing Application Pool
Step 1: Open Manage Application Pool
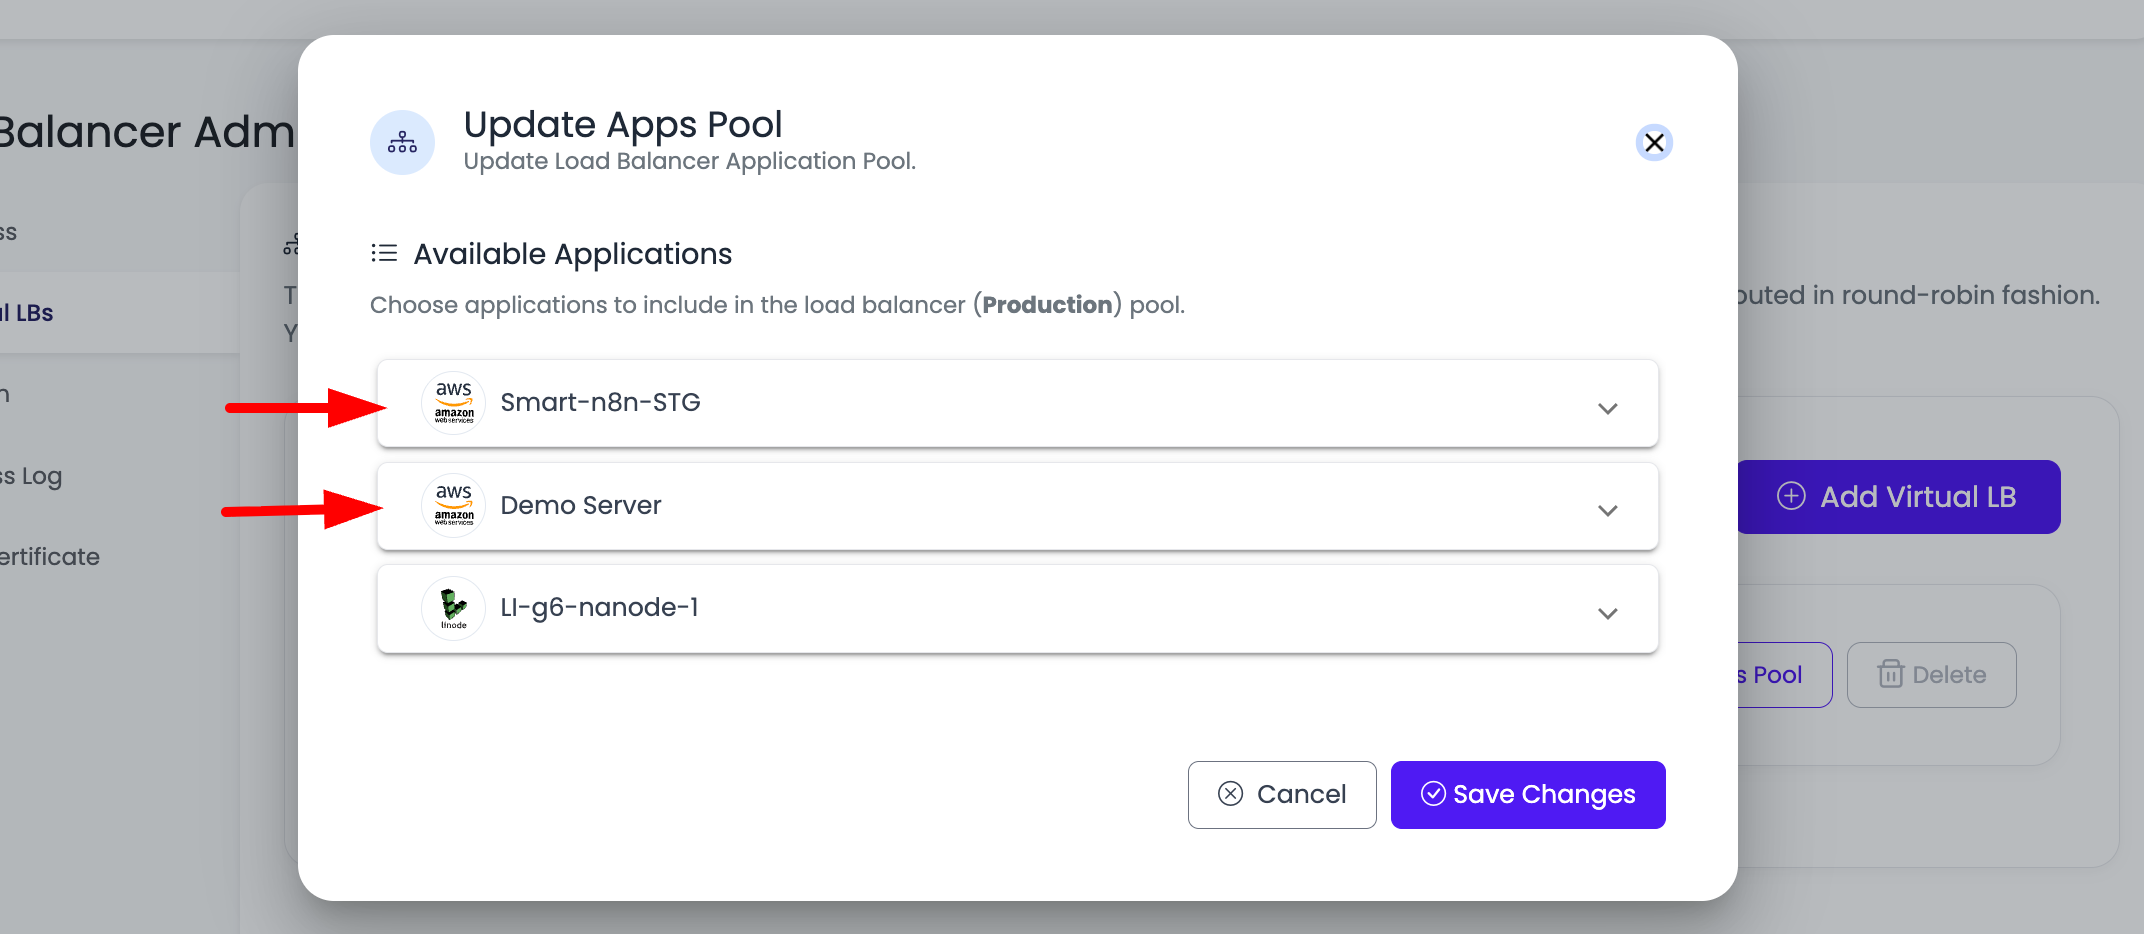
Once you click on it, a prompt will open to update the apps.
Manage Application Pool Prompt:
- Form Opens: A prompt/form opens for managing applications
- Server List: Where all your servers will be listed to select the app from it
- Application Selection: Select applications from available servers
- Save Option: Option to save changes
What You'll See:
- Server List: All your servers listed
- Expandable Servers: Servers can be expanded to view applications
- Application Selection: Checkboxes or selection options for applications
- Save Button: Button to save your selections
Server List Display:
- All Servers: All your servers are listed
- Server Information: Server name, location, and details
- Expandable: Each server can be expanded to see applications
- Application Count: Number of applications on each server
Step 2: Expand Servers to View Applications
Expand the server to view the applications available on this server.
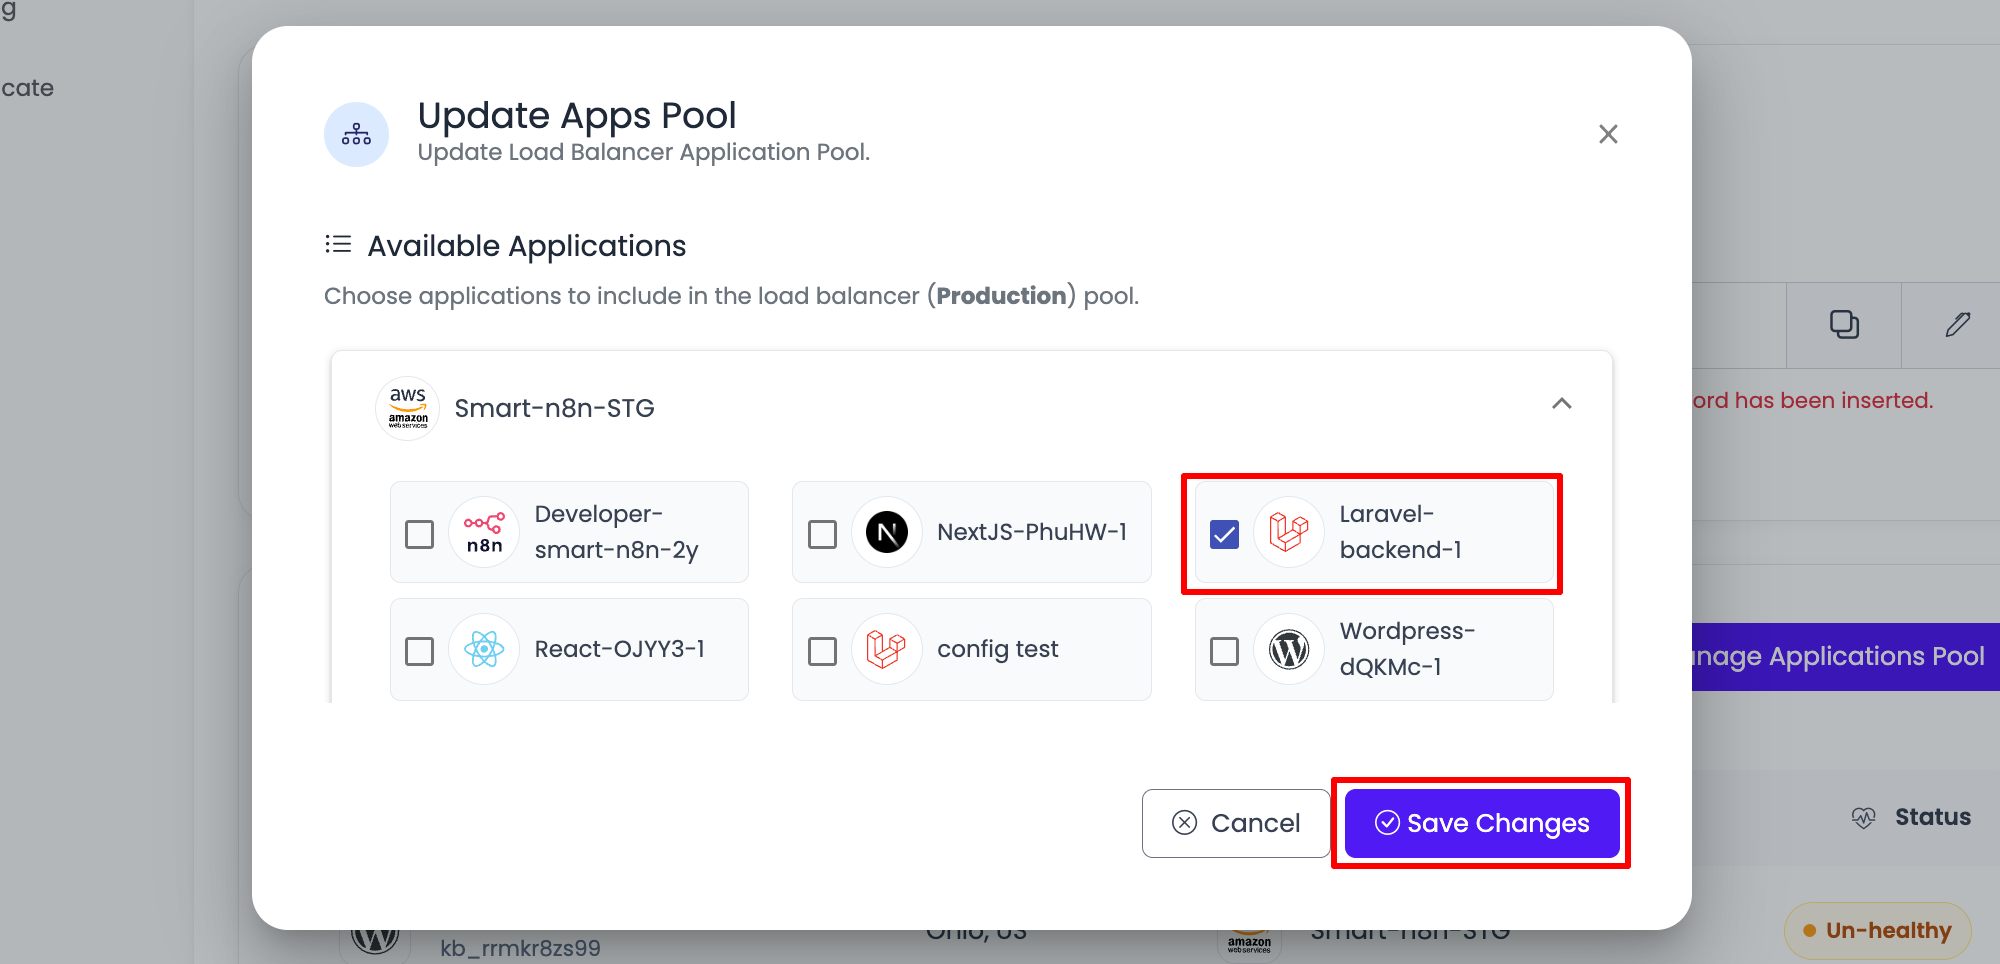
Expanding Servers:
- Click to Expand: Click on server to expand and view applications
- Application List: See all applications available on that server
- Application Details: View application name, type, and status
- Selection Options: Select applications to add to pool
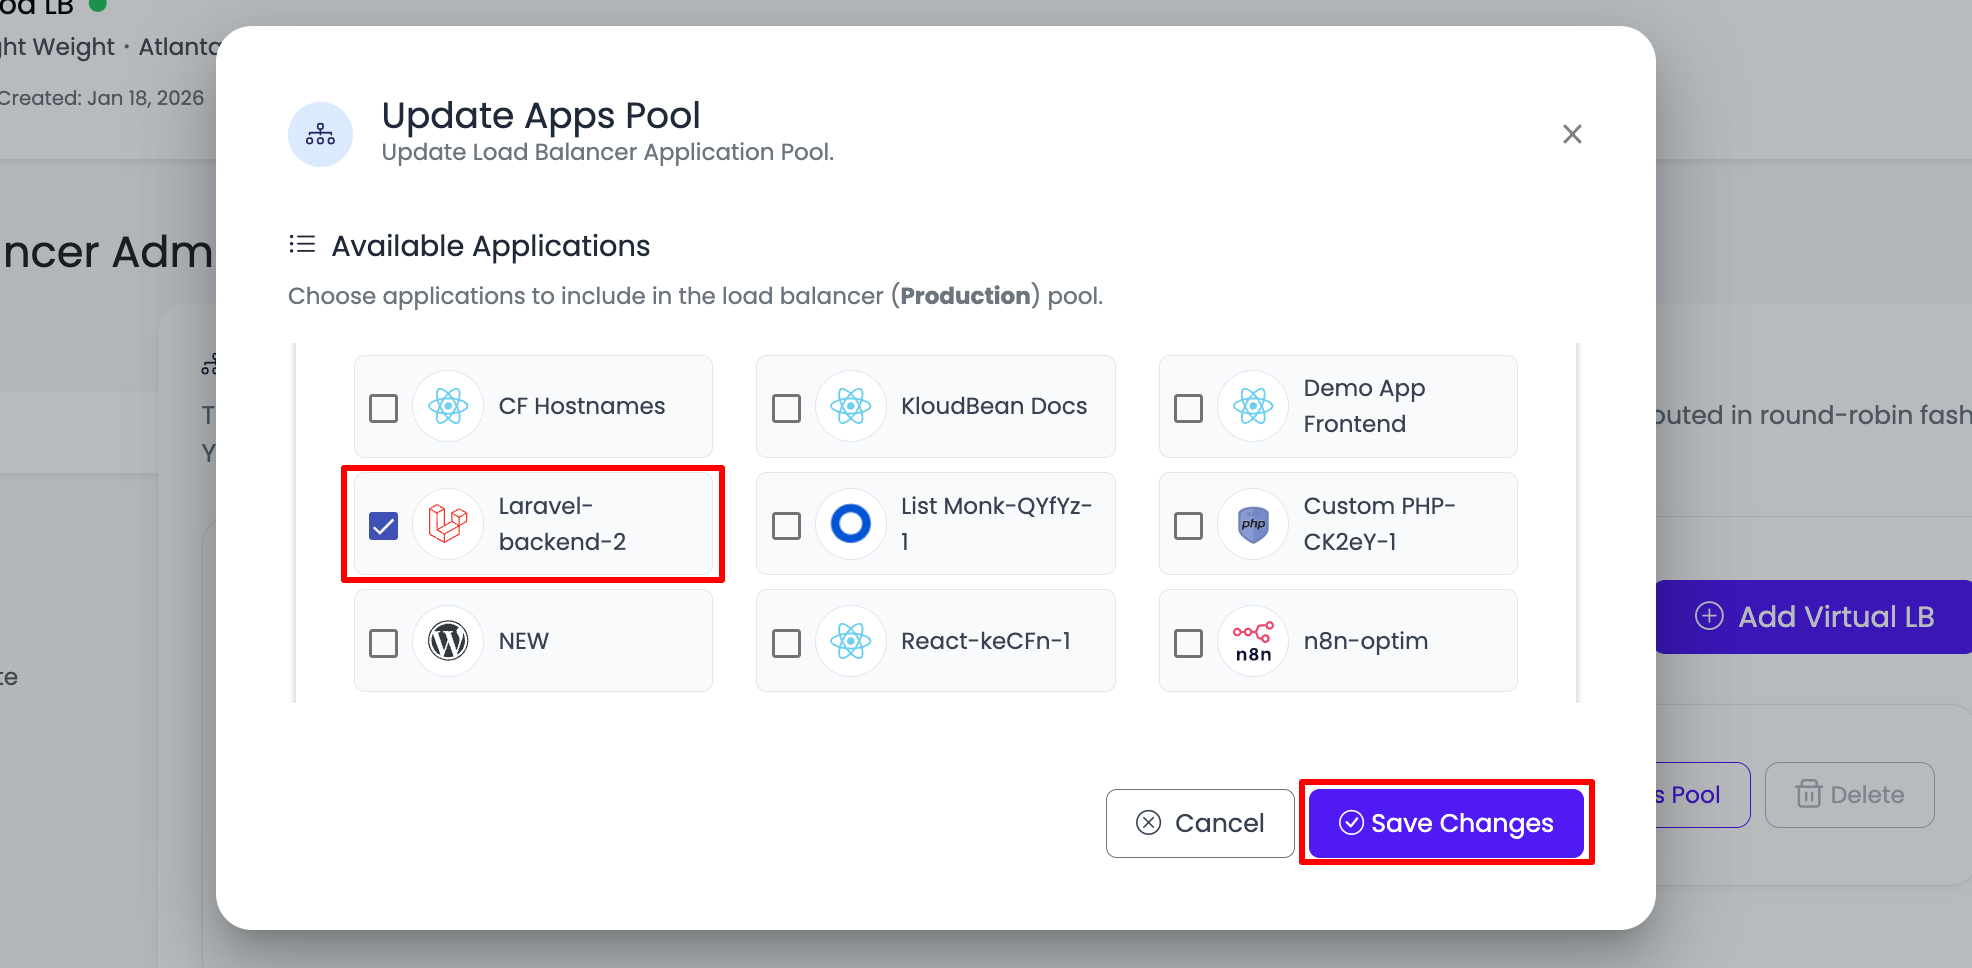
Expand First Server and Select the App.
Selecting Applications:
- Check Applications: Check the applications you want to add
- Multiple Selection: You can select multiple applications
- From Multiple Servers: Select applications from different servers
- Review Selection: Review your selections before saving
Expand Second Server and Select the App.
Selecting from Multiple Servers:
- Expand Each Server: Expand each server you want to select apps from
- Select Applications: Select applications from each server
- Multiple Servers: You can select apps from multiple servers
- All Apps Together: All selected apps will be added to the pool
Selection Process:
- Expand Server 1: Expand first server
- Select Apps: Select applications from first server
- Expand Server 2: Expand second server (if needed)
- Select Apps: Select applications from second server
- Continue: Expand and select from additional servers as needed
- Review: Review all selected applications
Step 3: Save Changes
Once selected, click on "Save changes" button to update the pool.
Saving Changes:
- Review Selection: Double-check your application selections
- Click Save: Click on "Save changes" button
- Processing: System processes your selections
- Pool Update: Application pool is updated with selected applications
What Happens:
- Applications Added: Selected applications are added to the pool
- Traffic Routing: Load balancer starts routing traffic to added applications
- Health Monitoring: KloudBean starts monitoring application health
- Status Update: Pool status is updated
Upon Success You Will See Apps Are Added.
After Saving:
- Applications Visible: Upon success you will see apps are added
- Pool Updated: Application pool shows all added applications
- Status Display: Application status is displayed
- Traffic Routing: Traffic routing begins immediately
What You'll See:
- Application List: List of all applications in the pool
- Application Details: Details for each application
- Status Indicators: Health status for each application
- Server Information: Which server each application is on
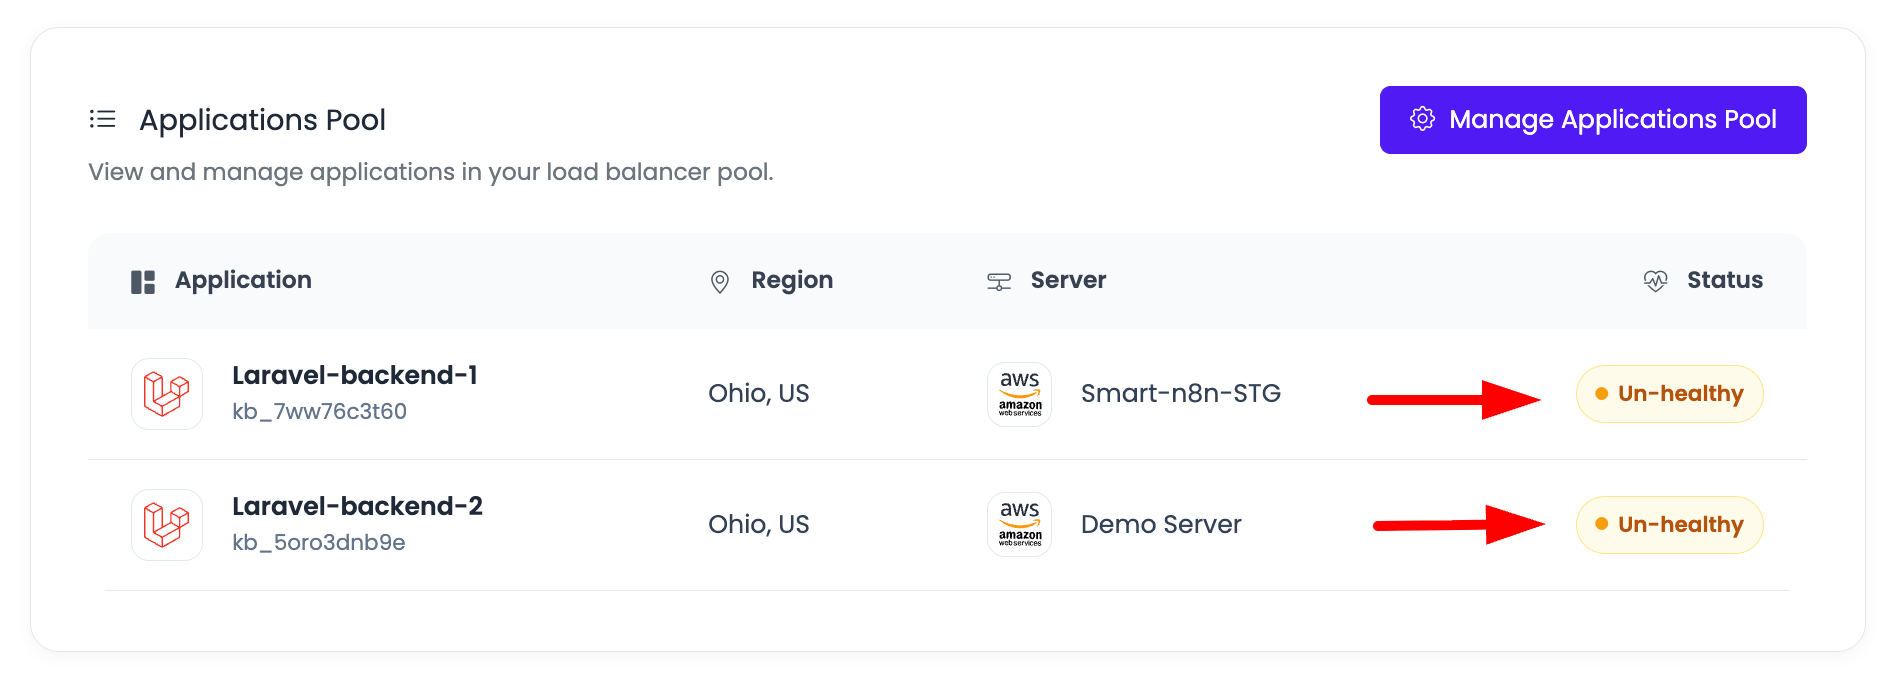
Application Health Monitoring
You will also be able to see the apps status, KloudBean monitor 200 response code apps, if app does not return 200 then it is considered as unhealthy.
Health Monitoring:
- Automatic Monitoring: KloudBean automatically monitors application health
- 200 Response Code: KloudBean monitor 200 response code apps
- Health Status: Applications are marked as healthy or unhealthy
- Real-Time Updates: Health status updates in real-time
Health Status Indicators:
Healthy Applications:
- Status: Marked as "Healthy" or shows green indicator
- 200 Response: Application returns 200 HTTP response code
- Receiving Traffic: Application is receiving traffic from load balancer
- Active: Application is active and responding
Unhealthy Applications:
- Status: Marked as "Unhealthy" or shows red indicator
- Non-200 Response: If app does not return 200 then it is considered as unhealthy
- No Traffic: Application may not receive traffic
- Automatic Removal: Unhealthy apps may be automatically removed from traffic routing
Health Check Details:
- Response Code: HTTP response code from application
- Response Time: Time taken for application to respond
- Last Check: When health check was last performed
- Status History: History of health status changes
Monitoring Features:
- Real-Time Status: See application status in real-time
- Health History: View health status history
- Automatic Recovery: Applications automatically re-added when healthy
- Alerts: Get notified when applications become unhealthy
Managing Applications in Pool
Viewing Application Pool
After Adding Applications:
- Application List: See all applications in the pool
- Status Display: View health status of each application
- Server Information: See which server each application is on
- Traffic Distribution: Understand how traffic is distributed
Removing Applications from Pool
To Remove Applications:
- Open Manage Pool: Click "Manage Application Pool" again
- Unselect Applications: Uncheck applications you want to remove
- Save Changes: Click "Save changes" to update pool
- Confirmation: Applications are removed from pool
When to Remove:
- Application No Longer Needed: Application is no longer in use
- Maintenance: Temporarily remove for maintenance
- Replacement: Remove old application when replacing with new one
- Troubleshooting: Remove problematic application temporarily
Updating Application Pool
Regular Updates:
- Add New Apps: Add new applications as they become available
- Remove Old Apps: Remove applications that are no longer needed
- Update Selection: Change which applications receive traffic
- Optimize Pool: Optimize pool for best performance
Best Practices
Application Selection
- Select Relevant Apps: Only select applications that should receive traffic from this vLB
- Multiple Servers: Select apps from multiple servers for redundancy
- Review Before Saving: Review your selections before saving
- Start Small: Start with a few applications and add more as needed
Health Monitoring
- Monitor Regularly: Regularly check application health status
- Address Unhealthy Apps: Fix unhealthy applications promptly
- Understand Status: Understand what healthy/unhealthy means
- Automatic Recovery: Let KloudBean automatically manage healthy apps
Pool Management
- Keep Pool Updated: Regularly update application pool
- Remove Unused Apps: Remove applications that are no longer needed
- Maintain Redundancy: Keep multiple applications for high availability
- Document Changes: Keep notes on pool changes
Troubleshooting
Applications Not Appearing in Pool
If applications are not showing in pool:
- Check Selection: Verify you selected applications and saved changes
- Refresh Page: Try refreshing the page
- Check Server Status: Verify servers are active
- Application Status: Check if applications are running
Applications Showing as Unhealthy
If applications show as unhealthy:
- Check Application: Verify application is running and accessible
- Response Code: Ensure application returns 200 response code
- Network Connectivity: Check network connectivity to application
- Application Logs: Review application logs for errors
- Health Check: Verify health check endpoint is working
Cannot Select Applications
If you cannot select applications:
- Check Server Status: Verify servers are active
- Application Status: Check if applications are running
- Permissions: Verify you have necessary permissions
- Refresh: Try refreshing the page and trying again
Applications Not Receiving Traffic
If applications are not receiving traffic:
- Check Health Status: Verify applications are healthy
- Pool Status: Verify applications are in the pool
- Load Balancer Status: Check load balancer is active
- Traffic Configuration: Review traffic routing configuration
Next Steps
After updating your application pool:
- Add Custom Domain: Configure Adding Custom Domain for your vLB
- Add SSL: Secure your vLB with Adding Free SSL Certificates
- Monitor Health: Monitor your load balancer with Monitoring Load Balancer Health
- Create More vLBs: Learn about Adding Virtual Load Balancers
Summary
Key Points:
- Default vLB Created: Default virtual load balancer is created automatically with empty pool
- Easy Management: Simple process to add applications to pool
- Server-Based Selection: Select applications from your servers
- Multiple Servers: Can select apps from multiple servers
- Health Monitoring: KloudBean monitors application health (200 response code)
- Dynamic Updates: Applications can be added or removed anytime
Process:
- Open Load Balancer Administration by clicking on FLB
- Click on "Virtual LBs" tab
- Click on virtual load balancer
- Scroll to "Applications Pool" section
- Click "Manage Application Pool"
- Expand servers and select applications
- Click "Save changes"
- Applications are added and health monitoring begins
Health Monitoring:
- 200 Response Code: Applications must return 200 to be healthy
- Automatic Monitoring: KloudBean automatically monitors health
- Status Display: See health status in real-time
- Automatic Management: Unhealthy apps are handled automatically