Adding Virtual Load Balancers
Learn how to add multiple virtual load balancers (vLBs) on a single Flexible Load Balancer (FLB). If you have already created a load balancer, now you have option to add multiple virtual load balancers on it.
Overview
If you have already created a load balancer, now you have option to add multiple virtual load balancers on it.
Key Benefits:
- Multiple vLBs on Single FLB: Launch multiple virtual load balancers on the same FLB server
- Cost-Effective: If you want to load balance multiple apps, you don't need to launch multiple FLB, (unless you want different location), you can launch multiple virtual LB on same FLB server
- Flexible Scaling: How many vLB you can launch depending upon the size of your FLB
- Efficient Resource Usage: Maximize the use of a single load balancer server
- Simplified Management: Manage multiple load balancers from one FLB instance
Why Use Multiple Virtual Load Balancers:
- Separate Applications: Load balance different applications independently
- Environment Separation: Separate production, staging, and development traffic
- Service Isolation: Isolate different services (frontend, API, admin)
- Traffic Management: Manage traffic for different domains or subdomains
- Cost Optimization: Avoid launching multiple FLBs when not needed
When to Launch Multiple FLBs:
- Different Locations: When you need load balancers in different geographic locations
- High Traffic: When a single FLB cannot handle all your traffic
- Isolation Requirements: When you need complete isolation between load balancers
Prerequisites
- Active Flexible Load Balancer: You must have an existing Flexible Load Balancer
- Applications Ready (Optional): Applications can be selected during vLB creation or added later
- Understanding of Traffic Needs: Know which applications you want to route traffic to
Adding Virtual Load Balancer
Step 1: Navigate to Virtual Load Balancers
In order to launch another virtual load balancer apart from default load balancer, go to "Load Balancer Administration".
Access Steps:
- Log in to KloudBean Dashboard: Access your KloudBean account
- Navigate to Load Balancers: Go to Flexible Load Balancers section
- Select Your FLB: Click on your existing Flexible Load Balancer
- Load Balancer Administration: This opens the Load Balancer Administration page
Click on "Virtual LBs" tab.
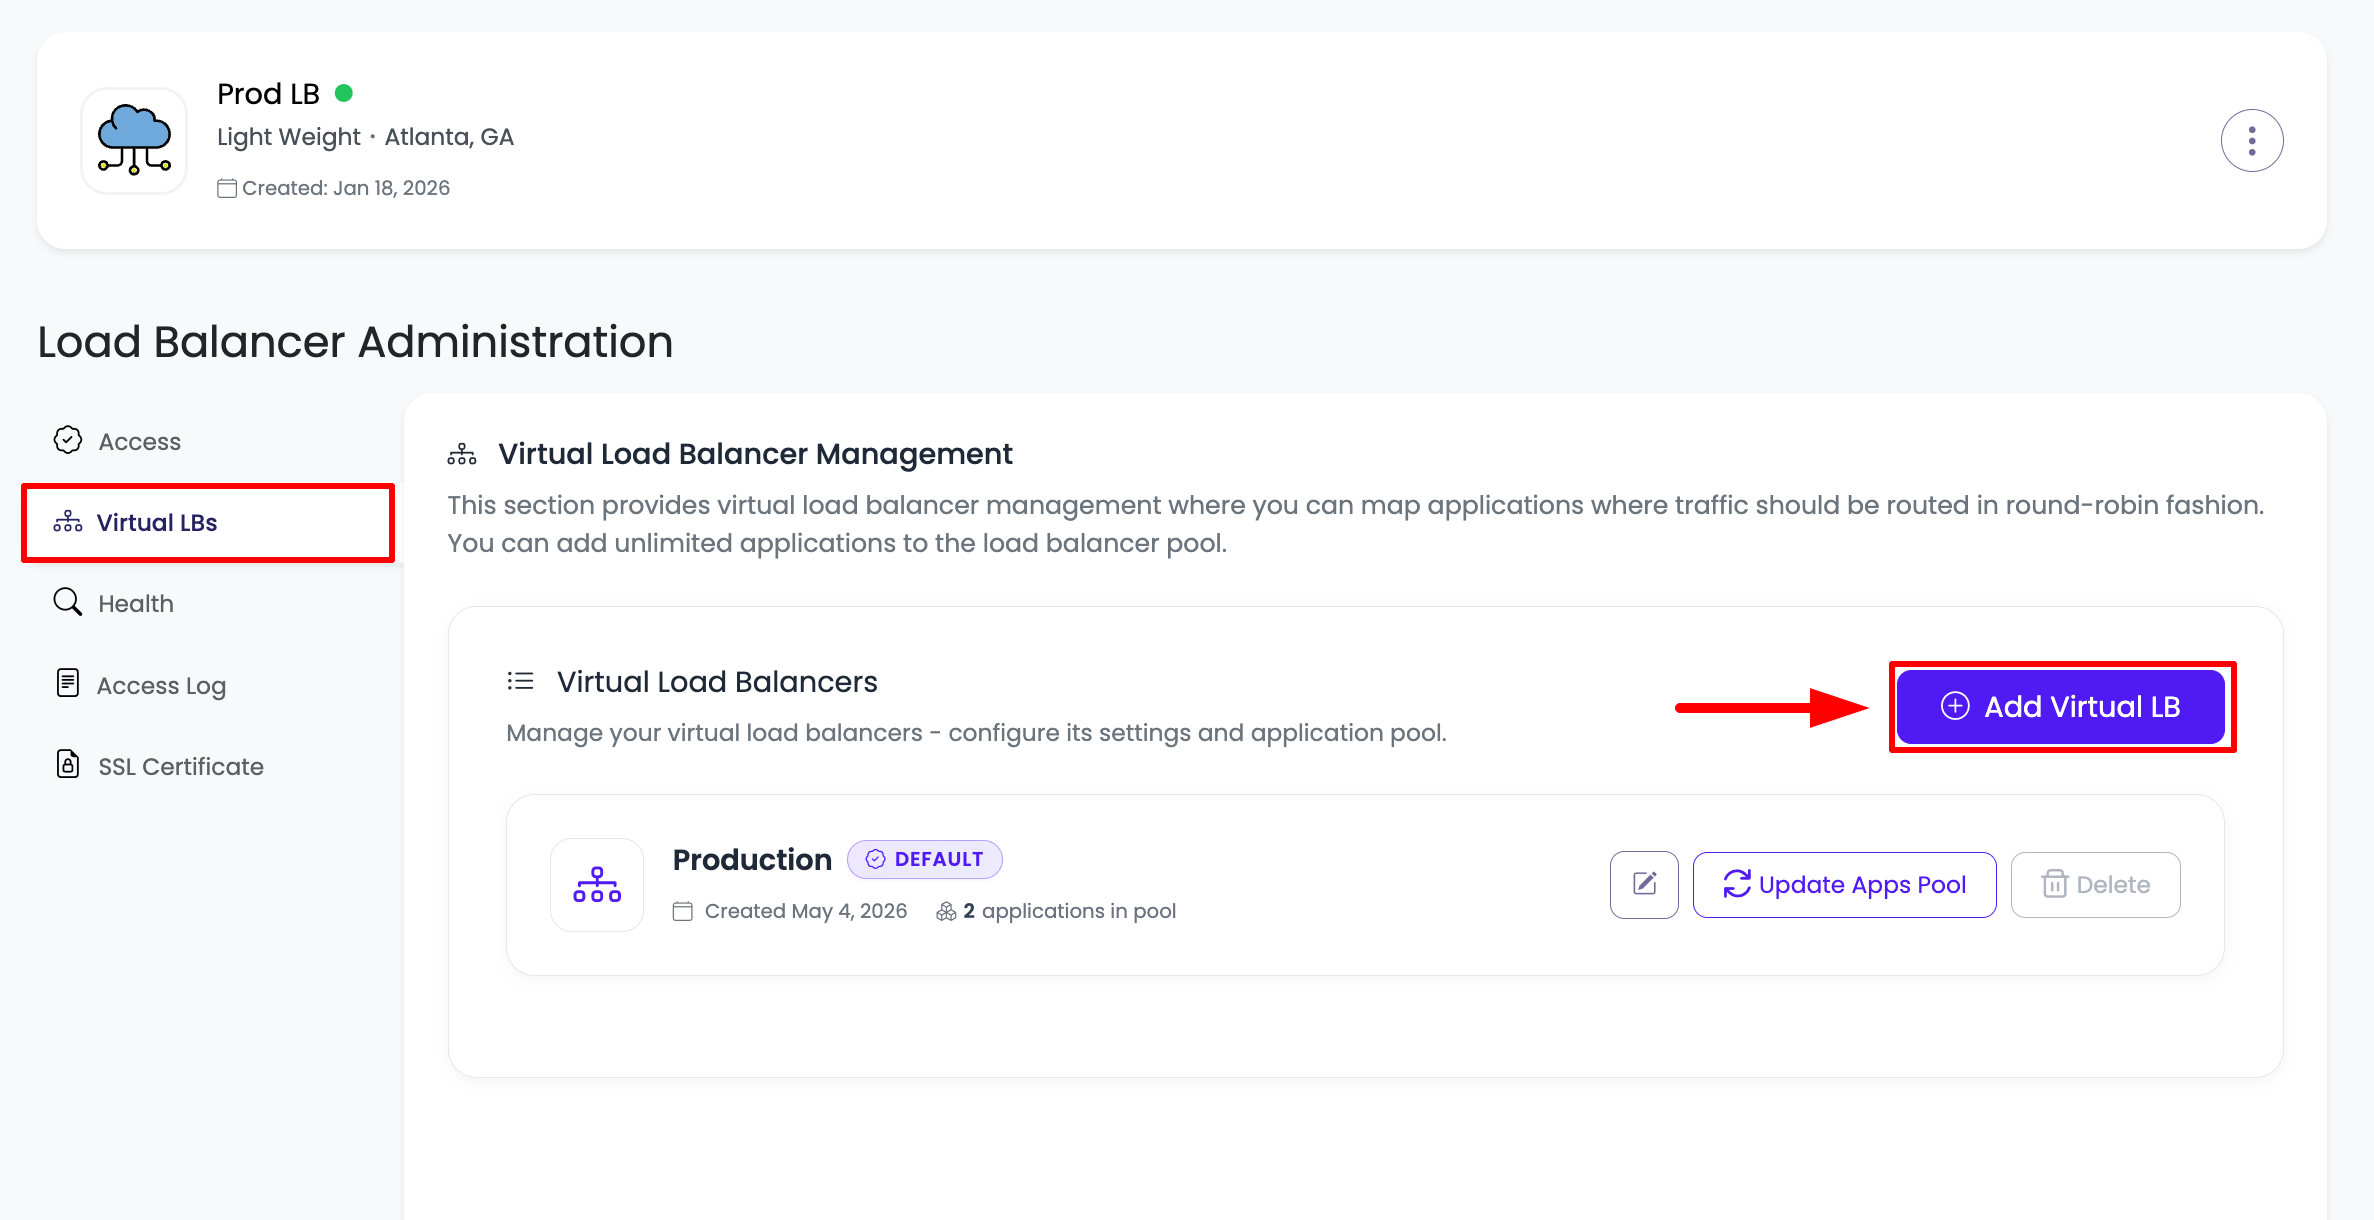
On Virtual LBs Tab:
- Existing Virtual LBs: On this tab you will see your existing virtual LB
- Default vLB: The default virtual load balancer created automatically
- Add Button: And a button "Add Virtual load balancer" to add another load balancer
- vLB List: View all your virtual load balancers in one place
What You'll See:
- Default Virtual Load Balancer: Created automatically when FLB was launched
- Add Virtual Load Balancer Button: Button to create new virtual load balancer
- vLB Status: Status of each virtual load balancer
- Quick Actions: Quick access to vLB management options
Step 2: Click Add Virtual Load Balancer
Click on this button and there will be a prompt, to enter new virtual load balancer detail.
Creation Prompt:
- Form Opens: A form/prompt opens for entering vLB details
- Required Fields: Fields that must be filled
- Optional Fields: Fields that can be configured later
- Application Selection: Option to select applications immediately
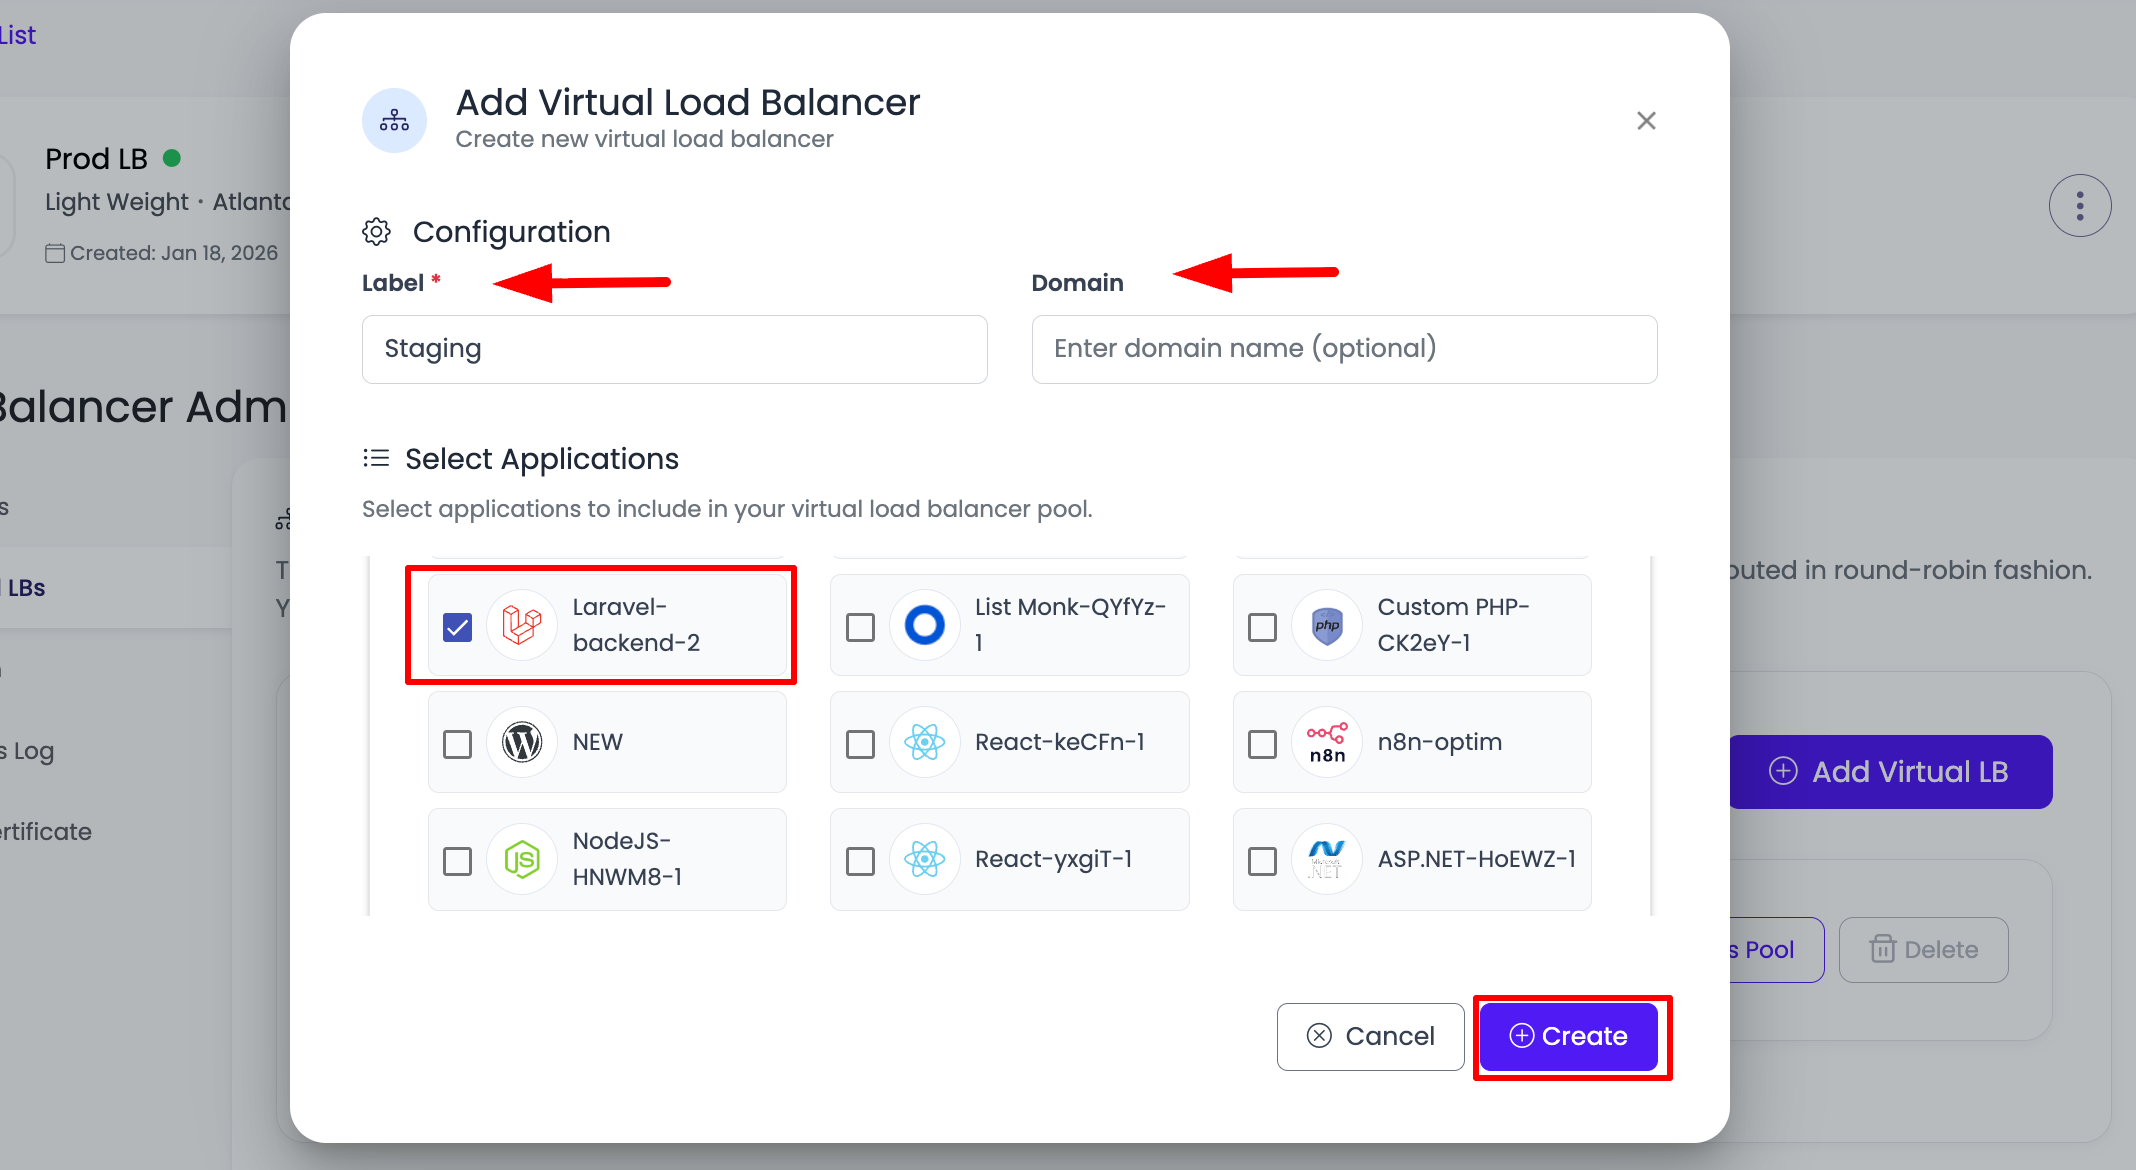
Step 3: Enter Virtual Load Balancer Details
You have to add following detail.
Required Information:
Label:
- Purpose: A descriptive name for your virtual load balancer
- Examples:
frontend-vlbfor frontend applicationsapi-vlbfor API servicesadmin-vlbfor admin interfacesproduction-vlbfor production environment
- Best Practice: Use a name that clearly describes the purpose
- Required: This field is mandatory
- Naming Tips:
- Use descriptive names
- Include environment if applicable
- Keep names consistent
Domain (Optional):
- Purpose: Your custom domain for this virtual load balancer
- Optional: You can add it later if not ready now
- Format: Example:
api.example.com,www.example.com - Benefits:
- Professional appearance
- Better branding
- SSL support
- Configuration: Can be configured after vLB creation
- CNAME Setup: Will need to point CNAME record to endpoint URL
Select Applications:
- Purpose: Select applications you want to route traffic to
- Application Pool: Applications that will receive traffic from this vLB
- Selection Options:
- Multiple Selection: You can select multiple applications
- All Applications: Select all or specific applications
- Add Later: Applications can be added later if not selected now
- Application List: Shows all available applications
- Filter Options: Filter applications by server, region, or type
- Best Practice: Select applications that should receive traffic from this vLB
Configuration Tips:
- Start Simple: You can start with basic configuration and add details later
- Applications Can Be Added Later: Don't worry if you don't select all applications now
- Domain Can Wait: Custom domain can be configured after vLB is created
- Label is Important: Choose a good label as it helps identify the vLB
Step 4: Create Virtual Load Balancer
Once you add these details, click on button create.
Creation Process:
- Click Create: Click the "Create" button to proceed
- Validation: System validates the information
- Processing: Virtual load balancer creation begins
- Quick Process: It will take couple of seconds and your virtual load balancer is up and running and routing traffic to selected apps
What Happens:
- vLB Creation: Virtual load balancer is created
- Configuration: Load balancer is configured automatically
- Application Routing: Traffic routing to selected applications begins
- Status Update: vLB status changes to "Active"
- Ready to Use: Virtual load balancer is immediately ready to use
After Creation:
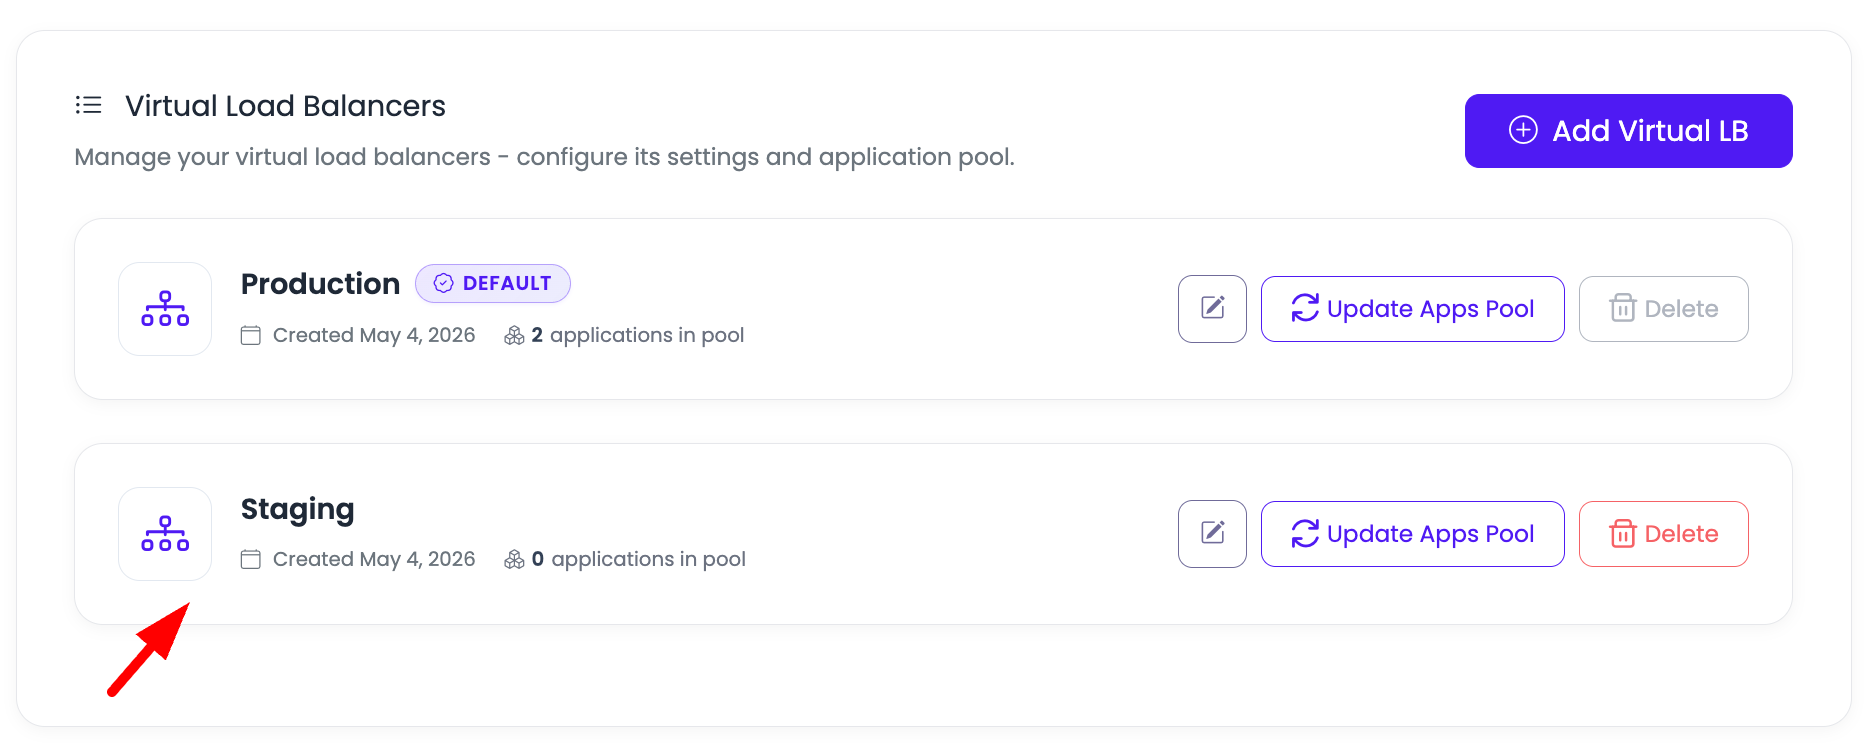
- vLB Appears in List: New virtual load balancer appears in the list
- Active Status: Shows as "Active" and ready
- Traffic Routing: Immediately starts routing traffic to selected applications
- Access Available: Can be accessed via endpoint URL
Step 5: Access Virtual Load Balancer
Click on your newly created virtual load balancer to open its detail, or click on three dotted menu to update its application pool.

Access Options:
Option 1: Click on vLB Card:
- Direct Access: Click directly on the virtual load balancer card
- Opens Details: Opens the virtual load balancer details page
- Full Information: View all vLB information and settings
Option 2: Three Dotted Menu:
- Menu Icon: Click on the three dotted menu (⋮) icon
- Quick Actions: Access quick action menu
- Update Application Pool: Option to update application pool directly
- Other Options: Additional management options available
Both Methods:
- Same Result: Both methods allow you to manage the vLB
- Choose Convenience: Use whichever method is more convenient
- Full Access: Full access to all vLB features and settings
Step 6: View Virtual Load Balancer Details
If you click on this, you will see load balancer details.
Virtual Load Balancer Information:
Endpoint URL:
- Purpose: Endpoint URL is the URL you use to access this virtual load balancer
- Format: Usually in format like
vlb-xxxxx.kloudbean.comor similar - Public Access: This URL is publicly accessible
- HTTPS Support: Supports both HTTP and HTTPS protocols
- Testing: Use this URL to test your virtual load balancer
- Application Access: Applications can be accessed through this URL
Domain:
- Purpose: Your custom domain (if configured)
- Status: Shows if custom domain is configured
- Configuration: Configure or update custom domain here
- CNAME Target: Endpoint URL is the CNAME target for custom domain
- Multiple Domains: You can add multiple domains to same vLB
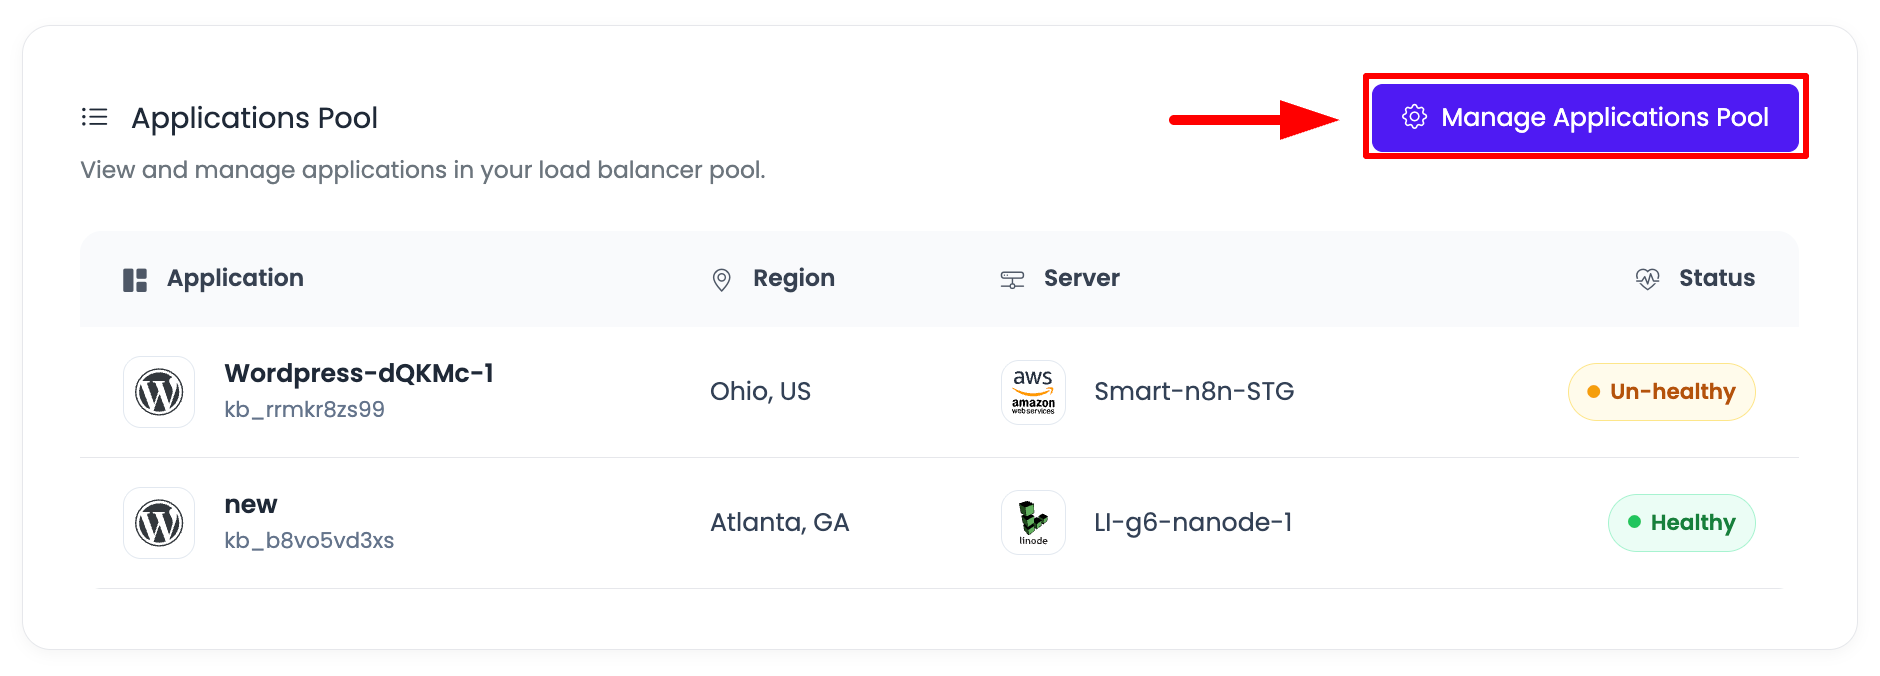
Applications Pool:
- Purpose: You can update apps pool as required
- Current Applications: Shows applications currently in the pool
- Add Applications: Add new applications to the pool
- Remove Applications: Remove applications from the pool
- Manage Pool: Full control over which applications receive traffic
- Pool Status: Shows health status of applications in pool
Additional Information (may be displayed):
- Status: Virtual load balancer status (Active/Inactive)
- Traffic Statistics: Traffic and performance metrics
- SSL Status: SSL certificate status
- Health Checks: Health check configuration and status
- Load Balancing Method: Current load balancing algorithm
Managing Application Pool
Updating Application Pool:
- Add Applications: Add new applications to the pool anytime
- Remove Applications: Remove applications from pool when needed
- Update Configuration: Modify application pool settings
- Health Monitoring: Monitor health of applications in pool
For detailed instructions on managing application pool, see: Updating Application Pool
Adding Custom Domain
Optionally you can add custom domain to your virtual load balancer.
Custom Domain Benefits:
- Professional Appearance: Use your own domain name
- Better Branding: Improved branding for your applications
- SSL Support: Can add SSL certificates for custom domain
- Multiple Domains: Support for multiple domains on same vLB
If you want to enable custom domain then you have to point CNAME record to this host URL.
CNAME Configuration:
- Record Type: CNAME
- Name: Your domain or subdomain (e.g.,
www,api,@) - Value: The endpoint URL (host URL) provided by KloudBean
- TTL: 3600 (or recommended value)
In order to know better how to add custom domain, review our document: Adding Custom Domain
Custom Domain Setup Process:
- Get Endpoint URL: Note the endpoint URL from vLB details
- Add CNAME Record: Add CNAME record at your domain registrar
- Point to Endpoint URL: Point CNAME record to the endpoint URL
- Verify Domain: Verify domain in KloudBean dashboard
- SSL Configuration: Add SSL certificate for secure connections
Virtual Load Balancer Limits
How many vLB you can launch depending upon the size of your FLB.
Factors Affecting vLB Capacity:
- FLB Server Size: Larger FLB servers support more vLBs
- Resource Allocation: Each vLB uses resources from the FLB server
- Traffic Volume: Number of vLBs depends on expected traffic
- Application Count: Number of applications being load balanced
Scaling Options:
- Upgrade FLB Size: Upgrade your FLB server size to support more vLBs
- Contact Support: Contact KloudBean support to understand your specific limits
- Optimize Configuration: Optimize vLB configuration for better resource usage
Best Practices:
- Plan Ahead: Consider how many vLBs you'll need before launching FLB
- Monitor Resources: Monitor FLB resource usage
- Scale When Needed: Upgrade FLB size when approaching limits
- Optimize vLBs: Remove unused vLBs to free up resources
Use Cases for Multiple Virtual Load Balancers
Application Separation
Different Applications:
- Frontend vLB: Route traffic to frontend applications
- API vLB: Route traffic to API services
- Admin vLB: Route traffic to admin interfaces
- Microservices: Separate vLBs for different microservices
Environment Separation
Different Environments:
- Production vLB: Production environment traffic
- Staging vLB: Staging environment traffic
- Development vLB: Development environment traffic
- Testing vLB: Testing environment traffic
Domain-Based Routing
Different Domains:
- Main Domain vLB:
example.comtraffic - API Domain vLB:
api.example.comtraffic - Admin Domain vLB:
admin.example.comtraffic - CDN vLB: Content delivery network traffic
Service-Based Routing
Different Services:
- Web Service vLB: Web application traffic
- Mobile API vLB: Mobile API traffic
- Third-Party vLB: Third-party service traffic
- Internal vLB: Internal service traffic
Best Practices
Planning
- Plan Your vLBs: Plan how many vLBs you'll need before creating them
- Choose Right FLB Size: Select FLB size based on expected number of vLBs
- Organize by Purpose: Group related applications in same vLB
- Use Descriptive Labels: Use clear, descriptive labels for vLBs
Configuration
- Start with Applications: Select applications during creation when possible
- Add Domain Later: Custom domain can be added after vLB creation
- Configure Health Checks: Set up health checks for applications
- Monitor Performance: Monitor each vLB's performance individually
Management
- Regular Review: Periodically review and optimize your vLBs
- Remove Unused vLBs: Remove vLBs that are no longer needed
- Update Application Pool: Keep application pool updated
- Document Configuration: Keep notes on each vLB's purpose and configuration
Troubleshooting
Cannot Add Virtual Load Balancer
If you cannot add a new virtual load balancer:
- Check FLB Status: Verify FLB is active and running
- Check Limits: Verify you haven't reached vLB limit for your FLB size
- Review Errors: Check for any error messages
- Contact Support: Contact KloudBean support if issues persist
Virtual Load Balancer Not Routing Traffic
If vLB is not routing traffic:
- Check Status: Verify vLB status is "Active"
- Check Application Pool: Verify applications are in the pool
- Verify Applications: Ensure applications are running and accessible
- Check Health Checks: Verify health checks are passing
- Review Configuration: Review vLB configuration settings
Applications Not Receiving Traffic
If applications are not receiving traffic:
- Check Application Pool: Verify applications are in the pool
- Application Status: Verify applications are running
- Health Status: Check application health status
- Network Connectivity: Verify network connectivity
- Load Balancing Method: Review load balancing algorithm
Next Steps
After creating your virtual load balancer:
- Add Applications: Learn how to Update Application Pool to manage applications
- Add Custom Domain: Configure Adding Custom Domain for your vLB
- Add SSL: Secure your vLB with Adding Free SSL Certificates
- Monitor Health: Monitor your load balancer with Monitoring Load Balancer Health
Summary
Key Points:
- Multiple vLBs on Single FLB: Add multiple virtual load balancers on one FLB server
- Cost-Effective: No need for multiple FLBs unless you need different locations
- vLB Capacity: Number of vLBs depends on FLB server size
- Quick Creation: Virtual load balancers are created in seconds
- Immediate Routing: Traffic routing starts immediately after creation
- Flexible Management: Applications and domains can be added or updated anytime
Creation Process:
- Navigate to Load Balancer Administration → Virtual LBs tab
- Click "Add Virtual load balancer" button
- Enter Label, Domain (optional), and Select Applications
- Click "Create" button
- Virtual load balancer is created and ready in seconds
Management:
- Access Details: Click on vLB card or use three-dotted menu
- View Information: See Endpoint URL, Domain, and Applications Pool
- Update Pool: Update application pool as required
- Add Domain: Configure custom domain by pointing CNAME to endpoint URL