Adding SSL Certificates
Learn how to add SSL certificates to your virtual load balancer (vLB) for secure HTTPS connections. If you have added your custom domain, you might need SSL certificates for your domain, in order to install certs you have 2 options.
Overview
If you have added your custom domain, you might need SSL certificates for your domain, in order to install certs you have 2 options.
Why SSL Certificates Are Needed:
- Secure Connections: Encrypt traffic between users and your load balancer
- HTTPS Support: Enable HTTPS for your custom domain
- Trust & Security: Build trust with users through secure connections
- SEO Benefits: HTTPS is preferred by search engines
- Compliance: Meet security and compliance requirements
SSL Certificate Options:
- Free Let's Encrypt SSL Certificates: Free, automatically renewed certificates
- Custom SSL Certificates: Your own SSL certificates from any provider
Benefits of SSL:
- Data Encryption: Encrypts data in transit
- Authentication: Verifies your domain identity
- User Trust: Builds trust with your users
- Browser Security: Prevents browser security warnings
- Modern Requirement: Essential for modern web applications
Prerequisites
For Let's Encrypt Certificates
Before installing certs, make sure you have already added custom domain and your domain CNAME is correctly pointing to this vLB.
Required Before Installing Let's Encrypt Certificates:
- Custom Domain Added: Make sure you have already added custom domain
- CNAME Record Configured: Your domain CNAME is correctly pointing to this vLB
- DNS Propagation: DNS changes have propagated
- Domain Accessible: Domain must be accessible from internet
- Domain Verification: Domain should be verified in KloudBean
Why These Prerequisites Are Important:
- Domain Ownership: Let's Encrypt needs to verify domain ownership
- DNS Validation: Validates domain through DNS records
- Accessibility: Domain must be reachable for validation
- CNAME Requirement: CNAME must point to vLB endpoint URL
Check Before Installing:
- Custom Domain Added: Verify custom domain is added in vLB settings
- CNAME Record: Verify CNAME record is set at domain registrar
- DNS Propagation: Check DNS has propagated (use DNS lookup tools)
- Domain Resolving: Verify domain resolves to correct IP address
- Domain Accessible: Test domain is accessible via browser
For Custom SSL Certificates
Required for Custom SSL Certificates:
- SSL Certificate: Valid SSL certificate file (.crt or .pem)
- Private Key: Private key file (.key)
- Certificate Chain: Intermediate certificates (if required)
- Domain Match: Certificate must match your domain
SSL Certificate Options
Option 1: Free Let's Encrypt SSL Certificates
Free Let's Encrypt SSL Certificates:
- Free: Completely free SSL certificates
- Automatic Renewal: Automatically renews every 90 days
- Easy Setup: Simple installation process
- Trusted: Trusted by all major browsers
- Multiple Domains: Support for multiple domains
Benefits:
- No Cost: Free SSL certificates
- Automatic Management: Handles renewal automatically
- Widely Trusted: Accepted by all browsers
- Easy Installation: Simple installation process
Requirements:
- Custom domain must be added
- CNAME record must be correctly configured
- Domain must be accessible from internet
Option 2: Custom SSL Certificates
Custom SSL Certificates:
- Your Own Certificate: Use certificates from any provider
- Full Control: Complete control over certificate
- Enterprise Certificates: Support for enterprise-grade certificates
- Wildcard Support: Support for wildcard certificates
- Extended Validation: Support for EV certificates
Benefits:
- Flexibility: Use certificates from any provider
- Custom Requirements: Meet specific certificate requirements
- Enterprise Support: Support for enterprise certificates
- Extended Features: Additional certificate features
Requirements:
- Valid SSL certificate file
- Private key file
- Certificate must match domain
Installing SSL Certificates
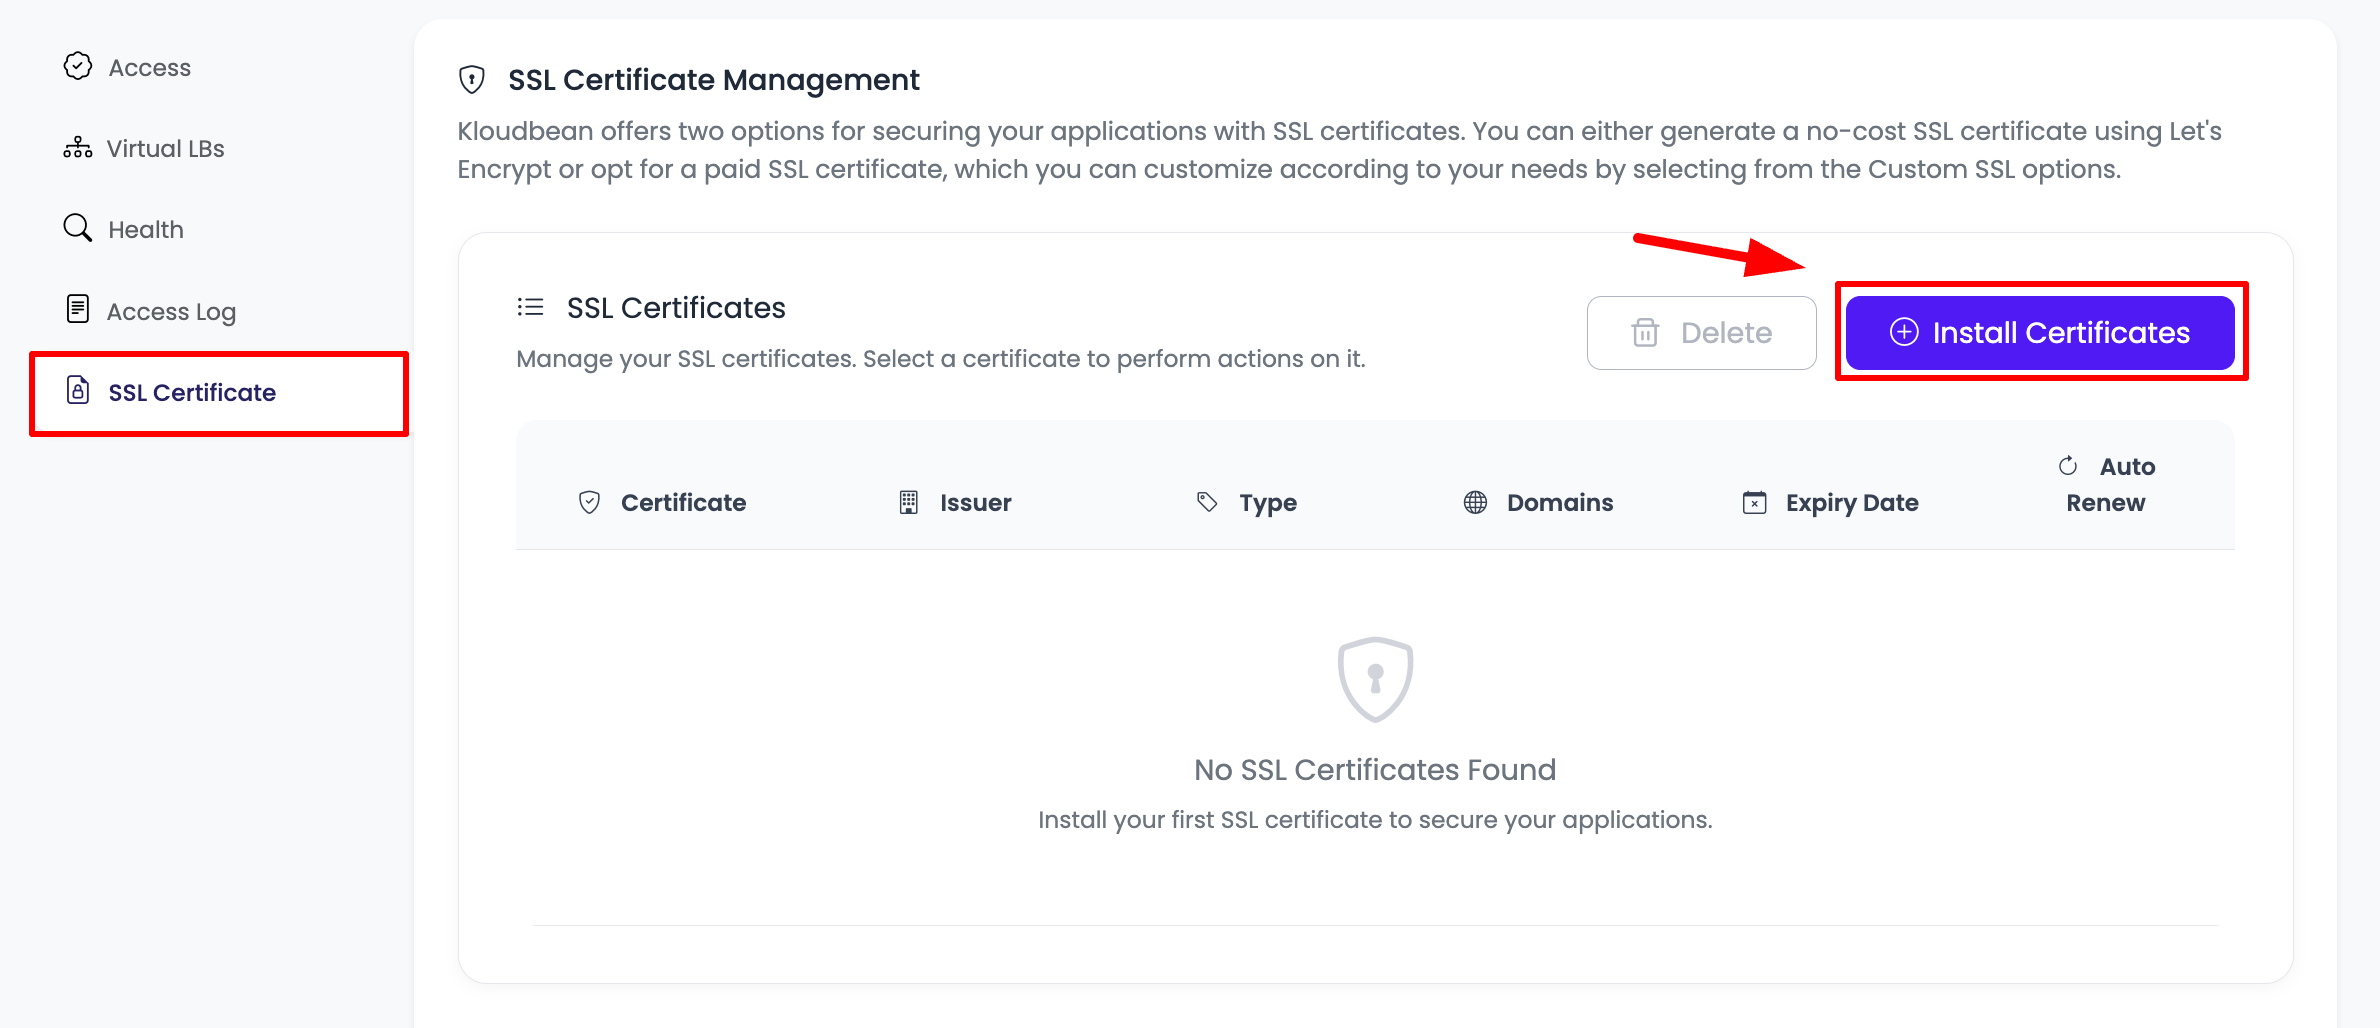
Step 1: Navigate to SSL Certificate Section
In order to install cert, navigate to "Load balancer administration" → "SSL Certificate".
Access Steps:
- Log in to KloudBean Dashboard: Access your KloudBean account
- Go to Flexible Load Balancers: Navigate to Flexible Load Balancers section
- Select Your FLB: Click on your Flexible Load Balancer
- Load Balancer Administration: This opens "Load balancer administration" page
- Click SSL Certificate Tab: Click on "SSL Certificate" tab
On This Screen:
- Already Added Certs: You will see already added certs (if any)
- Add New Certs: Option to add new certs
- Certificate List: List of all installed certificates
- Install Button: In order to add cert click on "Install Certificates" button
What You'll See:
- Certificate List: All installed SSL certificates
- Certificate Details: Details of each certificate
- Status: Status of each certificate (Active, Expired, etc.)
- Install Button: Button to install new certificates
Step 2: Click Install Certificates
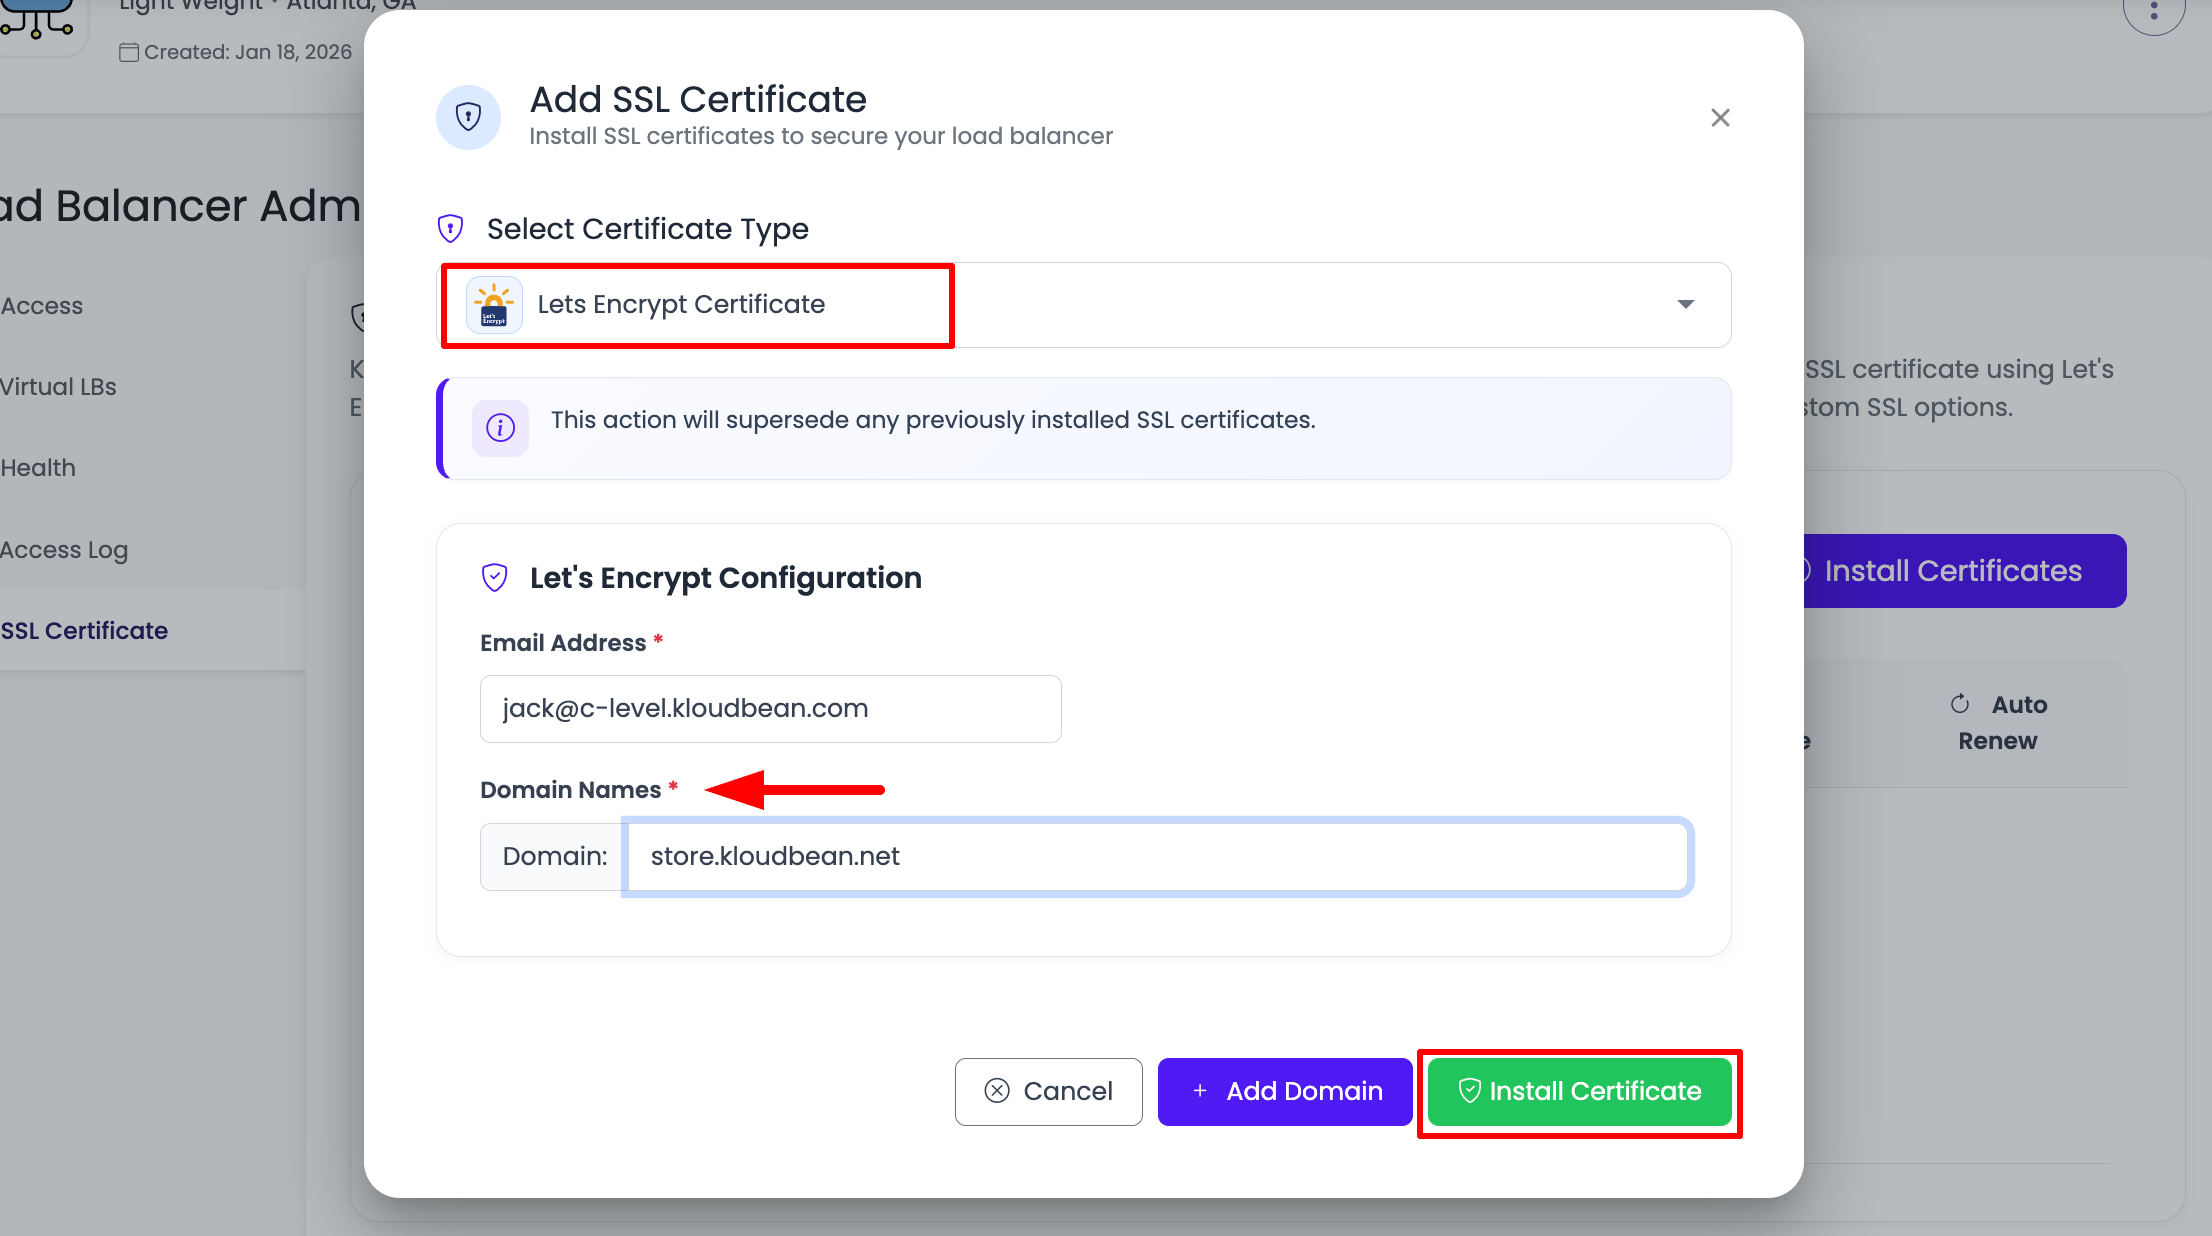
Once you click on it, a prompt will open to select the certificates type and enter detail.
Install Certificates Prompt:
- Certificate Type Selection: Choose between Let's Encrypt or Custom SSL
- Form Fields: Fields for entering certificate details
- Domain Selection: Option to select domains
- Install Button: Button to proceed with installation
Installing Free Let's Encrypt Certificates
Step 1: Select Certificate Type
Certificate Type → select "lets encrypt certificates".
Certificate Type Selection:
- Let's Encrypt Option: Select "lets encrypt certificates" from certificate type dropdown
- Free Option: This is the free SSL certificate option
- Automatic Renewal: Certificates will renew automatically
Step 2: Enter Certificate Details
Email Address *:
- Purpose: Email address for certificate notifications
- Required: This field is required (marked with *)
- Notifications: Used for certificate expiration notifications
- Let's Encrypt: Required by Let's Encrypt for certificate issuance
- Format: Enter valid email address
Domain Names:
- Purpose: Click on add domain to add as many domains you want
- Multiple Domains: Add multiple domains to one certificate
- Add Domain Button: Click "Add Domain" button to add domains
- Domain List: List of domains to be included in certificate
- Remove Option: Can remove domains if needed
Adding Domains:
- Click Add Domain: Click on "Add Domain" button
- Enter Domain: Enter domain name (e.g.,
www.example.com) - Add More: Click "Add Domain" again to add more domains
- Remove: Remove domains if needed
- Review: Review all domains before installing
Domain Requirements:
- Must Be Added: Domains must be added in vLB settings first
- CNAME Configured: CNAME records must be correctly configured
- Accessible: Domains must be accessible from internet
- Valid Format: Enter valid domain format
Step 3: Install Certificates
Once detail added, click on "Install Certificates", it will take a while and certs will be install.
Installation Process:
- Click Install: Click on "Install Certificates" button
- Validation: KloudBean validates domain ownership
- Certificate Request: Requests certificate from Let's Encrypt
- Installation: Installs certificate on load balancer
- Time Required: It will take a while (typically 5-10 minutes)
Before Installing Certs:
- Custom Domain Added: Before installing certs, make sure you have already added custom domain
- CNAME Configured: Your domain CNAME is correctly pointing to this vLB
- DNS Propagated: DNS changes have propagated
- Domain Accessible: Domain is accessible from internet
What Happens During Installation:
- Domain Validation: Let's Encrypt validates domain ownership
- DNS Check: Verifies DNS records are correct
- Certificate Issuance: Let's Encrypt issues certificate
- Installation: Certificate is installed on load balancer
- HTTPS Activation: HTTPS is activated for the domain
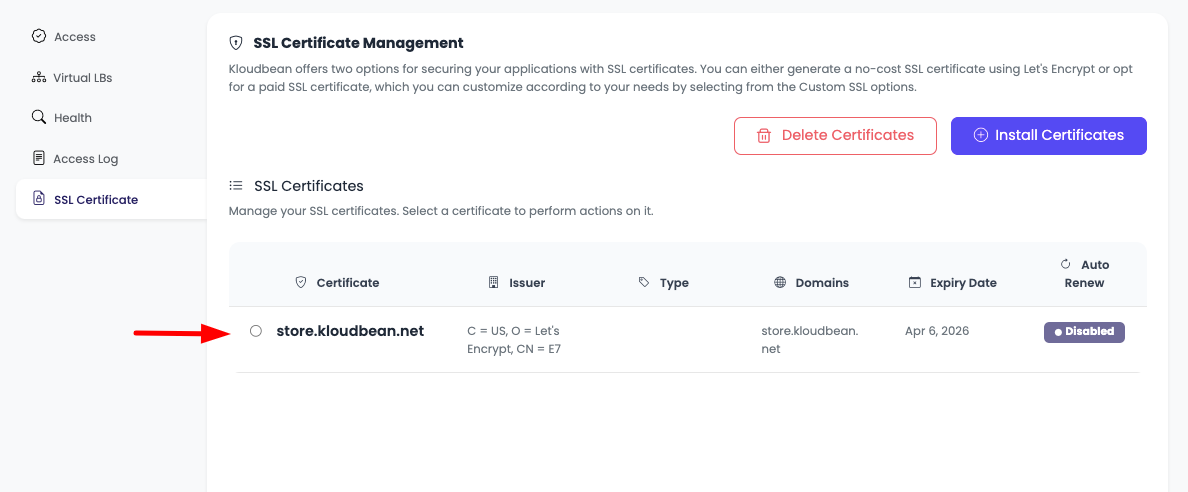
On This Tab, You Will See Certs Are Installed Successfully.
After Installation:
- Success Message: On this tab, you will see certs are installed successfully
- Certificate Active: Certificate status shows as "Active"
- HTTPS Working: HTTPS is now working for your domain
- Certificate Details: View certificate details and expiration
What You'll See:
- Certificate List: Certificate appears in the certificate list
- Status: Status shows as "Active" or "Installed"
- Expiration Date: Certificate expiration date is displayed
- Domain Coverage: Domains covered by the certificate
- Renewal Info: Automatic renewal information
Installing Custom SSL Certificates
Step 1: Select Custom SSL Certificate Type
In order to install custom certs, from install certs prompt select "Custom ssl certificates".
Certificate Type Selection:
- Custom Option: Select "Custom ssl certificates" from certificate type dropdown
- Your Own Certificate: Use your own SSL certificate
- Full Control: Complete control over certificate
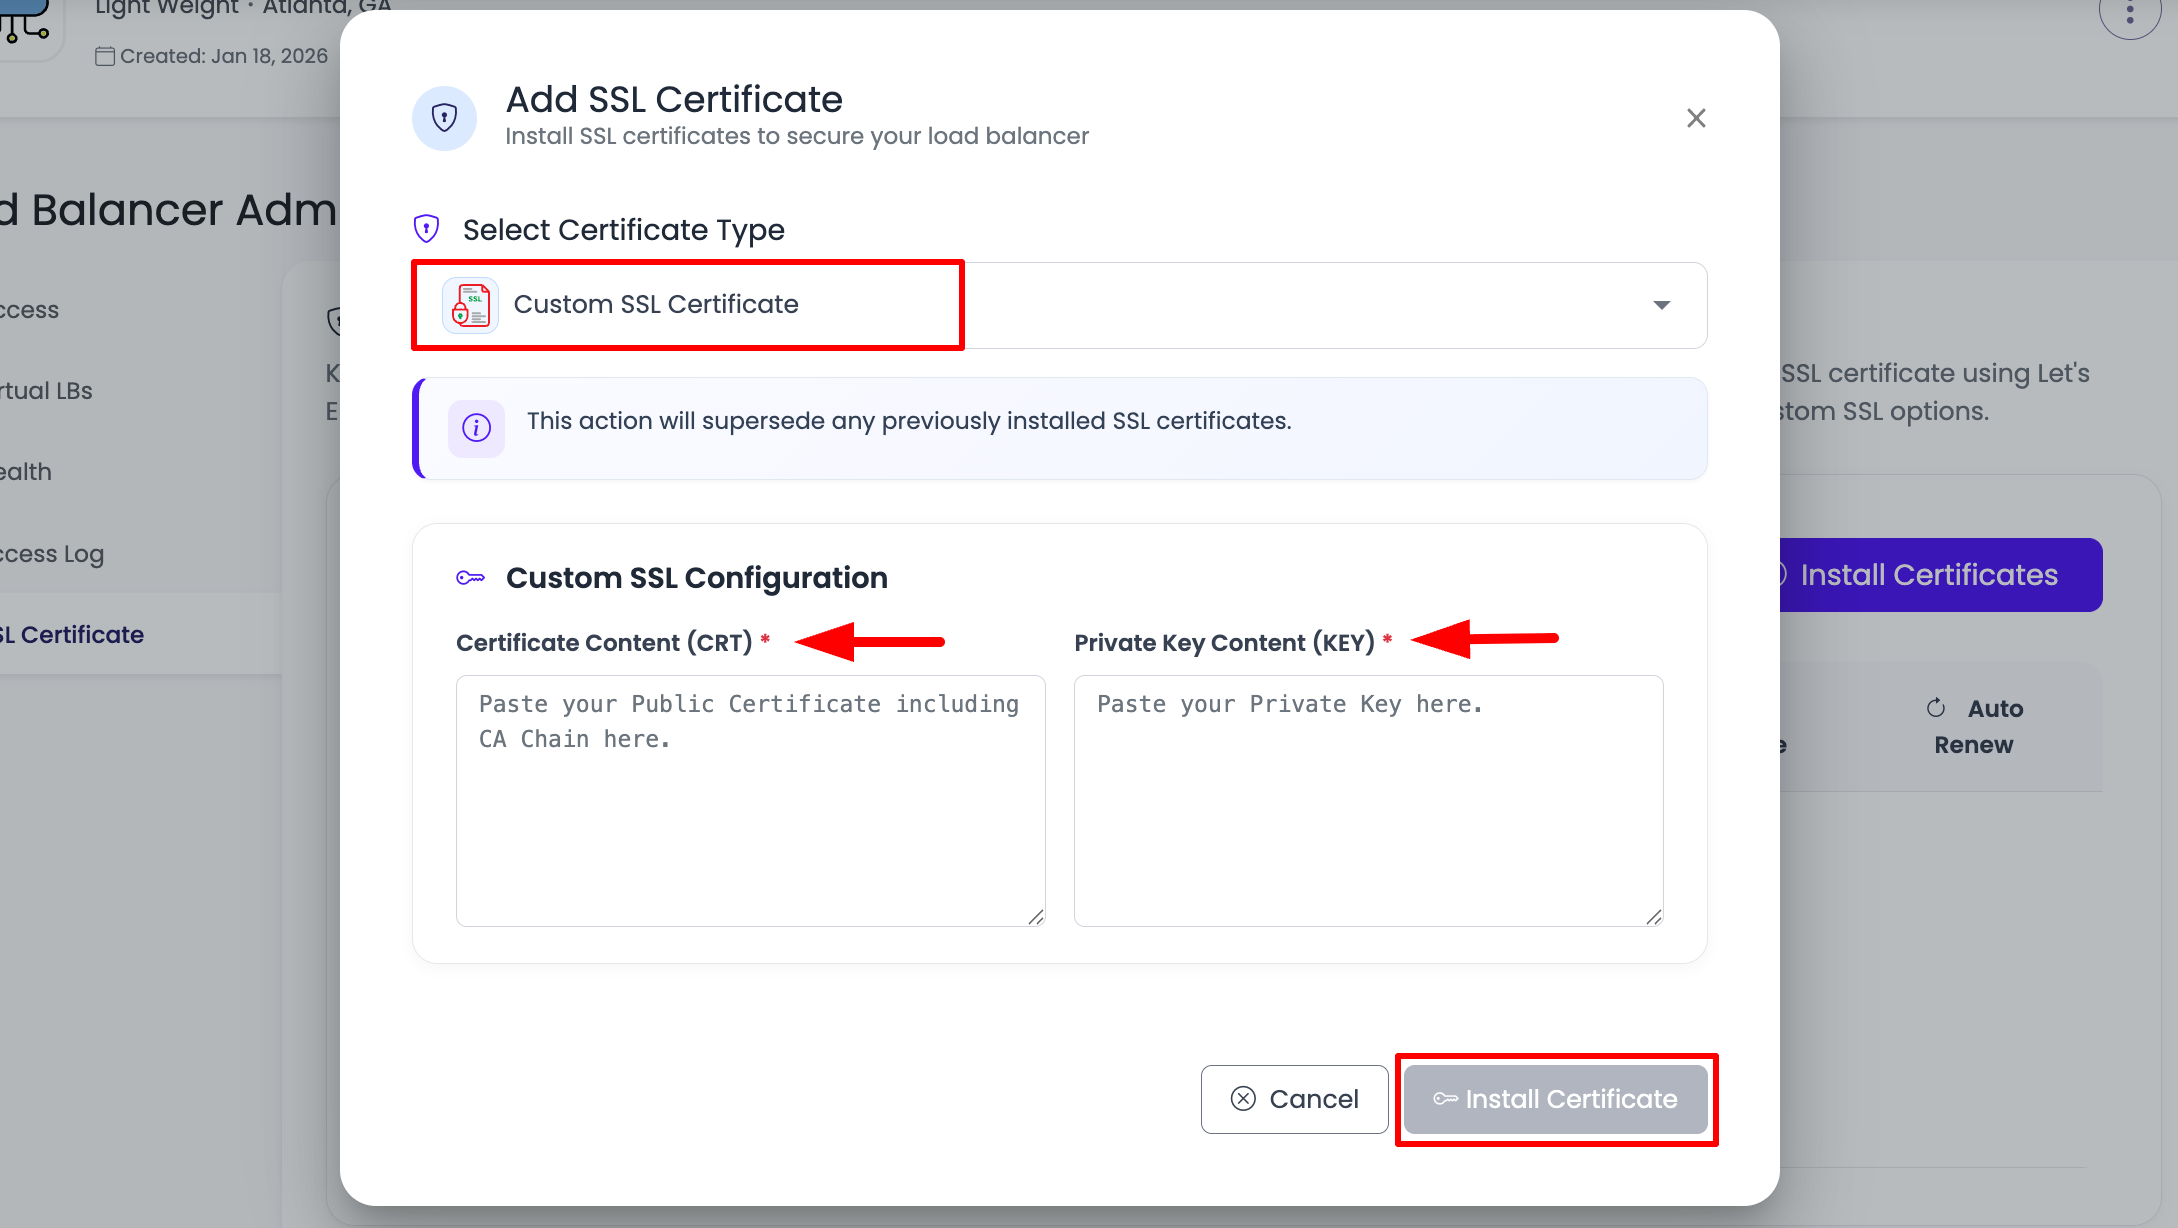
Custom Certificate Form:
- Certificate Content Field: Field for certificate content
- Certificate Key Field: Field for private key
- Upload Option: Option to upload files or paste content
Step 2: Enter Certificate Details
Add Certificate content crt:
- Certificate Content: Add Certificate content crt
- Certificate File: Paste certificate content or upload .crt/.pem file
- Format: Certificate in PEM format
- Full Chain: Include full certificate chain if required
- Required: This field is required
Certificate Content Format:
-----BEGIN CERTIFICATE-----
[Certificate content here]
-----END CERTIFICATE-----
Certificate Key:
- Private Key: Certificate key (private key file)
- Key File: Paste private key content or upload .key file
- Format: Private key in PEM format
- Keep Secure: Private key must be kept secure
- Required: This field is required
Private Key Format:
-----BEGIN PRIVATE KEY-----
[Private key content here]
-----END PRIVATE KEY-----
Certificate Details:
- Certificate Content: Full certificate content including chain
- Private Key: Private key matching the certificate
- Domain Match: Certificate must match your domain
- Valid Certificate: Certificate must be valid and not expired
Step 3: Install Custom Certificate
Click on install certs and it will be installed.
Installation Process:
- Click Install: Click on install certs button
- Validation: System validates certificate and key
- Installation: Certificate is installed on load balancer
- Activation: HTTPS is activated for the domain
- Time Required: Installation typically takes a few minutes
After Installation:
- Certificate Active: Certificate is installed and active
- HTTPS Working: HTTPS is now working for your domain
- Certificate Details: View certificate details
- Status: Certificate status shows as "Active"
What You'll See:
- Certificate List: Certificate appears in certificate list
- Status: Status shows as "Active"
- Expiration Date: Certificate expiration date
- Domain Coverage: Domain covered by certificate
Managing SSL Certificates
Viewing Installed Certificates
Certificate List:
- All Certificates: View all installed certificates
- Certificate Details: See details of each certificate
- Status: Check certificate status (Active, Expired, etc.)
- Expiration: View certificate expiration dates
Certificate Information:
- Issuer: Certificate issuer (Let's Encrypt or custom)
- Expiration Date: When certificate expires
- Domain Coverage: Which domains are covered
- Status: Current status of certificate
Certificate Renewal
Let's Encrypt Certificates:
- Automatic Renewal: Certificates renew automatically
- Renewal Period: Renews 30 days before expiration
- Zero Downtime: Renewal happens without downtime
- No Action Required: Fully automated
Custom Certificates:
- Manual Renewal: Must renew manually before expiration
- Upload New Certificate: Upload new certificate when renewing
- Update Certificate: Update certificate in SSL settings
- Plan Ahead: Renew before expiration to avoid downtime
Removing Certificates
To Remove Certificate:
- Go to SSL Certificate Tab: Navigate to SSL Certificate section
- Find Certificate: Locate certificate to remove
- Remove Option: Click remove or delete option
- Confirm Removal: Confirm certificate removal
- HTTPS Disabled: HTTPS will be disabled for that domain
Troubleshooting
Certificate Installation Fails
If Let's Encrypt installation fails:
- Check Custom Domain: Verify custom domain is added
- Verify CNAME: Ensure CNAME record is correctly configured
- DNS Propagation: Wait for DNS to fully propagate
- Domain Accessibility: Verify domain is accessible from internet
- Retry Installation: Try installing again after fixing issues
Common Errors:
- Domain Not Verified: Custom domain not added or verified
- CNAME Not Configured: CNAME record not pointing correctly
- DNS Not Propagated: DNS changes not yet propagated
- Domain Not Accessible: Domain not accessible from internet
Custom Certificate Installation Fails
If custom certificate installation fails:
- Check Certificate Format: Verify certificate is in correct format
- Verify Private Key: Ensure private key matches certificate
- Check Domain Match: Certificate must match your domain
- Valid Certificate: Certificate must be valid and not expired
- Review Error Message: Check error message for specific issue
SSL Not Working After Installation
If SSL is not working:
- Check Certificate Status: Verify certificate is active
- Domain Configuration: Verify domain is correctly configured
- HTTPS Test: Test HTTPS access to your domain
- Browser Cache: Clear browser cache and try again
- Certificate Details: Review certificate details for issues
Certificate Expired
If certificate is expired:
- Let's Encrypt: Should auto-renew, check renewal status
- Custom Certificate: Upload new certificate
- Renewal Process: Follow renewal process for your certificate type
- Contact Support: Contact KloudBean support if issues persist
Best Practices
Before Installation
- Add Custom Domain First: Always add custom domain before installing SSL
- Configure CNAME: Ensure CNAME record is correctly configured
- Wait for DNS: Wait for DNS propagation before installing
- Verify Domain: Verify domain is accessible before installing
Certificate Management
- Monitor Expiration: Keep track of certificate expiration dates
- Automatic Renewal: Enable automatic renewal for Let's Encrypt
- Backup Certificates: Keep backup of custom certificates
- Document Configuration: Keep records of certificate configuration
Security
- Use HTTPS: Always use HTTPS for production domains
- Force HTTPS: Enable HTTP to HTTPS redirect
- Strong Certificates: Use strong, valid certificates
- Regular Updates: Keep certificates updated
Next Steps
After installing SSL certificates:
- Test HTTPS: Test HTTPS access to your domain
- Monitor Health: Monitor your load balancer with Monitoring Load Balancer Health
- Update Application Pool: Manage applications with Updating Application Pool
- Review FAQs: Check Load Balancer FAQs for common questions
Summary
Key Points:
- Two Options: Free Let's Encrypt or Custom SSL certificates
- Prerequisites: Custom domain and CNAME must be configured for Let's Encrypt
- Easy Installation: Simple installation process for both types
- Automatic Renewal: Let's Encrypt certificates renew automatically
- Multiple Domains: Support for multiple domains in one certificate
Installation Process:
- Navigate to Load Balancer Administration → SSL Certificate
- Click "Install Certificates" button
- Select certificate type (Let's Encrypt or Custom)
- Enter certificate details
- Click "Install Certificates"
- Wait for installation to complete
- Certificate is installed and HTTPS is active
Important Reminders:
- Custom Domain Required: Must add custom domain before installing Let's Encrypt
- CNAME Must Be Configured: CNAME record must point to vLB endpoint URL
- Wait for DNS: Wait for DNS propagation before installing
- Certificate Match: Custom certificates must match your domain