Launching Flexible Load Balancer
Learn how to launch and configure a Flexible Load Balancer (FLB) on KloudBean. KloudBean provides an easy way to setup load balancer, called Flexible Load Balancer.
Overview
KloudBean provides an easy way to setup load balancer, called Flexible Load Balancer.
Why It's Called "Flexible":
- No Complicated Configurations: It does not require any complicated configurations to setup
- Multiple Virtual Load Balancers: It supports multiple virtual load balancers in price of single server
- Multi-Cloud Support: It can route traffic to the apps hosted on any cloud provider and any region (on KloudBean)
- Optimized Performance: Load balancer is optimized and high performant
Key Features:
- Easy Setup: Simple and straightforward configuration process
- Cost-Effective: Multiple virtual load balancers for the price of a single server
- Multi-Cloud Routing: Route traffic to applications across different cloud providers and regions
- High Performance: Optimized for maximum performance and efficiency
- Flexible Configuration: No complicated setup required
Usage of Load Balancer
Common Use Cases:
-
Distribute Traffic Among Multiple Nodes:
- Balance traffic across multiple application servers
- Ensure even distribution of requests
- Prevent any single server from being overwhelmed
-
Region Based Entry Points:
- Route traffic based on geographic location
- Provide entry points for different regions
- Optimize latency for global users
-
High Availability:
- Ensure service availability even if servers fail
- Automatic failover to healthy servers
- Redundancy for critical applications
-
Option to Turn Off Node for Maintenance or Code Update Without Impacting Service:
- Take servers offline for maintenance
- Update code without service interruption
- Gracefully handle server updates
- Zero-downtime deployments
On KloudBean all this step is a few steps process.
Prerequisites
Before Launching Flexible Load Balancer:
- Active KloudBean Account: You need an active KloudBean account
- Applications Setup (Recommended): Make sure that you have setup the apps already on server in order to launch balancer
Important Notes:
- Applications Not Required Initially: Even if apps are not available yet, you can still launch FLB, but at that moment it won't be routing to any app
- Add Applications Later: Once FLB is launched, you can add application in the pool anytime and remove them from pool whenever required
- Flexible Management: Applications can be added or removed from the pool as needed
Launching Flexible Load Balancer
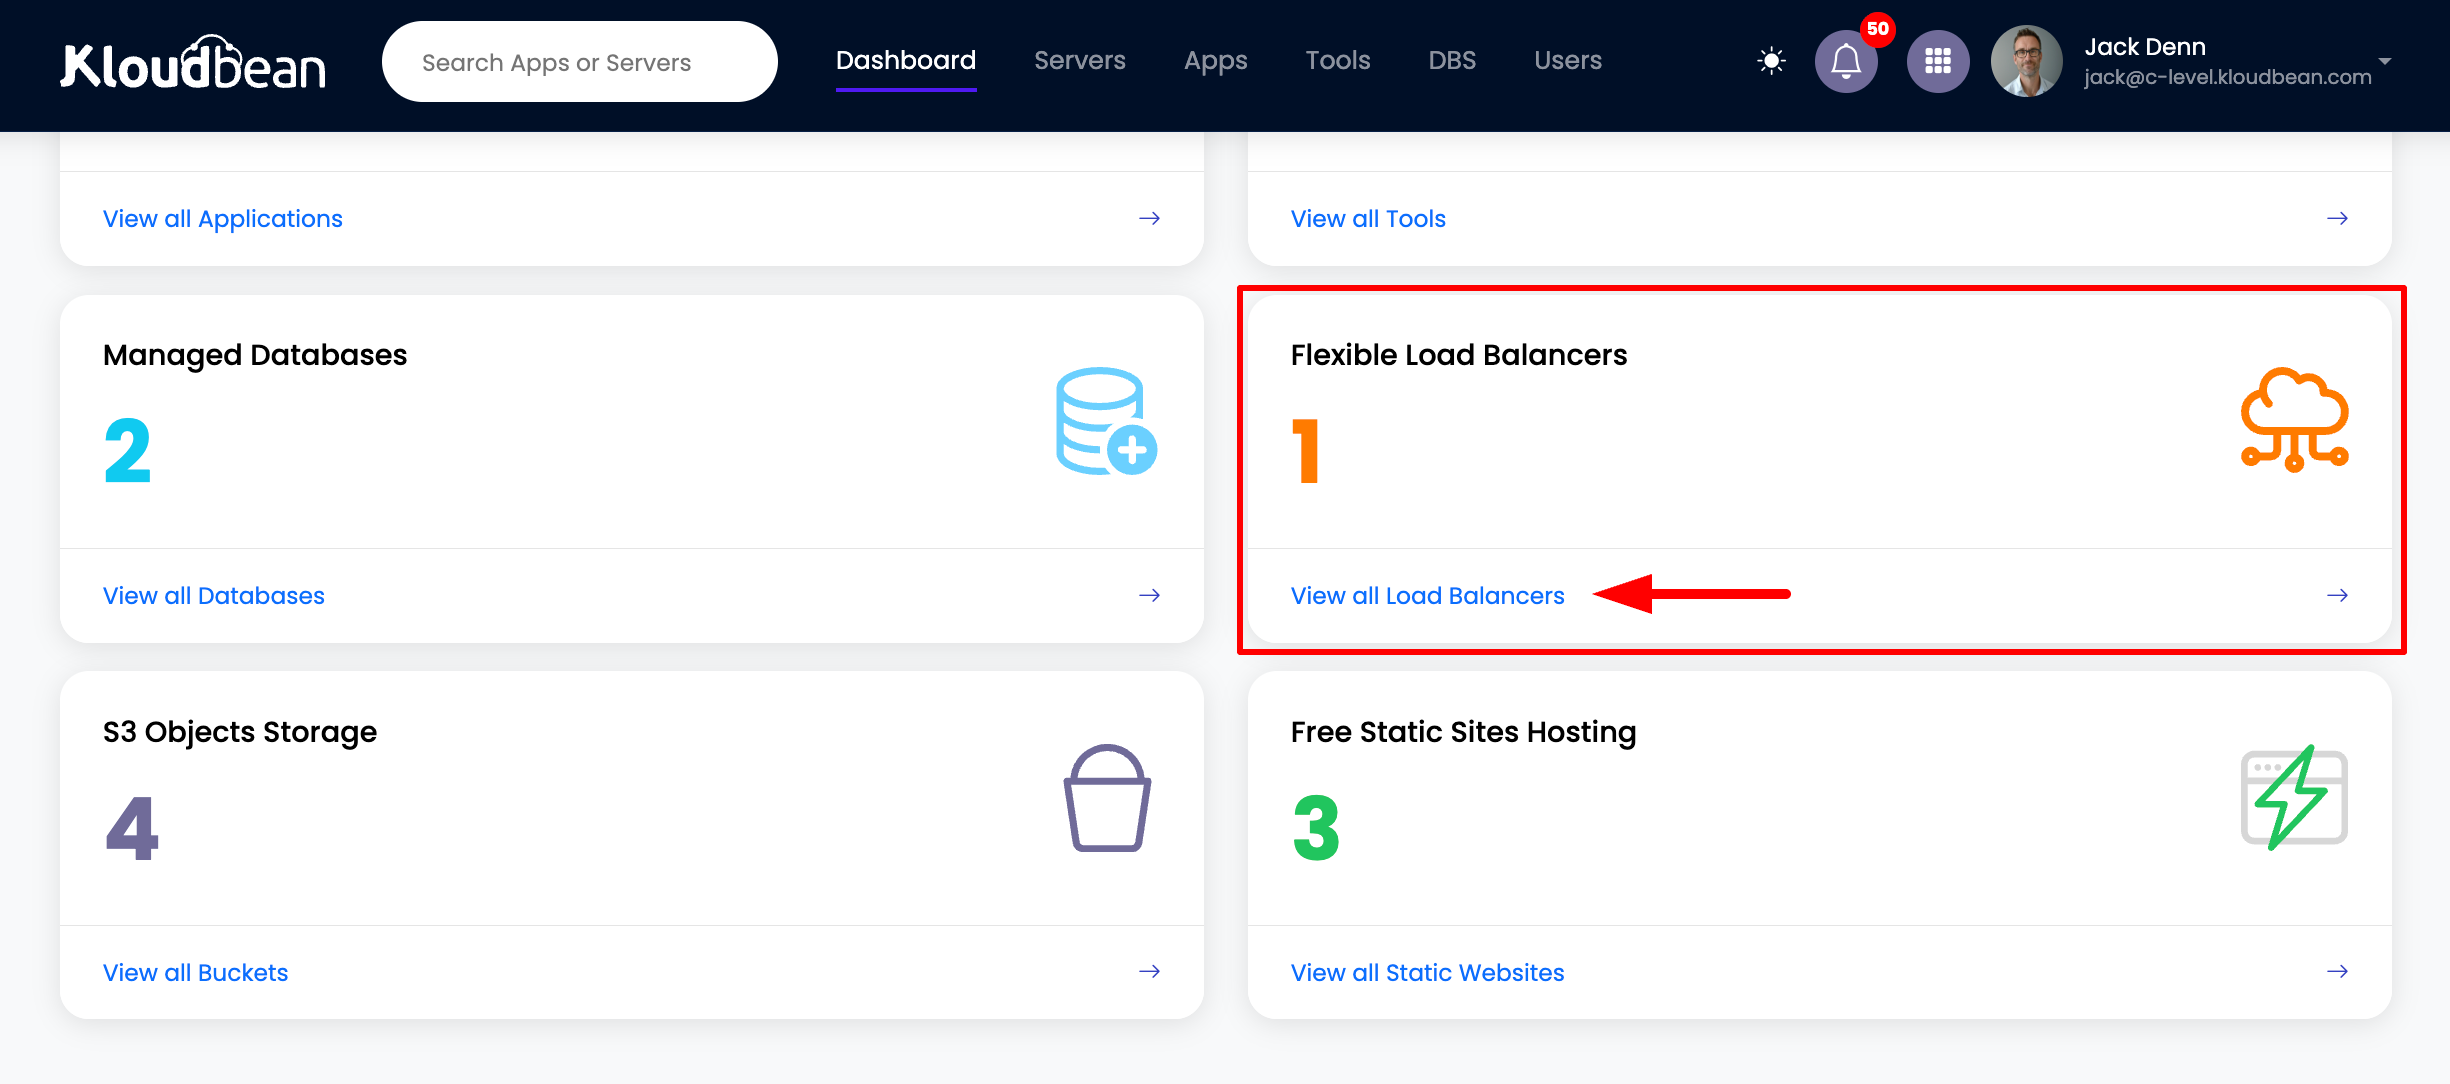
Step 1: Navigate to Flexible Load Balancer Page
Navigate to "Flexible load balancer" page from dashboard or from Quick menu.
Access Methods:
- From Dashboard: Navigate to "Flexible load balancer" page from dashboard
- From Quick Menu: Access from Quick menu for faster navigation
This will take you to load balancer page, where you will be able to see current load balancer (if you have any), and there will be a button "Launch Load Balancer".
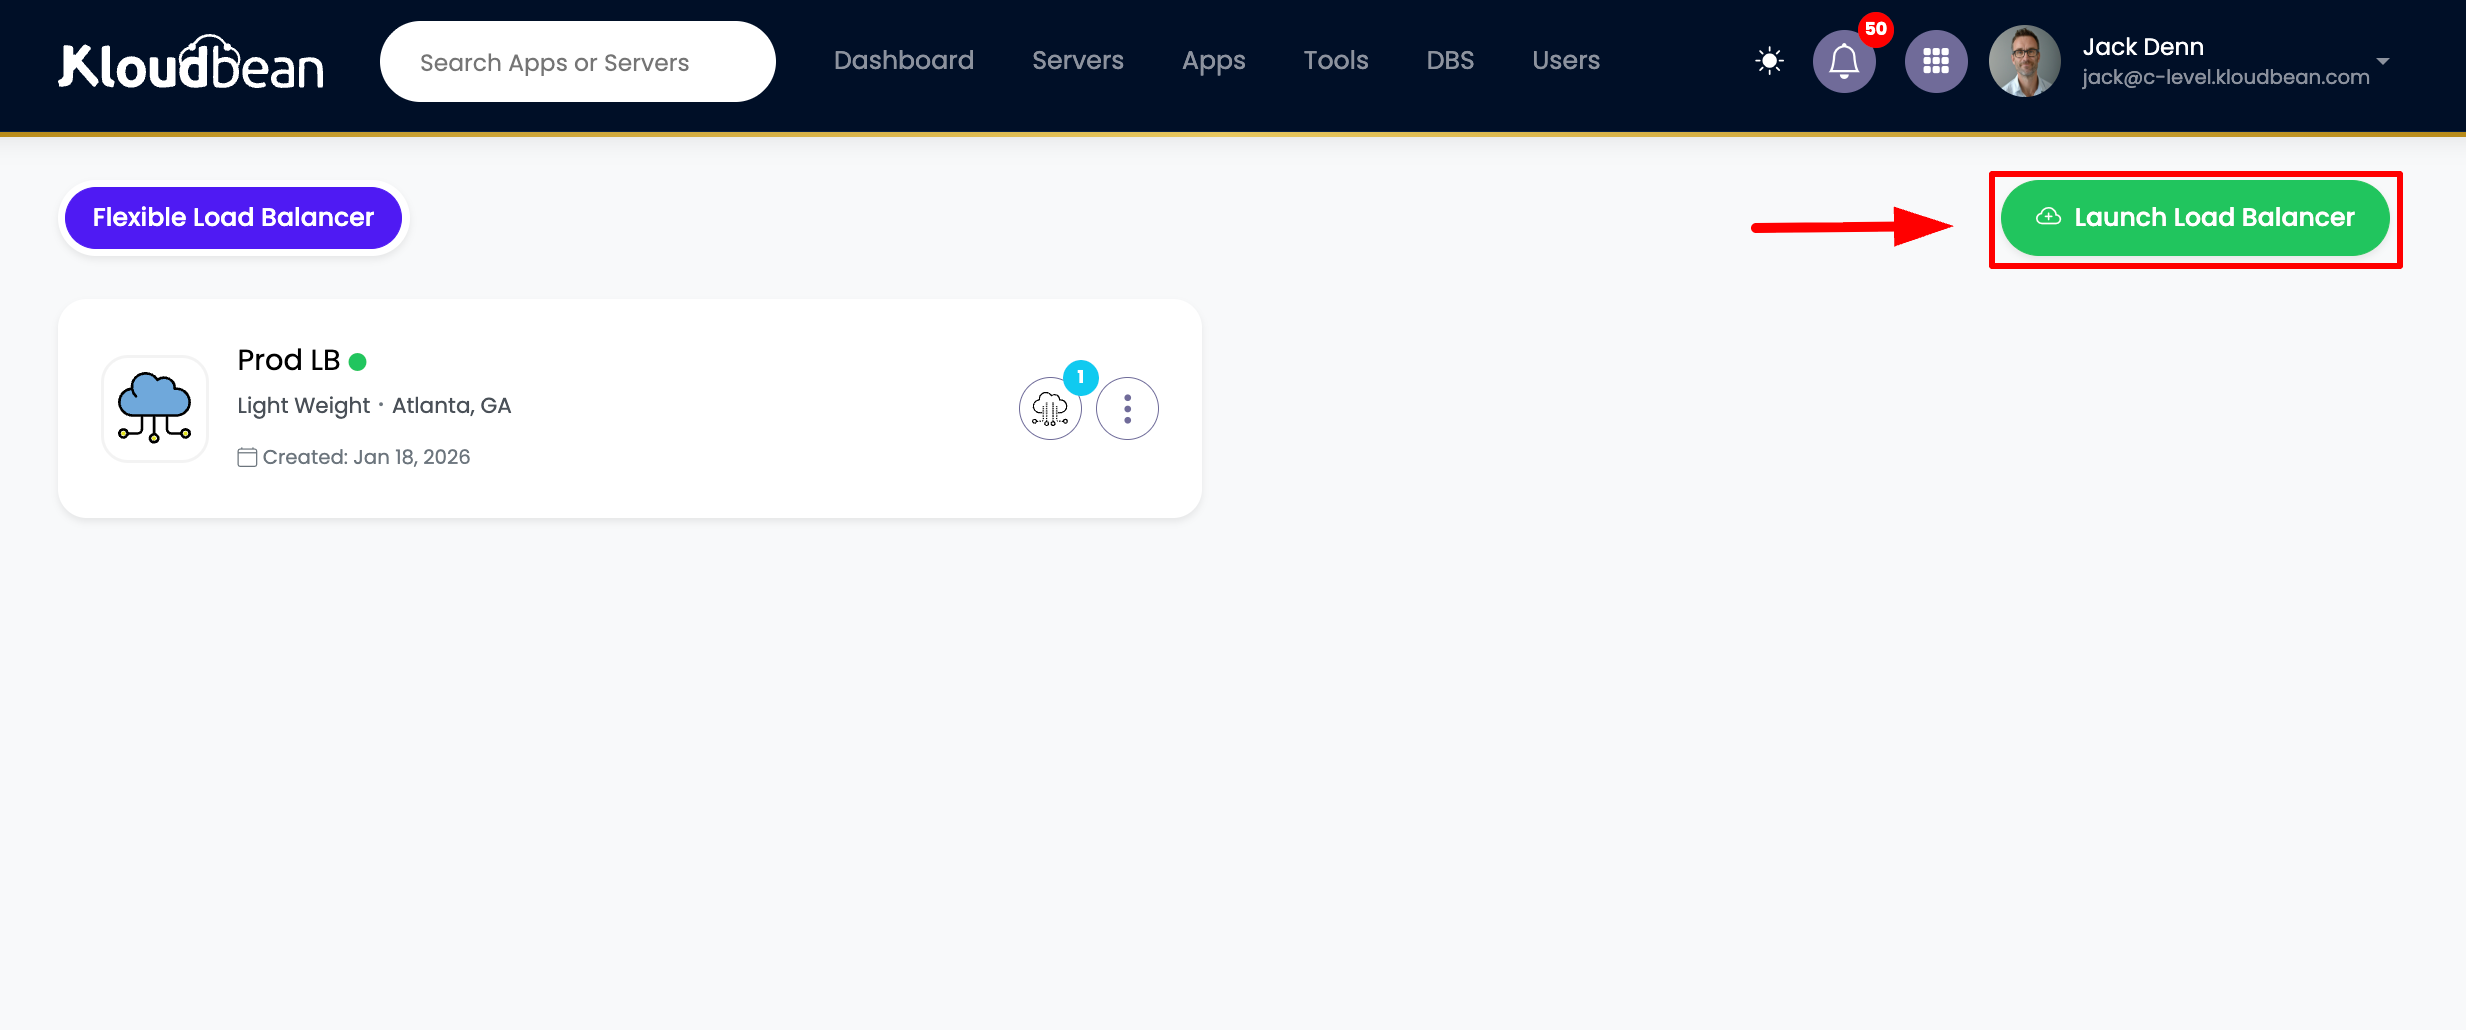
On the Load Balancer Page:
- Current Load Balancers: View all existing load balancers (if any)
- Launch Button: Click "Launch Load Balancer" button to create a new one
- Load Balancer List: See all your active load balancers
Step 2: Click Launch Load Balancer
Click on this button and you will be redirected to provision new flexible load balancer page.
Provisioning Page:
- Configuration Form: Form to configure your load balancer
- Payment Process: Payment screen after configuration
- Review Options: Review your selections before launching
Step 3: Provide Load Balancer Details
On provision page you will have to provide following detail.
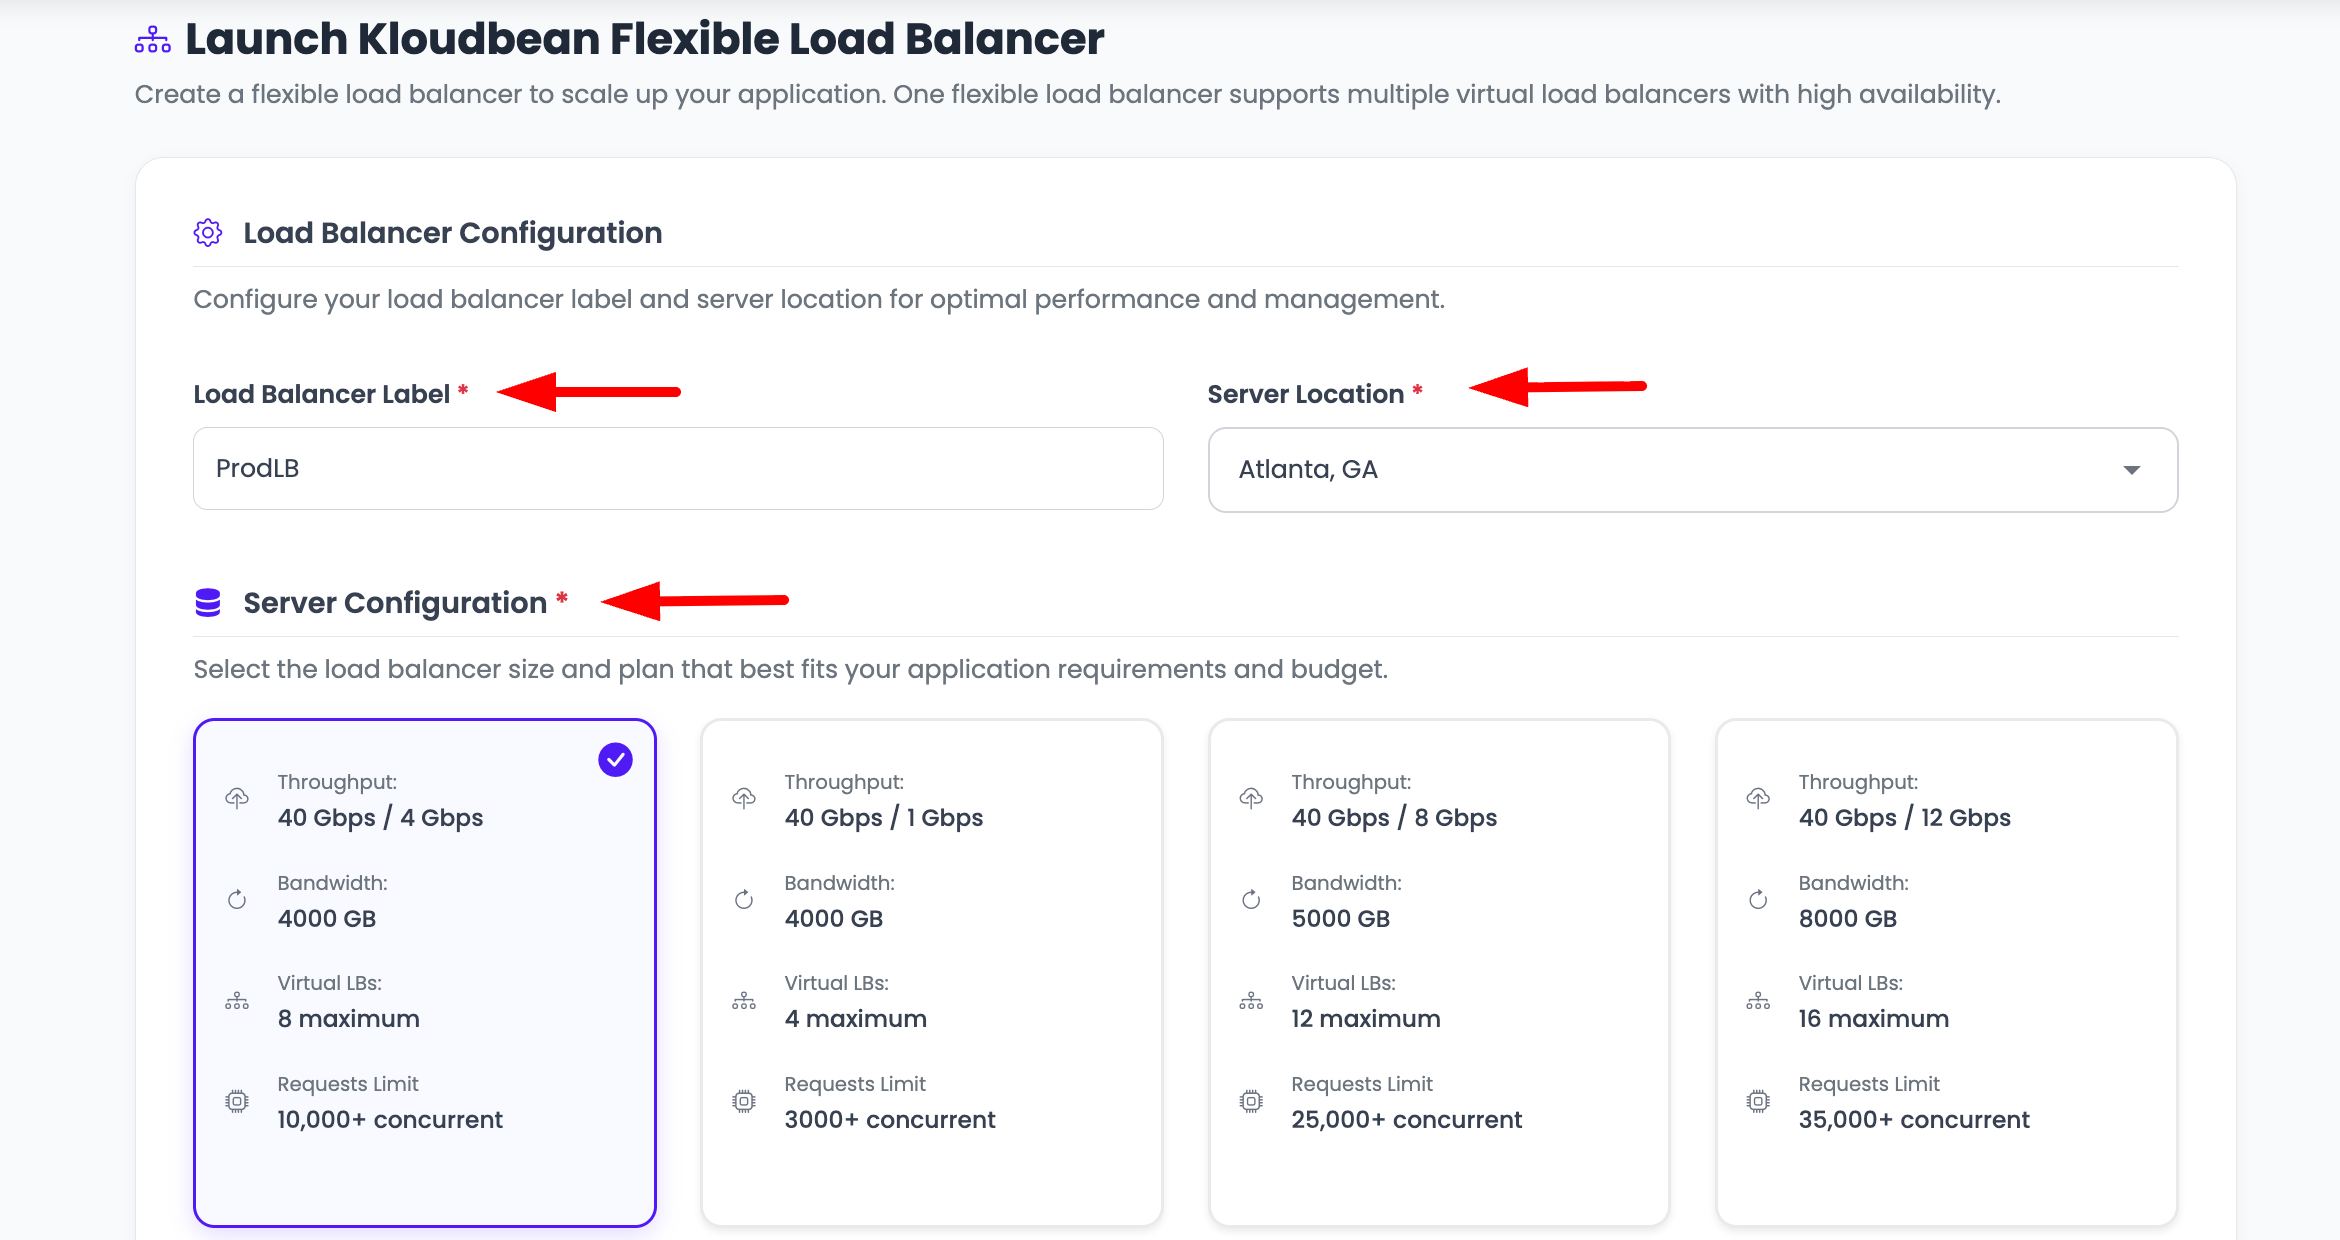
Required Information:
Load Balancer Label *:
- Purpose: A descriptive name for your load balancer
- Example:
production-lb,api-load-balancer,web-traffic-lb - Best Practice: Use a name that describes the purpose or environment
- Required: This field is mandatory
Server Location *:
- Purpose: Choose where your load balancer will be deployed
- Importance: This is important to choose location carefully
- Considerations:
- Proximity to Applications: Choose location close to your applications
- User Location: Consider where your users are located
- Latency: Closer locations reduce latency
- Compliance: Some regions may have compliance requirements
- Options: Select from available regions
- Required: This field is mandatory
Server Size:
- Purpose: Choose the size according to need
- Considerations:
- Traffic Volume: Expected traffic volume
- Number of Applications: How many applications will use this load balancer
- Virtual Load Balancers: How many virtual load balancers you plan to create
- Performance Requirements: Performance and throughput needs
- Scaling: You can scale up later if needed
- Options: Small, Medium, Large, or Custom sizes available
Configuration Tips:
- Start Small: You can start with a smaller size and scale up later
- Consider Growth: Plan for future traffic growth
- Multiple vLBs: Remember you can create multiple virtual load balancers on one FLB
- Cost Optimization: Choose size based on actual needs
Step 4: Launch and Payment
Once you fill this information, click on "launch load balancer" button, and proceed with the payment process.
Launch Process:
- Review Details: Double-check all information before launching
- Click Launch: Click "Launch Load Balancer" button
- Payment Screen: You'll be redirected to payment screen
- Complete Payment: Complete the payment process
- Provisioning Starts: Provisioning begins after payment
Payment Options:
- Wallet Balance: Use existing wallet balance
- Payment Methods: Various payment methods available
- Subscription: Monthly or annual billing options
Step 5: Provisioning Process
Once payment process is completes, you will be redirected to "flexible load balancers" list page, where you will see provisioning has been started, it will take a while to create and configure your high performant load balancer.
What Happens During Provisioning:
- Status: Load balancer shows "Provisioning" status
- Time Required: Typically takes a few minutes
- Automatic Configuration: KloudBean automatically configures your load balancer
- High Performance Setup: Load balancer is optimized for high performance
- Progress Updates: Status updates are shown during provisioning
Provisioning Steps (Automatic):
- Server Creation: Create load balancer server
- Network Configuration: Configure networking
- Load Balancer Software: Install and configure load balancer software
- Optimization: Optimize for performance
- Default vLB Creation: Create default virtual load balancer
- Final Configuration: Complete final configuration
Once Complete:
- Status Change: Status changes to "Active"
- Ready to Use: Load balancer is ready to use
- Access Available: You can now access and configure your load balancer
Accessing Your Load Balancer
Step 1: Open Load Balancer
Once complete, you will able to open this load balancer by clicking on it.
Access Methods:
- Click on Card: Click on the load balancer card in the list
- Load Balancer Details: Opens load balancer administration page
- Configuration Access: Access all configuration options
Step 2: Access Virtual Load Balancers
If you directly want to access virtual load balancers on this FLB, click on vLB icon of this card.
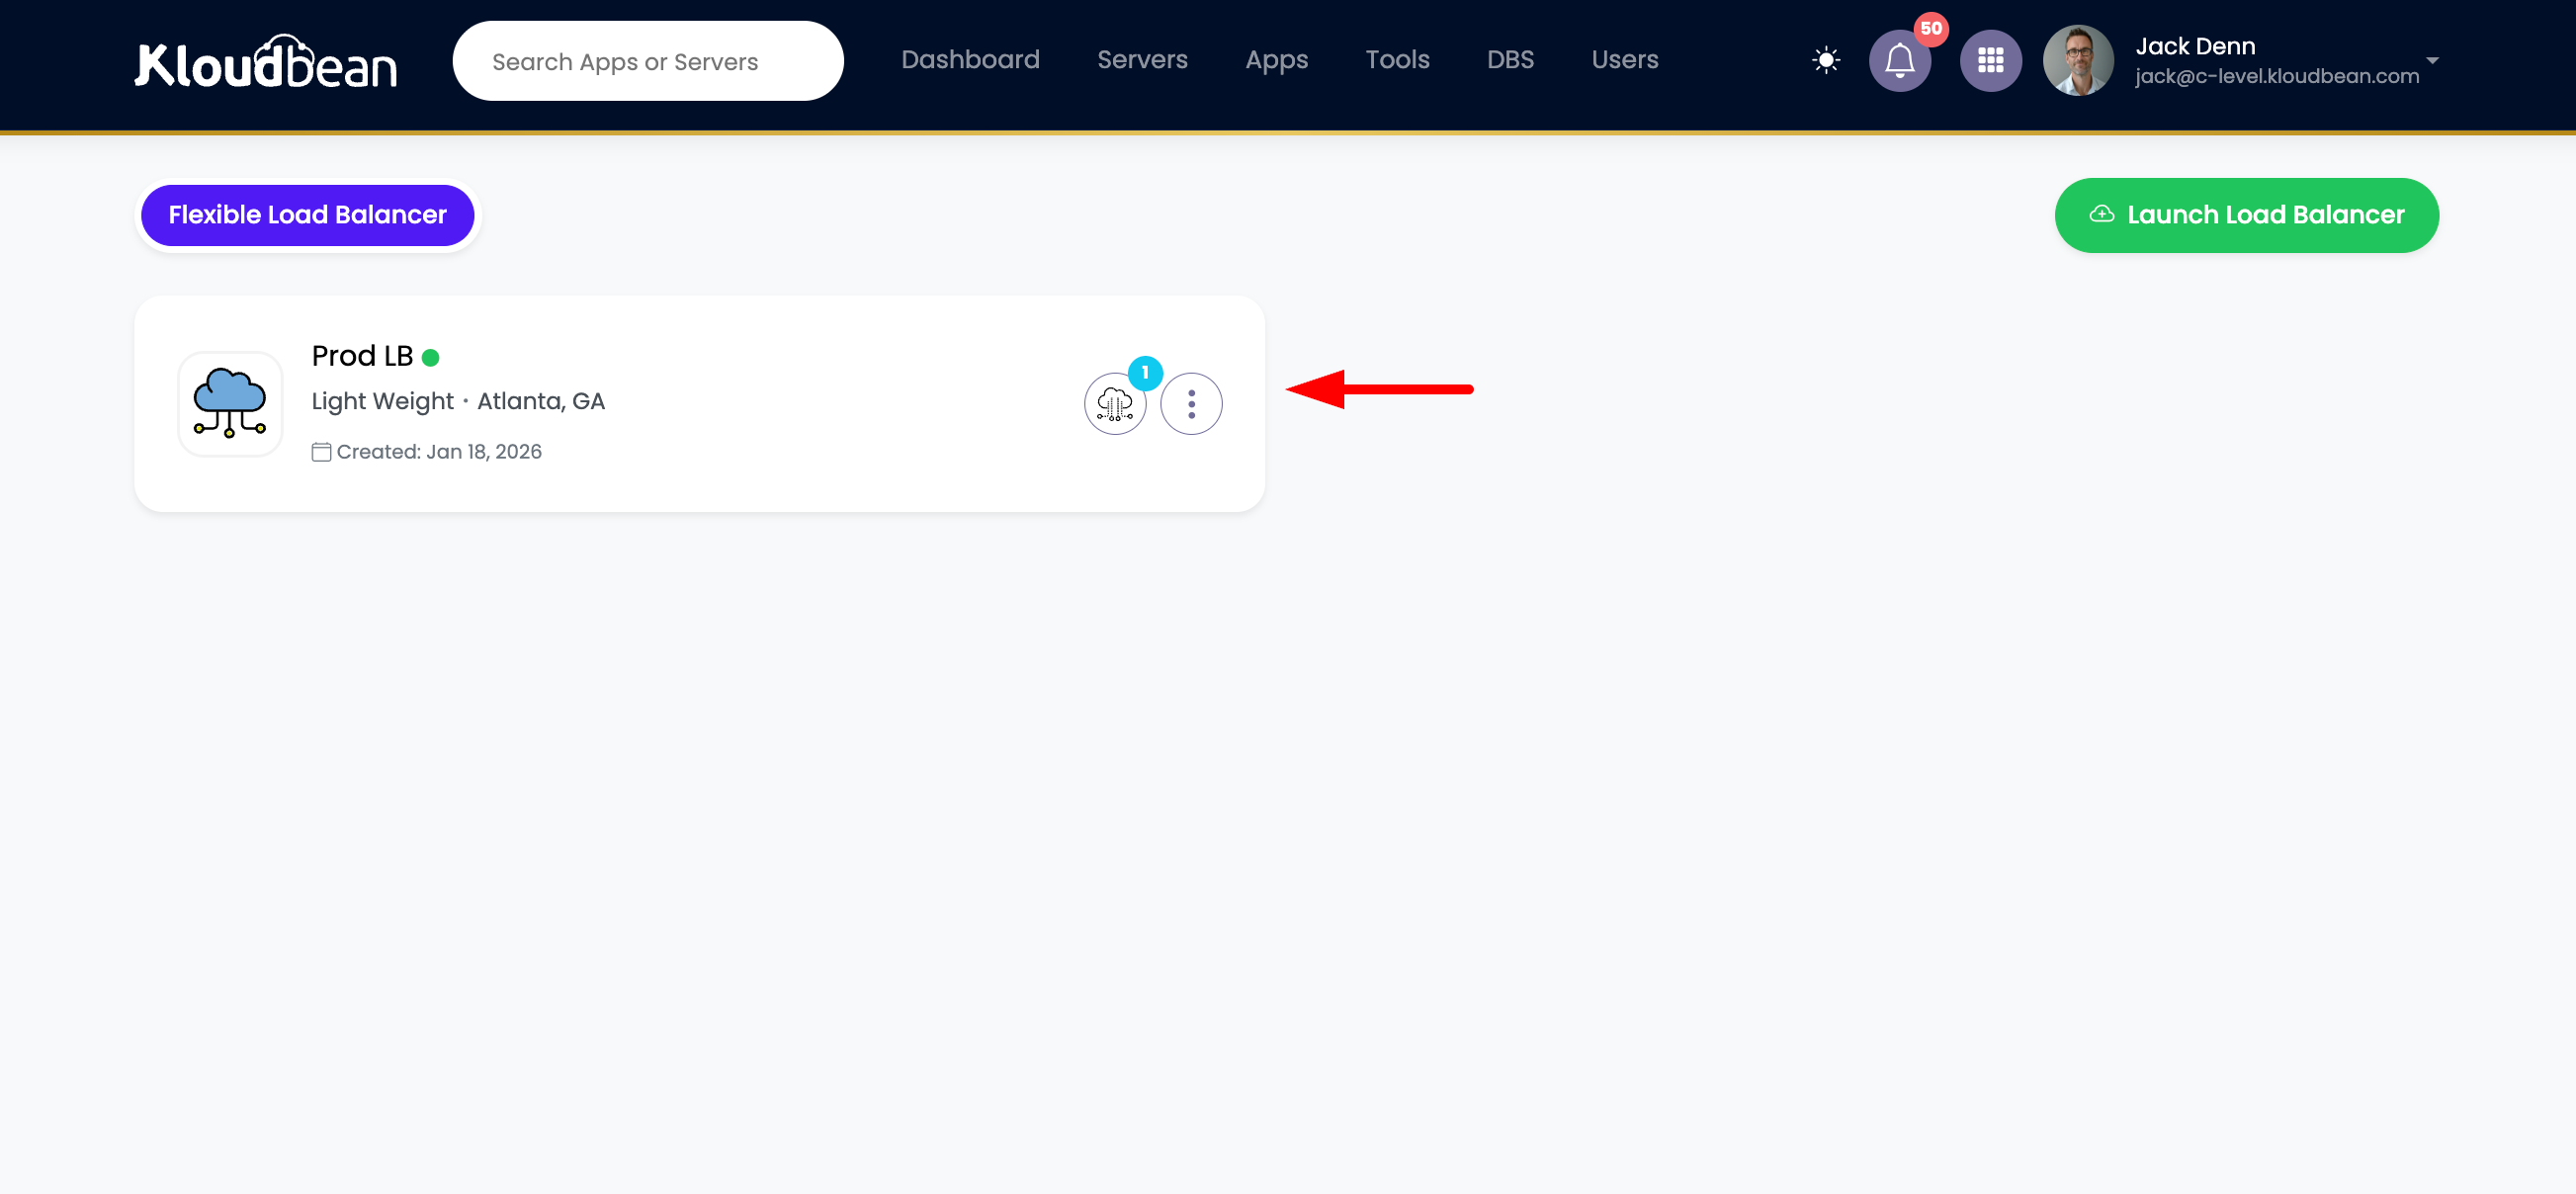
Virtual Load Balancer Icon:
- vLB Icon: Click on the vLB icon on the load balancer card
- Direct Access: Takes you directly to virtual load balancers
- Faster Navigation: Quick access to vLB management
Once you click on it, you will be able to see Default virtual load balancer.

Default Virtual Load Balancer:
- Automatic Creation: KloudBean automatically creates one default virtual balancer
- Empty Pool: Which is not pointing to any app, it has an empty applications pool
- Ready to Configure: Ready for you to add applications
- Default Name: Usually named "Default" or similar
Why Default vLB is Created:
- Immediate Availability: You can start using it right away
- No Additional Setup: No need to create first vLB manually
- Empty Pool: Applications pool is empty, ready for you to add apps
- Flexible: You can rename or reconfigure it as needed
Step 3: View Virtual Load Balancer Details
Click on this vLB and you will able to see following info.
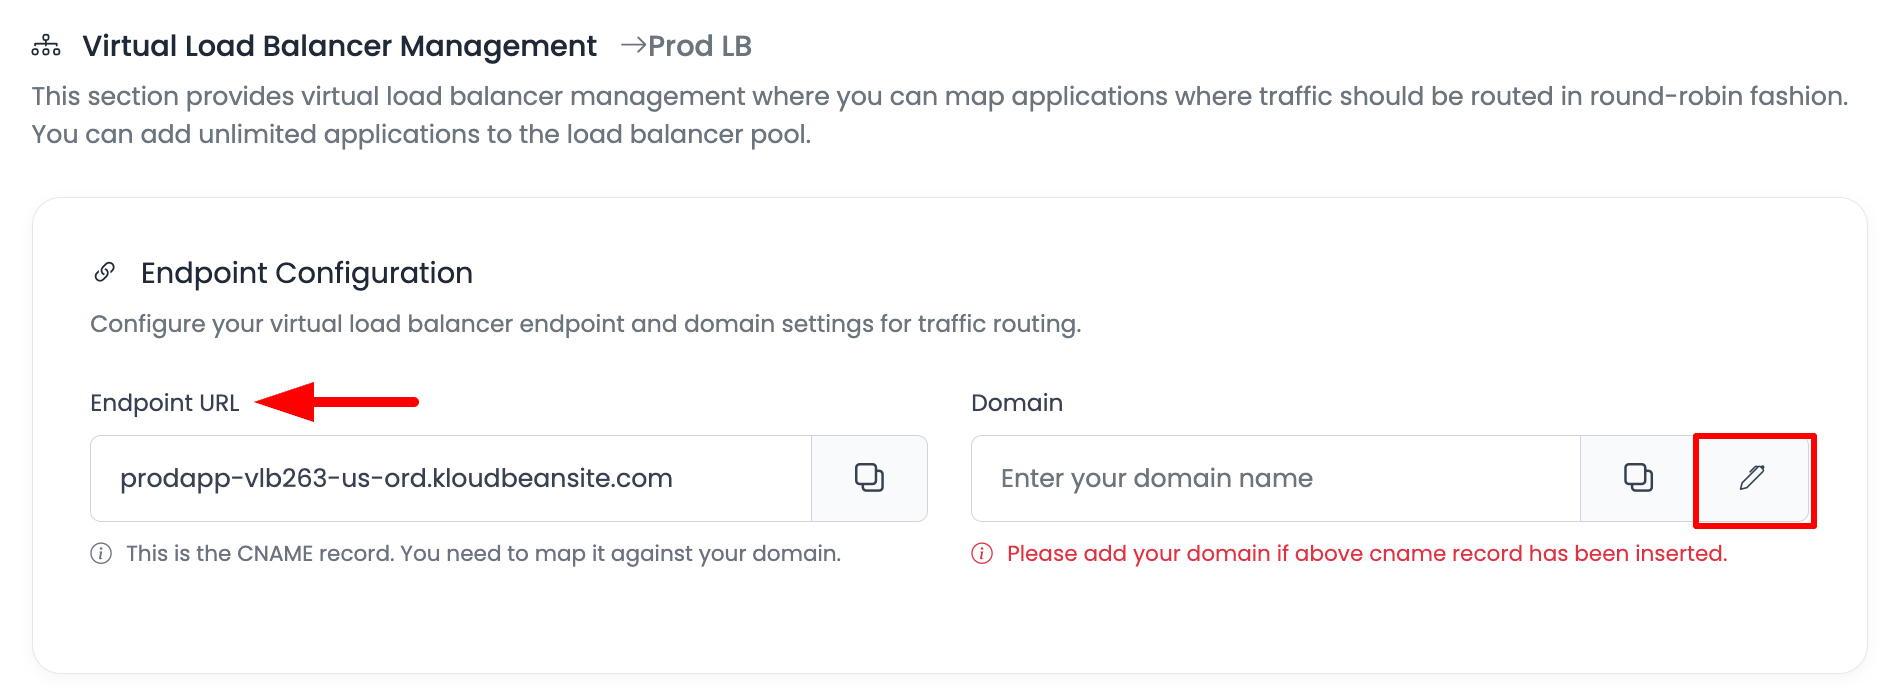
Virtual Load Balancer Information:
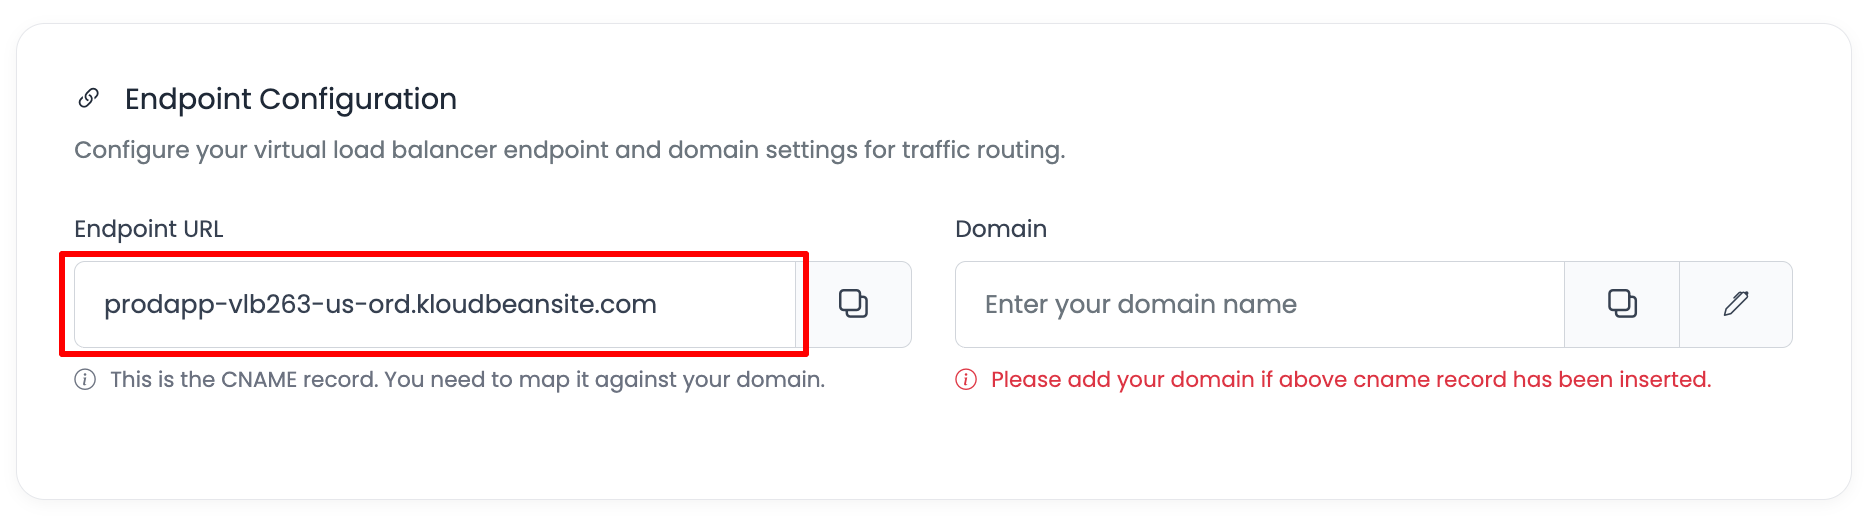
Endpoint URL:
- Purpose: Default URL to access load balancer
- Format: Usually in format like
lb-xxxxx.kloudbean.comor similar - Usage: Use this URL to access your load balancer
- Public Access: This URL is publicly accessible
- HTTPS Support: Supports both HTTP and HTTPS
Domain:
- Purpose: Your custom domain
- Status: Shows if custom domain is configured
- Configuration: Configure custom domain here
- Multiple Domains: You can add multiple domains
Additional Information (may be displayed):
- Status: Virtual load balancer status
- Applications Pool: Number of applications in pool
- Traffic Statistics: Traffic and performance metrics
- SSL Status: SSL certificate status
Step 4: Configure Custom Domain (Optional)
If you want to enable custom domain then you have to point CNAME record to this host URL.
Custom Domain Setup:
- Get Host URL: Note the endpoint URL (this is your CNAME target)
- Add CNAME Record: Add CNAME record at your domain registrar
- Point to Host URL: Point CNAME record to the endpoint URL
- Verify Domain: Verify domain in KloudBean dashboard
CNAME Configuration:
- Record Type: CNAME
- Name: Your domain or subdomain (e.g.,
www,api,@) - Value: The endpoint URL provided by KloudBean
- TTL: 3600 (or recommended value)
In order to know better how to add custom domain, review our document: Adding Custom Domain
Custom Domain Benefits:
- Professional Appearance: Use your own domain name
- Branding: Better branding for your applications
- SSL Support: Can add SSL certificates for custom domain
- Multiple Domains: Support for multiple domains on same vLB
Step 5: Access Virtual Load Balancer
In order to access vLB use this endpoint URL.
Using Endpoint URL:
- Direct Access: Use the endpoint URL directly to access your load balancer
- HTTP/HTTPS: Supports both HTTP and HTTPS protocols
- Public Access: URL is publicly accessible
- Testing: Use this URL to test your load balancer
And this URL is the CNAME value of your load balancer custom domain.
CNAME Value:
- For Custom Domain: If you configure custom domain, use this endpoint URL as CNAME value
- DNS Configuration: Point your domain's CNAME record to this URL
- Domain Access: Once DNS propagates, your custom domain will work
Access Examples:
- Endpoint URL:
https://lb-xxxxx.kloudbean.com - Custom Domain:
https://api.yourdomain.com(after CNAME configuration) - Both Work: Both URLs will route to the same load balancer
Next Steps
To further know how to add application in load balancer apps pool, read document: Updating Application Pool
After Launching Your Load Balancer:
- Add Applications: Learn how to add applications to the pool
- Configure Virtual Load Balancers: Create additional virtual load balancers if needed
- Add Custom Domain: Configure custom domain for your load balancer
- Set Up SSL: Add SSL certificates for secure connections
- Monitor Health: Monitor load balancer and application health
Related Documentation:
- Adding Virtual Load Balancers - Create additional virtual load balancers
- Updating Application Pool - Add and manage applications in the pool
- Adding Custom Domain - Configure custom domains
- Adding Free SSL Certificates - Secure your load balancer with SSL
Best Practices
Before Launching
- Plan Your Setup: Plan your load balancer configuration before launching
- Choose Right Location: Select location close to your applications and users
- Size Appropriately: Choose server size based on expected traffic
- Consider Growth: Plan for future scaling needs
After Launching
- Add Applications: Add applications to the pool as soon as possible
- Configure Health Checks: Set up health checks for your applications
- Monitor Performance: Monitor load balancer performance regularly
- Secure Your Load Balancer: Add SSL certificates for secure connections
- Use Custom Domains: Configure custom domains for better branding
General Practices
- Start Simple: Start with default configuration and add complexity as needed
- Document Configuration: Keep notes on your load balancer setup
- Regular Review: Periodically review and optimize your configuration
- Test Before Production: Test load balancer configuration thoroughly
- Monitor Health: Regularly check application and load balancer health
Troubleshooting
Load Balancer Not Launching
If load balancer fails to launch:
- Check Payment: Verify payment was completed successfully
- Review Errors: Check for any error messages
- Account Limits: Verify you haven't exceeded account limits
- Contact Support: Contact KloudBean support if issues persist
Provisioning Takes Too Long
If provisioning is taking longer than expected:
- Be Patient: Provisioning can take a few minutes
- Check Status: Monitor provisioning status in dashboard
- Refresh Page: Try refreshing the page to see latest status
- Contact Support: Contact support if provisioning seems stuck
Cannot Access Virtual Load Balancer
If you cannot access virtual load balancer:
- Check Status: Verify load balancer status is "Active"
- Verify Endpoint URL: Double-check the endpoint URL
- DNS Issues: If using custom domain, check DNS configuration
- Network Issues: Verify network connectivity
- Contact Support: Contact KloudBean support for assistance
Summary
Key Points:
- Easy Setup: KloudBean provides easy setup for Flexible Load Balancer
- No Complicated Config: No complicated configurations required
- Multiple vLBs: Support for multiple virtual load balancers on single server
- Multi-Cloud: Route traffic to apps on any cloud provider and region
- High Performance: Optimized and high performant load balancer
- Flexible Management: Add or remove applications from pool anytime
Launch Process:
- Navigate to Flexible Load Balancer page
- Click "Launch Load Balancer"
- Provide Load Balancer Label, Server Location, and Server Size
- Complete payment process
- Wait for provisioning to complete
- Access your load balancer and configure as needed
Default Virtual Load Balancer:
- Automatically created with empty applications pool
- Ready to add applications
- Can be accessed via endpoint URL
- Supports custom domain configuration