Adding Custom Domain
Learn how to configure a custom domain for your virtual load balancer (vLB). When you launched a FLB and any more virtual load balancer, you get a default access URL and optionally you can also configure a custom domain.
Overview
When you launched a FLB and any more virtual load balancer, you get a default access URL and optionally you can also configure a custom domain.
Default Access URL:
- Automatic Provision: Default access URL is automatically provided
- Format: Usually in format like
vlb-xxxxx.kloudbean.comor similar - Immediate Access: Available immediately after vLB creation
- Public Access: Can be used to access your load balancer right away
Custom Domain Benefits:
- Professional Appearance: Use your own domain name instead of default URL
- Better Branding: Improved branding for your applications
- SSL Support: Can add SSL certificates for custom domain
- Multiple Domains: Support for multiple domains on same vLB
- User-Friendly: Easier to remember and share
Why Configure Custom Domain:
- Brand Identity: Use your own domain for better brand identity
- User Experience: Easier for users to remember your domain
- SSL Certificates: Required for adding SSL certificates
- Multiple Services: Different domains for different services
Prerequisites
Make sure your custom domain is pointing to endpoint URL of this vLB correctly as CNAME record.
Before configuring custom domain in KloudBean, you must:
- Have Domain Registered: Your domain must be registered with a domain registrar
- Access DNS Settings: Have access to DNS management at your domain registrar
- Get Endpoint URL: Note the endpoint URL from your virtual load balancer
- Add CNAME Record: Make sure your custom domain is pointing to endpoint URL of this vLB correctly as CNAME record
Important: The CNAME record must be added at your domain registrar BEFORE adding the domain in KloudBean. If the CNAME record is not set up correctly, you will encounter an error.
Setting Up CNAME Record
Understanding CNAME Records
What is CNAME Record:
- Canonical Name: CNAME (Canonical Name) record points one domain name to another
- Alias: Creates an alias from your domain to the endpoint URL
- DNS Resolution: When someone visits your domain, DNS resolves it to the endpoint URL
- Required for vLB: CNAME is the recommended method for virtual load balancers
Why CNAME Instead of A Record:
- Flexibility: CNAME allows endpoint URL to change without updating DNS
- Easier Management: KloudBean can update endpoint URL without affecting your domain
- Best Practice: CNAME is the standard method for load balancers
- Dynamic IPs: Works better with dynamic IP addresses
Getting Your Endpoint URL
Before Adding CNAME:
- Access vLB Details: Go to your virtual load balancer details
- Find Endpoint URL: Look for "Endpoint URL" field
- Copy URL: Copy the complete endpoint URL
- Example:
vlb-abc123.kloudbean.comor similar format
Where to Find Endpoint URL:
- vLB Details Page: Endpoint URL is displayed on virtual load balancer details page
- Load Balancer Administration: Visible in Load Balancer Administration → Virtual LBs → Your vLB
- Format: Usually includes vLB identifier and kloudbean.com domain
Adding CNAME Record at DNS Provider
Step-by-Step Guide to Add CNAME Record:
Step 1: Log in to Your Domain Registrar
- Access Domain Registrar: Log in to your domain registrar's website
- Examples: GoDaddy, Namecheap, Cloudflare, Google Domains, etc.
- Navigate to DNS Management: Find DNS management or DNS settings
- Select Your Domain: Choose the domain you want to configure
Step 2: Access DNS Records
- Find DNS Section: Look for "DNS Records", "DNS Management", or "DNS Settings"
- View Current Records: See existing DNS records for your domain
- Add New Record: Click "Add Record" or "Create Record"
Step 3: Configure CNAME Record
CNAME Record Configuration:
For Root Domain (@ or example.com):
- Record Type: Select CNAME
- Name/Host: Enter
@or leave blank (depends on provider) - Value/Target: Enter your endpoint URL (e.g.,
vlb-abc123.kloudbean.com) - TTL: Set to
3600(1 hour) or use default - Save: Click "Save" or "Add Record"
For Subdomain (e.g., www, api):
- Record Type: Select CNAME
- Name/Host: Enter subdomain (e.g.,
www,api,admin) - Value/Target: Enter your endpoint URL (e.g.,
vlb-abc123.kloudbean.com) - TTL: Set to
3600(1 hour) or use default - Save: Click "Save" or "Add Record"
Example CNAME Record:
Type: CNAME
Name: www
Value: vlb-abc123.kloudbean.com
TTL: 3600
Example for API Subdomain:
Type: CNAME
Name: api
Value: vlb-abc123.kloudbean.com
TTL: 3600
Step 4: Save and Wait for Propagation
- Save Record: Save the CNAME record
- Wait for Propagation: Wait for a minute until it propagates
- DNS changes can take a few minutes to several hours
- Typically propagates within 1-24 hours
- Can check propagation using DNS lookup tools
- Verify CNAME: Use DNS lookup tools to verify CNAME is set correctly
DNS Propagation:
- Time Required: Usually takes 1-24 hours for full propagation
- Initial Propagation: Often works within a few minutes
- Global Propagation: May take longer for global DNS servers
- Check Status: Use tools like
digor online DNS checkers
Verifying CNAME Record
Before Adding Domain in KloudBean:
Using Command Line:
# Using dig command
dig www.yourdomain.com CNAME

# Using nslookup
nslookup -type=CNAME www.yourdomain.com
Using Online Tools:
- DNS Checker: Use online DNS checker tools
- What's My DNS: Check DNS propagation status
- MXToolbox: Verify DNS records
What to Look For:
- CNAME Record: Should show your endpoint URL
- Correct Target: Should point to your vLB endpoint URL
- Propagation: Should be visible across DNS servers
Configuring Custom Domain in KloudBean
Step 1: Navigate to Virtual Load Balancer
In order to configure, navigate to "Load balancer administration" → "Virtual LBs" → select your vLB.
Access Steps:
- Log in to KloudBean Dashboard: Access your KloudBean account
- Go to Flexible Load Balancers: Navigate to Flexible Load Balancers section
- Select Your FLB: Click on your Flexible Load Balancer
- Load Balancer Administration: This opens "Load balancer administration" page
- Click Virtual LBs Tab: Click on "Virtual LBs" tab
- Select Your vLB: Click on your virtual load balancer
What You'll See:
- vLB Details: Full details of your virtual load balancer
- Domain Field: Domain field visible on the page
- Edit Option: Option to edit domain field
Step 2: View Domain Field
On this section you will see a Domain field, which will be empty at the moment.

Domain Field:
- Location: Domain field is visible on the virtual load balancer details page
- Current Status: Which will be empty at the moment (if no domain configured)
- Edit Button: Edit button next to the domain field
- Placeholder: May show placeholder text or be completely empty
What You'll See:
- Empty Field: Domain field shows as empty
- Edit Icon/Button: Edit button or icon next to domain field
- No Domain Configured: Indicates no custom domain is set up yet
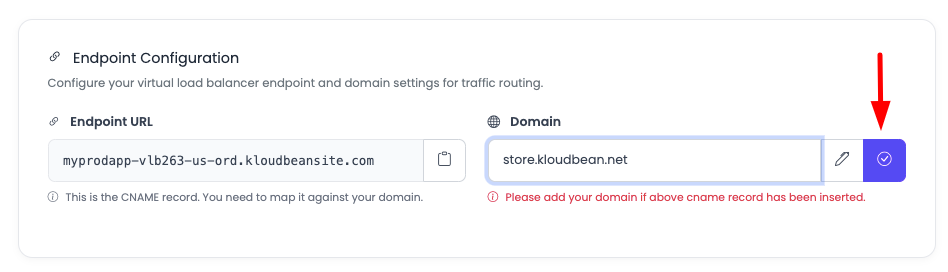
Step 3: Click Edit and Add Domain
Click on edit button of domain field and add your custom domain.
Editing Domain:
- Click Edit: Click on the edit button of the domain field
- Input Field: An input field appears for entering domain
- Enter Domain: Add your custom domain (e.g.,
www.example.com,api.example.com) - Domain Format: Enter domain without
http://orhttps://
Domain Entry:
- Full Domain: Enter full domain name (e.g.,
www.example.com) - Subdomain: Can enter subdomain (e.g.,
api.example.com) - No Protocol: Don't include
http://orhttps:// - No Trailing Slash: Don't include trailing slash
Step 4: Save Domain
Once domain is added, click the "tick" button to add this domain on your vLB.
Saving Domain:
- Tick Button: Click the "tick" button (✓) to save
- Save Process: System attempts to add the domain
- Validation: KloudBean validates the domain and CNAME record
- Success/Error: Shows success message or error
Before Adding, Make Sure:
- CNAME Record Added: Before adding, make sure that you have already setup a CNAME record where your domain is pointing to endpoint URL as CNAME
- DNS Propagated: Wait for DNS propagation (at least a minute)
- Correct Configuration: Verify CNAME record is correct
- Domain Accessible: Domain should be resolving correctly
Step 5: Handle Errors (If CNAME Not Set)
If you haven't added CNAME record yet, then you might face error "Given domain is not resolving to any ip address".
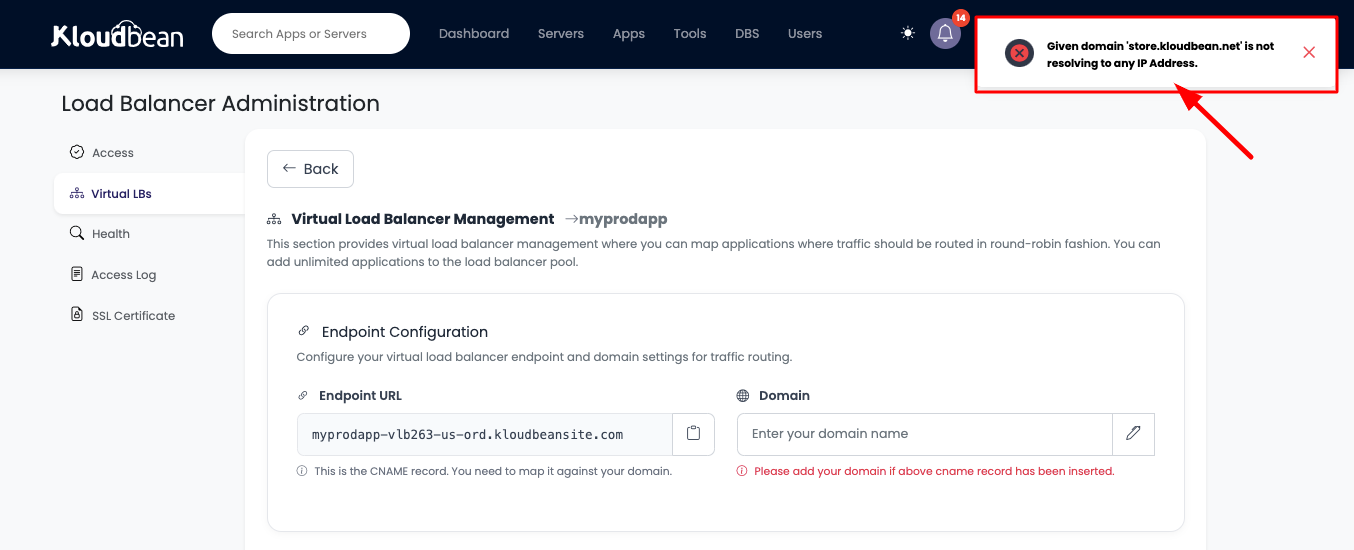
Error Message:
- Error Display: "Given domain is not resolving to any ip address" error appears
- Cause: CNAME record is not set up or not propagated yet
- DNS Issue: Domain is not pointing to endpoint URL correctly
- Resolution Required: Must fix DNS configuration before proceeding
What This Error Means:
- DNS Not Configured: CNAME record is not added at domain registrar
- Not Propagated: CNAME record added but not yet propagated
- Incorrect Configuration: CNAME record is pointing to wrong URL
- DNS Server Issues: Temporary DNS server issues
How to Fix:
- Check CNAME Record: Verify CNAME record is added at domain registrar
- Verify Target: Ensure CNAME points to correct endpoint URL
- Wait for Propagation: Make sure to add domain first. Once domain is added, then wait for a minute until it propagates and then try to add domain in your vLB again
- Retry: Try adding domain again after DNS propagates
DNS Propagation Steps:
- Add CNAME Record: Add CNAME record at your domain registrar
- Save Changes: Save the DNS record
- Wait: Wait for at least 1 minute (can take up to 24 hours)
- Verify: Verify CNAME is resolving correctly
- Retry in KloudBean: Try adding domain in KloudBean again
Step 6: Success - Domain Added
This time it should be added successfully and will see a green message below domain where your IP address is mentioned.
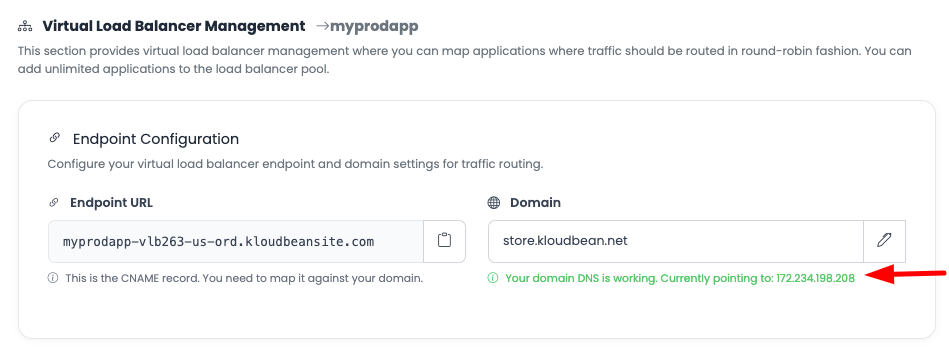
Success Indicators:
- Green Message: Will see a green message below domain
- IP Address Display: Where your IP address is mentioned
- Domain Active: Domain is now configured and active
- Traffic Routing: Domain now routes traffic to your vLB
What Success Looks Like:
- Domain Field: Domain field shows your custom domain
- Green Status: Green checkmark or success indicator
- IP Address: IP address displayed in green message
- Active Status: Domain status shows as "Active" or "Verified"
After Success:
- Domain Working: Your custom domain is now working
- Traffic Routing: Traffic from custom domain routes to your vLB
- SSL Ready: Can now add SSL certificate for the domain
- Accessible: Domain is accessible via custom domain name
Verifying Domain Configuration
Check Domain Resolution
After Adding Domain:
- DNS Lookup: Use
digornslookupto verify domain resolution - Browser Test: Try accessing domain in browser
- HTTPS Test: Test both HTTP and HTTPS (if SSL configured)
- Application Access: Verify applications are accessible via custom domain
Test Domain Access
Testing Steps:
- Open Browser: Open web browser
- Enter Domain: Enter your custom domain (e.g.,
www.example.com) - Check Response: Should see your application or load balancer response
- Verify SSL: If SSL is configured, verify HTTPS works
Troubleshooting
Error: "Given domain is not resolving to any ip address"
If you see this error:
- Check CNAME Record: Verify CNAME record is added at domain registrar
- Verify Target: Ensure CNAME points to correct endpoint URL
- Wait for Propagation: DNS changes can take time to propagate
- Check DNS: Use DNS lookup tools to verify CNAME is resolving
- Retry: Wait a few minutes and try adding domain again
Common Causes:
- CNAME Not Added: CNAME record not added at domain registrar
- Wrong Target: CNAME pointing to wrong endpoint URL
- Not Propagated: DNS changes not yet propagated
- DNS Server Issues: Temporary DNS server problems
Domain Not Working After Adding
If domain is added but not working:
- Check DNS Propagation: Verify DNS has fully propagated
- Verify CNAME: Ensure CNAME record is correct
- Check Endpoint URL: Verify endpoint URL is correct
- Test Resolution: Use DNS lookup tools to test
- Wait Longer: DNS propagation can take up to 24 hours
Cannot Edit Domain Field
If you cannot edit domain field:
- Check Permissions: Verify you have necessary permissions
- vLB Status: Ensure vLB is active
- Refresh Page: Try refreshing the page
- Contact Support: Contact KloudBean support if issues persist
Best Practices
DNS Configuration
- Add CNAME First: Always add CNAME record before adding domain in KloudBean
- Wait for Propagation: Wait for DNS propagation before adding domain
- Verify Before Adding: Verify CNAME is resolving correctly
- Use Correct TTL: Set appropriate TTL for DNS records
- Document Configuration: Keep records of DNS configuration
Domain Management
- Use Descriptive Domains: Use clear, descriptive domain names
- Subdomain Strategy: Use subdomains for different services
- SSL Ready: Prepare for SSL certificate after domain is added
- Monitor DNS: Regularly check DNS resolution
- Backup Configuration: Keep backup of DNS configuration
Next Steps
After adding your custom domain:
- Add SSL Certificate: Secure your domain with Adding Free SSL Certificates
- Monitor Health: Monitor your load balancer with Monitoring Load Balancer Health
- Update Application Pool: Manage applications with Updating Application Pool
Summary
Key Points:
- Default URL Provided: Default access URL is automatically provided
- Custom Domain Optional: Custom domain can be configured optionally
- CNAME Required: Must add CNAME record before adding domain in KloudBean
- DNS Propagation: Wait for DNS propagation before adding domain
- Error Handling: "Given domain is not resolving" error if CNAME not set
- Success Indicator: Green message with IP address when domain is added
Process:
- Add CNAME record at domain registrar pointing to endpoint URL
- Wait for DNS propagation (at least 1 minute)
- Navigate to Load Balancer Administration → Virtual LBs → Select vLB
- Click edit button on Domain field
- Enter your custom domain
- Click tick button to save
- See green success message with IP address
Important Reminders:
- CNAME First: Always add CNAME record before adding domain in KloudBean
- Wait for Propagation: DNS changes need time to propagate
- Verify Before Adding: Verify CNAME is resolving correctly
- Error Handling: If error occurs, check CNAME and wait, then retry