Launching MariaDB
Learn how to launch and deploy MariaDB database instances on KloudBean. KloudBean provides managed MariaDB database with high performance and robust security policies.
Overview
KloudBean provides managed MariaDB database. KloudBean databases are high performant and having good security policies as well.
KloudBean Managed MariaDB Benefits
High Performance:
- Optimized Configuration: Pre-configured for optimal performance
- Fast Query Execution: Optimized query processing with enhanced storage engines
- Efficient Resource Usage: Smart resource allocation
- Scalable Architecture: Built to scale with your needs
- MySQL Compatibility: Fully compatible with MySQL for easy migration
Security Policies:
- Encrypted Connections: SSL/TLS encryption for secure connections
- Access Control: Granular access control and IP whitelisting
- Regular Updates: Automatic security updates and patches
- Backup Security: Secure backup storage and encryption
Easy Setup and Access:
- Few Steps Installation: It is a few steps installation process
- Quick Deployment: Database creation takes only 2-5 minutes
- Simple Configuration: Minimal configuration required
- Easy Access: Straightforward access to database credentials
- User-Friendly Interface: Intuitive dashboard for management
Additional Benefits:
- Automated Backups: Automatic backup scheduling and management
- High Availability: Built-in redundancy and failover
- Monitoring: Real-time performance monitoring
- Scalability: Easy scaling as your needs grow
- Support: Expert support from KloudBean team
- Enhanced Features: Additional storage engines and improved performance over MySQL
Prerequisites
- An active KloudBean account
- Understanding of your database requirements
- Payment method for database provisioning
Launching MariaDB Database
Step 1: Navigate to Database Section
In order to launch MariaDB database:
From your KloudBean dashboard navigate to Managed database or from top header click on "DBS".
On DBS page there is a button "Launch Database".
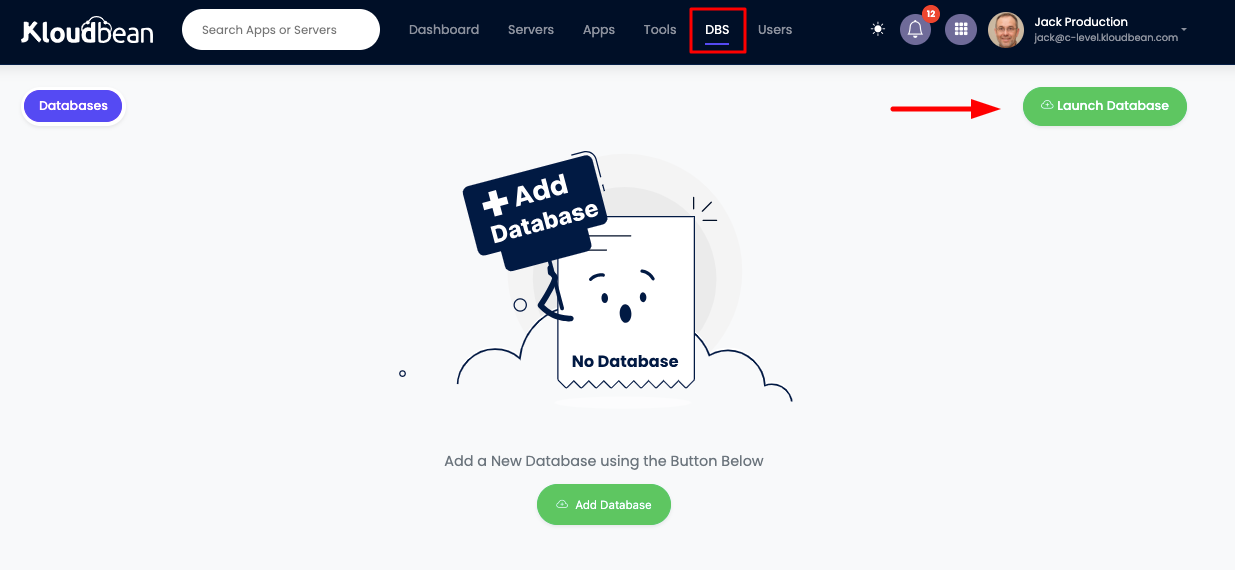
Once you click it will take you to database provision page.
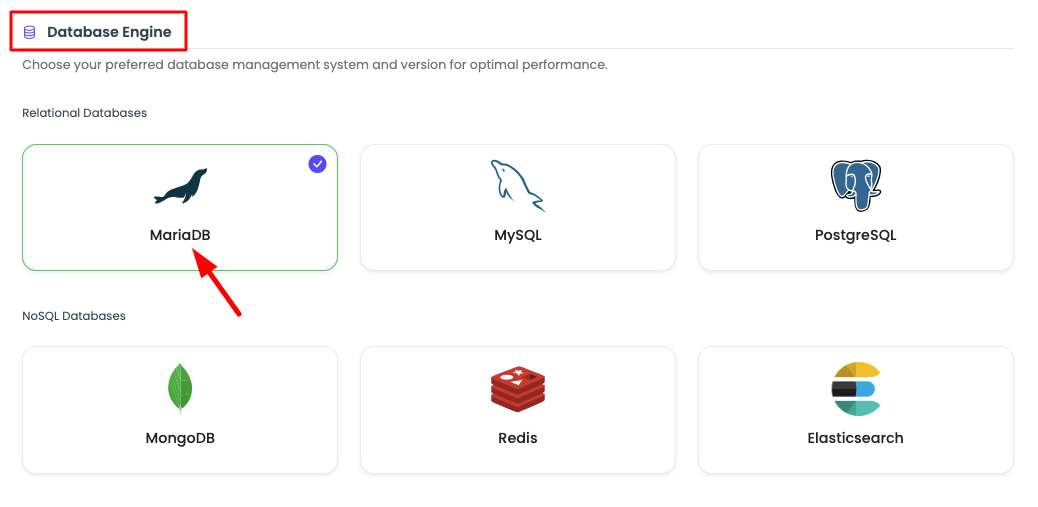
Step 2: Select Database Engine
Where you have to select:
Database engine: Select MariaDB from here.
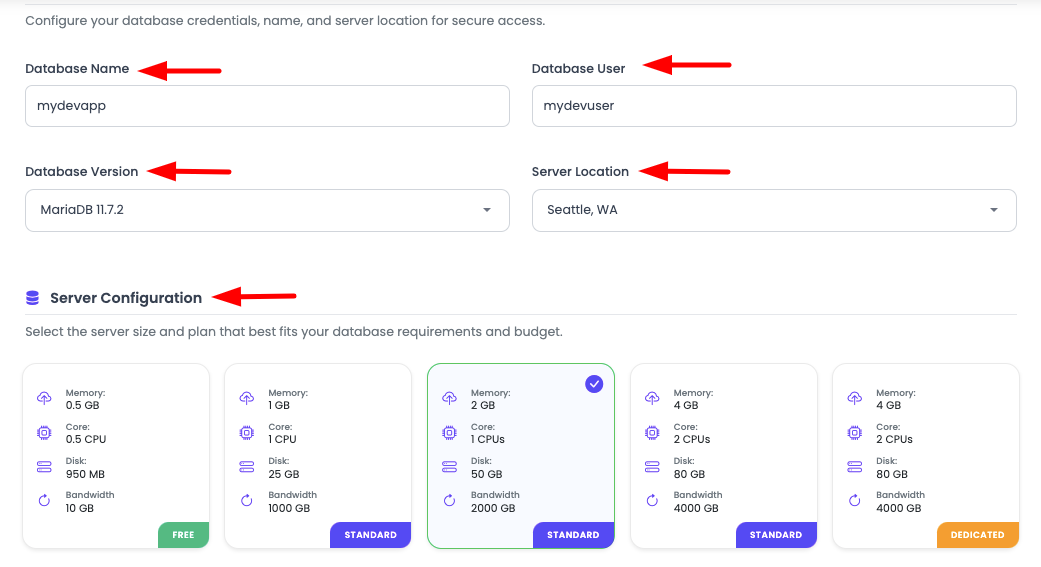
Step 3: Provide Database Details
Next step is to provide following database detail:
Required Information:
-
Database Name:
- Enter a unique name for your database
- Use lowercase letters, numbers, and underscores
- Example:
myapp_db,production_db
-
Database User:
- Create a username for database access
- Use lowercase letters, numbers, and underscores
- Example:
myapp_user,db_admin
-
Database Version:
- Select MariaDB version:
- MariaDB 11.x (latest, recommended)
- MariaDB 10.11 (stable)
- MariaDB 10.6 (legacy support)
- Choose based on your application requirements
- Select MariaDB version:
-
Server Location:
- Choose the geographic location for your database
- Select region closest to your application servers
- Consider data residency requirements
Step 4: Select Server Size
Once these details are added:
Decide server size and select most suitable size. Note that you can scale your database up any time, contact KloudBean for that.
Server Size Options:
- Small: Suitable for development and testing
- Medium: Good for small to medium applications
- Large: For production applications with high traffic
- Custom: Custom configuration for specific needs
Scaling Options:
- Vertical Scaling: Increase CPU, RAM, or storage
- Horizontal Scaling: Add read replicas
- Contact Support: Reach out to KloudBean support for scaling assistance
Considerations:
- Current Needs: Start with size that meets current needs
- Growth Projection: Consider future growth when selecting size
- Cost Optimization: Start smaller and scale as needed
- Performance: Larger sizes offer better performance
Step 5: Launch Database
Click on "Launch now" button, it will take you to the payment screen, where you will complete your payment.
Payment Process:
- Review Configuration: Verify all settings are correct
- Payment Method: Select your payment method
- Complete Payment: Complete the payment process
- Confirmation: Receive confirmation of payment
Once payment is completed, your database creation process will be initiated, and it will take around 2-5 minutes to create and configure your high performance database.
Creation Process:
- Database instance provisioning
- MariaDB installation and configuration
- Security setup and encryption
- Network configuration
- Initial backup setup
Once created you will see your database in DBS page.
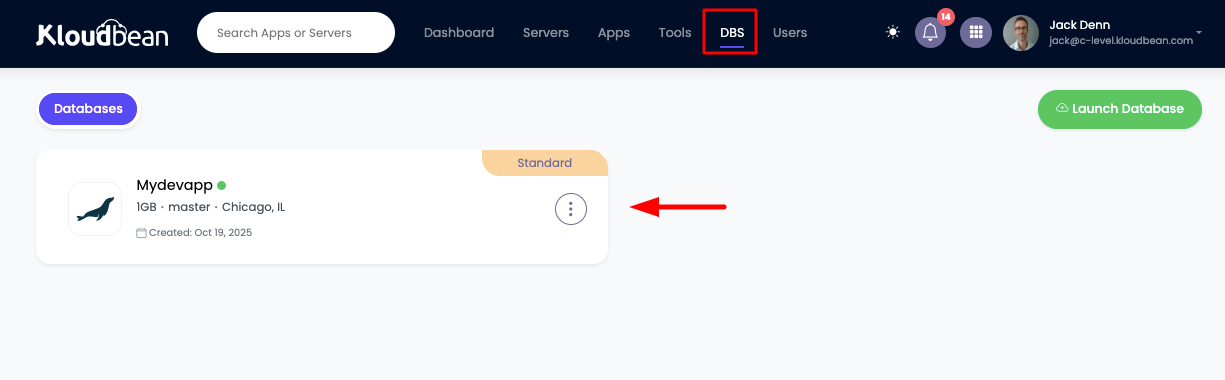
Accessing Database Details
Step 1: Navigate to Database Administration
In order to get database access detail click on your database and it will take you to database administration page where all the database access information is listed.
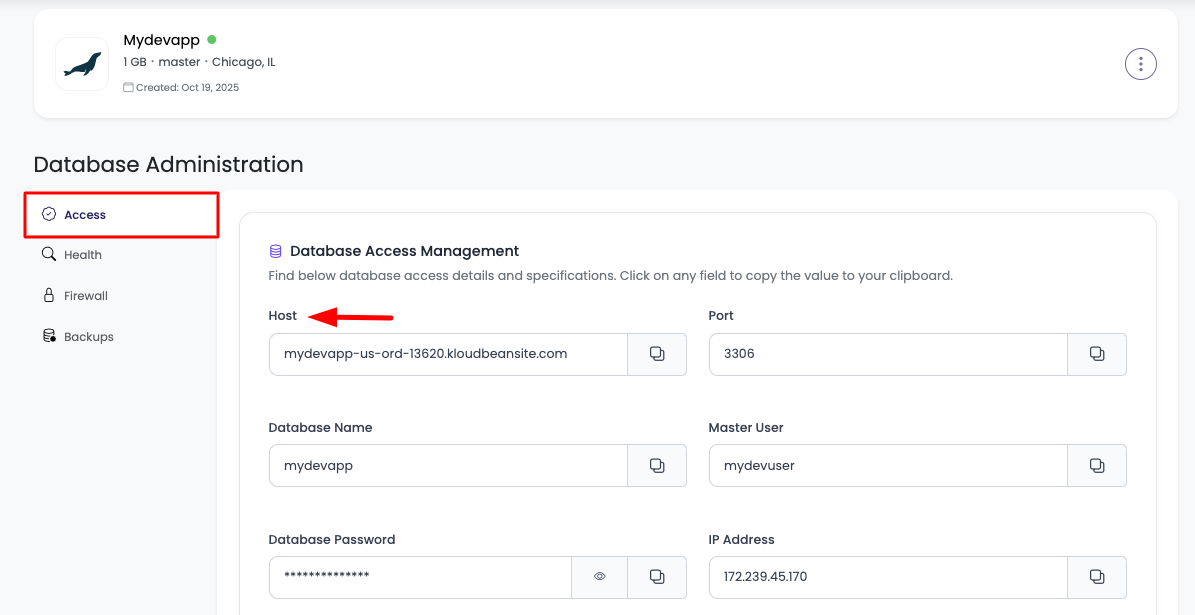
Step 2: View Database Credentials
Database Access Information:
Host:
- Database server hostname or IP address
- Use this to connect to your database
- Example:
mariadb-123456.kloudbeansite.comor192.168.1.100
Port:
- MariaDB port number (usually 3306)
- Default MariaDB port for connections
- Example:
3306
Database Name:
- Name of your database
- Use this in connection strings
- Example:
myapp_db
Master User:
- Username for database access
- Primary database user credentials
- Example:
myapp_user
Database Password:
- Password for database authentication
- Keep this secure and never expose publicly
- Use this with Master User for authentication
IP Address:
- Database server IP address
- Use for IP whitelisting if needed
- Example:
192.168.1.100
You can use this information to use this database in your application.
Accessing Database
Database Access Status
By default, the public access to your database is disabled.
In order to check access status, navigate to "Database Specifications" section of "Access" tab.
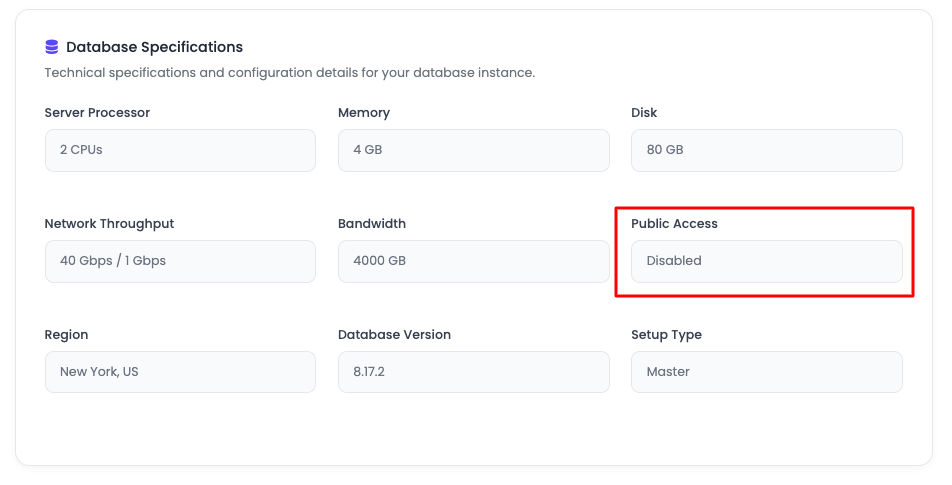
This represents that access is disabled and you cannot access it.
Enabling Database Access
In order to access database you have to whitelist the IP address of your source server or you have to enable public access of your database.
Important: Do Not Enable Public Access Unnecessarily
Why Public Access Should Be Avoided:
- Security Risk: Public access exposes your database to the entire internet
- Attack Surface: Increases vulnerability to attacks and unauthorized access
- Compliance Issues: May violate data protection regulations
- Best Practice: Always use IP whitelisting instead of public access
When Public Access Might Be Needed:
- Development/Testing: Only for non-production environments
- Temporary Access: For specific, time-limited tasks
- With Additional Security: Combined with strong passwords and SSL
Recommended Approach:
- IP Whitelisting: Always prefer IP whitelisting over public access
- Specific IPs: Whitelist only specific IP addresses that need access
- Source Server IP: Whitelist your application server's IP address
- VPN Access: Consider VPN for additional security layer
To get to know how you can update database access, read document: Controlling Database Access
Once access is enabled, now you can access your database.
Accessing Database from MySQL Workbench
Step 1: Install MySQL Workbench
Download and Install:
- Download: Go to MySQL Workbench Download Page
- Install: Follow installation instructions for your operating system
- Launch: Open MySQL Workbench
MySQL Workbench is fully compatible with MariaDB.
Step 2: Create New Connection
- Click "MySQL Connections" in the home screen
- Click "+" button to add new connection
- Fill in Connection Details:
- Connection Name: Give a descriptive name (e.g., "KloudBean MariaDB")
- Hostname: Enter the Host from database credentials
- Port: Enter the Port (usually 3306)
- Username: Enter the Master User from credentials
- Password: Click "Store in Keychain" and enter password
- Default Schema: Enter Database Name (optional)
Step 3: Test Connection
- Click "Test Connection" button
- Verify: You should see "Successfully made the MySQL connection"
- Click "OK" to save the connection
Step 4: Connect to Database
- Double-click on your saved connection
- Enter Password: If prompted, enter your database password
- You're Connected: You should now see the database schema and tables
Step 5: Using MySQL Workbench
Common Operations:
- Browse Data: Click on tables to view data
- Run Queries: Use SQL Editor to run SQL queries
- Create Tables: Use Table Editor to create new tables
- Import/Export: Import SQL files or export data
- Manage Users: Create and manage database users
- View Schemas: Browse database structure
Accessing Database from Shell/Command Line
Step 1: Install MariaDB Client
On Linux (Ubuntu/Debian):
sudo apt update
sudo apt install mariadb-client
On macOS:
brew install mariadb-client
On Windows:
- Download MariaDB Client from MariaDB Downloads
- Or use MySQL client (fully compatible)
Step 2: Connect to Database
Basic Connection Command:
mariadb -h [HOST] -P [PORT] -u [USERNAME] -p [DATABASE_NAME]
Example:
mariadb -h mariadb-123456.kloudbeansite.com -P 3306 -u myapp_user -p myapp_db
You will be prompted to enter password.
Alternative: Using MySQL Client (compatible):
mysql -h [HOST] -P [PORT] -u [USERNAME] -p [DATABASE_NAME]
Example:
mysql -h mariadb-123456.kloudbeansite.com -P 3306 -u myapp_user -p myapp_db
Step 3: Basic SQL Commands
Once connected, you can run SQL commands:
Show Databases:
SHOW DATABASES;
Use Database:
USE database_name;
Show Tables:
SHOW TABLES;
Describe Table:
DESCRIBE table_name;
-- or
DESC table_name;
Select Data:
SELECT * FROM table_name;
SELECT column1, column2 FROM table_name WHERE condition;
Create Table:
CREATE TABLE users (
    id INT AUTO_INCREMENT PRIMARY KEY,
    username VARCHAR(50) NOT NULL,
    email VARCHAR(100) UNIQUE,
    created_at TIMESTAMP DEFAULT CURRENT_TIMESTAMP
) ENGINE=InnoDB;
Insert Data:
INSERT INTO users (username, email) VALUES ('john_doe', '[email protected]');
Update Data:
UPDATE users SET email = '[email protected]' WHERE id = 1;
Delete Data:
DELETE FROM users WHERE id = 1;
Create Index:
CREATE INDEX idx_username ON users(username);
Show Table Structure:
SHOW CREATE TABLE table_name;
Exit MariaDB:
EXIT;
-- or
QUIT;
Step 4: Running SQL Scripts
Execute SQL File:
mariadb -h [HOST] -P [PORT] -u [USERNAME] -p [DATABASE_NAME] < script.sql
Example:
mariadb -h mariadb-123456.kloudbeansite.com -P 3306 -u myapp_user -p myapp_db < backup.sql
Using Database Credentials in Your Application
Connection String Format
Standard MariaDB Connection String:
mariadb://[USERNAME]:[PASSWORD]@[HOST]:[PORT]/[DATABASE_NAME]
Or MySQL-compatible format:
mysql://[USERNAME]:[PASSWORD]@[HOST]:[PORT]/[DATABASE_NAME]
Example:
mariadb://myapp_user:[email protected]:3306/myapp_db
PHP (PDO)
Using PDO:
<?php
$host = 'mariadb-123456.kloudbeansite.com';
$port = 3306;
$dbname = 'myapp_db';
$username = 'myapp_user';
$password = 'your_password';

try {
    $pdo = new PDO(
        "mysql:host=$host;port=$port;dbname=$dbname;charset=utf8mb4",
        $username,
        $password,
        [
            PDO::ATTR_ERRMODE => PDO::ERRMODE_EXCEPTION,
            PDO::ATTR_DEFAULT_FETCH_MODE => PDO::FETCH_ASSOC,
            PDO::ATTR_EMULATE_PREPARES => false,
        ]
    );
    echo "Connected successfully";
} catch (PDOException $e) {
    echo "Connection failed: " . $e->getMessage();
}
?>
Using mysqli:
<?php
$host = 'mariadb-123456.kloudbeansite.com';
$port = 3306;
$dbname = 'myapp_db';
$username = 'myapp_user';
$password = 'your_password';

$conn = new mysqli($host, $username, $password, $dbname, $port);

if ($conn->connect_error) {
    die("Connection failed: " . $conn->connect_error);
}
echo "Connected successfully";
?>
Node.js
Using mariadb package:
const mariadb = require('mariadb');

const pool = mariadb.createPool({
  host: 'mariadb-123456.kloudbeansite.com',
  port: 3306,
  user: 'myapp_user',
  password: 'your_password',
  database: 'myapp_db',
  connectionLimit: 5
});

// Use pool
const conn = await pool.getConnection();
const rows = await conn.query('SELECT * FROM users');
conn.release();
Using mysql2 package (compatible):
const mysql = require('mysql2/promise');

const connection = await mysql.createConnection({
  host: 'mariadb-123456.kloudbeansite.com',
  port: 3306,
  user: 'myapp_user',
  password: 'your_password',
  database: 'myapp_db'
});

const [rows] = await connection.execute('SELECT * FROM users');
connection.end();
Python
Using mysql-connector-python:
import mysql.connector

config = {
    'host': 'mariadb-123456.kloudbeansite.com',
    'port': 3306,
    'user': 'myapp_user',
    'password': 'your_password',
    'database': 'myapp_db'
}

conn = mysql.connector.connect(**config)
cursor = conn.cursor()

cursor.execute("SELECT * FROM users")
rows = cursor.fetchall()

for row in rows:
    print(row)

cursor.close()
conn.close()
Using PyMySQL:
import pymysql

connection = pymysql.connect(
    host='mariadb-123456.kloudbeansite.com',
    port=3306,
    user='myapp_user',
    password='your_password',
    database='myapp_db',
    cursorclass=pymysql.cursors.DictCursor
)

with connection.cursor() as cursor:
    cursor.execute("SELECT * FROM users")
    rows = cursor.fetchall()
    for row in rows:
        print(row)

connection.close()
Best Practices
Security
- Strong Passwords: Use strong, unique passwords for database users
- IP Whitelisting: Always use IP whitelisting instead of public access
- SSL/TLS: Enable SSL/TLS encryption for all connections
- Regular Updates: Keep MariaDB updated to latest version
- Access Control: Implement proper user permissions and access control
- Backup Security: Secure your database backups
Performance
- Proper Indexing: Create indexes on frequently queried columns
- Query Optimization: Optimize your SQL queries
- Connection Pooling: Use connection pooling in applications
- Resource Monitoring: Monitor database performance regularly
- Regular Maintenance: Perform regular database maintenance
- Storage Engines: Choose appropriate storage engines (InnoDB for transactions)
Management
- Regular Backups: Enable and test automatic backups
- Monitor Usage: Monitor database usage and performance
- Scale When Needed: Scale your database as your needs grow
- Documentation: Document your database configuration
- Version Control: Keep track of schema changes
Troubleshooting
Connection Issues
Cannot Connect to Database:
- Check IP Whitelist: Verify your IP is whitelisted
- Check Credentials: Verify host, port, username, and password
- Check Network: Verify network connectivity
- Check Firewall: Check firewall rules
- Review Access Settings: Check database access configuration
Access Denied Errors:
- Verify Credentials: Check username and password
- Check User Permissions: Verify user has necessary permissions
- Check Host Restrictions: Verify host restrictions allow connection
- Check Database Access: Verify user has access to the database
Performance Issues
Slow Queries:
- Check Indexes: Verify proper indexes exist
- Optimize Queries: Review and optimize slow queries
- Check Resources: Monitor CPU, memory, and disk usage
- Review Configuration: Review MariaDB configuration
Connection Limits:
- Check Limits: Verify connection limits
- Close Idle Connections: Close unused connections
- Use Connection Pooling: Implement connection pooling
- Review Active Connections: Check for connection leaks
Next Steps
After launching your MariaDB database:
- Learn about Controlling Database Access for managing access
- Explore Configuring Database Backup Settings for backups
- Review Monitoring Database Server Health for monitoring
- Check Launching MySQL for MySQL database options