Migrating Using FileManager
Learn how to migrate files and applications to KloudBean using the built-in FileManager tool. This guide covers accessing FileManager and uploading files for migration.
Overview
FileManager is a web-based file management tool that allows you to upload, download, and manage files directly through your browser. It's an excellent tool for migrating files and applications to KloudBean without needing SSH access or FTP clients.
Prerequisites
Before starting migration using FileManager, ensure you have:
- KloudBean account with server access
- Application created on KloudBean where you want to migrate files
- Source files ready for migration
- Web browser with JavaScript enabled
- FileManager enabled (can be enabled from Services section if disabled)
Important Limitations
Important: Before uploading files, be aware of the following limitations:
Zip and Tar File Limitations
If you upload a ZIP or TAR file, you cannot unzip or untar it directly from FileManager.
You have two options:
-
Upload Files Directly (Recommended):
- Unzip/Untar on your local machine first
- Upload files and folders directly without making a zip
- This allows you to maintain folder structure and upload everything at once
-
Upload ZIP/TAR and Extract via SSH:
- Upload the ZIP or TAR file using FileManager
- SSH into your KloudBean server
- Use shell commands to unzip or untar the file:
# For ZIP files
unzip filename.zip

# For TAR files
tar -xzf filename.tar.gz
# Or
tar -xf filename.tar
File Size Limits
- Maximum file upload size: 5GB per file
- For files larger than 5GB, contact KloudBean support team for assistance
Accessing FileManager
Step 1: Navigate to Application Administration
- Log in to your KloudBean dashboard
- Navigate to your application: Click on the application where you want to migrate files
- Open Application Administration: This will take you to the "Application Administration" page
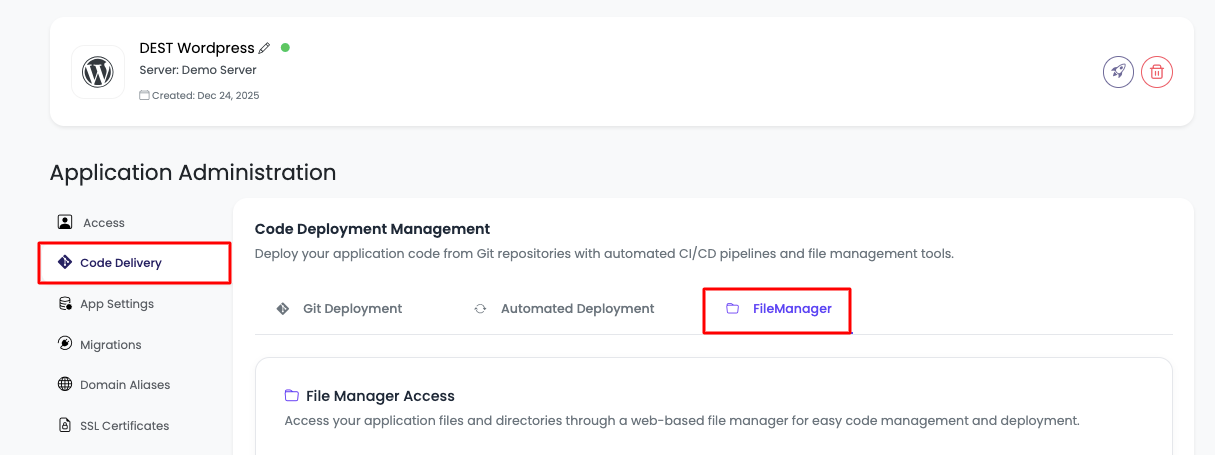
Step 2: Access FileManager Tab
-
Navigate to Code Delivery Tab:
- In the Application Administration page, navigate to the "Code Delivery" tab
- Click on "FileManager" within the Code Delivery section
-
View FileManager Section:
- Here you will see your application source directory information
- You'll see where you will upload files
- There will be a button to "Launch FileManager"
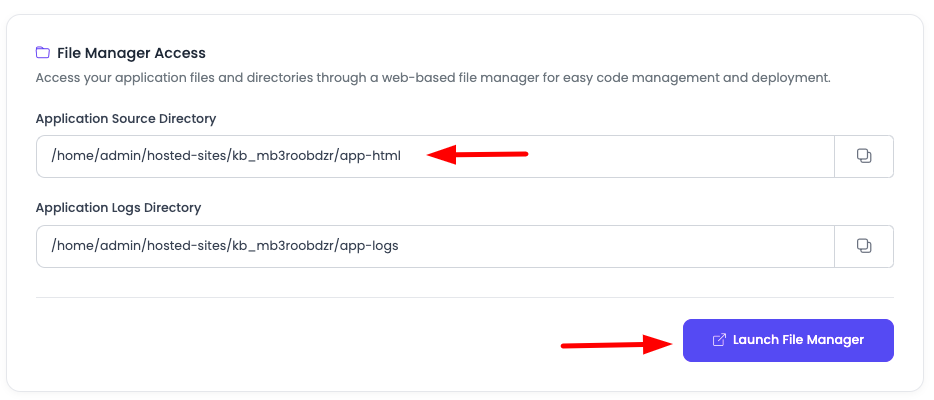
Step 3: Launch FileManager
-
Click "Launch FileManager":
- Click on the "Launch FileManager" button
- This will open FileManager using SSO (Single Sign-On) authentication
- You'll be automatically logged in to FileManager
-
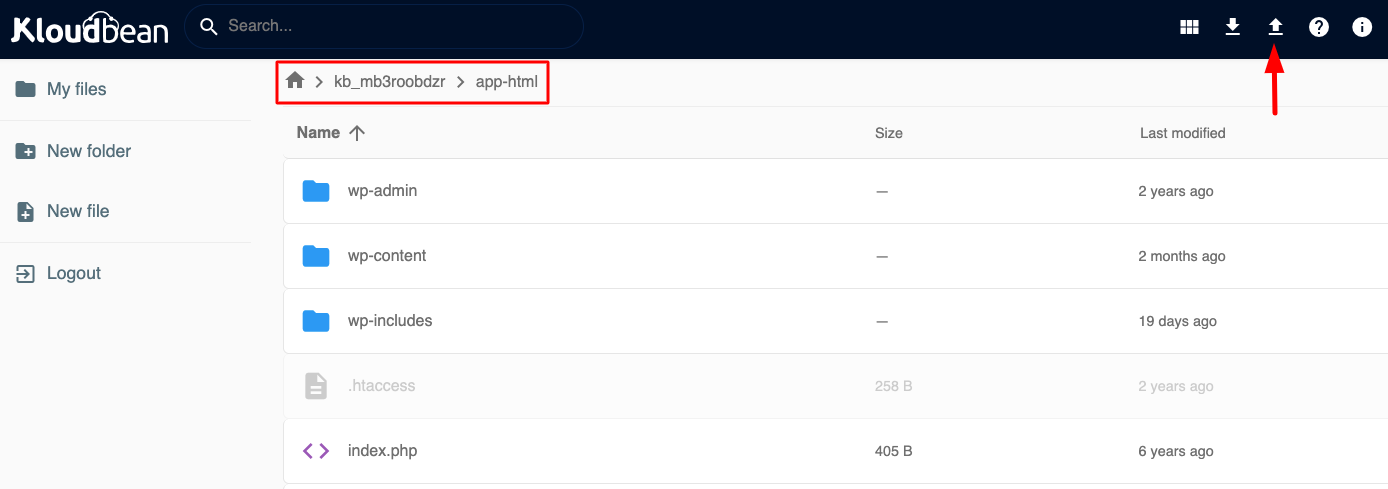
FileManager Interface:
- You are now inside the FileManager
- Here you can see your current files
- You can either delete existing files or directly upload new files to overwrite existing ones
Uploading Files for Migration
Upload Methods
You can upload files using two methods:
-
Upload Button:
- Click on the upload button icon in the FileManager interface
- Select files from your local machine
- Click "Upload" to start the upload process
-
Drag and Drop:
- Drag files from your local file explorer
- Drop them directly into the FileManager window
- Files will automatically start uploading
Upload Process
-
Navigate to Target Directory:
- Make sure you're in the correct directory where you want to upload files
- This is usually your application's webroot or source code directory
-
Select Files:
- Choose files or folders from your local machine
- You can select multiple files at once
-
Monitor Upload Progress:
- Watch the upload progress bar
- Wait for upload to complete
-
Verify Upload:
- Check that files appear in the FileManager
- Verify file sizes and names are correct
File Size Considerations
- Maximum file size: 5GB per file
- Large files: For files larger than 5GB, contact KloudBean support
- Multiple files: You can upload multiple files, but each file must be under 5GB
Migration Workflow
Step 1: Prepare Source Files
-
Organize Files:
- Organize your source files on your local machine
- Ensure all necessary files are included
-
Decide on Upload Method:
- Option A: Unzip/untar files locally and upload directly
- Option B: Upload ZIP/TAR file and extract via SSH
-
Check File Sizes:
- Verify no single file exceeds 5GB
- Split or compress if necessary
Step 2: Access FileManager
- Navigate to Application: Go to your application's Administration page
- Open FileManager: Follow the steps in "Accessing FileManager" section above
- Navigate to Target Directory: Go to the directory where you want to upload files
Step 3: Upload Files
-
Upload Files:
- Use upload button or drag-and-drop method
- Upload files in batches if you have many files
- Monitor upload progress
-
For ZIP/TAR Files:
- If you uploaded a ZIP or TAR file, you'll need to extract it via SSH
- See "Extracting ZIP/TAR Files via SSH" section below
Step 4: Extract ZIP/TAR Files (If Needed)
If you uploaded a ZIP or TAR file, follow these steps to extract it:
-
SSH into KloudBean Server:
ssh username@server-ip -
Navigate to Application Directory:
cd /home/admin/hosted-sites/<app_system_user>/app-html/noteReplace
<app_system_user>with your actual application system user. -
Extract ZIP File:
unzip filename.zip -
Extract TAR File:
# For .tar.gz files
tar -xzf filename.tar.gz

# For .tar files
tar -xf filename.tar -
Verify Extraction:
ls -la
# Check that files are extracted correctly -
Clean Up (Optional):
# Remove the ZIP/TAR file after extraction
rm filename.zip
Step 5: Verify Migration
-
Check File Count:
- Verify that all files have been uploaded
- Compare file count with source
-
Check File Sizes:
- Verify file sizes match source files
- Check for any upload errors
-
Test Application:
- Test your application to ensure it works correctly
- Check for any missing files or broken links
-
Verify Permissions:
- Check file permissions if needed
- Ensure executable files have correct permissions
FileManager Operations
For detailed information about all FileManager operations, including:
- Creating and managing files
- Editing files
- Downloading files
- Renaming files and folders
- Deleting files
- Moving and copying files
- Setting file permissions
See the complete guide: Managing Files with FileManager - FileManager Operations
Best Practices
- Organize First: Organize files on your local machine before uploading
- Upload in Batches: Upload files in smaller batches for better reliability
- Verify After Upload: Always verify that files uploaded correctly
- Use Direct Upload: Prefer uploading files directly rather than ZIP/TAR when possible
- Maintain Structure: Maintain directory structure during upload
- Check File Sizes: Ensure files are under 5GB limit
- Backup Before: Backup existing files before overwriting
- Test Functionality: Test your application after migration
Troubleshooting
Upload Fails
Problem: File upload fails or times out.
Solutions:
- Check File Size: Verify file size is under 5GB
- Check Permissions: Verify directory has write permissions
- Check Disk Space: Verify available disk space on server
- Try Smaller Batch: Upload files in smaller batches
- Check Network: Verify stable network connection
- Refresh FileManager: Refresh the FileManager page and try again
Files Not Appearing
Problem: Uploaded files don't appear in FileManager.
Solutions:
- Refresh FileManager: Refresh the FileManager page
- Check Directory: Verify you're in the correct directory
- Check Upload Status: Check if upload completed successfully
- Clear Browser Cache: Clear browser cache and refresh
- Check File Permissions: Verify file permissions are correct
ZIP/TAR File Cannot Be Extracted
Problem: Cannot extract ZIP or TAR file from FileManager.
Solutions:
- Use SSH: Extract files using SSH and shell commands (see "Extracting ZIP/TAR Files via SSH" section)
- Upload Directly: Unzip/untar files locally and upload directly instead
- Check File Format: Verify ZIP/TAR file is not corrupted
Slow Upload Speed
Problem: File upload is very slow.
Solutions:
- Check Network: Verify network connection speed
- Compress Files: Compress files before upload (if not already)
- Upload Off-Peak: Upload during off-peak hours
- Use Alternative Method: Consider using Rsync or FTP for large migrations
- Split Files: Split large files into smaller parts
File Size Exceeds Limit
Problem: File is larger than 5GB limit.
Solutions:
- Split File: Split the file into smaller parts
- Compress File: Compress the file to reduce size
- Contact Support: Contact KloudBean support team for assistance with large files
- Use Alternative Method: Use Rsync or FTP for very large files
Alternative Methods
For Large Migrations
If FileManager is too slow or limited for your migration:
-
Use Rsync: Use Rsync for efficient file synchronization
-
Use FTP/SFTP: Use FTP client for large file transfers
- More reliable for very large files
- Better progress tracking
-
Use SSH/SCP: Use SCP for direct file transfers
- Command-line method
- Good for automated migrations
-
Use KloudBean Migration Tool: Use built-in migration tools
- See Migrating WordPress for WordPress migrations
Next Steps
- Learn about Managing Files with FileManager for detailed FileManager operations
- Explore Migrating Using Rsync for large file migrations
- Review Migrating WordPress for complete WordPress migration
- Check Migrating Databases for database migration