Migrating WordPress
Learn how to migrate your WordPress/WooCommerce site to KloudBean using our built-in migration feature or third-party tools.
Overview
KloudBean provides an efficient and fast way to migrate your WordPress/WooCommerce site. Our built-in migration feature automatically handles the entire migration process, including transferring all files, databases, and updating domains and URLs as needed.
Prerequisites
Before starting the migration, ensure you have:
- WordPress/WooCommerce site on your current hosting provider
- KloudBean account with a server created
- New empty site created on KloudBean (existing data will be overwritten)
- Source site credentials (SSH/SFTP access and database credentials)
- Access to current hosting provider dashboard (for obtaining credentials)
Important Pre-Migration Notes
Critical: Before starting migration:
- Create a new empty site on KloudBean where you want to migrate
- Ensure the site is empty - once migration starts, all existing data and database on the KloudBean site will be overwritten
- No plugins required - you don't need to install any plugins on your current site
- Credentials needed - you'll need to provide access credentials to your current site
Migration Methods
Method 1: Migrate Using KloudBean Built-in Migration Feature
KloudBean provides an efficient and fast way to migrate your WordPress/WooCommerce site. This feature automatically migrates:
- WordPress files from the webroot directory
- WordPress database with all data
- Domain and URL updates (if required)
You won't require any plugin installation on your site, but you will need to enter your current site credentials to grant access. We'll discuss the steps in detail below.
Step 1: Prepare Your KloudBean Site
Before starting migration:
- Create a new site on KloudBean (if you haven't already)
- Ensure the site is empty - verify that the site doesn't contain any existing data
- Note: Once migration starts, all current site data and database on KloudBean will be overwritten
Step 2: Access Migration Tool
- Click on your new site (or the site where you want to migrate) to open "Application Administration"
- Navigate to the "Migrations" tab
- You'll see the "Migration Management" section
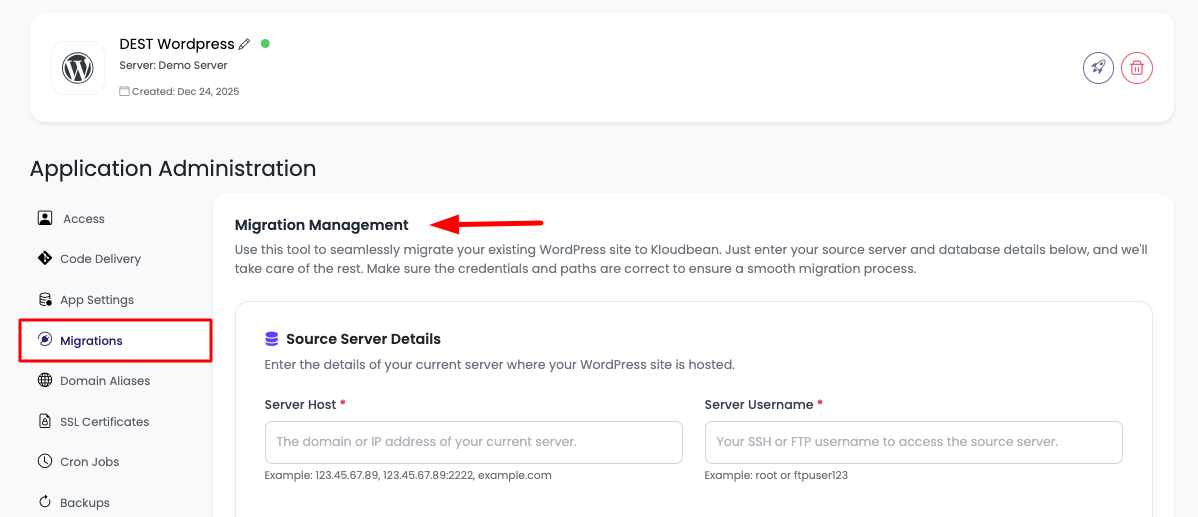
Step 3: Enter Source Server Details
In the "Migration Management" section, you'll need to provide the following details to fetch data from your existing site:
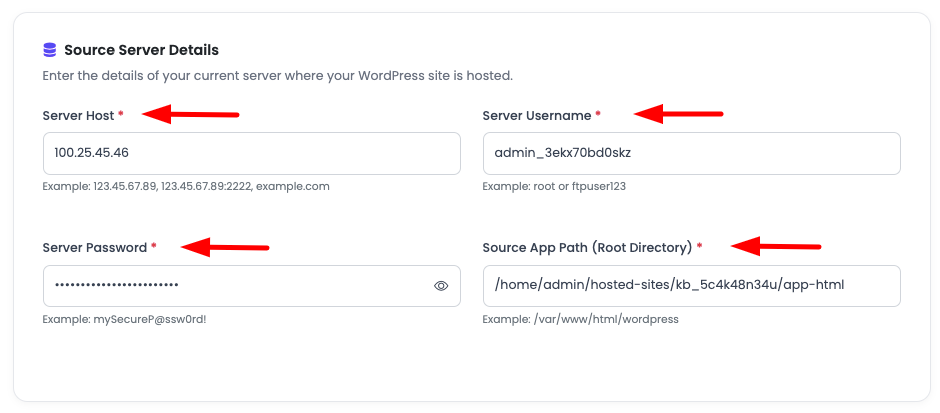
Source Server Details
Provide the following information:
- Server Host: Enter your server host (Example:
123.45.67.89,123.45.67.89:2222,example.com)- If the port is not the default port (22), you can mention it like
123.45.67.89:2222
- If the port is not the default port (22), you can mention it like
- Server Username: Enter your server username
- Server Password: Enter your server password
- Source App Path (Root Directory): Enter the root directory path where WordPress is installed
- Common paths:
/public_html,/www,/htdocs, or/var/www/html
- Common paths:
Step 4: Enter Source Database Details
It is required to mention database details to migrate the database. Provide the following fields:
- Database Host:
- It will be
localhostin most cases if the database is on the same server where the app is hosted - If the database is on a different server or a managed database service (like AWS RDS, Google Cloud SQL, etc.), enter the database hostname
- It will be
- Database Name: Enter your WordPress database name
- Database Username: Enter your database username
- Database Password: Enter your database password
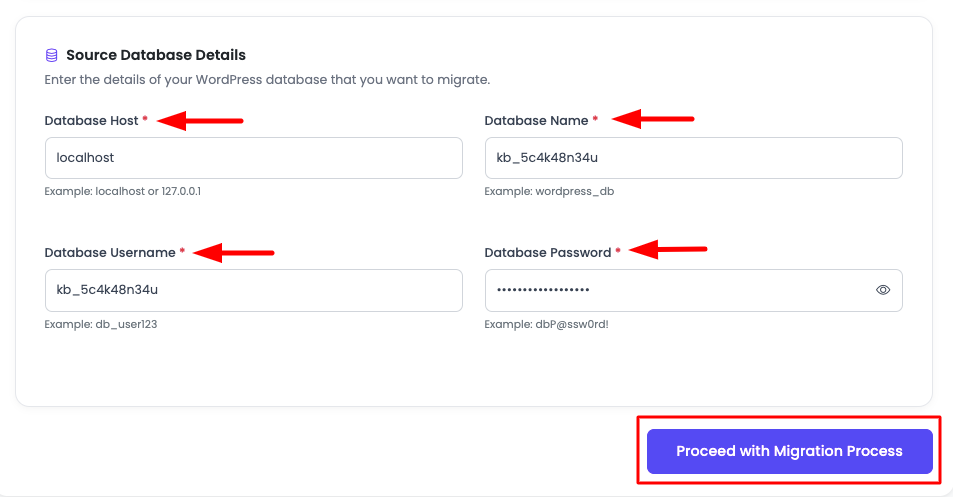
Step 5: Start Migration Process
Once you've added all the required fields, you're ready to start the migration process:
- Click on "Proceed with Migration Process" button
Step 6: System Validation
Before starting the migration, the system will test access using the provided credentials. The following information will be validated:
- ✅ SSH Connection: Verifies SSH/SFTP connectivity
- ✅ Database Connection: Tests database connectivity
- ✅ Database Exists: Confirms the database
<your database>exists - ✅ Webroot Directory Validation: Verifies the source application path
- ✅ WordPress Files Check: Confirms WordPress installation is detected
- ✅ Source Application URL Check: Validates the source site URL
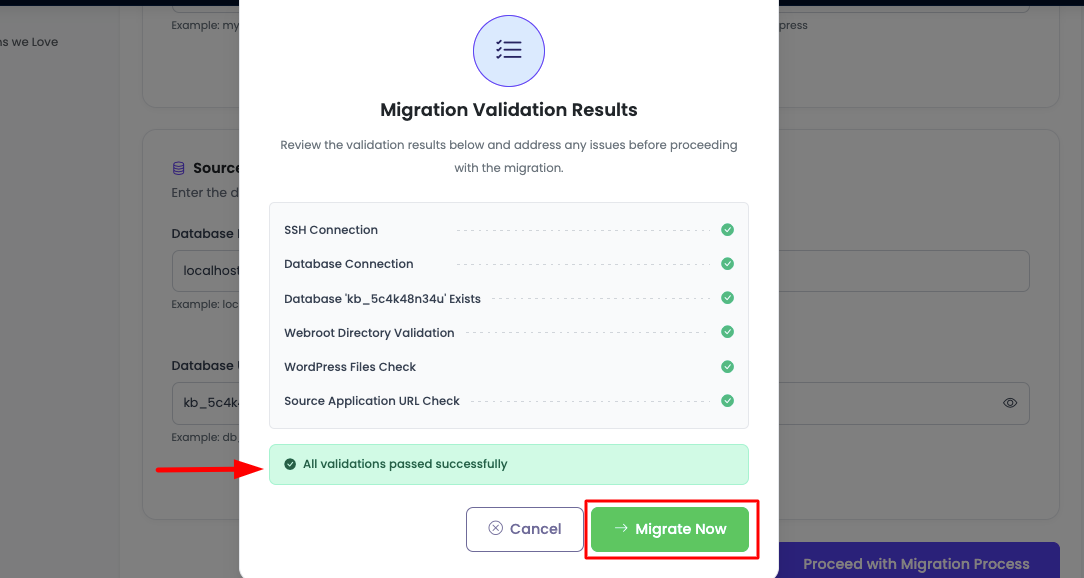
If all validations run successfully, you're ready to start the migration.
Step 7: Initiate Migration
- Click on "Start Migration" button
- Your migration process will be initiated
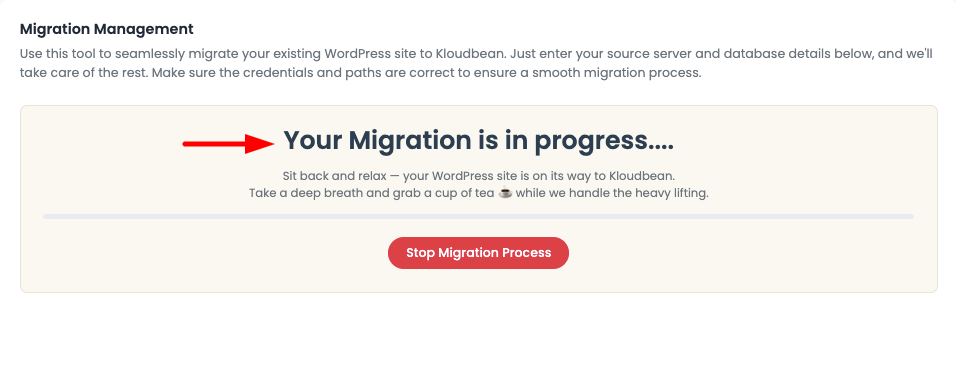
Migration Time: The process will take a couple of minutes, depending on your app size:
- Small sites (< 1GB): 5-15 minutes
- Medium sites (1-5GB): 15-30 minutes
- Large sites (> 5GB): 30-60 minutes or more
Step 8: Migration Completion
Once migration is complete, you'll see a success message with the following options:
- Delete Migration Info: Option to completely delete migration information
- Re-initiate Migration: Option to start migration again if needed

Step 9: Post-Migration Verification
After migration completion:
- Access your site - You should be able to access the migrated site
- If you still see the old site:
- Navigate to "Server Administration" → "Services" → "Service Management" → "Varnish"
- Click "Purge" to clear the cache
- Test functionality:
- Check WordPress admin login
- Verify plugins are working
- Test themes and customizations
- Check media files and uploads
- Test forms and functionality
Getting Credentials from Popular WordPress Hosting Providers
If your current WordPress site is hosted on any of the following providers that offer SSH/SFTP access, you can obtain access credentials from their dashboard. Note that this method can only migrate from providers who provide SSH/SFTP access to their apps/servers.
Kinsta
Kinsta provides SSH access for all plans:
-
Access SSH Info:
- Log in to your Kinsta MyKinsta dashboard
- Navigate to "Sites" → Select your site
- Go to "Info" tab
- Find "SSH details" section
- Note: SSH Host, SSH Port, SSH User, and SSH Key (or password)
-
Database Credentials:
- Go to "Databases" section
- Select your database
- View "Connection details" for host, name, username, and password
-
Application Path: Usually
/www/username/public/or check the "Info" tab for the exact path
WP Engine
WP Engine offers SFTP access:
-
Access SFTP Info:
- Log in to WP Engine User Portal
- Select your "Environment"
- Go to "SFTP" tab
- Find "SFTP credentials": Host, Username, Password, Port
-
Database Credentials:
- Go to "phpMyAdmin" or "Databases" section
- View database connection details
-
Application Path: Usually
/www/or check environment details
SiteGround
SiteGround provides SSH access:
-
Access SSH Info:
- Log in to Site Tools
- Navigate to "Dev" → "SSH Keys Manager" or "SSH Access"
- Find "SSH connection details": Host, Username, Port
- Generate or use existing SSH key
-
Database Credentials:
- Go to "Databases" → "MySQL"
- View database details: Host (usually
localhost), Database name, Username, Password
-
Application Path: Usually
/public_html/or check "Files" section
GridPane
GridPane provides SSH access:
-
Access SSH Info:
- Log in to GridPane dashboard
- Select your "Server"
- Go to "SSH Access" section
- Find "SSH connection details": Host, Username, Port, SSH Key
-
Database Credentials:
- Go to "Databases" section
- Select your database
- View connection details: Host (usually
localhost), Database name, Username, Password
-
Application Path: On KloudBean, the application path is
/home/admin/hosted-sites/<app_system_user>/app-html/
Cloudways
Cloudways provides SSH access:
-
Access SSH Info:
- Log in to Cloudways platform
- Select your "Application"
- Go to "Access Details" → "SSH/SFTP"
- Find "SSH credentials": Host, Username, Password, Port
-
Database Credentials:
- Go to "Application Management" → "Application Settings"
- View "Database Access" details: Host, Database name, Username, Password
-
Application Path: Usually
/public_html/or check application details
Other Providers
For other hosting providers (cPanel, Plesk, etc.):
-
SSH/SFTP Access:
- Check hosting control panel for "SSH" or "FTP" settings
- Look for "File Manager" or "FTP Accounts" section
- Note: Host, Username, Password, Port
-
Database Credentials:
- Access "phpMyAdmin" or "Databases" section
- View database connection details
-
Application Path: Usually
/public_html/,/www/, or/htdocs/
Method 2: Migrate Using Third-Party Tools
If you prefer using third-party migration tools, KloudBean supports migration from various popular WordPress migration plugins and tools. These tools can be useful if you need more control over the migration process or if your hosting provider doesn't support SSH/SFTP access.
Option 1: Migrate Guru Plugin
Migrate Guru is a popular free WordPress migration plugin that offers automated migrations without requiring technical knowledge.
Step 1: Install Migrate Guru Plugin
- Log in to WordPress Admin on your current site
- Navigate to "Plugins" → "Add New"
- Search for "Migrate Guru"
- Click "Install Now" and then "Activate"
Step 2: Start Migration
-
Access Migrate Guru:
- Go to "Migrate Guru" in your WordPress admin menu
- Or navigate to "Tools" → "Migrate Guru"
-
Enter Destination Details:
- Destination URL: Enter your KloudBean site URL
- Destination Type: Select "WordPress"
- FTP Details (if required):
- FTP Host
- FTP Username
- FTP Password
- FTP Port
-
Select What to Migrate:
- ✅ Files: WordPress files and media
- ✅ Database: WordPress database
- ✅ Plugins and Themes: All installed plugins and themes
- ✅ Settings: WordPress settings and configurations
Step 3: Configure Migration Settings
-
Migration Options:
- Search and Replace URLs: Automatically update URLs
- Migrate Media Files: Include all media files
- Migrate Plugins: Include all plugins
- Migrate Themes: Include all themes
-
Advanced Options (if needed):
- Exclude specific files or directories
- Custom search and replace rules
- Database table selection
Step 4: Start Migration
- Click "Migrate" button
- Wait for completion: Migration will run in the background
- Monitor progress: Check migration status in the plugin dashboard
- Receive notification: You'll be notified when migration completes
Step 5: Verify Migration
- Access your KloudBean site
- Test functionality: Verify all features work correctly
- Update DNS: Point your domain to KloudBean
- Test thoroughly: Check plugins, themes, and customizations
Migrate Guru handles URL updates automatically, but you may need to update DNS settings and clear cache after migration.
Option 2: All-in-One WP Migration Plugin
All-in-One WP Migration is another popular free WordPress migration plugin that offers simple drag-and-drop migration.
Step 1: Install Plugin on Source Site
- Log in to WordPress Admin on your current site
- Navigate to "Plugins" → "Add New"
- Search for "All-in-One WP Migration"
- Click "Install Now" and then "Activate"
Step 2: Export Your Site
-
Access Plugin:
- Go to "All-in-One WP Migration" in your WordPress admin menu
-
Export Site:
- Click "Export" button
- Select "Export to" → "File"
- Wait for export to complete
- Download the
.wpressfile
Step 3: Install Plugin on KloudBean Site
- Log in to WordPress Admin on your KloudBean site
- Install and activate "All-in-One WP Migration" plugin
Step 4: Import Site
-
Access Plugin:
- Go to "All-in-One WP Migration" in WordPress admin
-
Import Site:
- Click "Import" button
- Select "Import from" → "File"
- Upload the
.wpressfile you downloaded - Wait for import to complete
Step 5: Update URLs and Verify
- Plugin will update URLs automatically
- Test your site: Verify all functionality
- Update DNS: Point domain to KloudBean
- Clear cache: Purge Varnish cache if needed
Option 3: Duplicator Plugin
Duplicator is a free WordPress migration plugin that creates a complete package of your site for migration.
Step 1: Install Duplicator on Source Site
- Log in to WordPress Admin on your current site
- Navigate to "Plugins" → "Add New"
- Search for "Duplicator"
- Click "Install Now" and then "Activate"
Step 2: Create Package
-
Access Duplicator:
- Go to "Duplicator" → "Packages" in WordPress admin
- Click "Create New" button
-
Configure Package:
- Name: Enter package name
- Storage: Select storage location
- Archive: Configure archive settings
- Installer: Configure installer settings
-
Build Package:
- Click "Next" to start building
- Wait for package creation to complete
- Download both files:
- Archive file (
.zip) - Installer file (
installer.php)
- Archive file (
Step 3: Upload to KloudBean
- Upload Files:
- Use FileManager or FTP to upload both files to your KloudBean site root directory:
/home/admin/hosted-sites/<app_system_user>/app-html/ - Ensure both files are in the same directory
- Use FileManager or FTP to upload both files to your KloudBean site root directory:
Step 4: Run Installer
-
Access Installer:
- Navigate to
https://your-kloudbean-site.com/installer.phpin your browser
- Navigate to
-
Follow Installation Wizard:
- Step 1: Accept terms and continue
- Step 2: Enter database details (KloudBean database credentials)
- Step 3: Test database connection
- Step 4: Update site URL and paths
- Step 5: Run installer
Step 5: Complete Migration
- Installation will complete automatically
- Delete installer files: Remove
installer.phpand archive file for security - Test your site: Verify all functionality
- Update DNS: Point domain to KloudBean
Option 4: WP-CLI Migration (Advanced)
For advanced users comfortable with command-line tools, WP-CLI can be used for migration.
Step 1: Export from Source
- SSH into source server
- Export database:
wp db export export.sql - Create files archive:
# On source server (replace with actual source path)
tar -czf wordpress-files.tar.gz /path/to/wordpress
Step 2: Transfer to KloudBean
- Upload files to KloudBean server
- Import database:
wp db import export.sql - Update URLs:
wp search-replace 'old-url.com' 'new-url.com'
Step 3: Verify and Test
- Test site functionality
- Update DNS settings
- Clear cache
Post-Migration Steps
Update DNS
-
Point DNS to KloudBean:
- Update A record to point to KloudBean server IP
- Or update nameservers to KloudBean nameservers
-
Wait for propagation: Allow 24-48 hours for DNS propagation
-
Verify DNS: Check DNS propagation status using online tools
Clear Cache
-
Purge Varnish Cache:
- Navigate to "Server Administration" → "Services" → "Service Management" → "Varnish"
- Click "Purge" button
-
Clear Browser Cache: Clear your browser cache and cookies
-
Clear CDN Cache: If using CDN, clear CDN cache
Verify Site Functionality
- Test WordPress Admin: Log in to WordPress admin panel
- Check Plugins: Verify all plugins are working
- Test Themes: Check theme functionality
- Test Media: Verify images and media files load correctly
- Test Forms: Test contact forms and other functionality
- Check Permalinks: Verify permalink structure works
- Test WooCommerce (if applicable): Verify store functionality
Install SSL Certificate
- Request SSL: Request SSL certificate for your domain in KloudBean
- Configure SSL: SSL will be automatically configured
- Update URLs: Ensure all URLs use HTTPS
- Force HTTPS: Configure redirect from HTTP to HTTPS
Troubleshooting
Issue: Migration Validation Fails
Possible Causes:
- Incorrect SSH/SFTP credentials
- Database connection issues
- Wrong application path
- Firewall blocking access
Solutions:
- Double-check all credentials
- Verify SSH/SFTP access from your end
- Confirm database host and credentials
- Check firewall settings on source server
- Contact source hosting provider for assistance
Issue: Migration Stuck or Slow
Possible Causes:
- Large site size
- Slow network connection
- Server resource limitations
Solutions:
- Wait for migration to complete (can take time for large sites)
- Check server resources
- Contact KloudBean support if migration fails
Issue: Site Shows Old Content After Migration
Solution:
- Purge Varnish Cache:
- Navigate to "Server Administration" → "Services" → "Service Management" → "Varnish"
- Click "Purge" button
- Clear browser cache
- Wait a few minutes and refresh
Issue: Database Connection Error
Solution:
- Verify database credentials in
wp-config.php - Check database user permissions
- Verify database host is correct
- Test database connection
Issue: Images Not Loading
Solution:
- Check file permissions on uploads directory
- Verify uploads directory exists
- Update file paths in database if needed
- Check
.htaccessconfiguration
Issue: Permalinks Not Working
Solution:
- Regenerate
.htaccessfile:- Go to Settings → Permalinks in WordPress admin
- Click "Save Changes" (regenerates
.htaccess)
- Check
mod_rewriteis enabled - Verify
.htaccesspermissions
Best Practices
- Full Backup: Always create a full backup before migration
- Test on Staging: Test migration on a staging site first if possible
- Lower DNS TTL: Lower DNS TTL before migration for faster propagation
- Maintain File Permissions: Ensure correct file permissions are maintained
- Update URLs Properly: Use search-replace tools to update URLs
- Test Thoroughly: Test all functionality after migration
- Monitor Performance: Monitor site performance after migration
- Keep Old Site: Keep old site active until migration is fully verified
- Document Changes: Document any custom configurations or changes
Next Steps
- Learn about Migrating Databases for database-specific migrations
- Explore Migrating Using FileManager for manual file transfers
- Review Migrating Using Rsync for advanced file synchronization