Migrating Databases
Learn how to migrate your database to KloudBean when manually migrating your WordPress site or any other application. This guide focuses on migrating the database only.
Overview
If you are manually migrating your WordPress site, or any other site, and you have to migrate the database as well, this guide will help you. This guide is focused on migrating the database only, assuming you're handling file migration separately.
Prerequisites
Before starting database migration, ensure you have:
- Database dump file (SQL file) from your source database, OR
- Access to source database to create a dump
- KloudBean application created where you want to migrate the database
- Database credentials from KloudBean (we'll show you how to get these)
- SSH access to KloudBean server (for command-line methods)
- Database access enabled (if migrating from external server)
Getting Your KloudBean Database Credentials
Before you can migrate your database, you need to know your new database details on KloudBean, including the database name, username, and password.
Step 1: Navigate to Application Administration
- Log in to your KloudBean dashboard
- Navigate to your application: Click on the application where you want to migrate the database
- Open Application Administration: This will take you to the "Application Administration" page
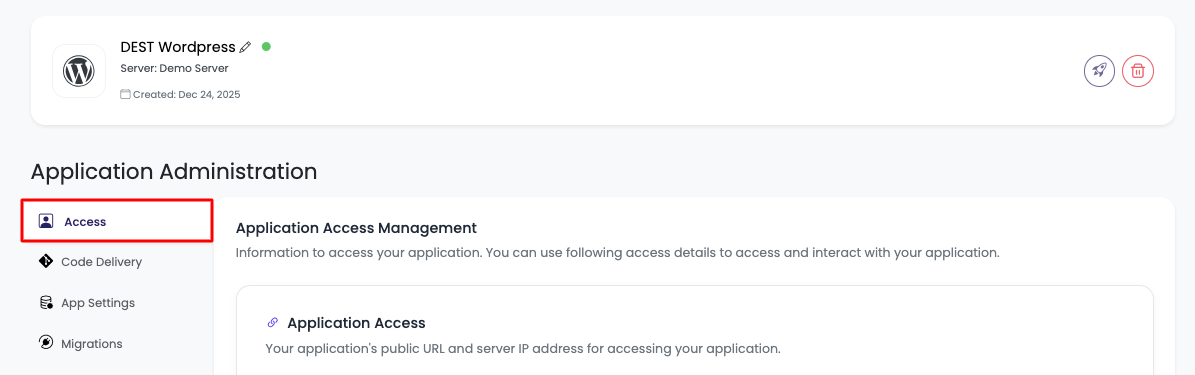
Step 2: Access Database Access Section
- Scroll down to the "Database Access" section on the application administration page
- View Database Details: In this section, you will get all the database details as well as a button to access your database using phpMyAdmin
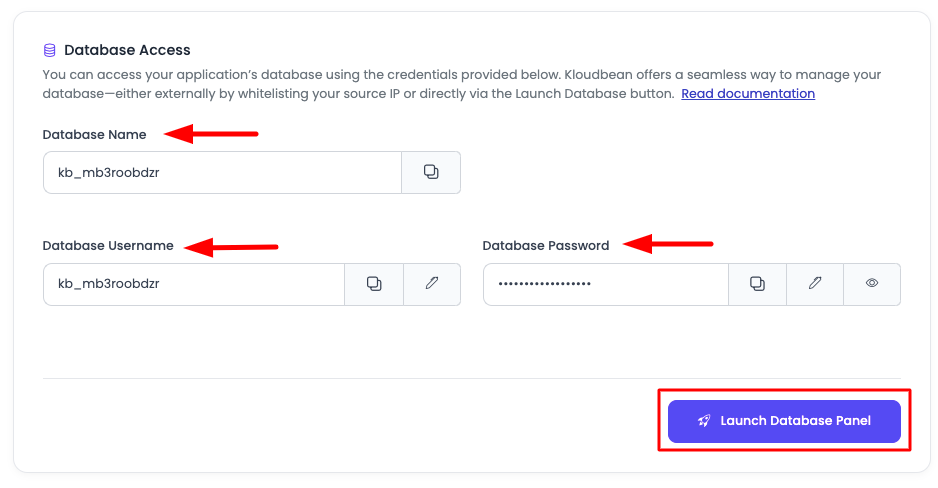
Database Information Available:
- Database Name: The name of your database on KloudBean
- Database Username: The username for database access
- Database Password: The password for database authentication
- Launch Database Panel Button: Button to access database via phpMyAdmin
Important: Make sure to copy these credentials as you'll need them for the migration process.
Database Migration Methods
If you already have database dumps (SQL files), you can migrate using the following methods. Choose the method that best suits your needs based on your database size and technical comfort level.
Method 1: Using phpMyAdmin
Best for: MySQL/MariaDB databases that are not very large (< 500MB recommended)
phpMyAdmin is the easiest method for smaller databases. It provides a user-friendly web interface for importing SQL files.
Step 1: Launch phpMyAdmin
-
Navigate to Database Access Section:
- Go to your application's "Application Administration" page
- Scroll down to "Database Access" section
-
Click "Launch Database Panel":
- Click on the "Launch Database Panel" button
- This will connect you to phpMyAdmin using SSO (Single Sign-On) authentication
- You'll be automatically logged in to phpMyAdmin
Step 2: Select Your Database
- View Database List: In phpMyAdmin, you'll see your database listed in the left sidebar
- Click on Your Database: Click on your database name to select it
- Database Selected: You'll see all tables (if any) in the database
Step 3: Import SQL File
-
Go to Import Tab:
- Click on the "Import" tab at the top of the phpMyAdmin interface
-
Choose File:
- Click "Choose File" or "Browse" button
- Select your SQL dump file from your local computer
- File Size Limit: Note that phpMyAdmin has file size limits (usually 50-100MB). For larger files, use command-line methods.
-
Import Options:
- Format: Should be automatically detected as SQL
- Character Set: Usually UTF-8 (default)
- Partial Import: Check this if you want to import only part of the file
- SQL Compatibility Mode: Leave as default unless you have specific requirements
-
Start Import:
- Click "Go" button at the bottom
- Wait for the import to complete
- You'll see a success message when the import is finished
Step 4: Verify Import
- Check Tables: Verify that all tables have been imported
- Check Data: Browse a few tables to ensure data is present
- Check Structure: Verify that table structures are correct
For very large databases, phpMyAdmin may timeout. In such cases, use command-line methods (Method 3) instead.
Method 2: Using MySQL Workbench
Best for: Medium to large databases, users comfortable with GUI tools
MySQL Workbench is a powerful GUI tool that provides better control and progress tracking for database migrations.
Step 1: Install MySQL Workbench
- Download MySQL Workbench:
- Visit MySQL Workbench Download Page
- Download the appropriate version for your operating system
- Install MySQL Workbench on your local machine
Step 2: Connect to KloudBean Database
-
Open MySQL Workbench
-
Create New Connection:
- Click "+" button next to "MySQL Connections"
- Or go to "Database" → "Manage Connections"
-
Enter Connection Details:
- Connection Name: Give it a name (e.g., "KloudBean Database")
- Hostname: Enter your KloudBean database host
- For application databases: Usually
localhostor the server IP
- For application databases: Usually
You may need to enable database public access first (see Method 4).
- Port:
3306(default MySQL port) - Username: Enter your database username (from Database Access section)
- Password: Click "Store in Keychain" and enter your database password
- Default Schema: Leave empty or enter your database name
-
Test Connection:
- Click "Test Connection" to verify connectivity
- If successful, click "OK" to save
-
Connect:
- Double-click on the connection to connect to the database
Step 3: Import Database
-
Open Data Import:
- Go to "Server" → "Data Import" in the menu
- Or use the shortcut: "Server" → "Data Import"
-
Select Import Options:
- Import from Self-Contained File: Select this option
- Browse: Click "Browse" and select your SQL dump file
- Default Target Schema: Select your database from the dropdown
- Target Schema: Make sure your database is selected
-
Import Progress:
- Click "Start Import" button
- You'll see a progress bar showing import status
- Wait for the import to complete
-
Verify Import:
- Check the "Import Progress" tab for any errors
- Verify tables in the database
Step 4: Handle Large Files
If your SQL file is very large:
- Use Command Line: For files > 1GB, consider using command-line methods
- Split Import: You can split large SQL files and import in parts
- Compress: MySQL Workbench can handle compressed files
Make sure database public access is enabled if connecting from outside KloudBean. See Method 4 for details.
Method 3: Using MySQL Command from Terminal
Best for: Large databases, advanced users, automated migrations
This method involves SSH into your KloudBean server and using MySQL command-line tools. It's the most reliable method for large databases.
Step 1: SSH into KloudBean Server
-
Get SSH Access:
- Navigate to your server's "Server Administration" page
- Go to "SSH Access" section
- Get your SSH credentials (host, username, password, or SSH key)
-
Connect via SSH:
ssh username@server-ip
# Or with specific port
ssh -p 2222 username@server-ip
Step 2: Transfer Database Dump to KloudBean Server
You have two options to get your SQL dump file on the KloudBean server:
Option A: Using SCP (Secure Copy)
-
From your local machine, use SCP to transfer the file:
# Basic SCP command (to KloudBean server)
scp /path/to/your/dump.sql username@server-ip:/tmp/dump.sql

# Example (to temporary location)
scp ~/backup.sql [email protected]:/tmp/backup.sql

# With specific port
scp -P 2222 ~/backup.sql [email protected]:/tmp/backup.sql

# Then move to application directory if needed
# scp ~/backup.sql [email protected]:/home/admin/hosted-sites/<app_system_user>/app-html/backup.sql -
Enter password when prompted (or use SSH key authentication)
Option B: Using SFTP
-
Connect via SFTP:
sftp username@server-ip
# Or with port
sftp -P 2222 username@server-ip -
Upload file:
put /path/to/your/dump.sql /tmp/dump.sql -
Exit SFTP:
exit
Option C: Download Directly on Server
If your dump is available via URL:
# Using wget
wget https://example.com/backup.sql -O /tmp/backup.sql

# Using curl
curl -o /tmp/backup.sql https://example.com/backup.sql
Step 3: Load Database Using MySQL Command
-
SSH into KloudBean server (if not already connected)
-
Import Database:
# Basic import command
mysql -u database_username -p database_name < /tmp/backup.sql

# Example
mysql -u mydbuser -p mydatabase < /tmp/backup.sql -
Enter Password: Enter your database password when prompted
-
For Compressed Files:
# If your dump is compressed (.gz)
gunzip < /tmp/backup.sql.gz | mysql -u database_username -p database_name

# Or using zcat
zcat /tmp/backup.sql.gz | mysql -u database_username -p database_name
Step 4: Advanced Import Options
For better control and handling of large databases:
# Import with specific options
mysql -u database_username -p database_name \
  --default-character-set=utf8 \
  --single-transaction \
  < /tmp/backup.sql

# For very large databases, you might want to increase timeout
mysql -u database_username -p database_name \
  --max_allowed_packet=1G \
  < /tmp/backup.sql
Step 5: Verify Import
-
Connect to MySQL:
mysql -u database_username -p database_name -
Check Tables:
SHOW TABLES; -
Check Row Counts:
SELECT COUNT(*) FROM table_name; -
Exit MySQL:
exit;
Step 6: Clean Up
Remove the dump file from the server (optional, for security):
rm /tmp/backup.sql
Method 4: SSH into Current Server and Load Dumps Directly
Best for: Direct server-to-server transfers, avoiding local file transfers
This method allows you to SSH into your current (source) server and directly load the database dump to KloudBean's database. This is useful when you don't want to download and re-upload large dump files.
Prerequisites
Important: To use this method, you must first allow database access from your current server's IP address. The database access is disabled by default for security reasons.
To check how to allow database access, review the document: Accessing and Managing Database - Database Access Rules
Step 1: Enable Database Access on KloudBean
-
Get Your Current Server IP:
- Find the public IP address of your current server
- You can check this by running:
curl ifconfig.meorcurl ipinfo.io/ipon your current server
-
Whitelist IP Address:
- Navigate to your KloudBean "Server Administration" page
- Go to "Firewall" → "Database Access Rules"
- Add your current server's IP address
- Click "Save Changes"
-
Get KloudBean Database Host:
- Note your KloudBean database host (usually the server IP or a specific database host)
- You can find this in the "Database Access" section of your application
Step 2: Create Database Dump on Current Server
-
SSH into your current server:
ssh username@current-server-ip -
Create Database Dump:
# Basic mysqldump
mysqldump -u database_username -p database_name > backup.sql

# With options (recommended)
mysqldump -u database_username -p \
  --single-transaction \
  --routines \
  --triggers \
  --events \
  database_name > backup.sql

# Compressed dump (for large databases)
mysqldump -u database_username -p database_name | gzip > backup.sql.gz
Step 3: Direct Import to KloudBean Database
Option A: Direct Pipe (Recommended for Small to Medium Databases)
# Direct import without saving file locally
mysqldump -u source_username -p source_database | \
  mysql -h kloudbean_database_host \
        -u kloudbean_username \
        -p kloudbean_database_name
Option B: Using Dump File
-
Create dump (as shown in Step 2)
-
Import directly:
# For uncompressed file
mysql -h kloudbean_database_host \
      -u kloudbean_username \
      -p kloudbean_database_name < backup.sql

# For compressed file
gunzip < backup.sql.gz | \
  mysql -h kloudbean_database_host \
        -u kloudbean_username \
        -p kloudbean_database_name
Option C: Using SSH Tunnel (More Secure)
If direct connection is not possible, you can use an SSH tunnel:
# Create SSH tunnel (run this in a separate terminal)
ssh -L 3307:kloudbean_database_host:3306 username@kloudbean_server

# Then import through tunnel
mysqldump -u source_username -p source_database | \
  mysql -h 127.0.0.1 -P 3307 \
        -u kloudbean_username \
        -p kloudbean_database_name
Step 4: Verify Import
-
Connect to KloudBean Database:
mysql -h kloudbean_database_host \
      -u kloudbean_username \
-p kloudbean_database_name -
Verify Data:
SHOW TABLES;
SELECT COUNT(*) FROM important_table;
Step 5: Disable Database Access (Security)
After migration is complete, for security reasons:
- Remove IP from Whitelist:
- Go back to "Database Access Rules" in KloudBean
- Remove the IP address you added
- Click "Save Changes"
This ensures your database is not accessible from external IPs after migration.
Post-Migration Steps
Verify Data Integrity
- Check Table Counts: Compare row counts between source and destination
- Sample Data Verification: Check sample data in key tables
- Test Application: Test your application to ensure it works with the new database
- Check Relationships: Verify foreign keys and relationships are intact
Update Application Configuration
-
Update Database Credentials:
- Your application should already be using KloudBean database credentials
- Verify
.envfile or configuration files have correct credentials
-
Test Database Connection:
- Test that your application can connect to the database
- Check for any connection errors
Performance Optimization
-
Analyze Tables:
ANALYZE TABLE table_name; -
Optimize Tables:
OPTIMIZE TABLE table_name; -
Check Indexes: Verify that indexes are created correctly
Troubleshooting
Issue: phpMyAdmin Import Timeout
Problem: Import fails or times out for large files.
Solutions:
- Use command-line method (Method 3) instead
- Split large SQL files into smaller parts
- Increase PHP execution time limits (if you have access)
Issue: Cannot Connect to Database (Method 4)
Problem: Connection refused when trying to connect from external server.
Solutions:
- Verify database access is enabled in KloudBean
- Check that your IP address is whitelisted
- Verify database host and port are correct
- Check firewall rules on both servers
Issue: Character Encoding Problems
Problem: Special characters or non-English text appear incorrectly.
Solutions:
- Ensure dump is created with UTF-8 encoding:
mysqldump -u username -p --default-character-set=utf8 database_name > backup.sql - Import with UTF-8:
mysql -u username -p --default-character-set=utf8 database_name < backup.sql
Issue: Foreign Key Constraints Error
Problem: Import fails due to foreign key constraints.
Solutions:
- Disable foreign key checks during import:
SET FOREIGN_KEY_CHECKS=0;
-- Import your data
SET FOREIGN_KEY_CHECKS=1; - Or add to your SQL file:
SET FOREIGN_KEY_CHECKS=0;
-- Your dump content here
SET FOREIGN_KEY_CHECKS=1;
Issue: Large File Upload/Transfer
Problem: File is too large to transfer or import.
Solutions:
- Compress the dump file:
gzip backup.sql - Use command-line methods instead of phpMyAdmin
- Split large files into smaller parts
- Use direct server-to-server transfer (Method 4)
Best Practices
- Always Backup: Create a backup of your source database before migration
- Test First: Test migration on a staging environment if possible
- Verify Credentials: Double-check all database credentials before starting
- Monitor Progress: Monitor import progress, especially for large databases
- Check Logs: Review error logs if migration fails
- Verify Data: Always verify data integrity after migration
- Security: Remove IP whitelist entries after migration is complete
- Documentation: Document any custom configurations or changes
Migration Timeline
Typical Migration Time
- Small Database (< 100MB): 5-15 minutes
- Medium Database (100MB - 1GB): 15-60 minutes
- Large Database (> 1GB): 1-4 hours
Factors Affecting Time
- Database size
- Network speed
- Server performance
- Number of tables
- Data complexity
- Network latency (for remote transfers)
Next Steps
- Learn about Migrating WordPress for complete WordPress migration
- Explore Migrating Using FileManager for file migrations
- Review Migrating Using Rsync for advanced file synchronization
- Check Accessing and Managing Database for database access configuration