Restricting Application Access by IP Address
Learn how to control who can reach your KloudBean application using IP-based access rules. With IP Access Control you can whitelist trusted IP addresses (so only your office or VPN can view the site) or blacklist unwanted visitors, individually or by subnet. Denied visitors receive a 403 Forbidden response.
Overview
IP Access Control works at the web-server (nginx) level, before requests ever reach your application code. This makes it a fast, reliable way to lock down a site without touching your application. Common use cases include:
- Private or pre-launch sites: Keep a staging or internal application visible only to your team.
- VPN-only access: Allow just your company VPN or office network to reach the app.
- Blocking abuse: Deny a specific IP or subnet that is scraping, spamming, or attacking your site.
KloudBean gives you two mutually exclusive modes:
- Allow all, block some (blacklist): Everyone can access the application except the IP addresses you list.
- Block all, allow some (whitelist): Only the IP addresses you list can access the application; everyone else is blocked.
You can add single IP addresses (IPv4 or IPv6) or entire ranges using CIDR notation (for example a whole subnet).
Prerequisites
Before configuring IP access rules, ensure you have:
- An Active KloudBean Application: Your application must be created and running.
- Access to the Application Dashboard: You need to be logged in to your KloudBean account.
- Your Own IP Address: Especially important for whitelist mode. You can find your public IP by searching "what is my IP" in your browser, or check your VPN's egress IP if you connect through one.
IP rules apply to the public IP address that reaches the server. If your visitors sit behind a shared corporate gateway or VPN, they will all appear to come from that gateway's IP. Plan your rules accordingly.
Accessing IP Access Control
- Navigate to Application Administration: Log in to your KloudBean dashboard and open the application administration page for your desired application.
- Open Access Rules: In the left-hand menu, click "Access Rules".
- Select the IP Access Tab: At the top of the Access Rules panel, make sure the "IP Access" tab is selected.
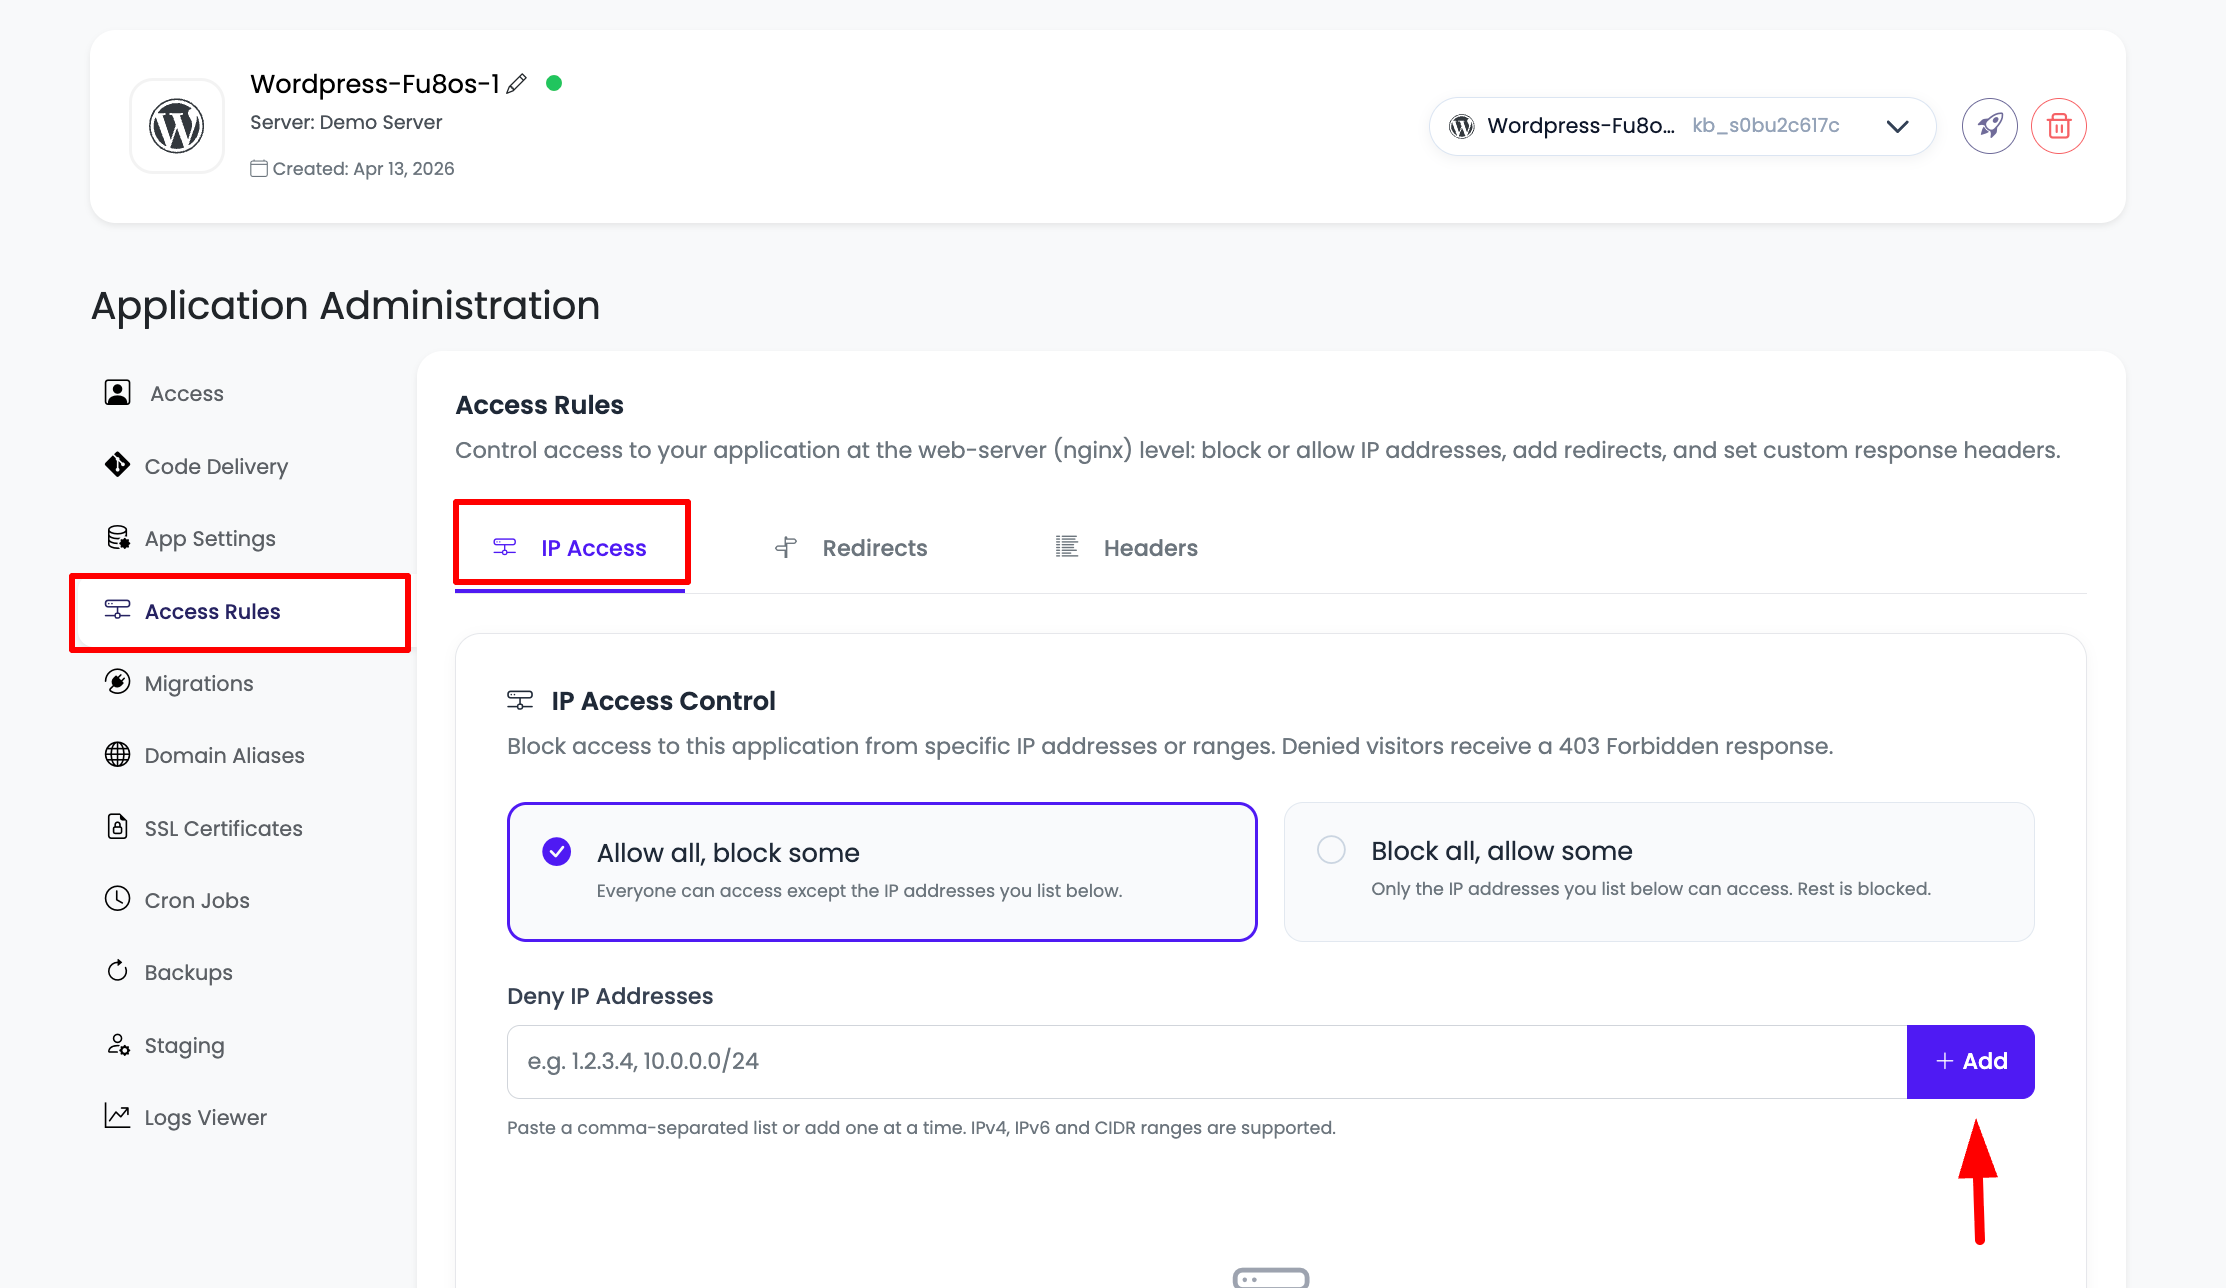
Choosing an Access Mode
At the top of the IP Access section you will see two cards. Click the one that matches what you want to do.
Allow all, block some (Blacklist)
Choose this mode when your site should stay public but you want to keep specific visitors out.
- Everyone can access the application except the IP addresses or subnets you list.
- The list is labeled "Deny IP Addresses".
- Best for blocking abusive IPs while keeping the site open to the world.
Block all, allow some (Whitelist)
Choose this mode when your site is private and only trusted networks should reach it.
- Only the IP addresses or subnets you list can access the application. Everyone else is blocked with a
403 Forbidden. - The list is labeled "Allow IP Addresses".
- Best for private, internal, or pre-launch sites that should be reachable only from your office network or VPN.
In whitelist mode, only the IPs you list can reach the application. Always add your own IP address first, otherwise you will lock yourself out. Saving whitelist mode with an empty list blocks all access to the site.
Adding IP Addresses and Subnets
Once you have picked a mode, add the IP addresses or ranges the rule applies to.
- Enter an IP or subnet in the input field (the placeholder shows an example such as
1.2.3.4, 10.0.0.0/24). - Add it to the list: Click the "Add" button, or press
Enter. - Add multiple at once: You can paste a comma-separated (or space-separated) list and KloudBean will add each valid entry as its own chip.
- Remove an entry: Click the small ✕ on any IP chip to remove it from the list.
Supported Formats
The input accepts the following, and invalid entries are skipped with a warning:
- Single IPv4 address:
203.0.113.25 - Single IPv6 address:
2001:db8::1 - IPv4 subnet (CIDR):
10.0.0.0/24(covers10.0.0.0–10.0.0.255) - IPv6 subnet (CIDR):
2001:db8::/32
Use CIDR notation to cover a whole network in a single rule. For example, to whitelist an office network that hands out addresses in the 192.168.10.x range, add 192.168.10.0/24 instead of listing each address individually. Note that a private range like 192.168.x.x only makes sense if the server actually sees that address — for internet visitors you will use your network's public IP or subnet.
Saving Your Rules
IP rules only take effect after you save them.
- Review the list: Confirm the mode is correct and the right IPs are listed.
- Click "Save Changes": KloudBean applies the rules at the nginx level within a few seconds.
- Confirmation: You will see a success message when the rules are applied.
Changes take effect almost immediately. If you are in whitelist mode, test access from an allowed IP right after saving to confirm you are not locked out.
Example Scenarios
Make a Private Site Reachable Only From Your VPN
- Select "Block all, allow some".
- Add your VPN's public egress IP, for example
198.51.100.10. - If your VPN uses a range, add the subnet instead, for example
198.51.100.0/24. - Click "Save Changes".
Now only visitors coming through the VPN can open the site; everyone else receives a 403 Forbidden.
Block a Single Abusive IP While Keeping the Site Public
- Select "Allow all, block some".
- Add the offending IP, for example
203.0.113.66. - Click "Save Changes".
The site stays open to everyone except that IP.
Troubleshooting
- Locked out of your own site: You most likely enabled whitelist mode without including your current IP. If you can still reach the KloudBean dashboard, open Access Rules, add your IP (or switch back to "Allow all, block some"), and save. Remember your public IP can change, especially on home or mobile connections.
- A visitor is still blocked/allowed unexpectedly: Confirm which IP the server actually sees. Visitors behind a VPN, proxy, or corporate gateway share that gateway's public IP, so a rule on their local address will not match.
- Entry was ignored when adding: The value was not a valid IPv4/IPv6 address or CIDR range. Check for typos, extra spaces, or a missing prefix length on subnets.
- Rule did not apply: Make sure you clicked "Save Changes". Adding an IP to the list without saving does not activate the rule.
Best Practices
- Add your own IP first before switching to whitelist mode.
- Prefer subnets (CIDR) over long lists of individual IPs when covering a known network.
- Use static IPs for allow rules where possible; dynamic IPs from home ISPs can change without notice.
- Combine with authentication: IP rules are a strong first layer, but keep proper application-level authentication in place too.
- Document your rules: Keep a note of why each IP or subnet is on the list so you can clean it up later.
Next Steps
After configuring IP access rules, continue securing and shaping your application traffic:
- Set up URL Redirects and Rewrites to route requests to the right place.
- Add Custom and Security Response Headers to harden your site.
- Review Security and Performance Settings for more access and performance controls.