Adding Custom and Security Response Headers
Learn how to attach custom HTTP response headers to your KloudBean application. Response headers let you harden your site against common web attacks, control caching, and pass extra metadata to browsers and clients. Headers are added at the web-server (nginx) level, so they apply to every response your site sends.
Overview
An HTTP response header is a key/value pair the server sends back with every response (for example X-Frame-Options: SAMEORIGIN). Browsers read these headers and change their behavior accordingly. With Header Rules you can:
- Add security headers that tell browsers how to protect your users (the most common use).
- Add caching headers to influence how responses are stored.
- Add custom metadata headers your application or clients rely on.
Each header rule has three parts:
- Header Name: The header key (letters, digits, and hyphens only), for example
X-Frame-Options. - Value: The header value, for example
SAMEORIGIN. - Apply to: When the header is sent — All responses or Successful only.
Prerequisites
Before adding header rules, ensure you have:
- An Active KloudBean Application: Your application must be created and running.
- Access to the Application Dashboard: You need to be logged in to your KloudBean account.
- The Headers You Want to Add: Know the header names and values you intend to set (see the recommended security headers below).
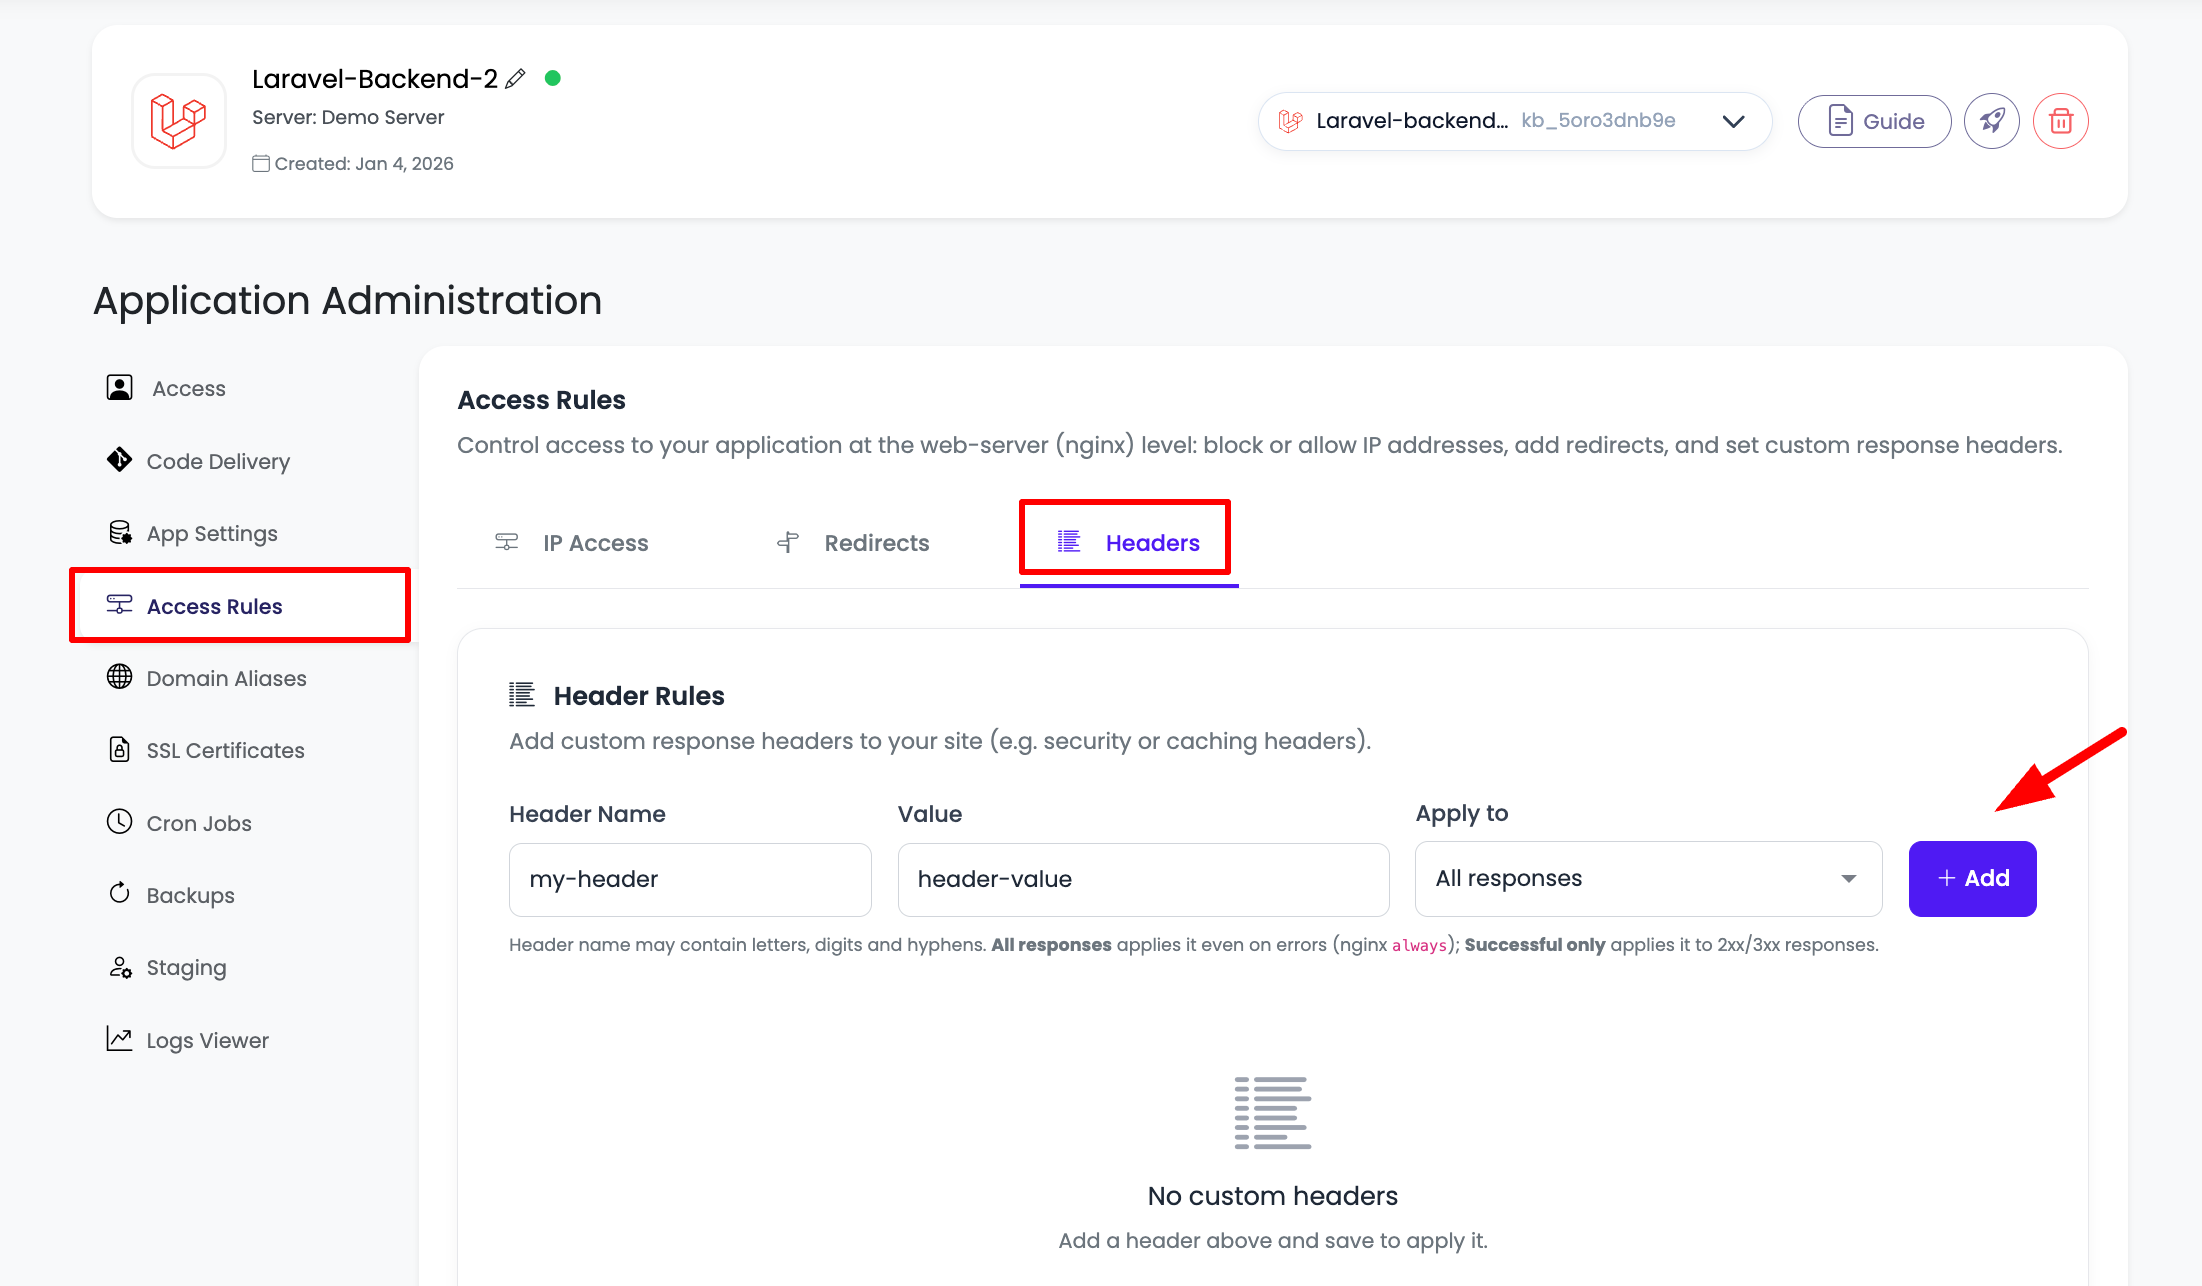
Accessing Header Rules
- Navigate to Application Administration: Log in to your KloudBean dashboard and open the application administration page for your desired application.
- Open Access Rules: In the left-hand menu, click "Access Rules".
- Select the Headers Tab: At the top of the Access Rules panel, click the "Headers" tab.
Adding a Header
The Headers tab provides three inputs — Header Name, Value, and Apply to — plus an Add button.
- Enter the Header Name: For example
X-Frame-Options. The name may only contain letters, digits, and hyphens. - Enter the Value: For example
SAMEORIGIN. - Choose Apply to:
- All responses: The header is sent on every response, including error pages (this uses nginx's
alwaysflag). - Successful only: The header is sent only on successful responses (2xx and 3xx status codes).
- All responses: The header is sent on every response, including error pages (this uses nginx's
- Click "Add": The header is added to the table below the form. Both name and value are required.
- Click "Save Changes": The header only takes effect once you save.
Adding a header to the list is not enough — click "Save Changes" to apply it. You can add several headers and save them all at once. For security headers, choose All responses so protection is applied even on error pages.
Managing Existing Headers
Saved headers appear in a table showing the Header, Value, and Apply to setting.
- Review: Confirm each header name and value is correct.
- Delete: Click the trash icon in the Actions column to remove a header.
- Save after changes: After adding or removing headers, click "Save Changes" to apply the updated set.
Security Headers
Security headers are one of the easiest, highest-impact ways to protect a web application. They instruct the browser to enforce protections that defend against attacks such as clickjacking, MIME-type sniffing, protocol downgrade, and cross-site scripting. Because they run in the browser, they add a strong layer of defense on top of your application code — and many security scanners and compliance checklists specifically look for them.
The screenshot below shows a recommended set of security headers configured together:
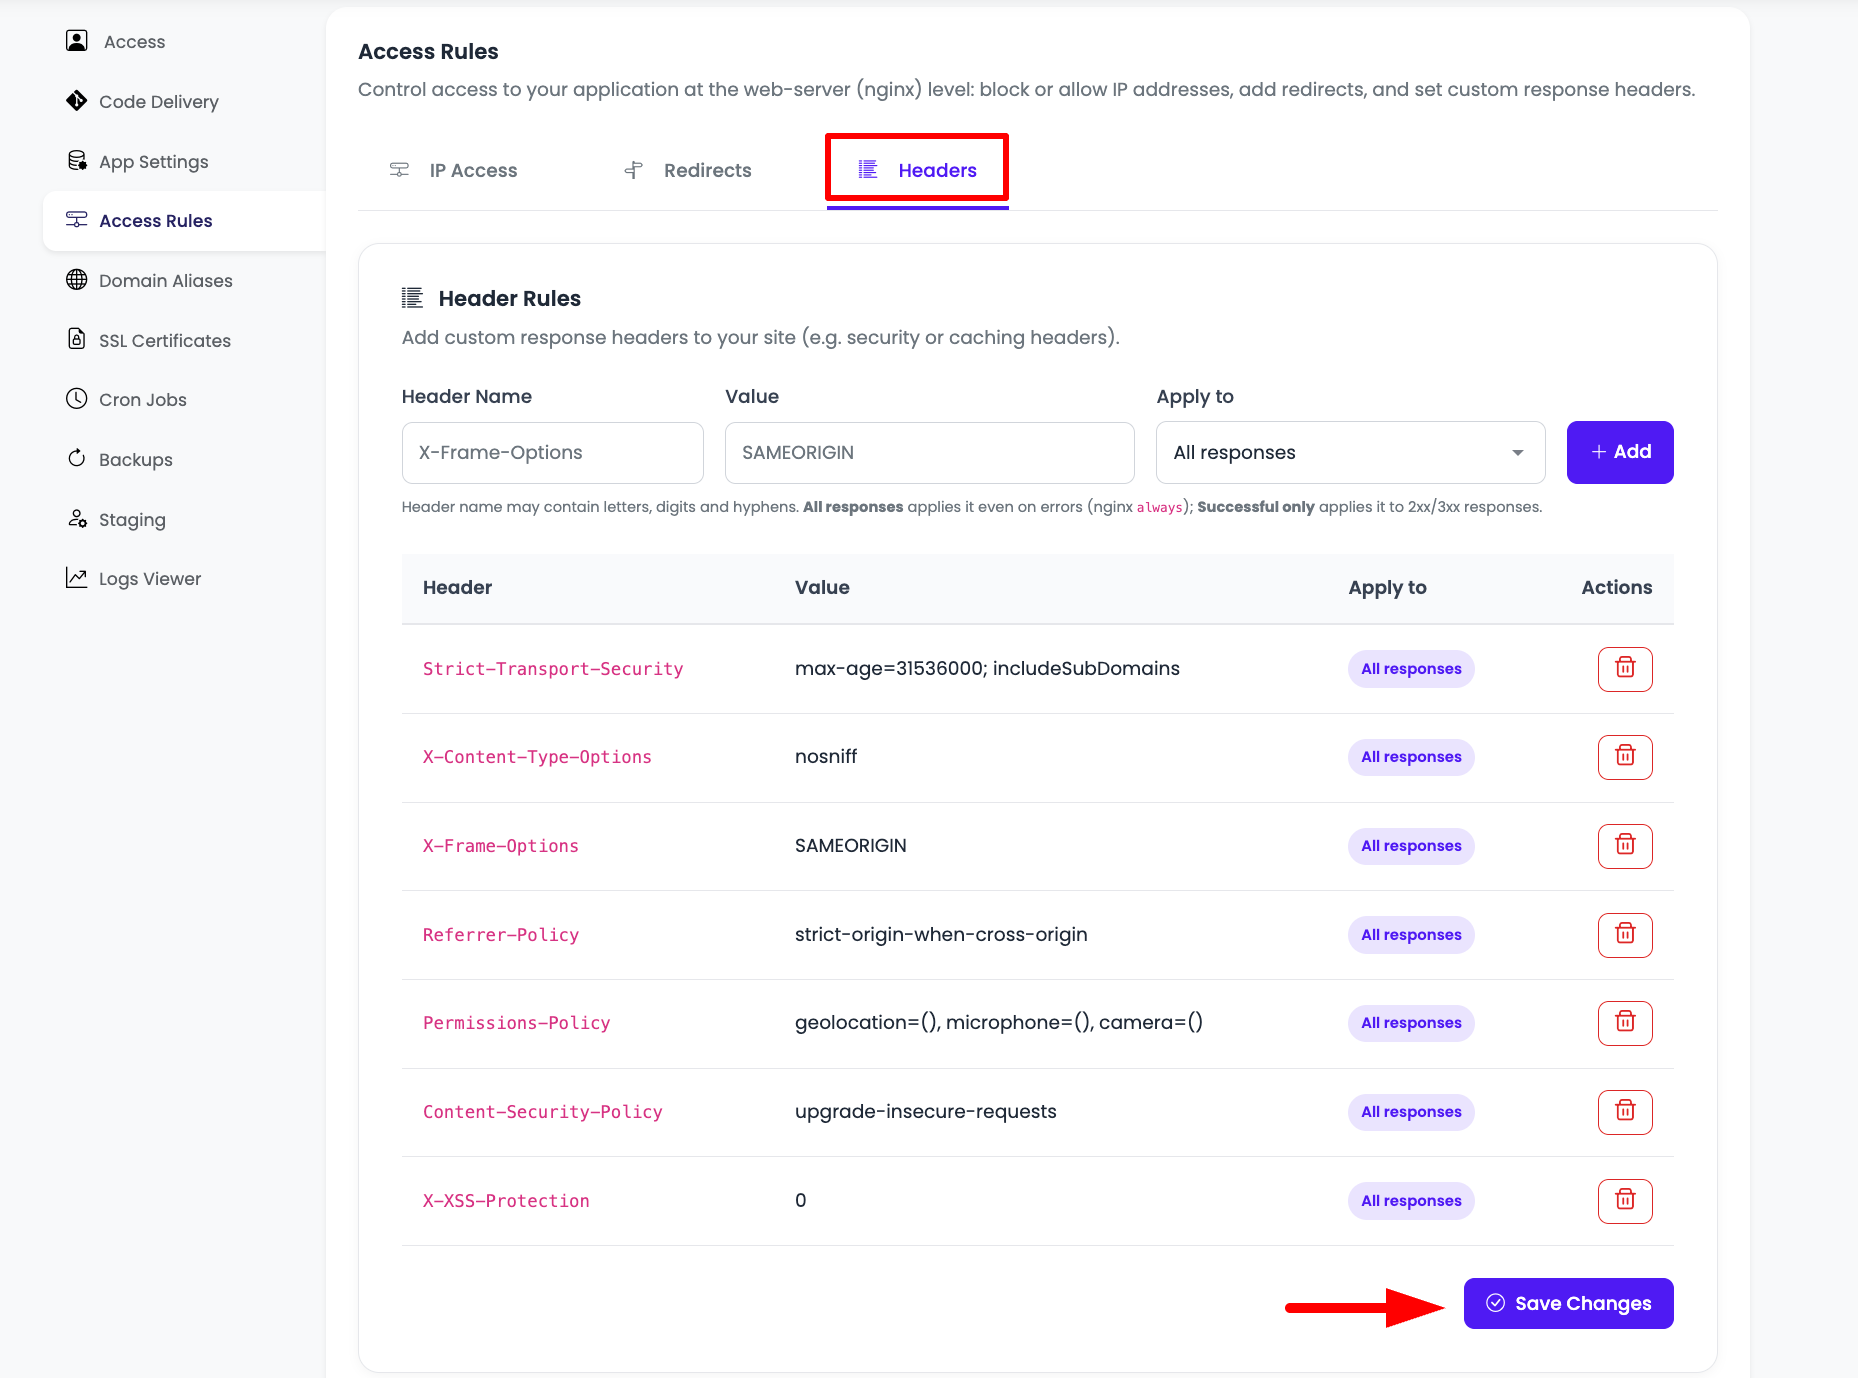
Add each of the following as its own header rule, set Apply to: All responses, and click "Save Changes".
Strict-Transport-Security (HSTS)
- Recommended value:
max-age=31536000; includeSubDomains - What it does: Forces browsers to only connect to your site over HTTPS for the specified duration (
max-agein seconds — here, one year).includeSubDomainsextends this to all subdomains. - Why it matters: Prevents protocol-downgrade and man-in-the-middle attacks where an attacker tries to force an insecure HTTP connection. Once a browser has seen this header, it refuses to talk to your site over plain HTTP.
Only add HSTS once you are confident your site (and any subdomains, if you use includeSubDomains) works fully over HTTPS. Browsers remember this setting for the whole max-age period, so serving over HTTP afterwards will fail. Make sure a valid SSL certificate is installed first — see Managing SSL Certificates.
X-Content-Type-Options
- Recommended value:
nosniff - What it does: Stops the browser from trying to guess ("sniff") the content type of a response and forces it to use the declared
Content-Type. - Why it matters: Prevents attacks where a file is served as one type but interpreted as another (for example, a malicious script disguised as an image).
X-Frame-Options
- Recommended value:
SAMEORIGIN - What it does: Controls whether your pages can be embedded in an
<iframe>on another site.SAMEORIGINallows framing only by pages on your own domain. - Why it matters: Defends against clickjacking, where an attacker embeds your site in a hidden frame and tricks users into clicking things they did not intend to.
Referrer-Policy
- Recommended value:
strict-origin-when-cross-origin - What it does: Controls how much referrer information (the page a user came from) is sent when they navigate away. This value sends the full URL for same-origin requests but only the origin for cross-origin requests, and nothing when downgrading from HTTPS to HTTP.
- Why it matters: Protects user privacy and prevents leaking sensitive URL data (such as tokens or IDs in the path) to third-party sites.
Permissions-Policy
- Recommended value:
geolocation=(), microphone=(), camera=() - What it does: Explicitly disables browser features your site does not use. The empty parentheses
()mean "allow no origin to use this feature." - Why it matters: Reduces your attack surface. If a page is compromised, an attacker still cannot request the camera, microphone, or location because the browser blocks those APIs outright. Add or remove features in the list based on what your app actually needs.
Content-Security-Policy (CSP)
- Recommended starting value:
upgrade-insecure-requests - What it does: CSP is a powerful policy that controls which sources of content (scripts, styles, images, etc.) the browser is allowed to load. The
upgrade-insecure-requestsdirective automatically upgrades anyhttp://resource references tohttps://. - Why it matters: A full CSP is one of the strongest defenses against cross-site scripting (XSS) and mixed-content issues.
upgrade-insecure-requestsis a safe starting point that eliminates mixed-content warnings.
A complete Content-Security-Policy (for example one that restricts script-src and style-src to specific domains) is very effective but must be tailored to your application, or it can block legitimate scripts and styles. Start with upgrade-insecure-requests, then build out a stricter policy and test it thoroughly before enforcing it in production.
X-XSS-Protection
- Recommended value:
0 - What it does: Disables the legacy XSS auditor that older browsers used.
- Why it matters: The old built-in XSS filter could itself introduce vulnerabilities and is deprecated in modern browsers. Setting it to
0is the current best practice — real XSS protection should come from a proper Content-Security-Policy instead.
Recommended Security Header Set
| Header | Value | Apply to |
|---|---|---|
Strict-Transport-Security | max-age=31536000; includeSubDomains | All responses |
X-Content-Type-Options | nosniff | All responses |
X-Frame-Options | SAMEORIGIN | All responses |
Referrer-Policy | strict-origin-when-cross-origin | All responses |
Permissions-Policy | geolocation=(), microphone=(), camera=() | All responses |
Content-Security-Policy | upgrade-insecure-requests | All responses |
X-XSS-Protection | 0 | All responses |
Verifying Your Headers
After saving, confirm the headers are being sent:
- Browser DevTools: Open your site, press F12, go to the Network tab, reload, click the main document request, and check the Response Headers section.
- Command line: Run
curl -I https://your-domain.comand look for your headers in the output. - Online scanners: Tools such as security-header scanners can grade your site and confirm each header is present.
Troubleshooting
- Header not appearing: Make sure you clicked "Save Changes". Also confirm the Apply to setting — a header set to "Successful only" will not show on error pages.
- Header name rejected: Header names may only contain letters, digits, and hyphens. Remove spaces, underscores, or other symbols.
- Value rejected: Values cannot contain double quotes (
") or line breaks. Rewrite the value without them. - Site broken after adding CSP: A strict Content-Security-Policy may block your own scripts or styles. Loosen the policy or start with just
upgrade-insecure-requests, then tighten gradually while testing. - Site unreachable over HTTP after HSTS: That is HSTS working as intended. Ensure HTTPS is fully functional; browsers will keep enforcing HTTPS until
max-ageexpires.
Best Practices
- Apply security headers to All responses so protection covers error pages too.
- Install SSL before enabling HSTS and confirm HTTPS works site-wide.
- Introduce CSP gradually, testing each change, since it can block legitimate resources.
- Only enable the browser features you need in
Permissions-Policy; disable the rest. - Verify after every change using DevTools,
curl, or an online header scanner. - Document your header set so your team knows why each one is configured.
Next Steps
After configuring your response headers, round out your application's access controls:
- Set up IP-based access rules to control who can reach the site.
- Configure URL Redirects and Rewrites to route requests.
- Install and manage SSL Certificates so HTTPS and HSTS work correctly.
- Review Security and Performance Settings for additional protections.