Adding Custom Domains
Learn how to add a custom domain to your static site hosted on KloudBean. This guide covers adding domains, configuring CNAME records, and making your domain live.
Overview
Once your static site is up and running, you can add a custom domain to use your own domain name instead of the default KloudBean URL. KloudBean provides automatic SSL certificate provisioning for your custom domains, ensuring secure HTTPS access.
Prerequisites
- An active static site on KloudBean that is fully initialized
- A domain name registered with a domain registrar
- Access to your domain registrar's DNS management panel
Adding Custom Domain
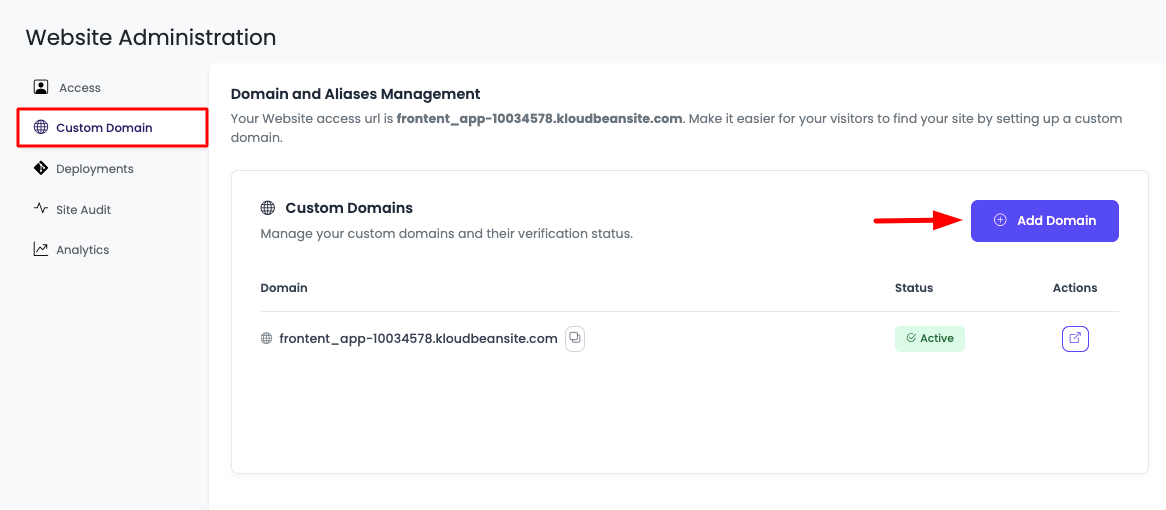
Step 1: Access Custom Domain Settings
In order to add a custom domain, navigate to "Website Administration" → "Custom Domain".
Here you will see current domains and an option to add a new domain. In order to add a domain, click on "Add domain".
Step 2: Enter Domain Name
It will open a prompt to insert the domain. Make sure to add the correct domain.
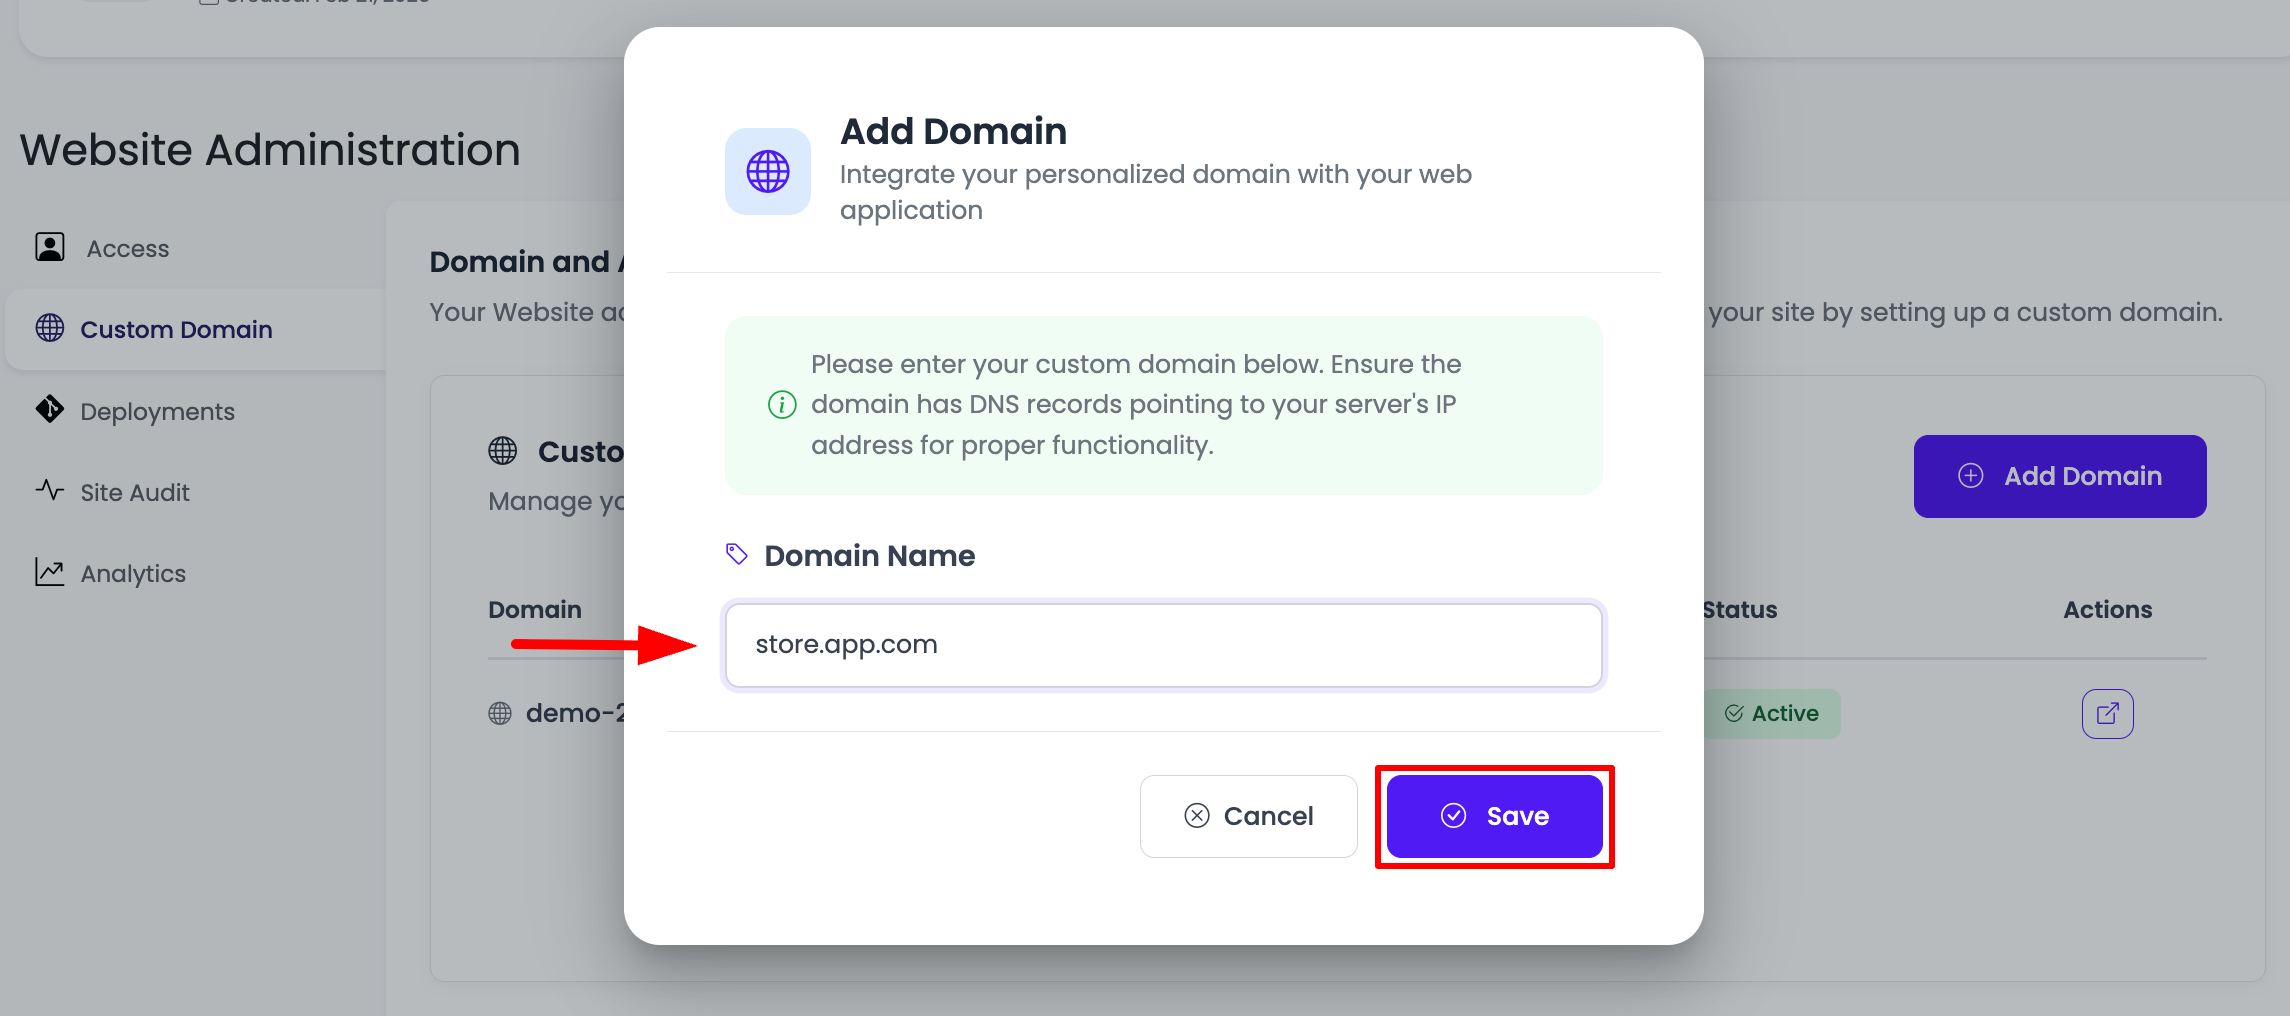
Once you have added the domain, click on the "Save" button, and your domain will be added.
Step 3: Domain Status
Once your domain is added, you will see it listed in the domain list, but currently, the status will be "Pending".
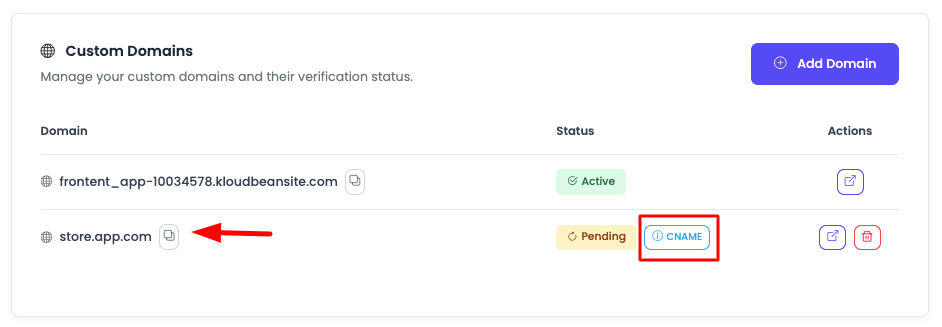
This means the domain has been added to KloudBean, but it's not yet live because DNS records need to be configured.
Configuring DNS Records
Step 4: Get CNAME Record Details
In order to make your new domain live, you have to add a CNAME record in your domain provider. Click on the "CNAME" button, and it will show you the value that you have to add.
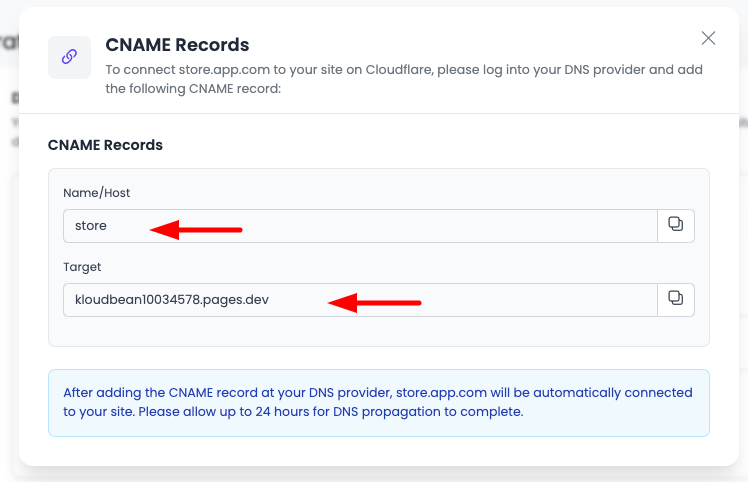
In the prompt, you will see:
- CNAME Records
- Name/Host: The hostname for your CNAME record
- Target: The target value to point your domain to
Step 5: Add CNAME Record at Domain Registrar
Go to your domain registrar and add a new CNAME record for your domain using the values provided:
-
Log in to Your Domain Registrar: Access your domain registrar's control panel (e.g., GoDaddy, Namecheap, Cloudflare, etc.)
-
Navigate to DNS Management: Find the DNS management or DNS settings section
-
Add CNAME Record:
- Record Type: Select CNAME
- Name/Host: Enter the name/host value from KloudBean (typically
@for root domain orwwwfor subdomain) - Target/Value: Enter the target value provided by KloudBean
- TTL: Use default or set to 3600
-
Save the Record: Save the CNAME record
Step 6: Wait for DNS Propagation
Once the CNAME record is added, wait for DNS propagation. DNS changes can take anywhere from a few minutes to 48 hours, though typically they propagate within a few hours.
- Check Propagation: You can use DNS checker tools to verify when your DNS changes have propagated globally
- Monitor Status: Return to KloudBean's Custom Domain section to monitor the status
- Status Update: Once DNS propagation is complete, the domain status will change from "Pending" to "Active" or "Live"
Once DNS propagation is complete, you should be able to access your site using your custom domain.
Root Domain Configuration
Special Consideration for Root Domains
If you have a root domain (e.g., example.com), some domain registrars like GoDaddy do not allow you to add a CNAME record directly to the root domain. This is because CNAME records cannot coexist with other record types (like MX records) at the root level.
Solution: Domain Forwarding
For registrars that don't support CNAME records at the root level, you can use domain forwarding:
-
Set Up Domain Forwarding:
- In your domain registrar's control panel, look for "Domain Forwarding" or "URL Forwarding" settings
- Set up forwarding from your root domain (e.g.,
example.com) to yourwwwsubdomain (e.g.,www.example.com) - Choose "Permanent Redirect" (301 redirect) for better SEO
-
Add CNAME for www Subdomain:
- Add a CNAME record for the
wwwsubdomain pointing to KloudBean's target - This is the recommended approach for root domains
- Add a CNAME record for the
-
Alternative: Use A Record (if provided):
- Some registrars may provide an A record option instead of CNAME
- If KloudBean provides an IP address, you can use an A record for the root domain
- However, CNAME is preferred as it's more flexible for load balancing
Recommended Setup
For best compatibility and SEO:
- Add CNAME for www:
www.example.com→ KloudBean target - Forward root domain:
example.com→www.example.com(301 redirect) - Access site via:
www.example.com(primary) andexample.com(redirects to www)
SSL Certificate
Once your domain is properly configured and DNS has propagated, KloudBean will automatically:
- Provision SSL Certificate: A free Let's Encrypt SSL certificate will be automatically provisioned
- Enable HTTPS: Your site will be accessible via HTTPS
- Auto-Renewal: The SSL certificate will automatically renew before expiration
The SSL provisioning typically takes 5-10 minutes after DNS propagation is complete.
Managing Multiple Domains
You can add multiple custom domains to a single static site:
- Each domain needs its own CNAME record configuration
- All domains will receive automatic SSL certificates
- All domains will serve the same site content
Troubleshooting
Domain Status Remains Pending
- Check DNS Records: Verify that the CNAME record was added correctly at your registrar
- Wait for Propagation: DNS changes can take up to 48 hours to propagate globally
- Verify Values: Double-check that the Name/Host and Target values match exactly what KloudBean provided
- Check TTL: Lower TTL values can help with faster propagation
Domain Not Accessible
- DNS Propagation: Wait for DNS propagation to complete
- Clear Browser Cache: Clear your browser cache and try again
- Test DNS: Use
digornslookupcommands to verify DNS resolution - Check Registrar: Ensure DNS changes were saved at your registrar
SSL Certificate Not Issued
- DNS Must Be Active: Ensure DNS has fully propagated before SSL provisioning
- Domain Must Be Accessible: The domain must resolve correctly
- Wait Time: Allow 5-10 minutes after DNS propagation for SSL provisioning
- Contact Support: If SSL doesn't provision after 24 hours, contact support
Best Practices
- Use www Subdomain: For root domains, use www subdomain with CNAME and forward root to www
- Verify DNS First: Complete DNS configuration before expecting the domain to work
- Wait for Propagation: Be patient with DNS propagation—it can take time
- Document Settings: Keep a record of your DNS settings for future reference
- Test After Setup: Test your domain after configuration to ensure it works correctly
- Monitor Status: Regularly check domain status in KloudBean dashboard
Next Steps
- Learn about managing deployments and site updates
- Explore site optimization and performance options
- Review site analytics and monitoring features