Using API Access
KloudBean's Platform API lets you access your account's resources programmatically — from scripts, CI pipelines, monitoring tools, or your own applications. This guide covers everything: creating an API token, choosing scopes, authenticating your requests, the available endpoints, and how to test them in Swagger.
Overview
The Platform API is a read-only, versioned API (currently v1) that returns information about your KloudBean resources such as servers, applications, managed databases, and deployments.
Access is controlled by personal API tokens. A token:
- Is a long-lived credential, separate from your browser login session.
- Is limited to the scopes you grant it (least-privilege by design).
- Is shown in full only once, at creation time.
- Can be rotated, revoked, or deleted at any time.
Both account owners and subusers can create and manage their own API tokens. Each user only sees and manages the tokens they created.
A subuser's token is automatically limited to that subuser's own permissions — it can only read the servers, applications, and databases the subuser has been granted access to in the console. It never grants more access than the subuser already has. An account owner's token can access all resources in the account.
Accessing the API Access Page
You can open the API Access page in two ways:
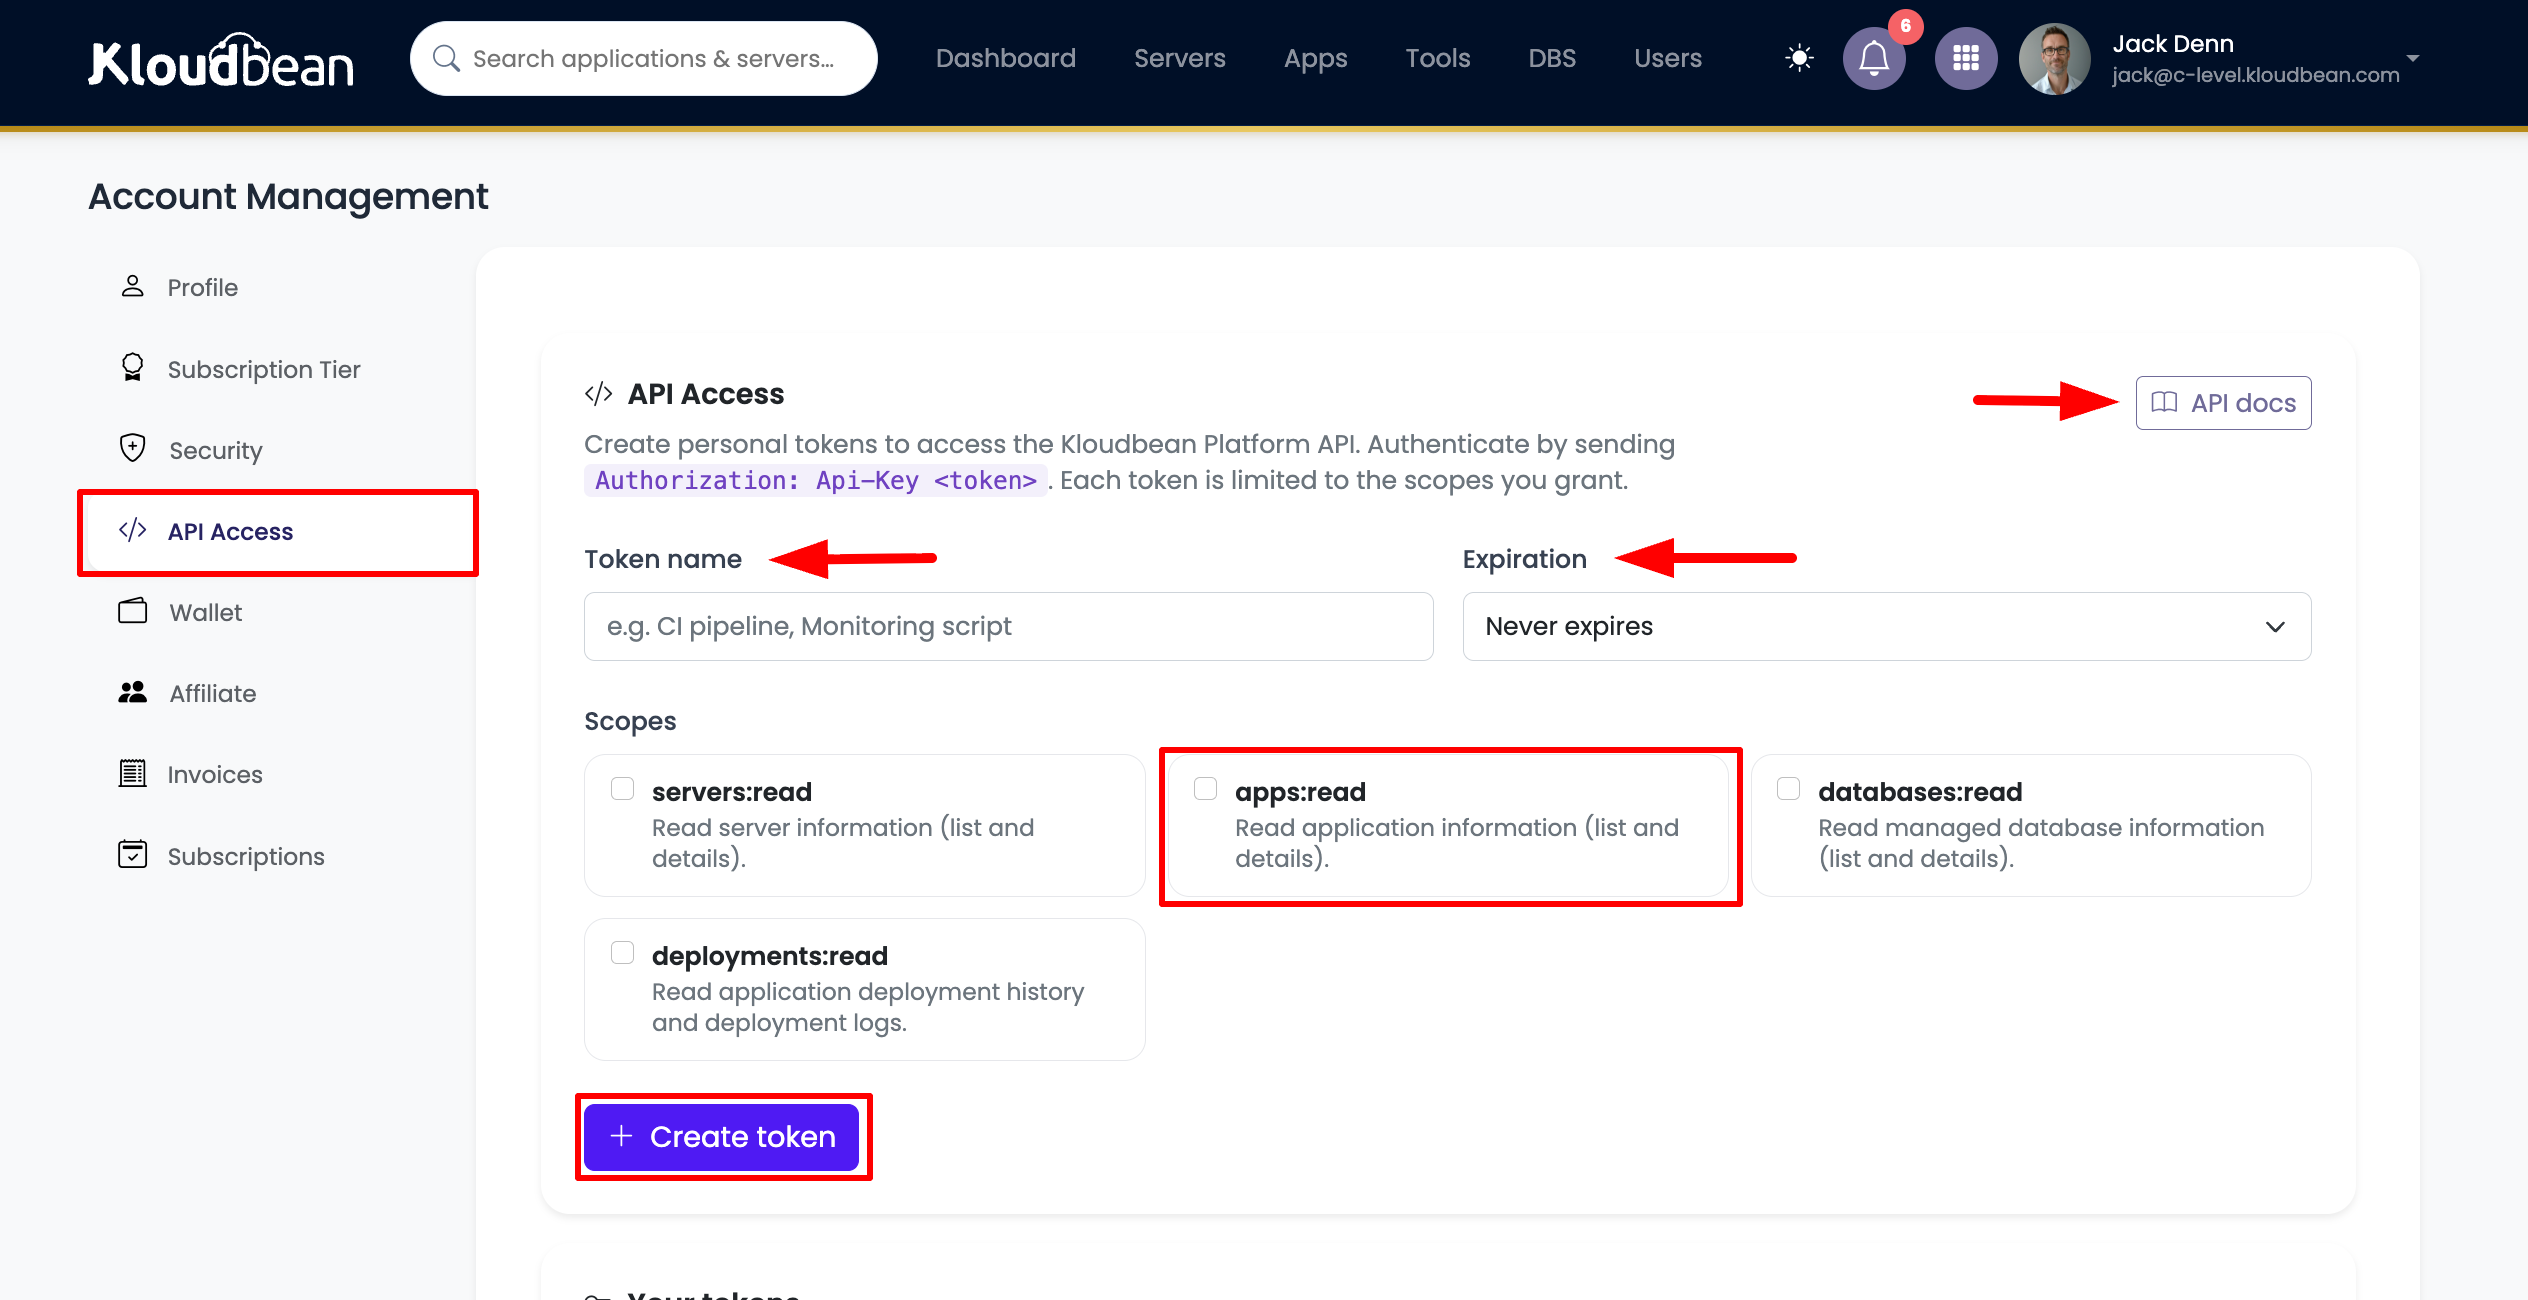
- From the account sidebar: Log in, go to Account, then click API Access in the left sidebar.
- From the top-right menu: Click your profile avatar in the top-right corner, then choose API Access.
The page has two parts: a Create a new token form, and a list of Your tokens.
Understanding Scopes
Scopes define exactly what a token is allowed to read. A token can only call an endpoint if it has been granted the matching scope. Grant only the scopes a token actually needs.
| Scope | What it allows |
|---|---|
servers:read | Read server information (list and details). |
apps:read | Read application information (list and details). |
databases:read | Read managed database information (list and details). |
deployments:read | Read application deployment history and deployment logs. |
The scope list on the create-token screen always reflects what the API currently supports. If new scopes are added, they'll appear automatically as options.
Creating an API Token
- Go to Account → API Access.
- In Create a new token, fill in the fields:
- Token name — a label to help you recognize it later (e.g.
CI pipeline,Monitoring script). - Expiration — choose Never expires, or 30 days, 90 days, or 1 year. An expiring token stops working automatically after the chosen period.
- Scopes — select one or more scope cards. You must pick at least one.
- Token name — a label to help you recognize it later (e.g.
- Click Create token.
- The full token is displayed once in a confirmation box. Click Copy and store it somewhere safe (a password manager or your CI secret store).
For security, KloudBean stores only a hashed version of your token and can never show the full value again. If you lose it, you'll need to rotate the token (which generates a new secret) or create a new one.
Token Format
A KloudBean API token looks like this:
kb_<prefix>_<secret>
kbidentifies it as a KloudBean token.<prefix>is a short, non-secret identifier used to display and look up the token.<secret>is the sensitive part — treat the whole string as a password.
In your token list, only the masked form (kb_<prefix>_••••••••) is ever shown.
Using the Token in a Request
Send the token in the Authorization header using the Api-Key scheme (note: this is different from the Bearer scheme used by the web console):
Authorization: Api-Key kb_<prefix>_<secret>
Example: list your servers with cURL
curl -H "Authorization: Api-Key kb_1a2b3c4d5e6f_XXXXXXXX...." \
  https://api-cloud-controller.kloudbean.com/api/v1/servers
Example: verify your token
The ping endpoint works with any valid token and confirms which account and scopes the token has:
curl -H "Authorization: Api-Key kb_1a2b3c4d5e6f_XXXXXXXX...." \
  https://api-cloud-controller.kloudbean.com/api/v1/ping
Response format
Every response is a JSON object with this shape:
{
  "data": [ ... ],
  "status": true,
  "error_message": null,
  "success_message": "Servers."
}
dataholds the result.statusistrueon success,falseon a handled error.error_message/success_messagedescribe the outcome.
Replace the host in the examples with your KloudBean API base URL, followed by /api/v1/. You can always find the exact base URL by opening the API docs link on the API Access page.
Available Endpoints (v1)
All endpoints are GET and read-only.
| Method & Path | Required scope | Description |
|---|---|---|
GET /api/v1/ping | any valid token | Verify the token; returns account and granted scopes. |
GET /api/v1/servers | servers:read | List your servers. |
GET /api/v1/servers/{id} | servers:read | Get a single server. |
GET /api/v1/apps | apps:read | List your applications. |
GET /api/v1/apps/{id} | apps:read | Get a single application. |
GET /api/v1/apps/{id}/deployments | deployments:read | List deployment history for an application. |
GET /api/v1/apps/{id}/deployments/{deploy_id}/logs | deployments:read | Get logs for a specific deployment. |
GET /api/v1/databases | databases:read | List your managed databases. |
GET /api/v1/databases/{id} | databases:read | Get a single managed database. |
A token only ever sees resources that belong to your account.
Testing in Swagger
KloudBean publishes interactive API documentation (Swagger UI) where you can try every endpoint from your browser.
1. Open the API docs
On the API Access page, click the API docs button. It opens the Swagger UI for the Platform API (at /api/v1/docs/), listing all available endpoints.
2. Authorize with your token
-
In the Swagger UI, click the Authorize button (top-right, usually with a padlock icon).
-
In the value field, enter your token using the
Api-Keyscheme — include the wordApi-Key, a space, then your token:Api-Key kb_<prefix>_<secret> -
Click Authorize, then Close.
You must include the Api-Key prefix (with a trailing space) before the token — for example Api-Key kb_1a2b3c4d5e6f_XXXX.... Pasting only the token, or using Bearer, will result in a 401 Unauthorized.
3. Try an endpoint
- Expand any endpoint (for example,
GET /api/v1/servers). - Click Try it out.
- Fill in any path parameters (such as
id) if required. - Click Execute.
- Swagger shows the exact request it sent and the live response from your account.
If you get a 403, your token is missing the scope that endpoint requires — create or rotate a token with the correct scope.
Managing Your Tokens
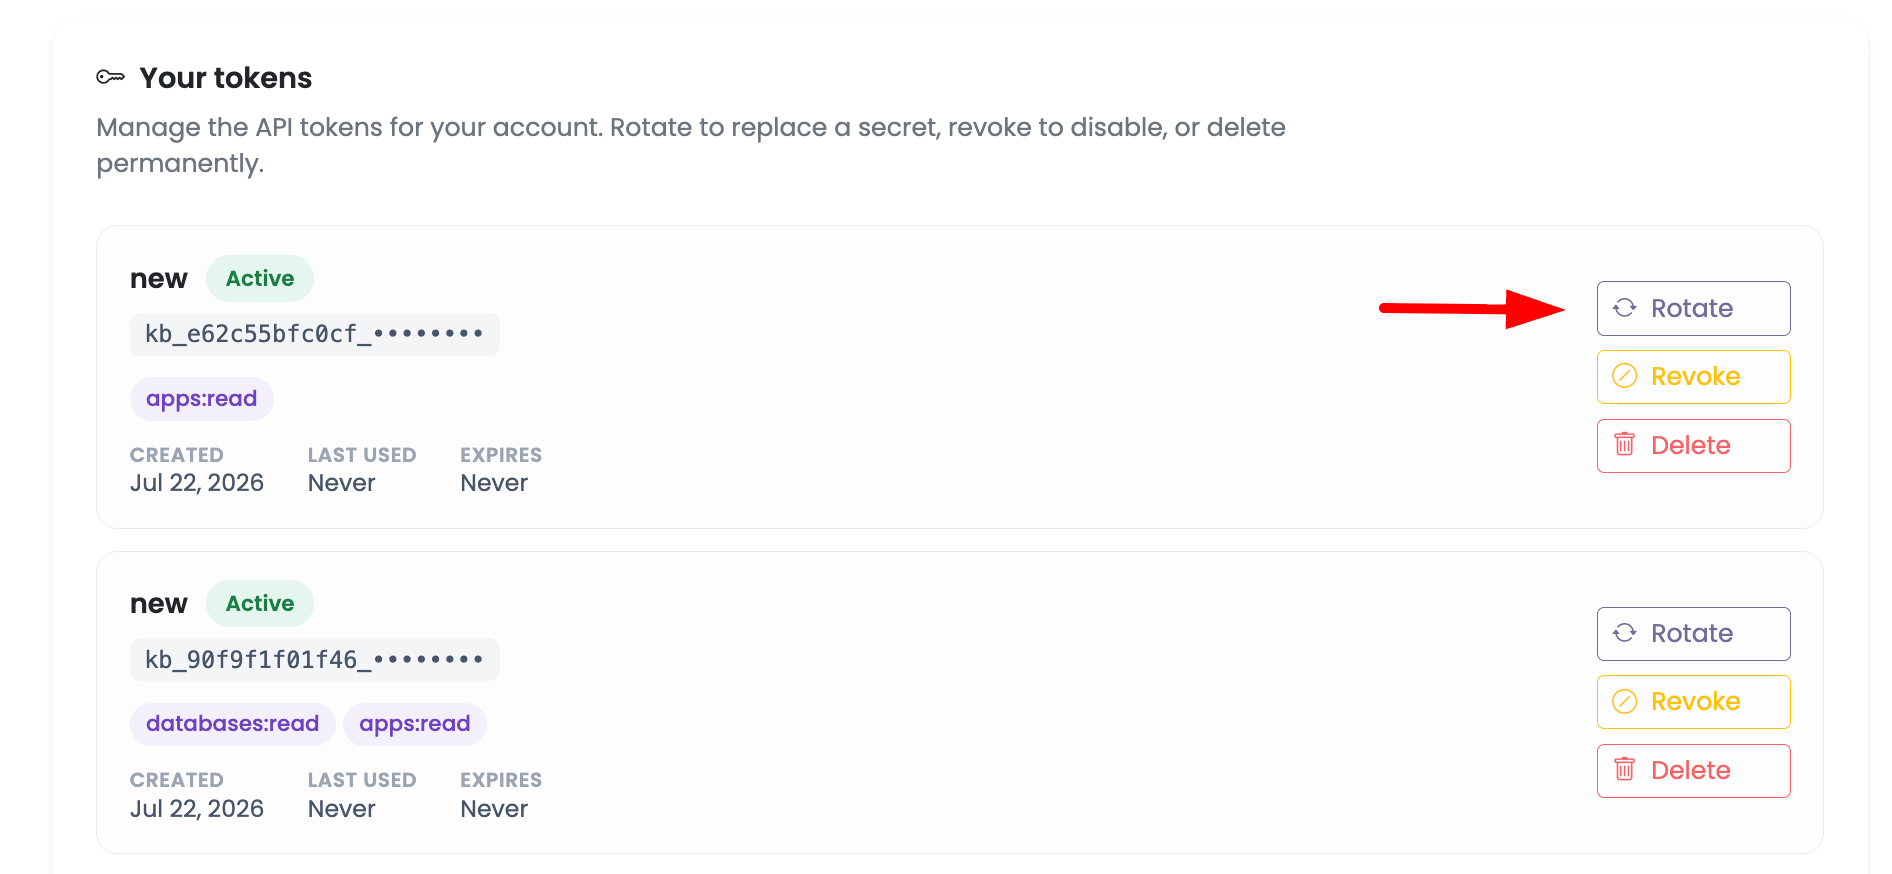
In the Your tokens list, each token shows its name, masked value, scopes, status, last-used time, and expiry. Available actions:
- Rotate — generates a brand-new secret for the token (same name and scopes). The old secret stops working immediately, and the new one is shown once. Use this if a token may have been exposed.
- Revoke — disables the token immediately without deleting it. It stays in the list marked as
revokedfor your records. - Delete — permanently removes the token.
Status values:
active— usable.revoked— disabled by you.expired— passed its expiration date.
Rate Limits
Each token has its own request budget (by default 1000 requests per hour), independent of your web session. If you exceed it, requests return 429 Too Many Requests until the window resets. Cache responses and avoid tight polling loops where possible.
Security Best Practices
- ✅ Grant minimal scopes: Only give a token the scopes it actually needs.
- ✅ Use separate tokens: Create a distinct token per integration (CI, monitoring, scripts) so you can revoke one without affecting the others.
- ✅ Store tokens securely: Keep them in a secret manager or your CI/CD secret store — never in source code, screenshots, or shared chats.
- ✅ Set an expiration: Use an expiry for short-lived or temporary integrations.
- ✅ Rotate on exposure: If a token might have leaked, rotate it immediately.
- ✅ Revoke unused tokens: Remove tokens you no longer use.
- ✅ Always use HTTPS: Send tokens only over secure connections, and only in the
Authorizationheader — never in a URL query string.
Troubleshooting
401 Unauthorized
- The token is missing, malformed, expired, or revoked.
- Ensure the header is exactly
Authorization: Api-Key <token>(with theApi-Keyprefix and a space). - Confirm the token status is
activeon the API Access page.
403 Forbidden
- The token is valid but lacks the scope required by that endpoint.
- Create or rotate a token that includes the needed scope (see the endpoints table above).
404 Not Found
- The resource ID doesn't exist or doesn't belong to your account.
429 Too Many Requests
- You've hit the per-token rate limit. Wait for the window to reset and reduce request frequency.
Next Steps
- Review Updating Account Security to protect the account behind your tokens.
- Learn about Managing Team Members if others need console access.