Adding Funds to Wallet
Learn how to add funds to your KloudBean wallet for convenient payment management and automatic subscription renewals.
Overview
The KloudBean wallet allows you to preload funds that can be used for automatic payments, subscription renewals, and service charges. Adding funds to your wallet provides convenience and ensures uninterrupted service.
Prerequisites
- An active KloudBean account
- Valid payment method
- Access to billing section
Understanding the Wallet
What is the Wallet?
The wallet is a prepaid balance system that:
- Stores Funds: Holds prepaid funds for your account
- Auto-Payment: Automatically pays for services
- Convenience: Simplifies payment management
- Flexibility: Use for various services
Wallet Benefits
- Automatic Payments: Funds used for auto-renewals
- No Interruptions: Prevents service interruptions
- Convenience: One-time funding, multiple uses
- Control: Better control over spending
- Budgeting: Easier budget management
Accessing Wallet
In order to view or manage your wallet:
- Click on Account from the right side of the top header on the dashboard
- From the dropdown menu, navigate to the Wallet section
- You'll be taken to the wallet management page
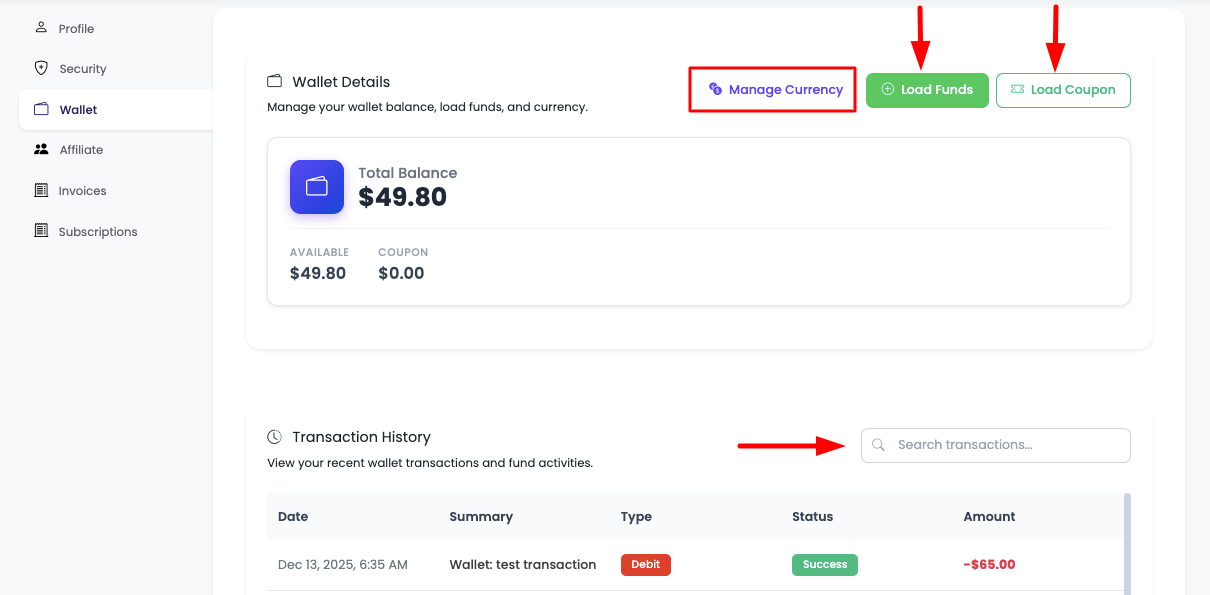
Wallet Section Overview
In the wallet section, you have the following options:
- View Wallet Balance: See your current wallet balance and balance details
- Load Funds: Add funds to your wallet for future use
- Load Coupon: Apply discount or promotion codes
- Update Currency: Change your wallet currency settings
- View Historical Transactions and Payments: Access complete transaction history
Loading Funds to Wallet
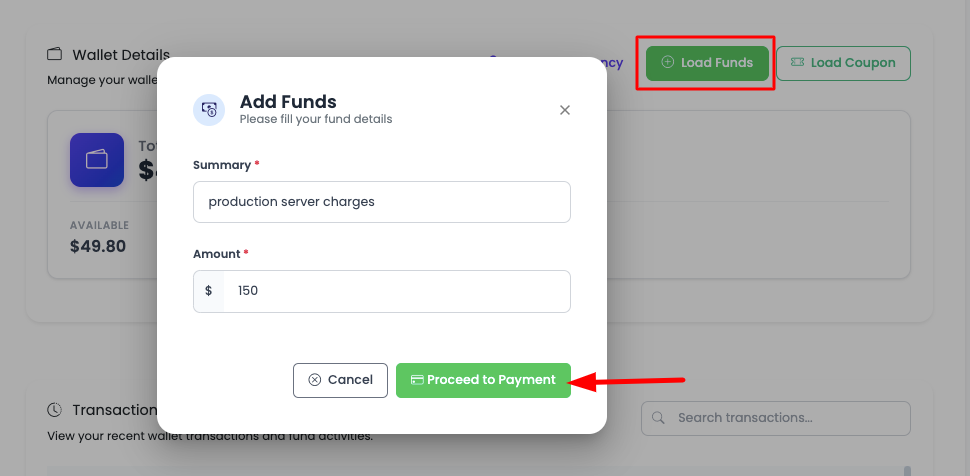
Steps to Load Funds
If you intend to load funds into your wallet:
-
Click Load Funds Button:
- Click on the "Load Funds" button in the wallet section
- This will open the fund loading interface
-
Add Funds Summary:
- Review the funds summary information
- Understand the amount you're adding and any applicable fees
-
Enter Amount:
- Enter the amount you want to add to your wallet
- Minimum and maximum amounts may apply
- The amount will be displayed in your selected currency
-
Proceed to Payment:
- Click "Proceed to Payment" button
- This will take you to the Stripe payment session
Stripe Payment Session
After clicking "Proceed to Payment":
- Stripe Checkout: You'll be redirected to a secure Stripe payment session
- Enter Payment Details:
- Add your card information
- Complete the payment form
- Complete Checkout:
- Review the payment amount
- Confirm and complete the checkout session
- Instant Funds:
- Once the checkout session is complete, you will instantly see funds in your wallet
- Funds are immediately available to spend on any KloudBean service
- No waiting period - use funds right away
Wallet Auto-Payment
Enabling Auto-Payment
- Auto-Payment Settings: Go to auto-payment settings
- Enable Auto-Payment: Toggle auto-payment on
- Low Balance Alert: Set low balance threshold
- Auto-Top Up: Enable automatic top-up when low
Auto-Top Up Configuration
- Threshold: Set minimum balance threshold
- Top-Up Amount: Amount to add when threshold reached
- Payment Method: Select payment method for auto-top up
- Save Settings: Apply auto-top up configuration
Low Balance Alerts
- Alert Threshold: Set balance alert threshold
- Alert Method: Choose alert method (email, SMS)
- Alert Frequency: How often to receive alerts
- Save Alerts: Configure alert settings
Viewing Wallet Transactions
Transaction History
- History Tab: Go to transaction history
- View Transactions: See all wallet transactions
- Transaction Details:
- Transaction date
- Transaction type (add, use, refund)
- Amount
- Status
- Description
Filtering Transactions
-
Date Range: Filter by date range
-
Transaction Type: Filter by type
- All transactions
- Funds added
- Funds used
- Refunds
-
Status: Filter by status
-
Search: Search transactions
Using Loaded Funds
After funds are added to your wallet:
- Immediate Availability: Funds are available immediately after payment
- Use for Services: Spend on any KloudBean service (servers, applications, databases, etc.)
- Automatic Payments: Wallet balance is automatically used for subscription renewals
- No Expiration: Funds don't expire and remain in your wallet until used
Best Practices
- Maintain Balance: Keep sufficient balance
- Set Alerts: Configure low balance alerts
- Enable Auto-Top Up: Use auto-top up for convenience
- Monitor Usage: Regularly check wallet usage
- Review Transactions: Review transaction history
- Budget Planning: Plan wallet funding based on usage
- Secure Payment: Use secure payment methods
Troubleshooting
Funds Not Appearing
- Check Payment Status: Verify payment was successful in Stripe
- Refresh Page: Try refreshing the wallet page
- Check Email: Look for payment confirmation email
- Contact Support: Reach out to support if funds don't appear after 5 minutes
Payment Issues
- Card Declined: Check card details and available funds
- Payment Failed: Verify payment method is valid
- Contact Support: Reach out to 24/7 support for payment assistance
Next Steps
- Learn about Managing Subscriptions
- Explore Updating Currency Settings
- Review Viewing Subscriptions