Restoring Database from Backup
Learn how to restore your database from backup on KloudBean. KloudBean provides very easy steps and efficient way to restore your database from backup.
Overview
KloudBean provides a very easy steps and efficient way to restore your database from backup.
Key Features:
- Easy Restoration: Simple and straightforward restore process
- Anytime Restore: You can restore database anytime to any available backups
- Restore to New Instance: You can restore database to a new instance (for this option you should have premium support package enabled)
- Point-in-Time Recovery: Restore to any available backup point
- Efficient Process: Fast and reliable restoration process
Why Restore from Backup:
- Data Recovery: Recover from data loss or corruption
- Accidental Deletion: Restore accidentally deleted data
- System Failures: Recover from system failures or crashes
- Testing: Create test environments from production backups
- Migration: Migrate to new infrastructure
Prerequisites
- An active database instance on KloudBean
- Existing database backups
- Admin access to your KloudBean account
- Understanding of restore implications
- (For restore to new instance) Premium support package enabled
Important Precautions Before Restoring
Critical Warnings
You should be careful with this process.
Why This Process Requires Caution:
- Data Overwrite: Restoring will overwrite your current database data
- Irreversible: Once restored, current data cannot be recovered (unless you have a backup)
- Downtime: Database will be locked during restoration
- Application Impact: Applications using the database will be affected
- Service Disruption: May cause service disruption during restore
Pre-Restore Checklist
Before starting the restore process, take these precautions:
-
Backup Current Database:
- Create Safety Backup: Take a backup of your current database before restoring
- Why: In case you need to revert the restore
- When: Always before any restore operation
- How: Use KloudBean backup feature to create a backup
-
Verify Backup Selection:
- Check Backup Date: Verify the backup date is correct
- Verify Backup Integrity: Ensure the backup is valid and complete
- Review Backup Details: Check backup size and information
- Confirm Backup: Double-check you're selecting the right backup
-
Notify Stakeholders:
- Inform Team: Notify your team about the restore operation
- Schedule Downtime: Plan for database downtime
- User Communication: Inform users if services will be affected
- Maintenance Window: Schedule during low-traffic periods if possible
-
Application Preparation:
- Stop Applications: Stop applications that use the database (if possible)
- Close Connections: Close all database connections
- Save Work: Ensure all important work is saved
- Backup Application Data: Backup any application-specific data
-
Verify Restore Requirements:
- Restore Point: Confirm the restore point is correct
- Data Loss: Understand what data will be lost (data after backup date)
- Recovery Plan: Have a plan for after restore
- Rollback Plan: Prepare a rollback plan if restore fails
-
Check Database Status:
- Database Health: Verify database is in good health
- Storage Space: Ensure sufficient storage for restore
- Resource Availability: Check resources are available
- Network Connectivity: Verify network connectivity
What Happens During Restore
Understanding the Restore Process:
- Database Lock: Database will be locked during restoration
- No Access: You cannot access the database while restoring
- Time Required: Restoration time depends on database size
- Automatic Process: Restoration is automatic once started
- Progress Tracking: You can monitor restore progress
Database Lock State:
- Locked Status: Database will show as "locked" in dashboard
- No Operations: No database operations can be performed
- Wait for Completion: Must wait for restore to complete
- Automatic Unlock: Database unlocks automatically when restore completes
Accessing Database Backups
Step 1: Navigate to Backups Tab
In order to restore database from backup, navigate to Database Administration → "Backups" tab.
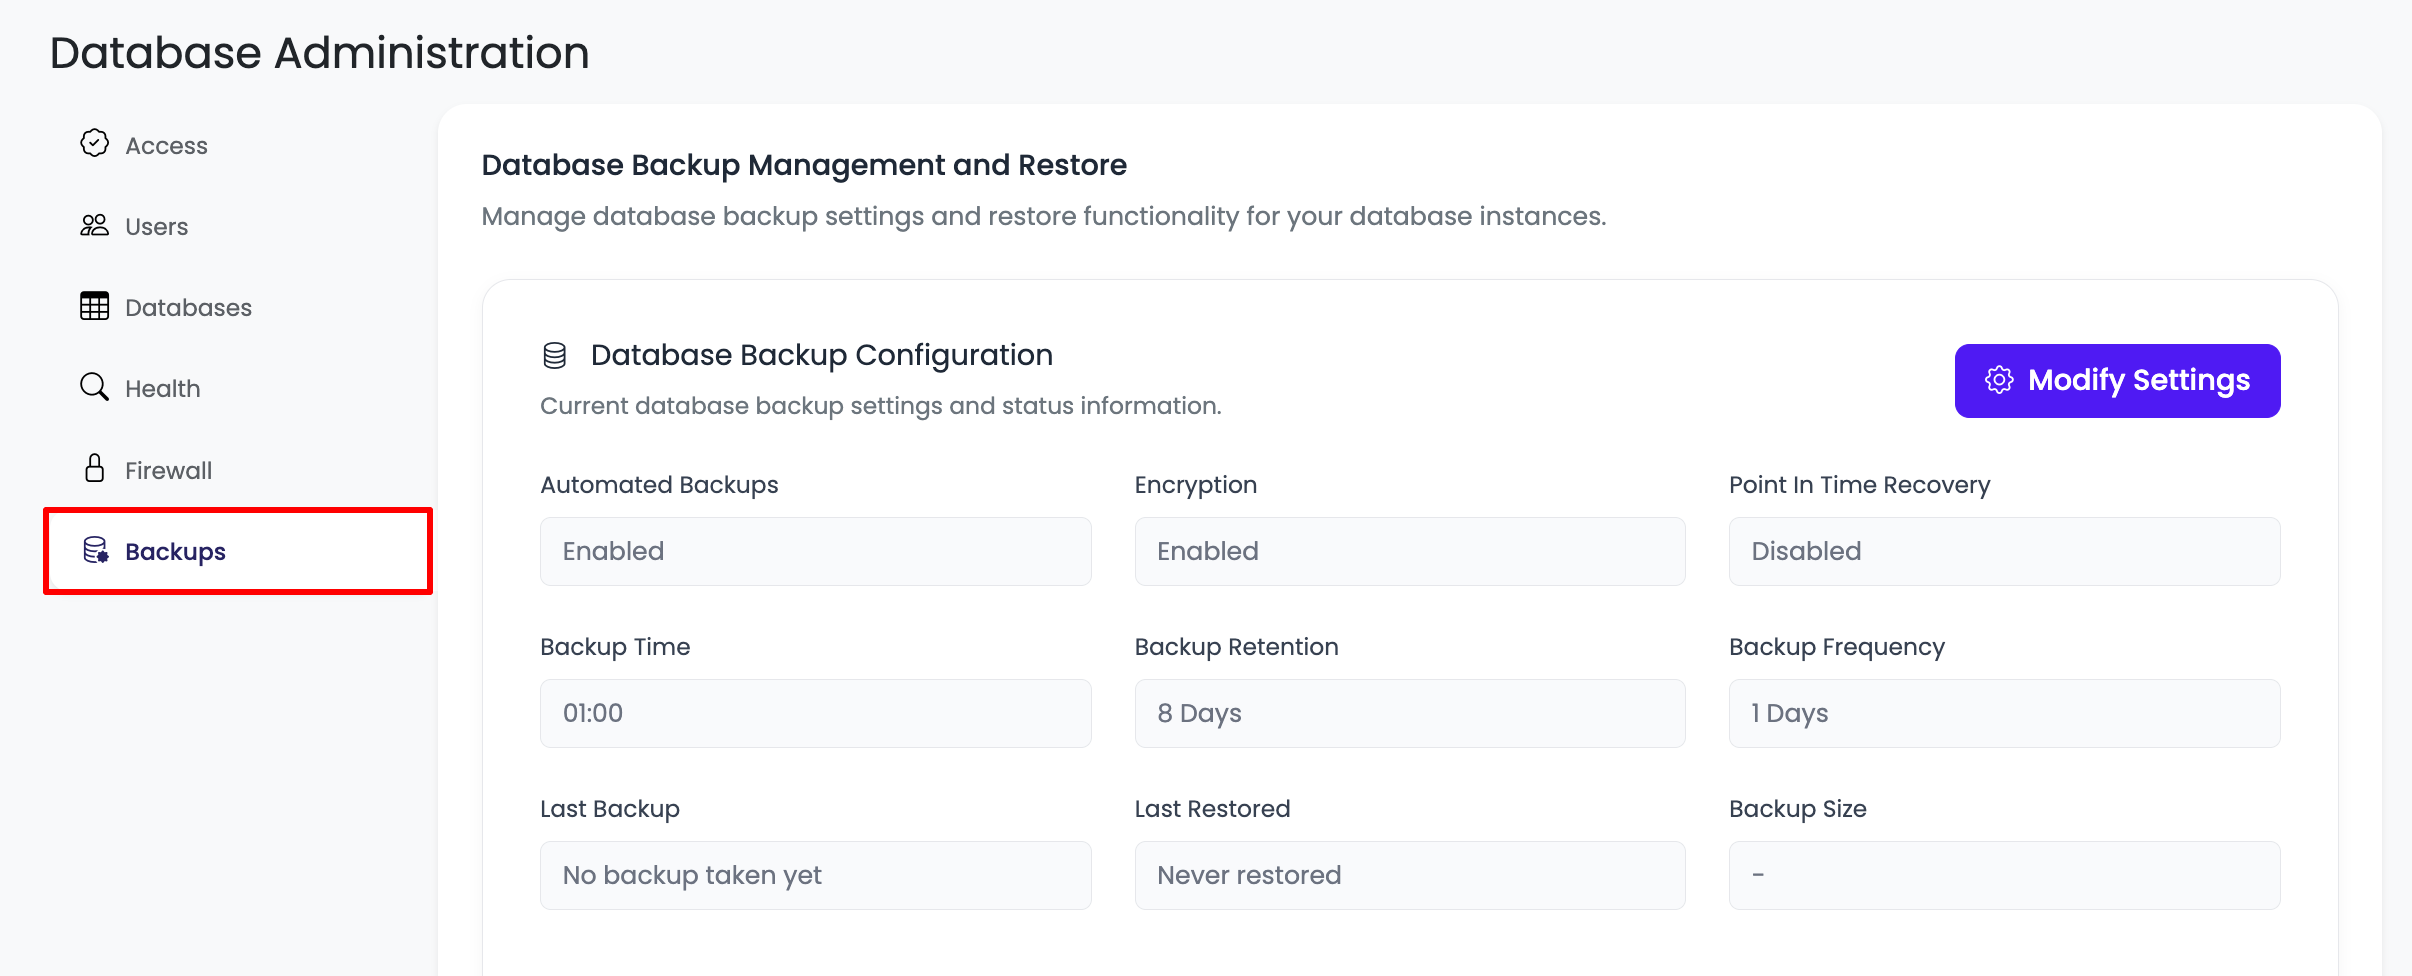
Steps:
- Log in to your KloudBean dashboard
- Navigate to Databases: Go to the Databases section
- Select Your Database: Click on your database instance
- Go to Backups: Navigate to "Backups" tab in database administration
Step 2: View Database Backup History
On this tab scroll down to section "Database Backup History".
This is where you will see all the backups available along with detail.
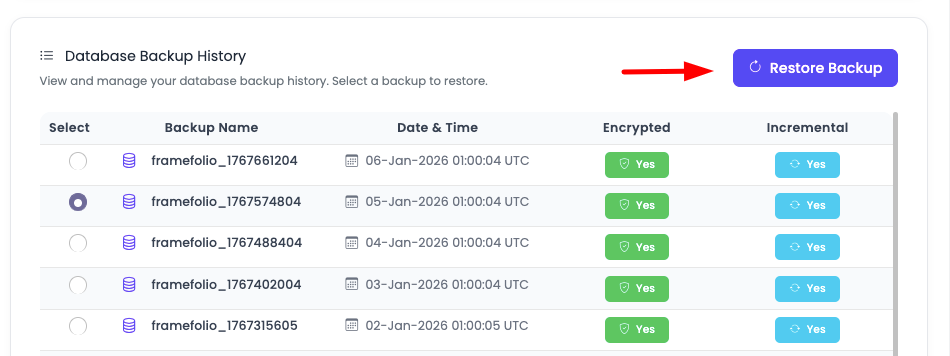
Backup Information Displayed:
Backup Name:
- Unique identifier for each backup
- Helps identify and select the correct backup
- Usually includes date/time information
Date & Time:
- When the backup was created
- Helps you choose the right restore point
- Format: Date and time of backup creation
Additional Information (may be displayed):
- Backup Size: Size of the backup file
- Backup Status: Status of the backup (success, failed, etc.)
- Backup Type: Type of backup (full, incremental, etc.)
- Storage Location: Where backup is stored
Selecting the Right Backup:
- Review All Backups: Review all available backups
- Check Dates: Verify backup dates match your restore needs
- Latest Backup: Most recent backup for latest data
- Specific Date: Choose backup closest to desired restore point
- Verify Details: Double-check backup details before selecting
Performing Database Restore
Step 1: Select Backup to Restore
Select the backup which you want to restore and click on "Restore backup" button.
Selection Process:
- Review Backups: Review all available backups in the list
- Choose Backup: Click on the backup you want to restore
- Verify Selection: Double-check backup date and details
- Click Restore: Click on "Restore backup" button
Important: Make sure you've selected the correct backup. Once restore starts, you cannot cancel it easily.
Step 2: Confirm Restore Operation
Once you click, it will ask for confirmation.
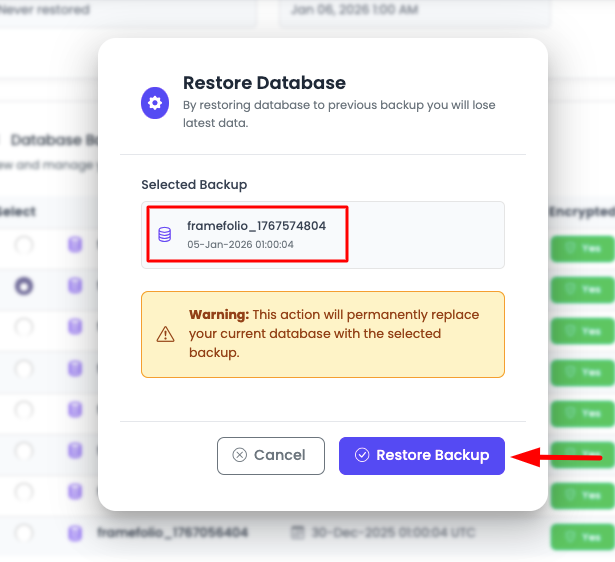
Confirmation Dialog:
- Warning Message: Warning about data loss and database lock
- Backup Details: Shows which backup will be restored
- Confirmation Required: You must confirm to proceed
- Cancel Option: Option to cancel if needed
Before Confirming:
- Double-Check Backup: Verify you selected the correct backup
- Understand Impact: Understand that current data will be overwritten
- Ready for Downtime: Be prepared for database downtime
- Safety Backup: Ensure you have a backup of current data
Confirm and Proceed:
- Read Warning: Carefully read the warning message
- Confirm Selection: Confirm you want to proceed
- Click Confirm: Click confirm button to start restore
Step 3: Restore Process
Confirm and then restoring process will start.
Restore Process:
- Automatic Start: Restoration starts automatically after confirmation
- Progress Tracking: You can monitor restore progress
- Status Updates: Status updates are shown during restore
- Time Required: It will take some time depending upon your database size
Database Lock State:
- Locked Status: Until restoring, your database from dashboard will remain in lock state
- No Access: You cannot access the database during restore
- Operations Blocked: All database operations are blocked
- Wait Required: You must wait for restore to complete
What to Expect:
- Progress Indicator: Progress bar or status indicator
- Estimated Time: Estimated time remaining (if available)
- Status Messages: Status messages during restore
- Completion Notification: Notification when restore completes
Restore Duration Factors:
- Database Size: Larger databases take longer to restore
- Backup Size: Size of the backup file
- Network Speed: Network speed for offsite backups
- Server Resources: Available server resources
- Complexity: Database complexity and structure
Typical Restore Times (approximate):
- Small Database (< 1GB): 5-15 minutes
- Medium Database (1-10GB): 15-60 minutes
- Large Database (10-100GB): 1-4 hours
- Very Large Database (100GB+): 4+ hours
Step 4: Restore Completion
After Restore Completes:
- Unlock Database: Database automatically unlocks
- Access Restored: You can access the database again
- Verification: Verify restore was successful
- Test Database: Test database functionality
Post-Restore Verification:
- Connect to Database: Connect and verify access works
- Check Data: Verify data is restored correctly
- Test Queries: Run test queries to verify functionality
- Check Applications: Test application connections
- Verify Schema: Check database structure is correct
Restore Options
Restore to Same Instance
Default Option: Restore to the same database instance.
What Happens:
- Overwrite Data: Current database data is overwritten
- Same Instance: Database is restored to the same instance
- Immediate Effect: Changes take effect immediately
- No New Instance: No new database instance is created
Use Cases:
- Data Recovery: Recover from data loss or corruption
- Accidental Deletion: Restore accidentally deleted data
- System Failure: Recover from system failures
- Rollback: Rollback to previous state
Restore to New Instance
You can restore database to a new instance (for this option you should have premium support package enabled).
What This Means:
- New Database: Creates a new database instance
- Premium Support: Requires premium support package
- Original Unchanged: Original database remains unchanged
- Separate Instance: New instance is completely separate
Benefits:
- Safety: Original database remains untouched
- Testing: Test restore without affecting production
- Comparison: Compare restored data with current data
- Migration: Use for database migration
How to Use:
- Contact Support: Reach out to KloudBean support
- Request Restore: Request restore to new instance
- Provide Details: Provide backup details and requirements
- Support Assistance: KloudBean support will assist with restore
Best Practices
Before Restore
- Always Backup First: Create a backup of current database before restoring
- Verify Backup: Verify backup integrity before restoring
- Choose Right Backup: Select the correct backup for your needs
- Plan Downtime: Schedule restore during maintenance window
- Notify Team: Inform team about restore operation
- Review Precautions: Review all precautions before starting
During Restore
- Monitor Progress: Monitor restore progress
- Be Patient: Don't interrupt the restore process
- Wait for Completion: Wait for restore to complete
- Don't Cancel: Avoid canceling restore unless absolutely necessary
- Check Status: Regularly check restore status
After Restore
- Verify Restore: Always verify restore was successful
- Test Database: Test database functionality thoroughly
- Check Applications: Verify applications work correctly
- Monitor Performance: Monitor database performance
- Document Restore: Document restore details and results
General Practices
- Regular Backups: Ensure regular backups are configured
- Test Restores: Periodically test restore procedures
- Documentation: Keep records of restore operations
- Training: Train team on restore procedures
- Emergency Plan: Have an emergency restore plan ready
Troubleshooting
Restore Takes Too Long
If restore is taking longer than expected:
- Check Database Size: Verify database size matches expected restore time
- Monitor Progress: Check restore progress regularly
- Be Patient: Large databases take time to restore
- Check Resources: Verify server resources are available
- Contact Support: Contact KloudBean support if restore seems stuck
Restore Fails
If restore fails:
- Check Backup: Verify backup is valid and complete
- Review Logs: Check restore logs for error messages
- Storage Space: Verify sufficient storage space is available
- Retry Restore: Try restoring again
- Contact Support: Contact KloudBean support for assistance
Database Remains Locked
If database remains locked after restore:
- Wait Longer: Restore may still be in progress
- Check Status: Verify restore status in dashboard
- Refresh Dashboard: Refresh dashboard to see latest status
- Contact Support: Contact KloudBean support if locked for extended period
Data Not Restored Correctly
If data doesn't match expectations:
- Verify Backup Date: Ensure you selected the correct backup
- Check Restore Logs: Review restore logs for errors
- Compare Data: Compare restored data with backup details
- Re-restore: Try restoring again if needed
- Contact Support: Contact KloudBean support for assistance
Security Considerations
Access Control
- Authorized Access Only: Only authorized personnel should perform restores
- Audit Trail: Restore operations are logged for audit
- Confirmation Required: Confirmation prevents accidental restores
- Access Management: Control who can access restore features
Data Protection
- Backup Encryption: Backups are encrypted (automatic)
- Secure Restore: Restore process is secure
- Data Integrity: Verify data integrity after restore
- Compliance: Restore process meets compliance requirements
Next Steps
After restoring your database:
- Learn about Configuring Database Backup Settings to manage backups
- Review Monitoring Database Server Health to track database performance
- Explore Controlling Database Access for access management