In this article, users will learn how to easily launch a Flexible Load Balancer (FLB) within Kloudbean and point it to applications running on different cloud providers. The FLB eliminates the challenges often encountered in traditional load balancing setups, allowing for a seamless configuration with minimal effort. The step-by-step guide walks users through the process of creating and managing their load balancer, ensuring their application traffic is automatically distributed across multiple servers. With Kloudbean's intuitive platform, businesses of all sizes can streamline their infrastructure without the need for complex technical setups.
Why Kloudbean's load balancer is called Flexible?
Kloudbean’s Flexible Load Balancer (FLB) earns its name due to its ability to offer high flexibility in managing traffic and optimizing application performance across various environments. Here are the key reasons why:
1. Support for Multiple Cloud Providers
Kloudbean's Flexible Load Balancer allows you to direct traffic to servers hosted on any of the 7 cloud providers offered within the platform, regardless of the provider's location or the size of the machine. This flexibility removes the limitations often imposed by using a single cloud provider or region, ensuring greater reliability, stability, and availability for your application. By spreading resources across multiple providers and regions, the risk of downtime due to dependency on a single cloud provider is minimized, enhancing the overall trustworthiness of your application’s infrastructure.
2. Multiple Virtual Load Balancers on a Single Server
With Kloudbean's FLB, you can configure multiple virtual load balancers on a single physical load balancer server. This allows users with multiple applications, such as a frontend and backend in a JAMstack architecture, to efficiently manage all their services without purchasing separate load balancers for each one. This feature is particularly beneficial for agencies managing numerous client applications, as it provides a cost-effective solution to load balancing. Instead of maintaining multiple physical load balancers, agencies can consolidate traffic management for all their clients into one machine with multiple virtual load balancers, optimizing both cost and resource allocation.
3. Simplified Setup and Endpoint Pool Management
Setting up and configuring a traditional load balancer can be a complex and time-consuming task, often requiring specialized DevOps or cloud engineering expertise. However, Kloudbean’s FLB simplifies the process significantly, offering an intuitive, one-click setup that can be managed entirely through a user-friendly interface. Whether you're adding applications or updating the load balancer’s endpoint pool, the entire process is streamlined and hassle-free, making it accessible even to users with little or no background in cloud infrastructure management. This ease of use makes Kloudbean’s FLB an ideal solution for developers and agencies looking to deploy and manage load balancing without the complexity typically associated with traditional platforms.
Now, let's go ahead and see a demo of how we can launch a Flexible Load Balancer in real-time on Kloudbean.
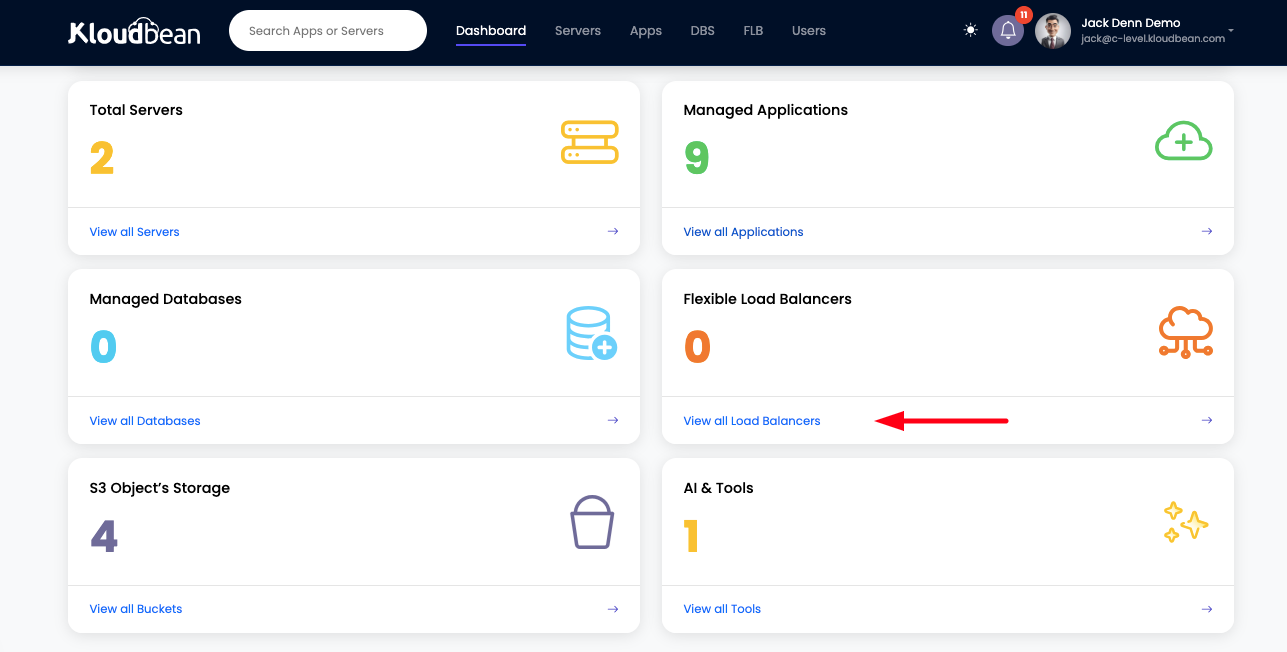
In order to access FLB section, from the dashboard click on Flexible Load Balancers.
Step 1: Launch New Load Balancer
From FLB section, click on Launch Load Balancer in order to create new load balancer.
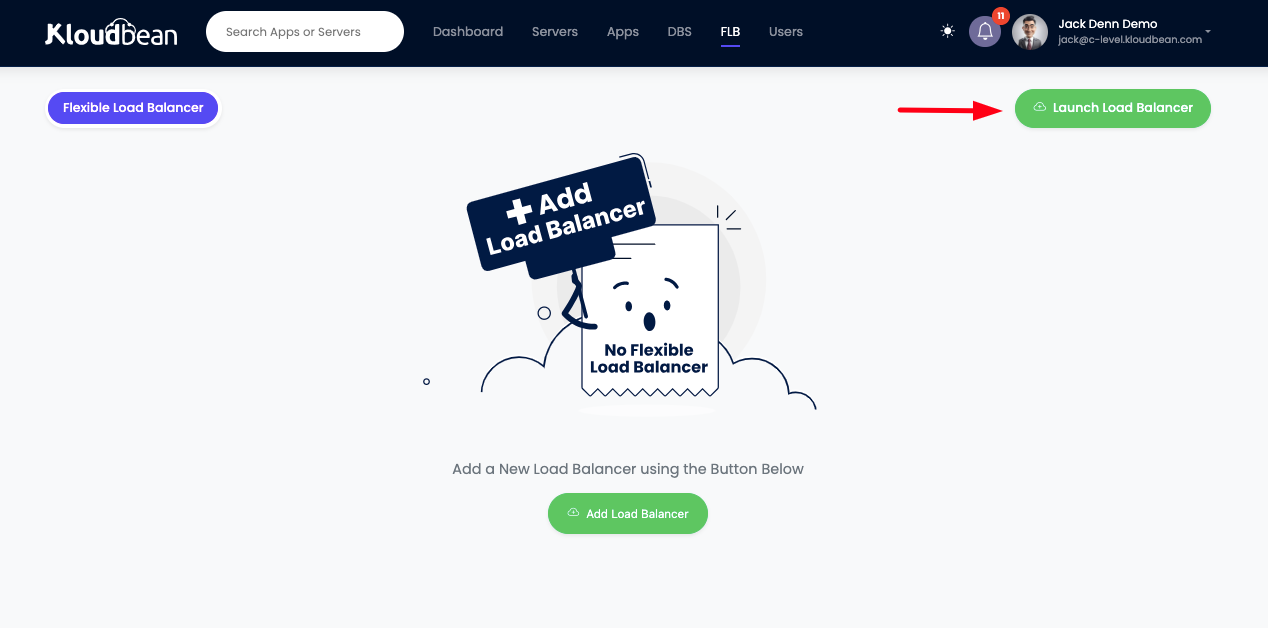
Once we click on Launch Load Balancer, new load balancer prompt will open, where we have choice to select load balancer of required size according to the traffic load.
Currently Kloudbean offers three types of Load Balancers, each designed to meet varying performance and scalability needs, ensuring that users can choose the best solution based on their application’s traffic requirements.
Light Weight: The Lightweight Load Balancer is designed for smaller applications or those with moderate traffic demands. It is optimized to handle up to 3,000 requests per second and supports up to 4 virtual load balancers. This makes it ideal for small-scale applications or environments that require efficient traffic distribution without significant resource overhead.
Thunder Medium: The Thunder Medium Load Balancer offers a step up in performance, capable of handling up to 10,000 requests per second. This load balancer can support up to 8 virtual load balancers, providing greater flexibility for medium-sized applications or services with higher traffic needs. It’s a perfect choice for growing applications that need a balance between cost-efficiency and scalability.
Heavy Duty: The Heavy Duty Load Balancer is built for high-performance applications and large-scale traffic. It can handle up to 25,000 requests per second and supports up to 12 virtual load balancers. This option is ideal for enterprises or applications with high traffic volumes, providing robust scalability and high availability to ensure reliable performance even under heavy loads.
In this demo we are going to select medium sized Thunder load balancer as I'm going to load balance frontend react application where I'm expecting a traffic size from 5K in average and 15K during peak time.
I will select the location, nearest to most of my audience region.
Click on LAUNCH LOAD BALANCER and proceed to payment page.
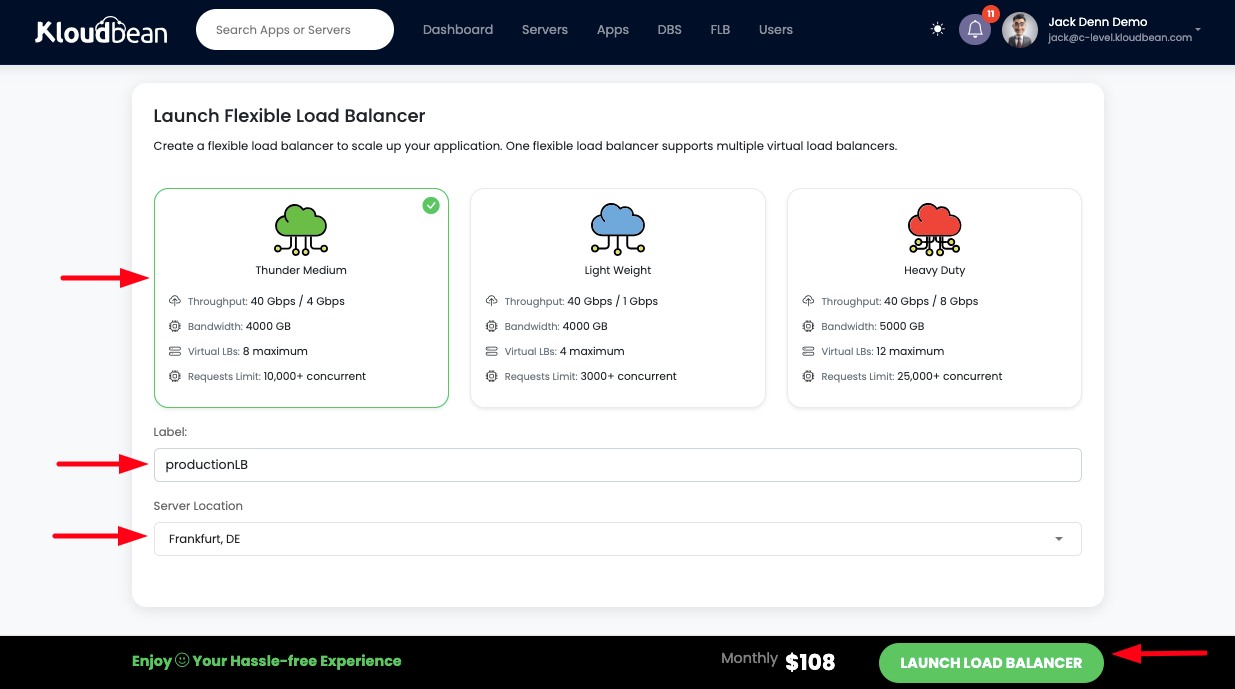
Once payment is done, we will be redirected to FLB section where we can see Load balancer creation process initiated and it will take around 4 -6 minutes to create a configure a load balancer with one default virtual load balancer.
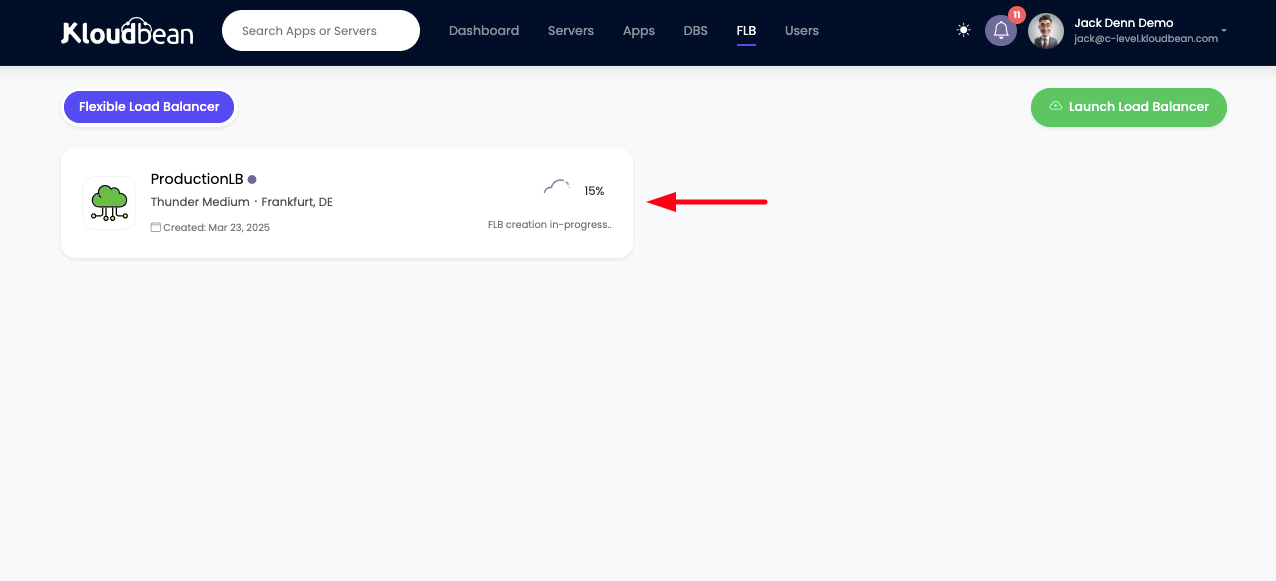
As load balancer creation process is completed. Now are good to access and configure this load balancer.
Step 2: Access default Virtual Load Balancer.
Click on the virtual LB icon which is currently showing 1 virtual LB.
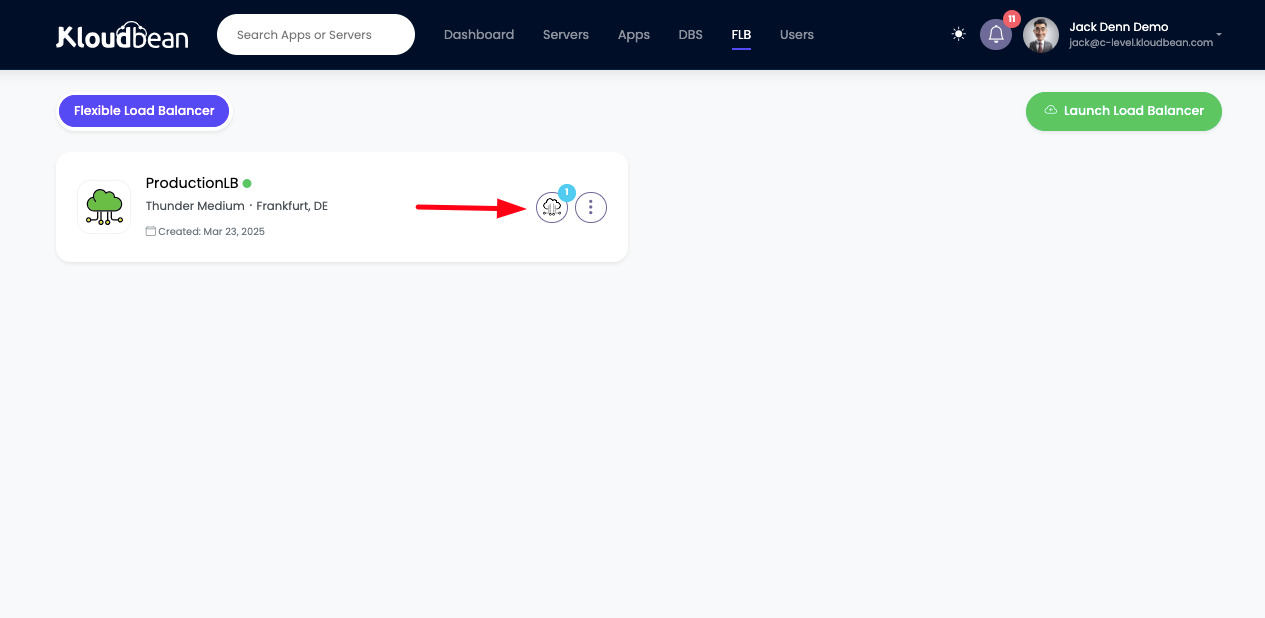
Once we are in Virtual LB's tab. We can see that there is one virtual load balancer already created.
Note that when we launch a FLB, one virtual LB is created by default.
Now in order to configure this virtual LB, go ahead and click on this vLB.
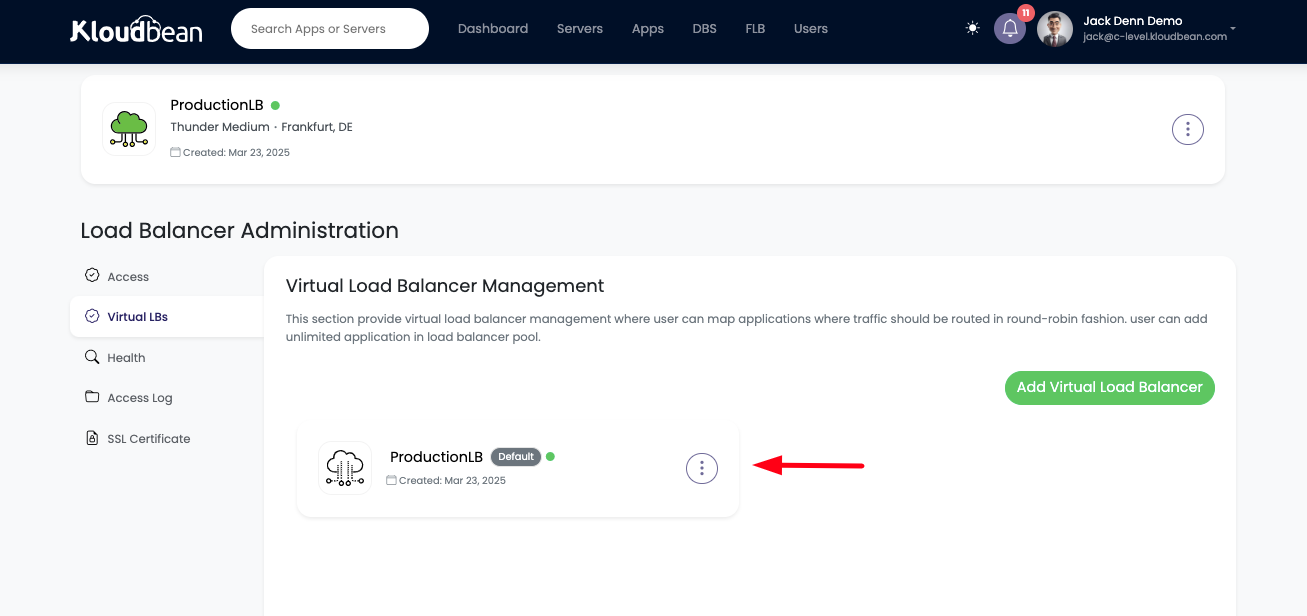
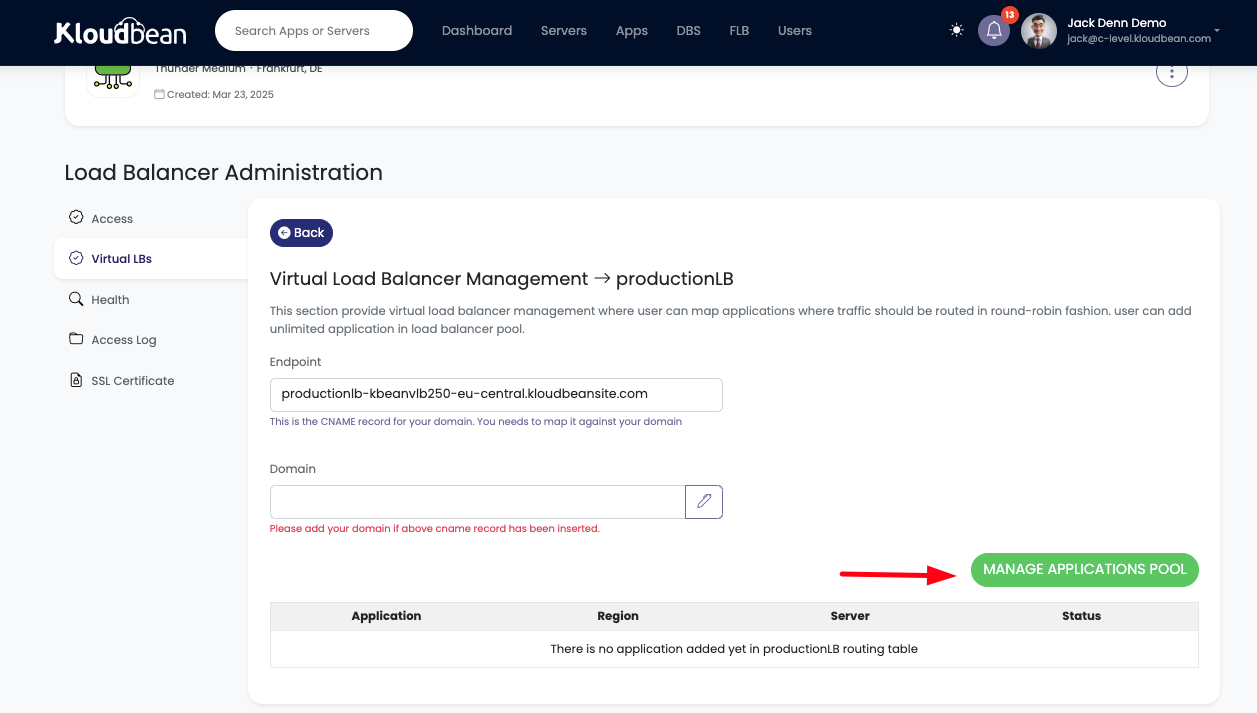
Once we click on vLB, It will directly take us to vLB configuration where we can see;
- Virtual LB accessible endpoint url.
- Custom domain addition option.
- Manage application Pool button.
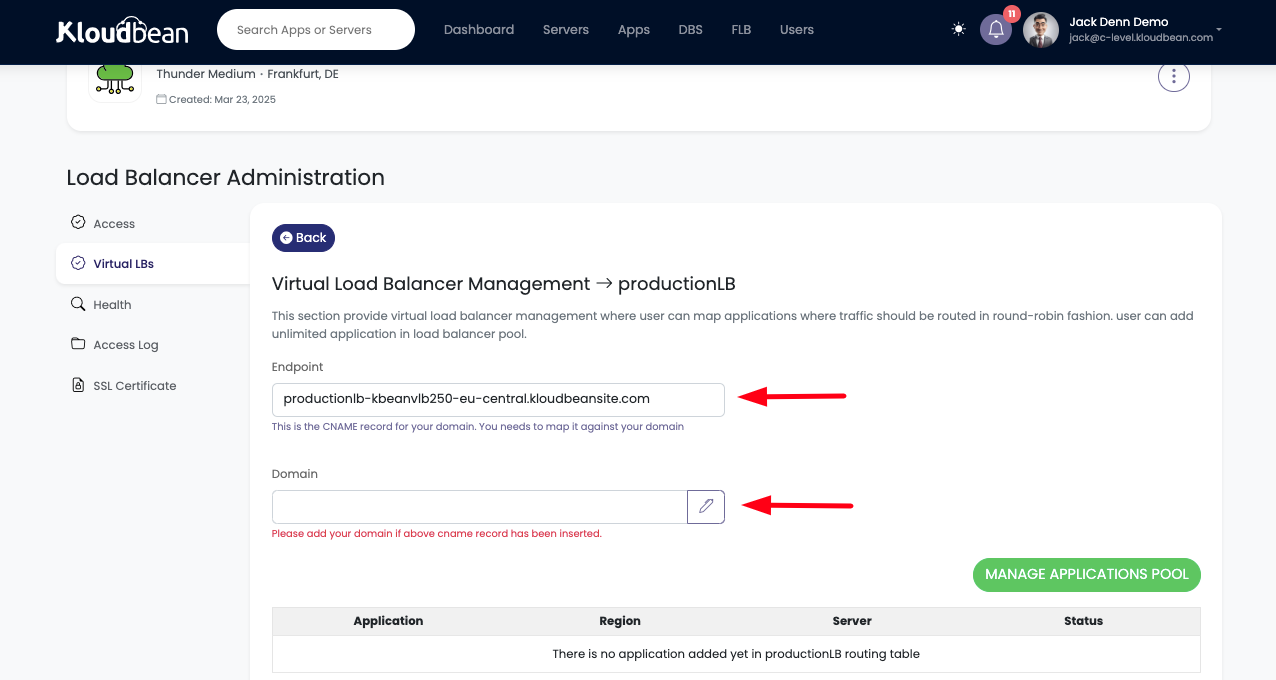
Accessing vLB endpoint URL.
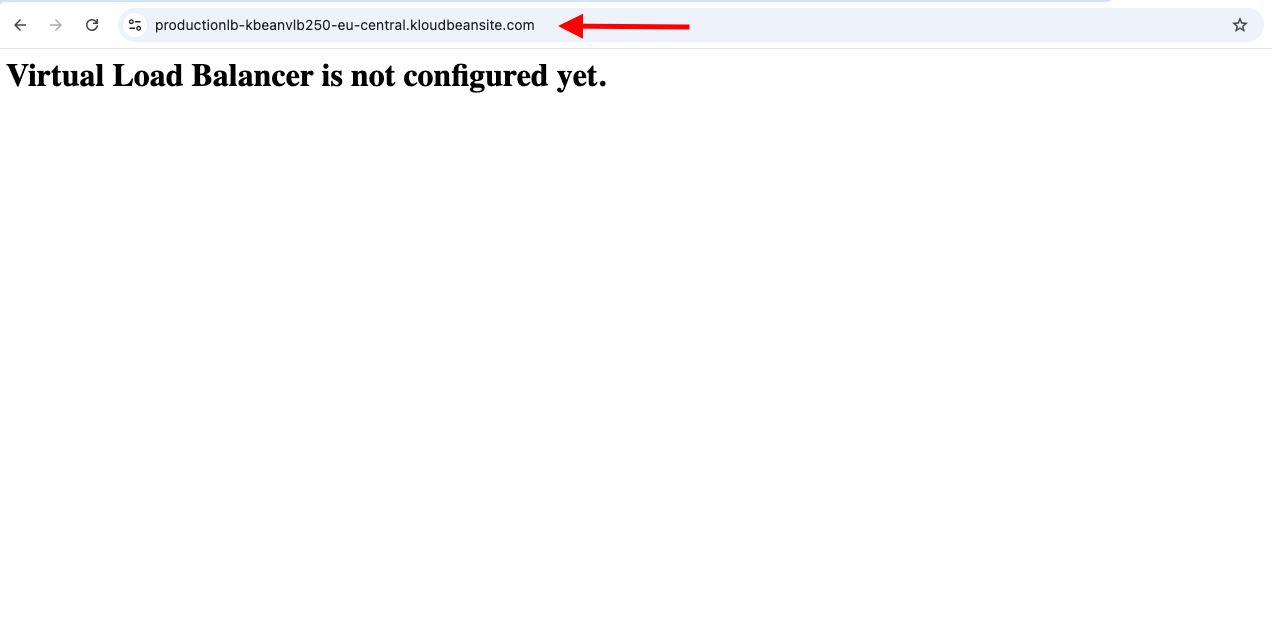
Let's click and copy vLB endpoint url and past it into brower.
So far vLB is accessible but it showing empty non-configured page.
Step 3: Updating vLB Application Pool.
Now in order to attach application to this virtual LB for load balancing, click on MANAGE APPLICATION POOL.
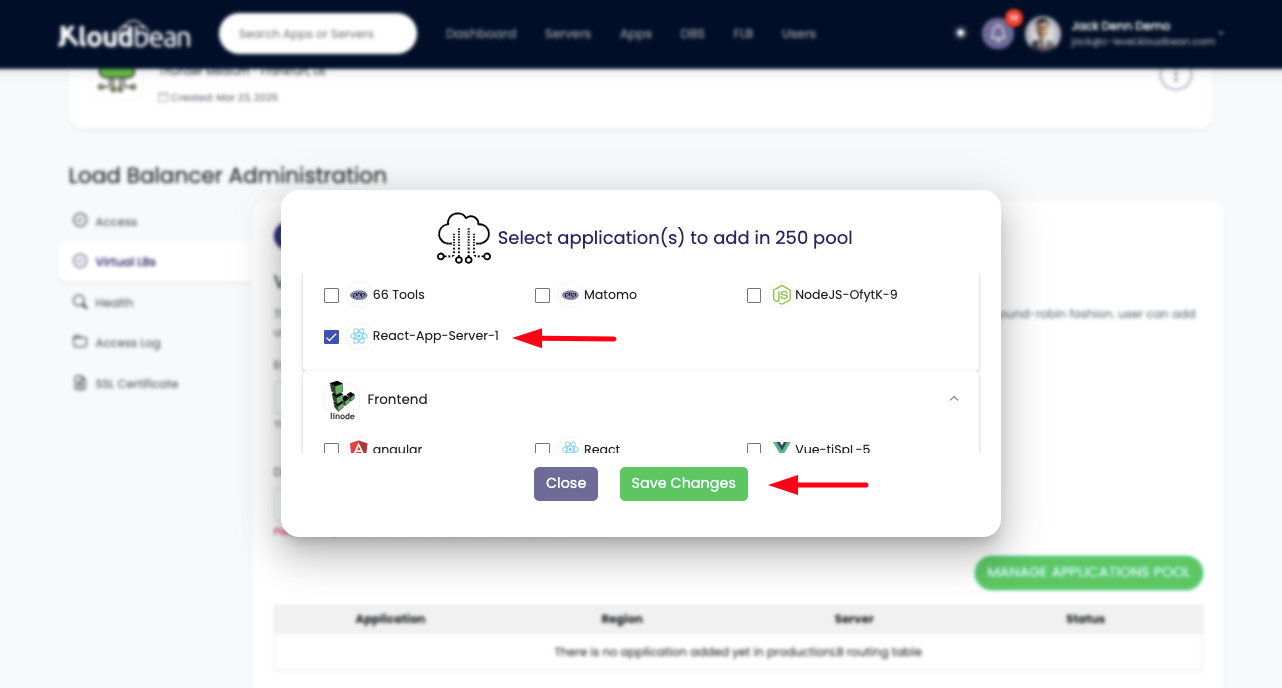
This will open a prompt, asking to select the applications that we want to add in this pool for this virtual LB.
I'm going to select my react frontend from Server 1 and same replica of this app from Server 2.
Click on Save Changes to update the pool.
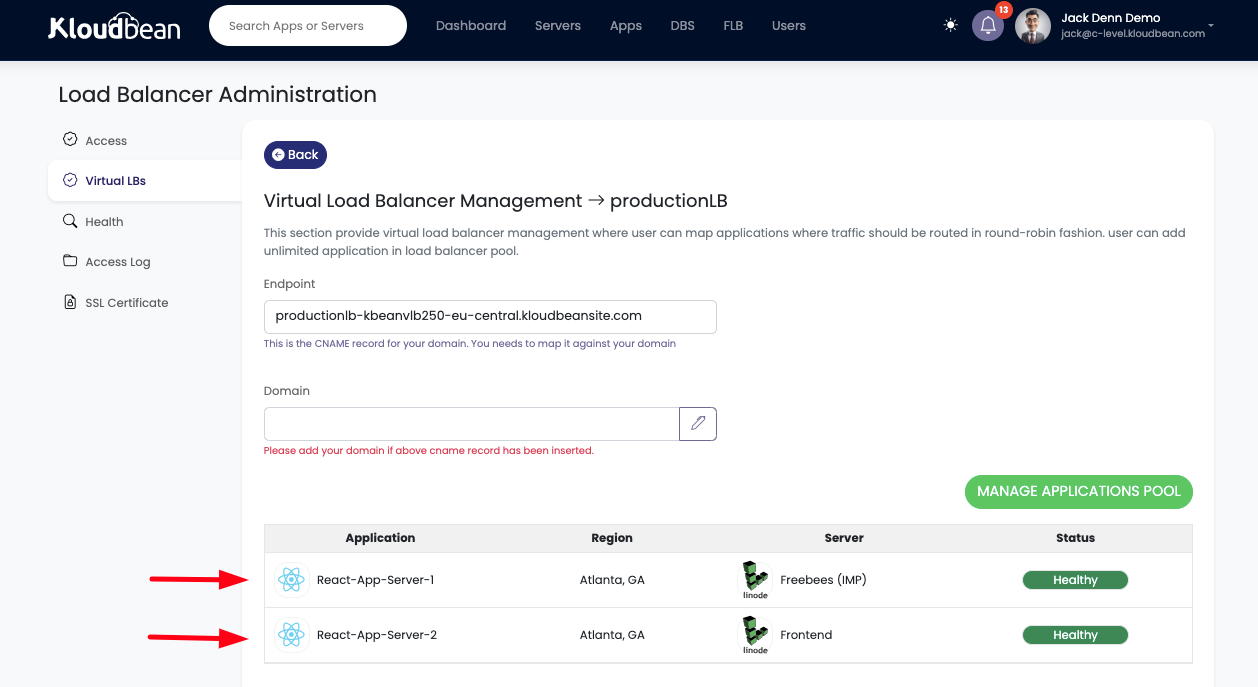
That's all we need to do to configure a vLB. We can see there are 2 applications added in the pool where now traffic will be load balanced and in case of faulty response from any app, our load balancer will automatically start routing traffic to the accessible application endpoint. We can add as many application on needed bases, just by updating the application pool.
Status section show the current status of app. In case any application is under deployment or may get down due to some issue, its status will change to Faulty. In that case load balancer will automatically stop sending requests to that faulty replica, but you can also review app status from here and update or delete app replica.
Currently both replica's of app are in healthy status.
Step 4: Accessing vLB after updating Application Pool.
Now that pool has been updated, let's go ahead and try to access same vLB endpoint again.
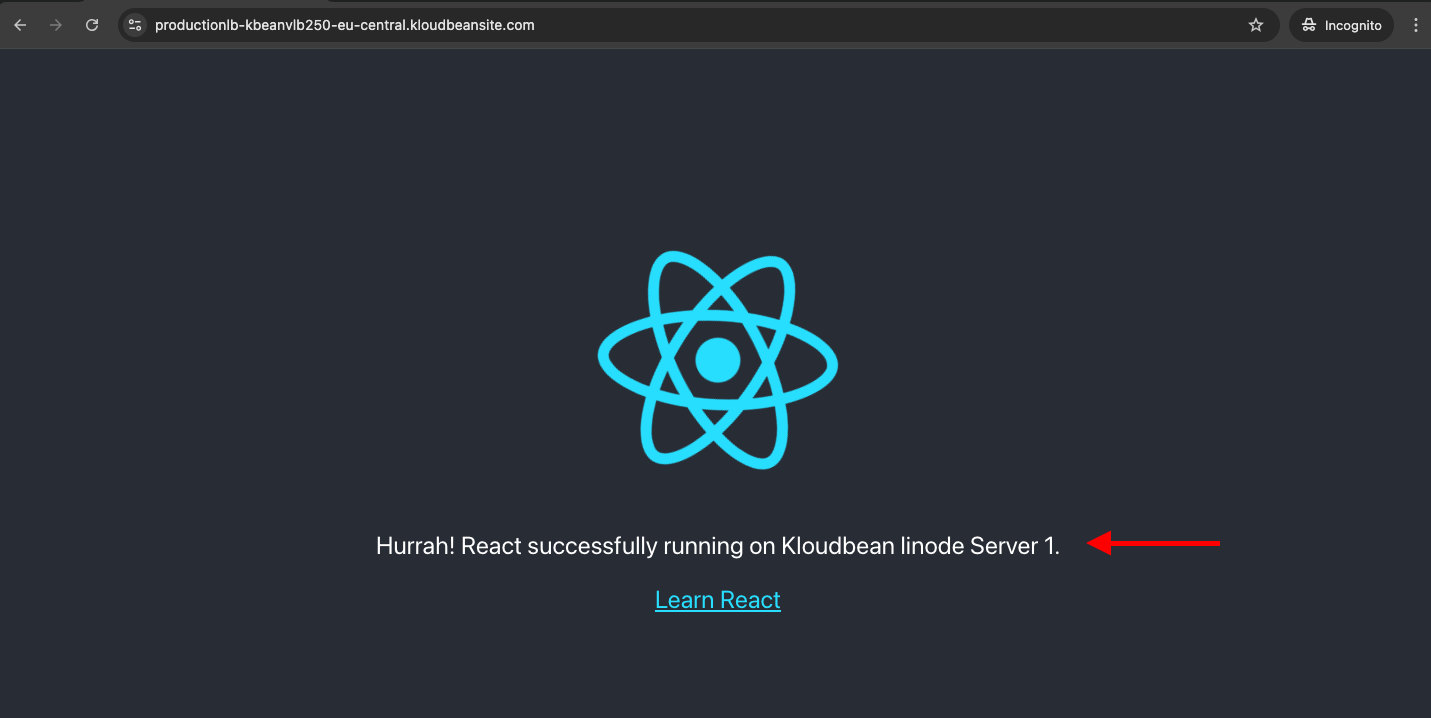
This time when we access it, we are seeing react application interface, and resources are being served from replica 2 that is running on Server 2.
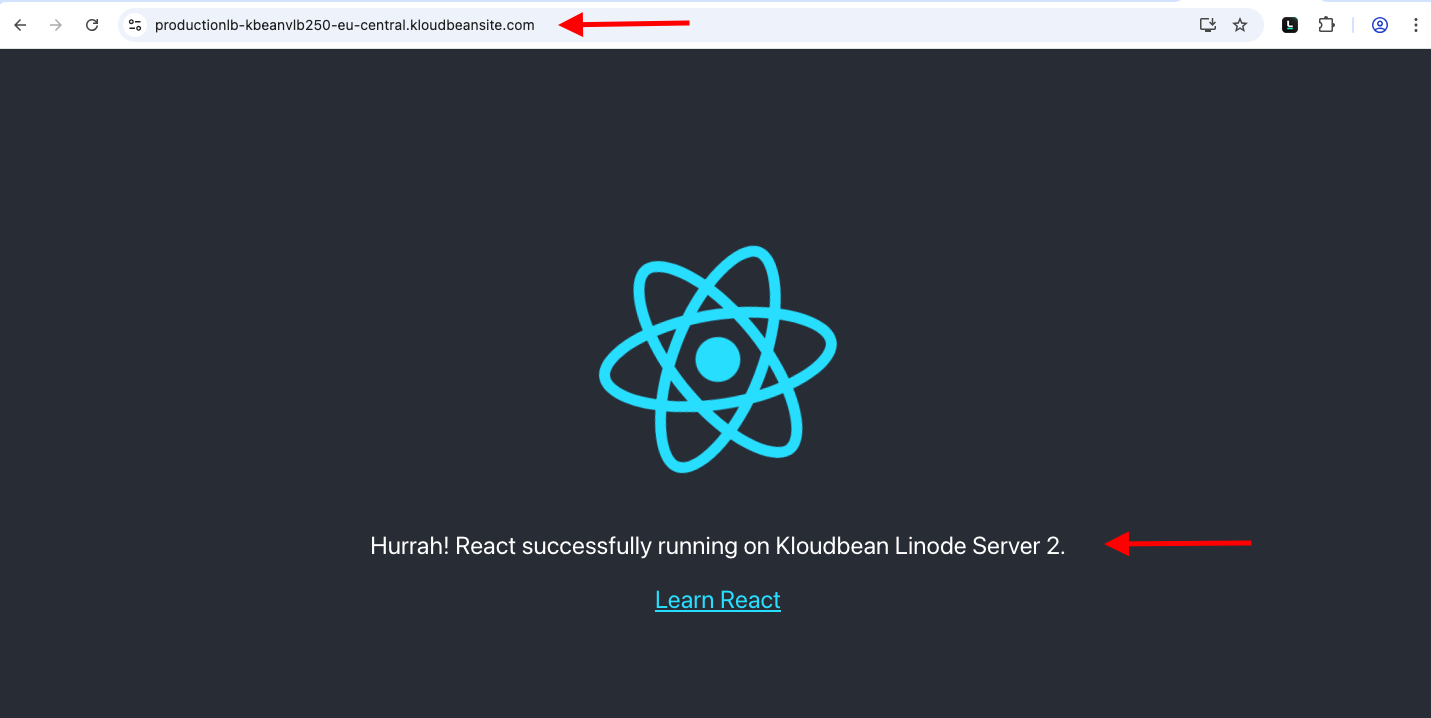
If we hit refresh again and again we will see each time application is being served from different replica.
As endpoint got cached in browser for each user, we are going to bypass cache by opening url in incognito mode and this time we see application is being served by replica 1 from Server 1.
That’s all for launching the Flexible Load Balancer (FLB) and configuring virtual load balancers (vLB) to efficiently manage traffic using Kloudbean's powerful and user-friendly Flexible Load Balancer product.
Conclusion
Kloudbean simplifies the process of launching and managing Flexible Load Balancers, removing the complexities typically associated with traditional load balancing solutions. With just a few clicks, you can configure a load balancer to efficiently distribute traffic to your applications across multiple cloud providers. Start using Kloudbean's Flexible Load Balancer today and ensure optimal performance and scalability for your applications without the hassle of complex setups.
If you run into any issues while launching or managing your Flexible Load Balancer, our dedicated support team is available 24/7 to provide assistance.