Why Choose Kloudbean for Your Vue Application?
- Deploy your Vue app in minutes with just a few clicks.
- Kloudbean automatically adjusts resources to handle varying traffic loads, ensuring your app runs smoothly.
- Built-in monitoring tools track app performance, health, and resource usage for easy troubleshooting.
- Kloudbean secures your app with multi-layered security protocols, including application isolation and encryption.
- Set up custom domains and enjoy free SSL certificates for secure connections.
- Kloudbean offers optimized Nginx configurations for efficient traffic handling and fast performance.
- Track incoming traffic and responses to ensure smooth performance under load.
- CICD and One-Click deployment.
With Kloudbean managing the complexities of deployment, scaling, and security, you can focus on what matters most—your code and business. Let’s dive into how to get your Vue app up and running on Kloudbean.
Build & Running Your Vue Application on Kloudbean
Now that you understand the benefits, let's dive into how you can build and run your Vue application on Kloudbean.
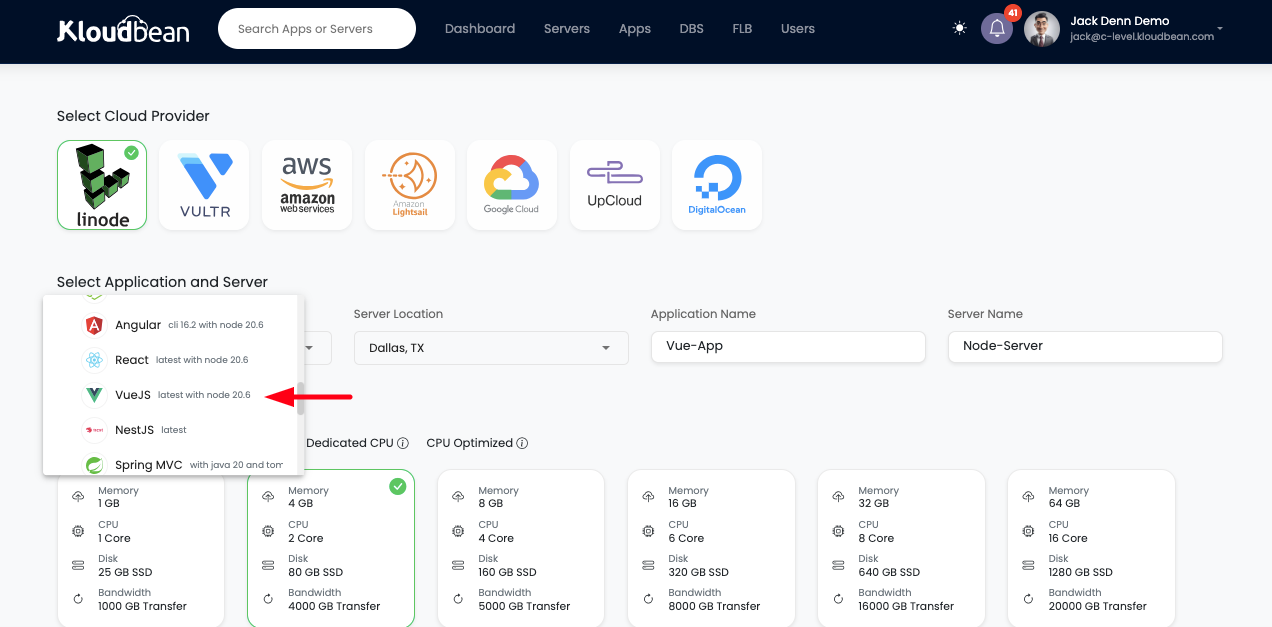
Step 1: Creating Vue app on new server.
This step involves;
- Choosing Cloud Provider
- Choosing Application
- Choosing Datacenter with nearest location
- Adding Application Name
- Adding Server Name
- Selecting Server size depending on needs.
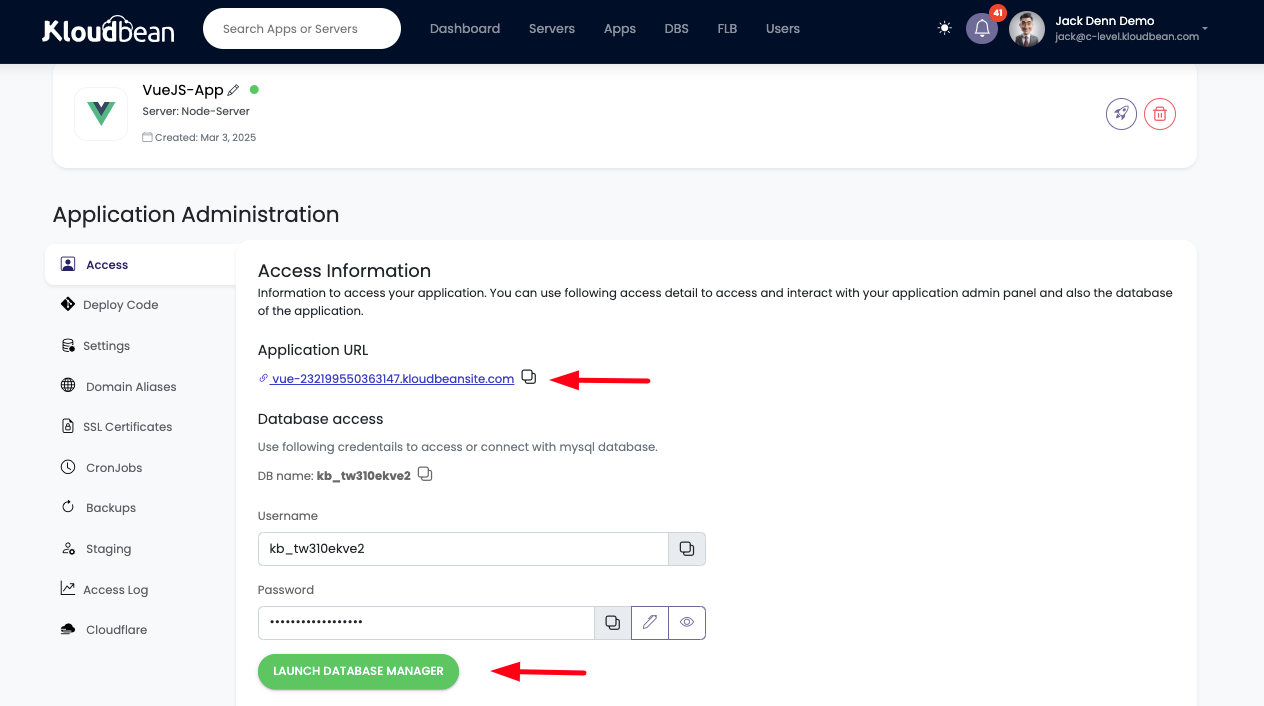
Once your application is created. You can access default application by using the Application URL from Application Administration . This section include following access panels.
- Application default access url (managed by kloudbean).
- Database access url using phpmyadmin. Optionally you can use this database if your vue app needs it.
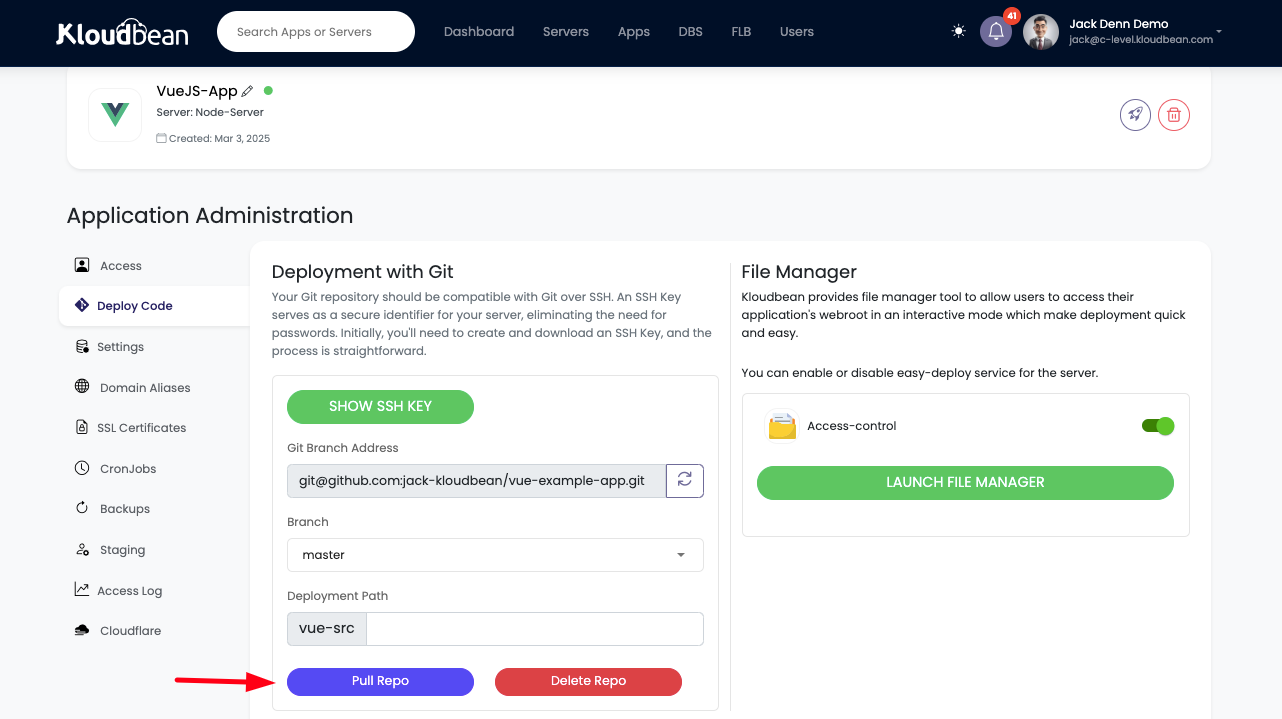
Step 2: Deploying Vue project with Git.
To deploy your code from GitHub repo, you will have to copy repository address.
As an example we are going to deploy private vue project named vue-example-app.
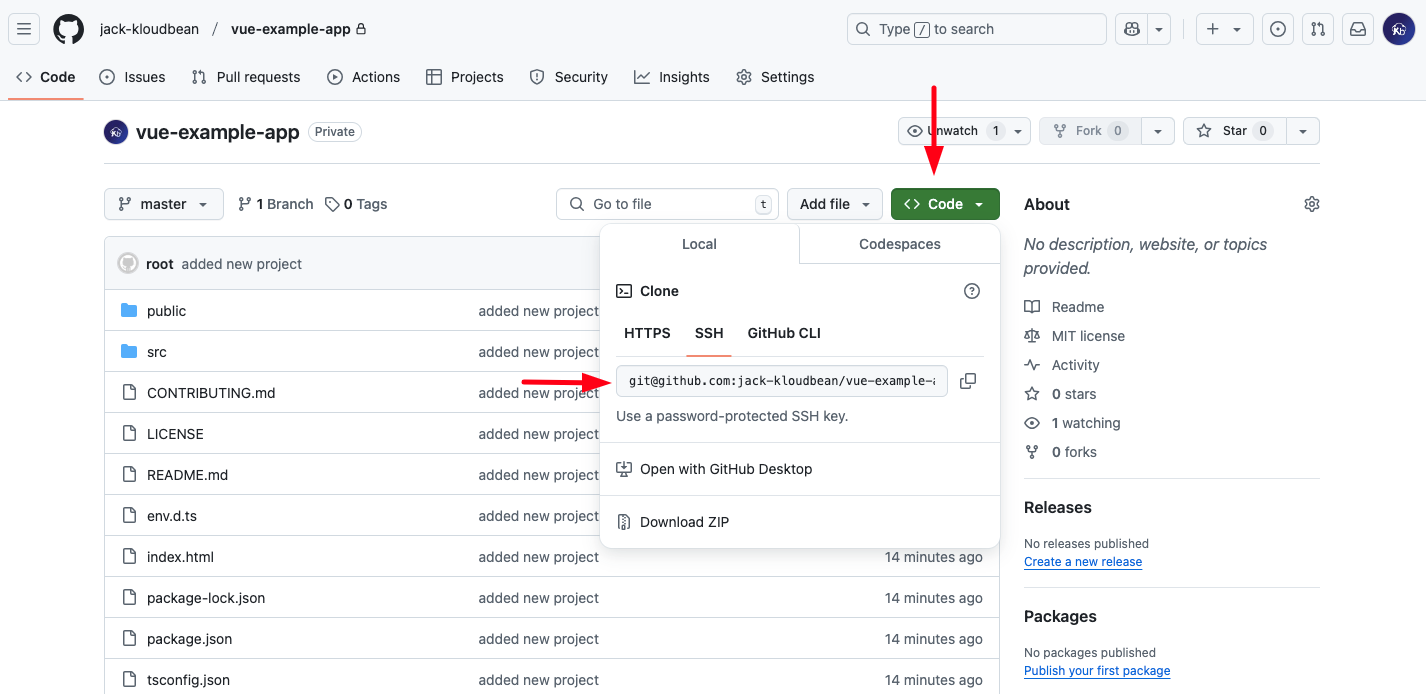
In order to deploy your code through Git, Follow these steps:
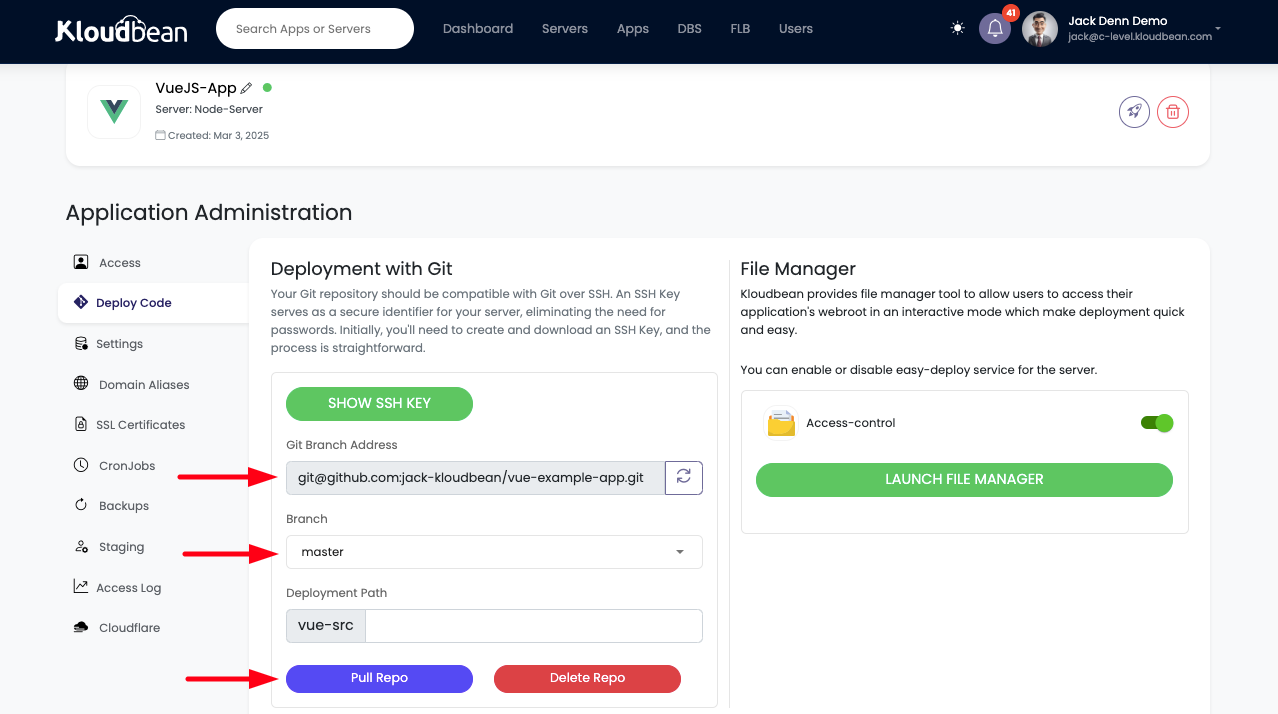
- Go to
Deploy Codesection, Click onGENERATE SSH KEY, if not already generated. If your repo is private, then you can get SSH key by clicking onSHOW SSH KEY. - Once SSH keys are added in your private repo (not required for public repo), Copy Git Address from your Github and paste it to
Git Branch Addressfield. - Select your branch that you wants to deploy from
Branchfield. - Once above steps are done, Click on
Clone NowButton to clone your repo.
Additionally you can see your code using kloudbean File Manager feature, by clicking on LAUNCH FILE MANAGER button.
Read this to learn more about connecting Git repo.
Step 3: Updating bean.conf file
In your code directory you will see a file named bean.conf is created automatically by kloudbean deployment process inside vue-src directory. This file is super important and it includes the information about the node_version, node packages install command and build command, along with number of workers.
Note that you will see app source code is present at following directory;

- NODE_VERSION is the node version your project required to install node packages and build project. Default version is
NODE_VERSION=20.18.3 - INSTALL_CMD is the command which will be executed to install node dependencies. Default command is
npm install. - BUILD_CMD is the command which will be executed to build project. Default command is
npm run build. - PROJECT_DIR is the directory where project resides. In this example project is at root directory so we keep its value to
None.
Note that you can create this file in your code root path as well, if you have different node_version, install_cmd and build_cmd requirement. You can update this file anytime according to project requirements.
NODE_VERSION=20.18.3
INSTALL_CMD=npm install
BUILD_CMD=npm run build
PROJECT_DIR=None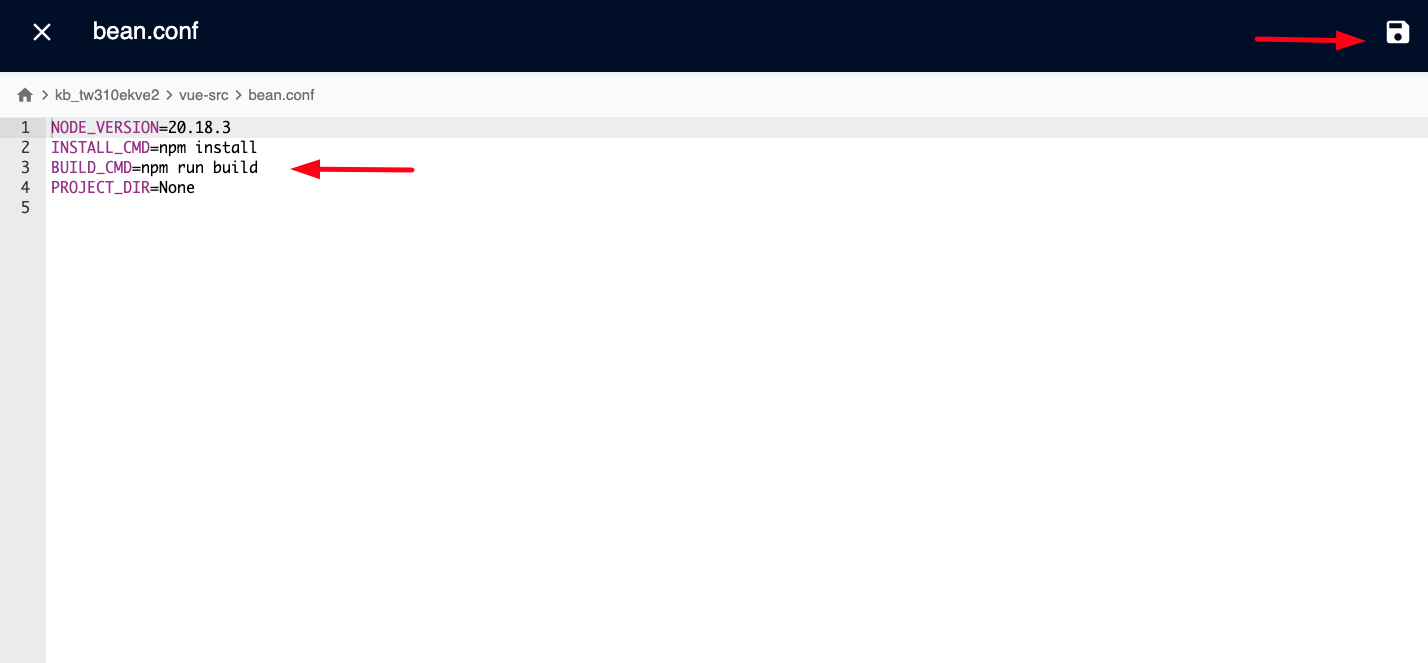
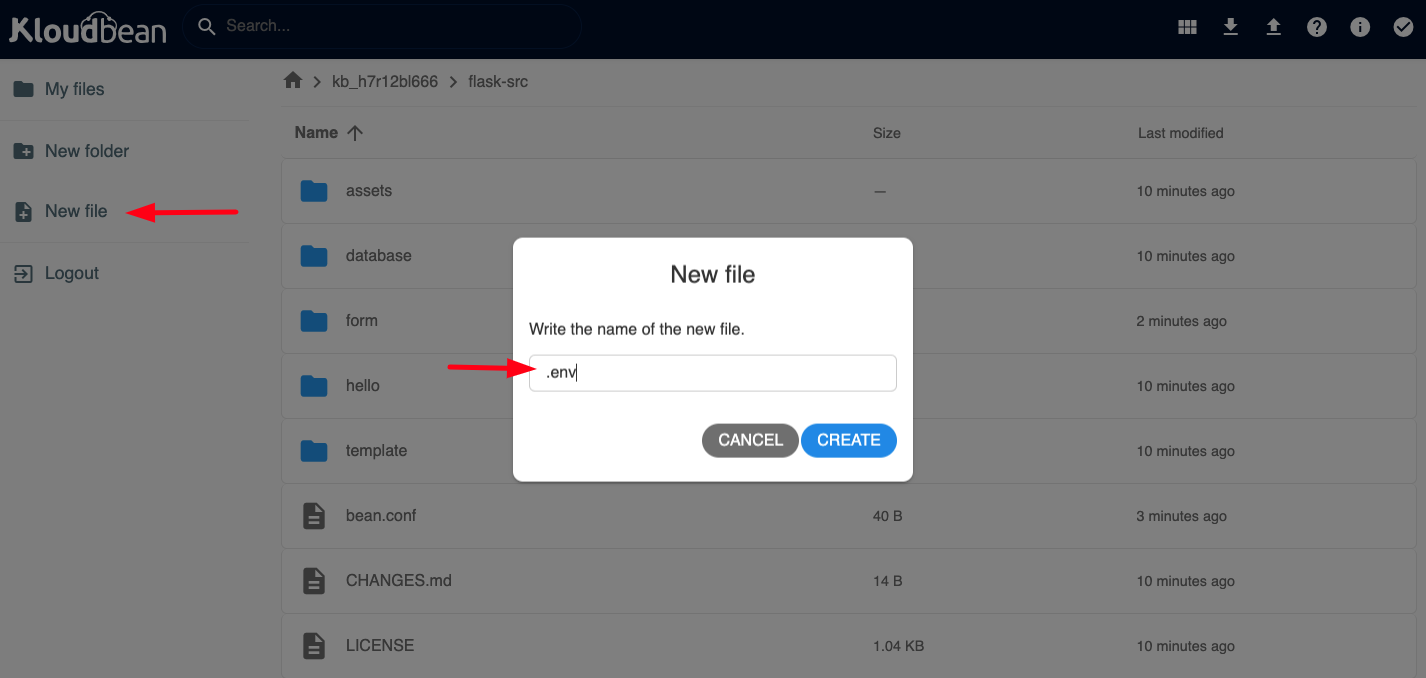
Optional Step 4: Adding env file for environment variables
If application use env file in order to load app enviroment variables. we can easily create env file using File Manager.
- Access file manager by clicking on
LAUNCH FILE MANAGERBUTTON. - In required directory Click on New file from side menu.
- Add file name (.env) and hit
CREATEButton.
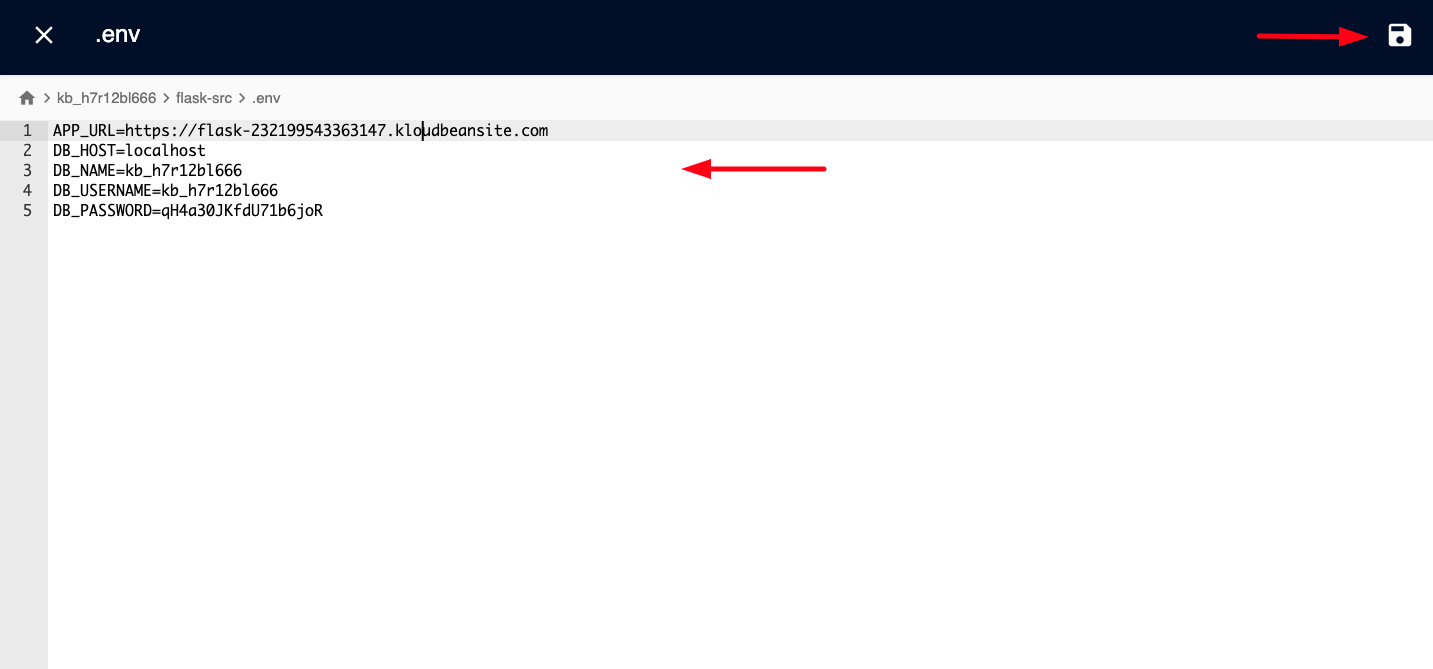
Your env file is created and opened in editor. you can copy paste or add variables manually in this file. If your application is reading database credentials from env, you can add them as well.
Step 5: Build Project and Deploy new Artifacts
Once all the required configurations are update. It's time to apply those changes. We can apply the changes either by Hitting Pull & Deploy button, or we can run sudo adm command from the shell or terminal.
Accessing the Application
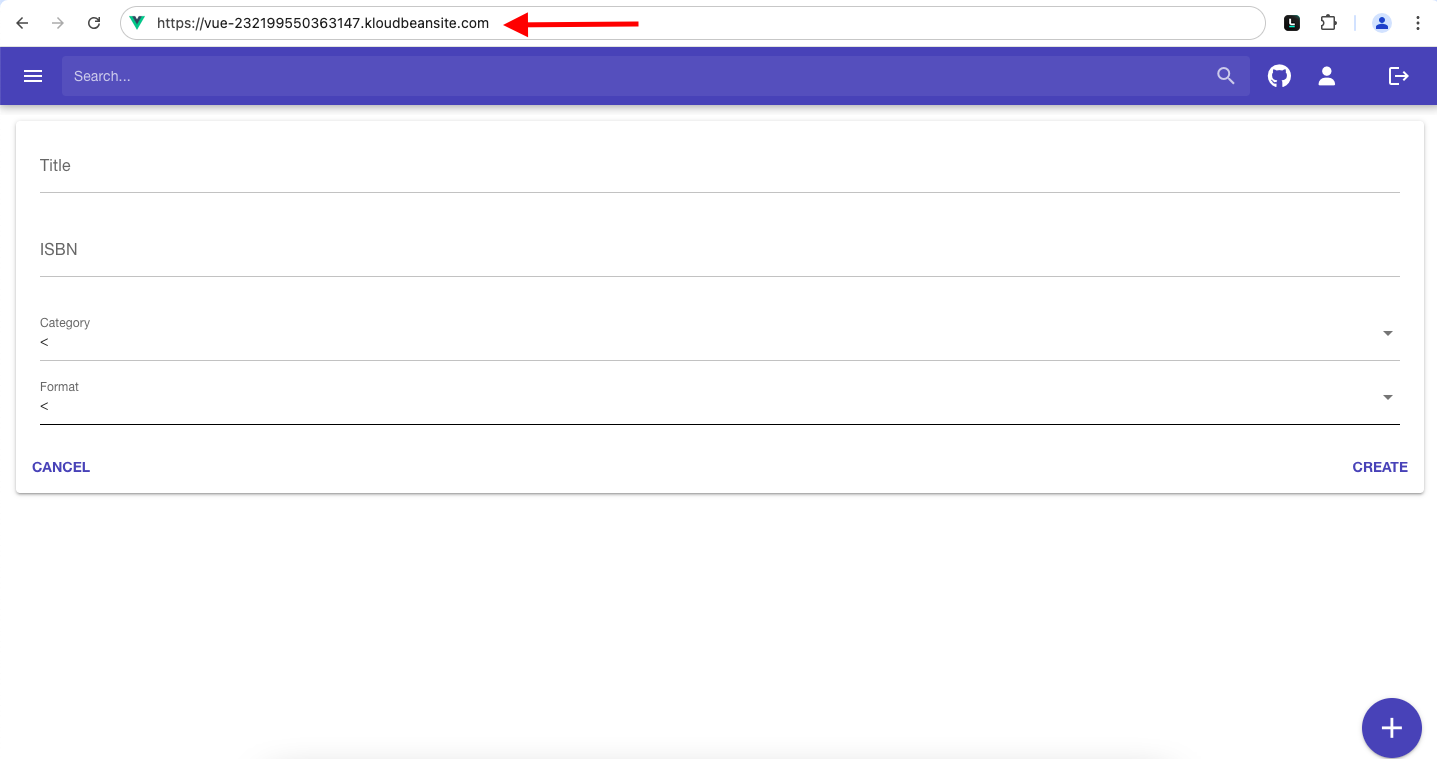
As application has been deployed. You can access it using the default URL provided by kloudbean on Access Tab. In this example url is https://vue-232199550363147.kloudbeansite.com
Optional Step 6: Deployment through Shell/Terminal:
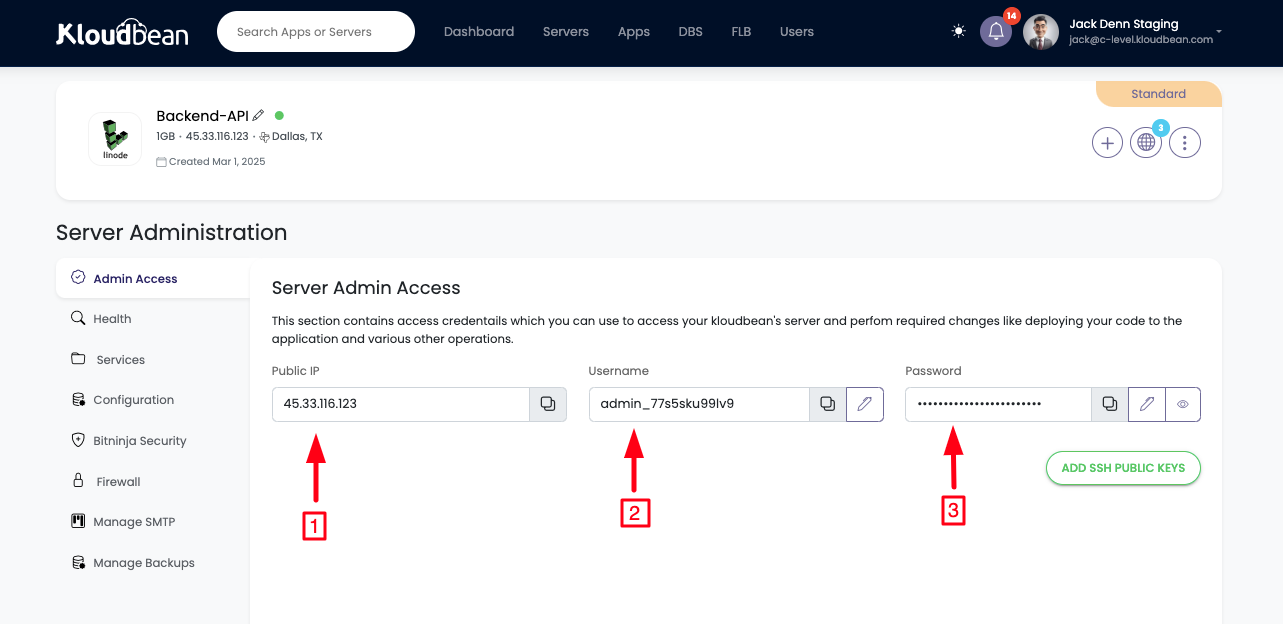
If you to want access your application server through shell in order to perform deployments, explore logs and errors or update/review code, Follow these steps.
- Access your server using ssh command on your terminal. Copy server IP address.
- Copy admin username.
- Copy admin user password.
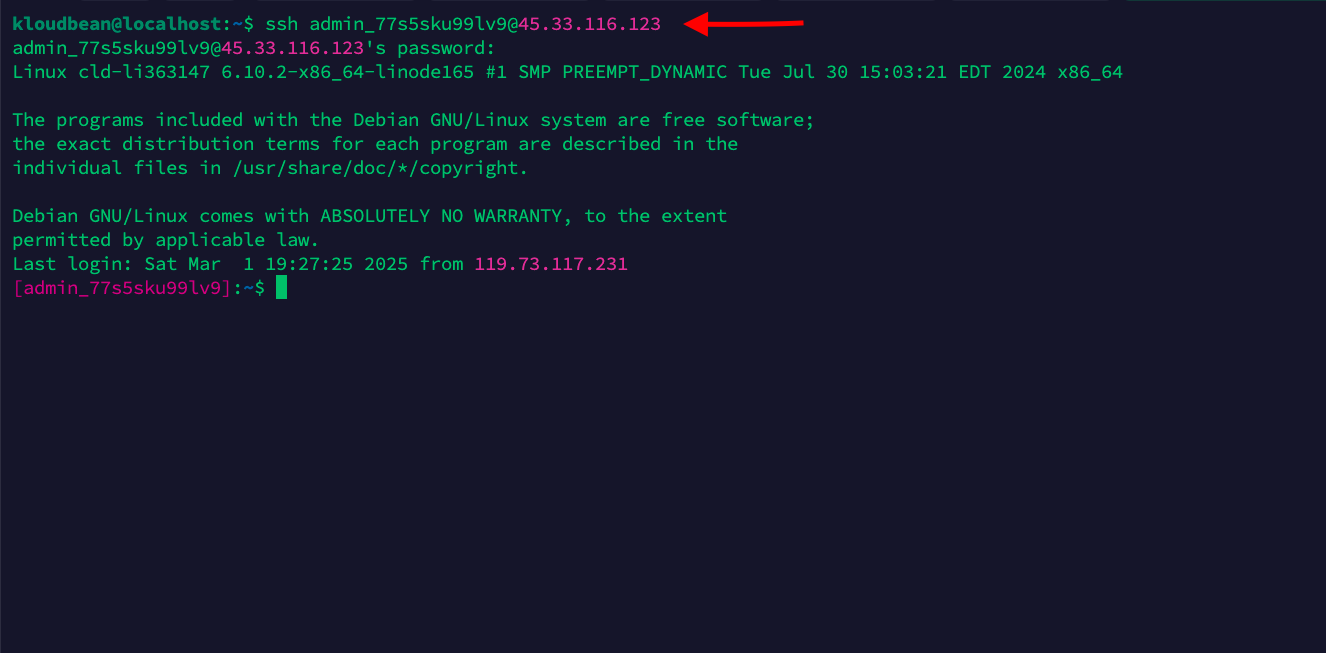
In your terminal write SSH command. ssh <admin-username>@<ip-address>
Like in this example ssh command is ssh [email protected]
After you paste password and hit Enter, You should be successfully into the server through secure shell.
Read this to learn more about how to ssh a server.
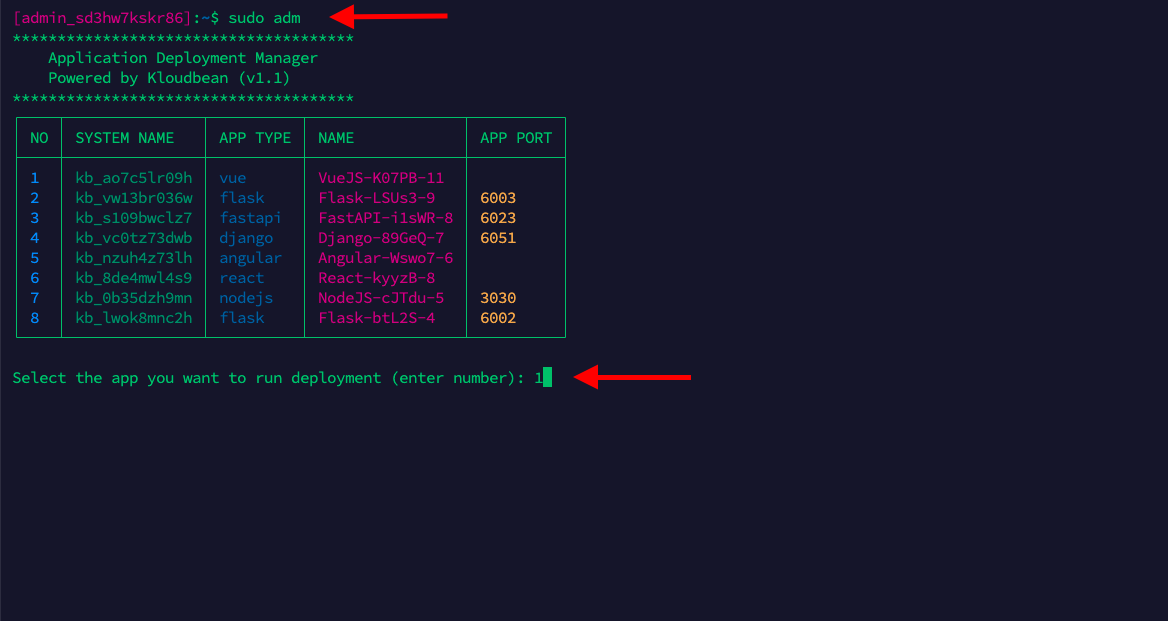
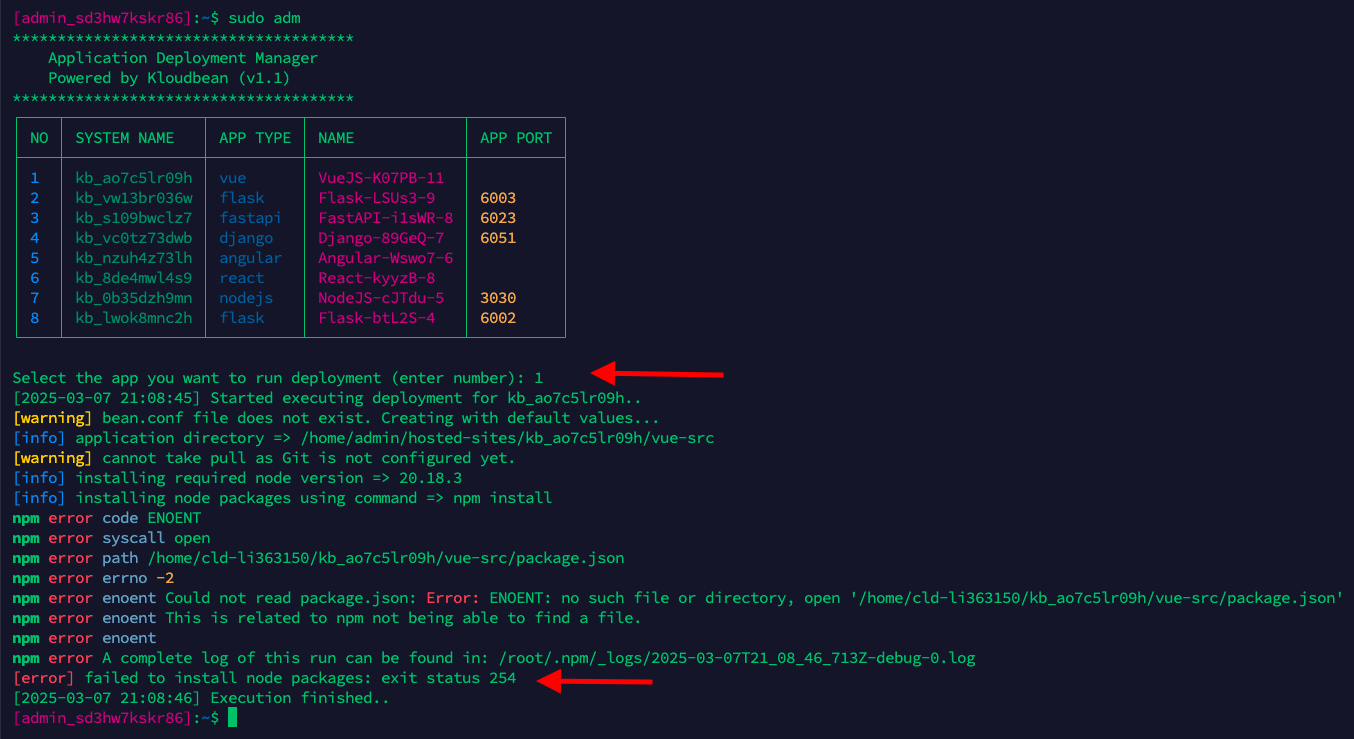
Optional Step 5: Build & Deployment using sudo adm command
Once you are ssh into the server, you can perform manual deployment using command sudo adm on the terminal. It will list you all the applications that are installed on this server, with its system-name. The application we just installed is the one with system-name kb_ao7c5lr09h so we will type 1 and hit Enter. It will start deploying the application.
Once deployment process starts, It will perform following steps;
- Take a pull. If new commits are available on our branch, latest code will be pulled.
- System will set he require node version.
- System will execute the install and build commands.
- System the update the artifacts on the correct directory (app-html).
Optional Step 6: View Build & Deployment logs
If you want to view application logs you can see api access and application logs from app-logs directory by executing following command;tail -100 /home/admin/hosted-sites/<app-system-name>/app-logs/service.log
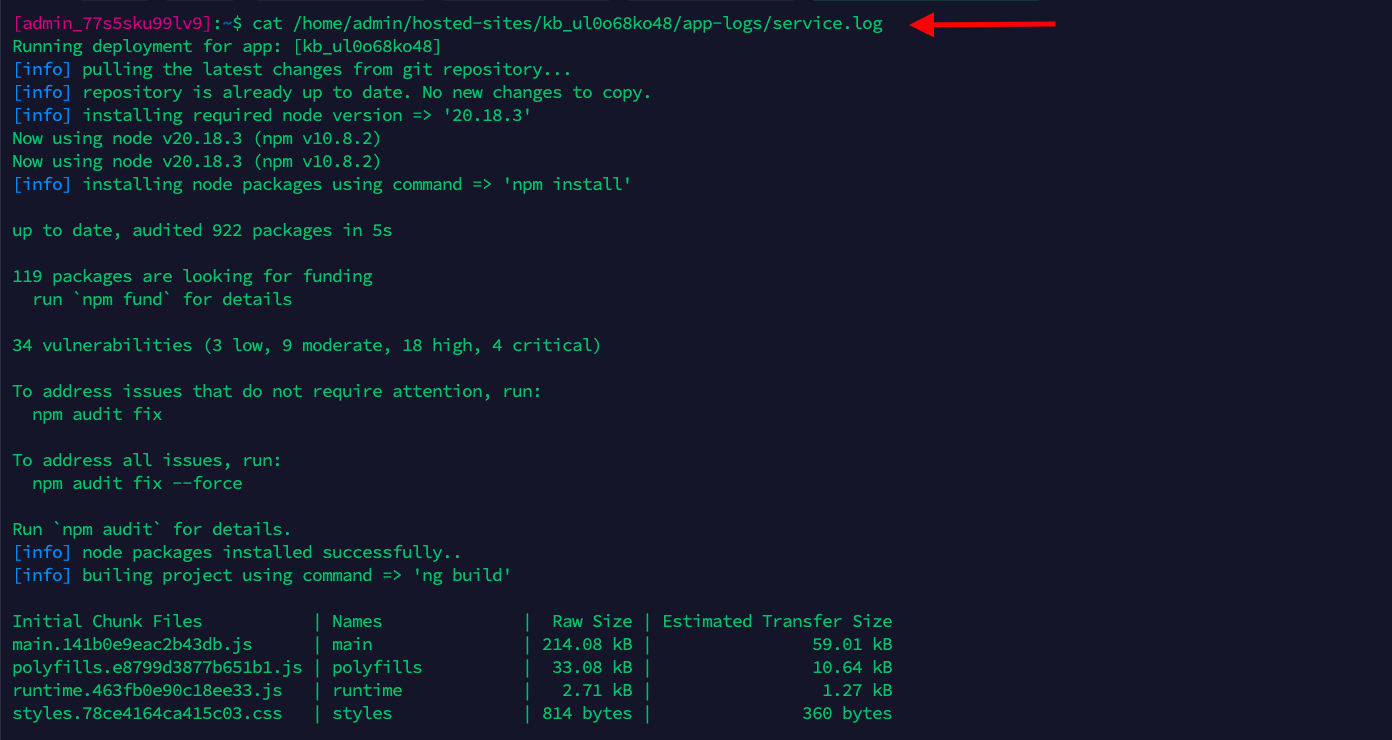
Optionally you can review application and access logs from File Manager.
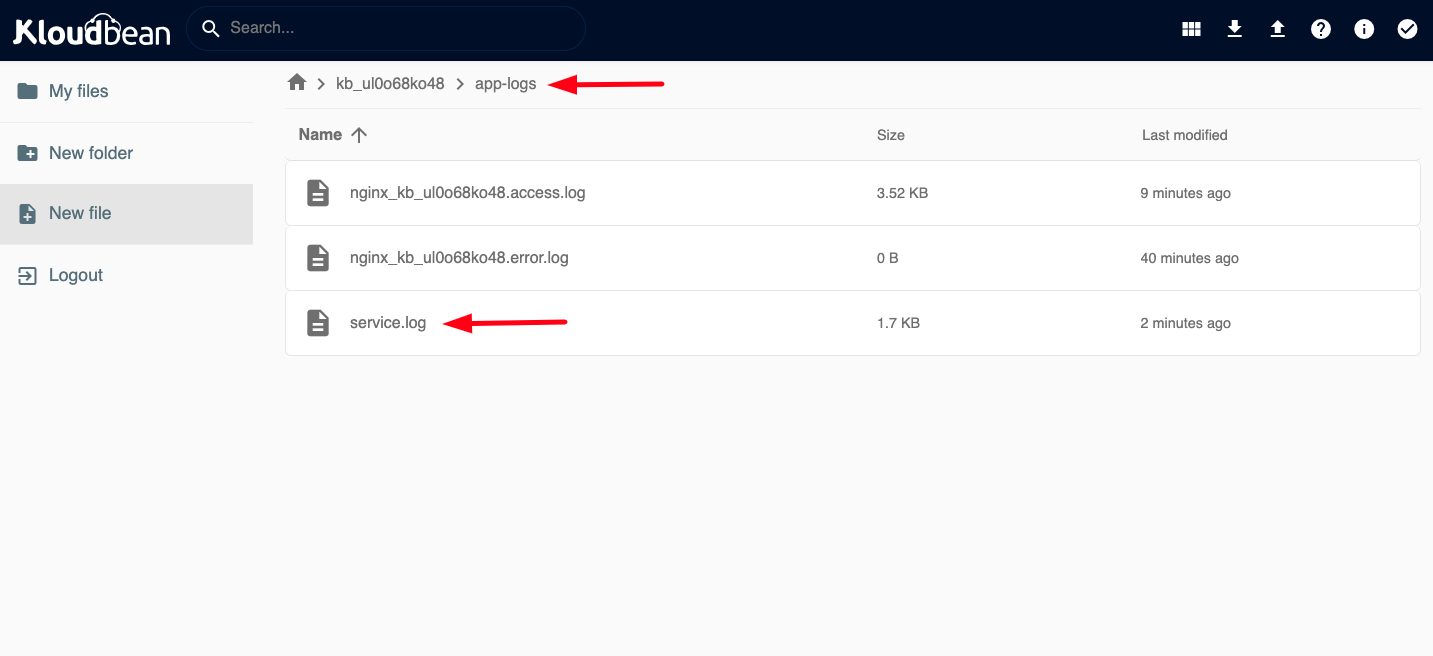
- Access File Manager by Clicking on
LAUNCH FILE MANAGERfromDeploy CodeTab. - Click on app-system-name
kb_ul0o68ko48in top navigation bar. - Click on Folder
app-logs - Double click on
server.logto view application logs file.
Read this to learn how to enable auto deployment using CI/CD.
Conclusion
Kloudbean makes Vue Build and host process fast, easy, and secure, freeing you from the complexities of DevOps. With just a few clicks, your application is ready to handle production traffic with optimized performance. Start deploying with Kloudbean today and take your Vue application to the next level!
If you still face any trouble while making your Vue Project live using kloudbean platform, Our DevOps support is available 24/7 to assist you.