Table of Content
- Why Choose Let’s Encrypt SSL
- How to Install Let’s Encrypt SSL Certificate
- How to Force HTTPS Redirection
- How to Verify SSL Certificate
- How to Renew Let’s Encrypt SSL Certificate
- FAQs
This guide outlines the steps for installing a Let’s Encrypt SSL Certificate on your application. Additionally, we offer a separate article explaining the significance of SSL and why it's essential for your website.
Let’s Encrypt is an automated and open certificate authority (CA) that provides free SSL/TLS certificates. This initiative is led by the Internet Security Research Group (ISRG) with the goal of making SSL/TLS certificates more accessible to promote a safer and more privacy-focused web.
Why Choose Let’s Encrypt SSL
Here are compelling reasons to choose the Let’s Encrypt SSL Certificate:
1. Zero Cost: The Let’s Encrypt SSL Certificate is completely free, eliminating any financial barrier to securing your website with HTTPS.
2. Safe: Despite being free, Let’s Encrypt certificates are as secure as paid certificates. They utilize modern security practices and encryption techniques to safeguard your data.
3. Easy: Installation is straightforward and user-friendly. There's no need to create accounts elsewhere, undergo email validations, or make payments.
4. Automatic: Let’s Encrypt streamlines the entire SSL certificate process. It automatically handles certificate generation, installation, and renewal, saving you time and effort.
Choosing Let’s Encrypt ensures your website benefits from strong encryption and security without the complexity and cost associated with traditional SSL certificates.
Important
- Let’s Encrypt has some limitations for its SSL/TLS certificates to prevent abuse.
- Let’s Encrypt only offers Domain Validation (DV) certificates, not Organization Validation (OV) certificates.
How to Install Let’s Encrypt SSL Certificate
Prerequisites
- To ensure that your website is live and accessible, it's essential to confirm that your domains are mapped correctly and DNS records are properly configured.
- See if your web application is compatible.
If you currently utilize any Web Application Firewall (WAF) services like Cloudflare, Sucuri, or others for your website's security, please select the service you use below. There are specific steps you may need to follow based on your choice. Otherwise, if you do not use any WAF service, please proceed directly to Step #1.
Cloudflare
If you are using Cloudflare, it's important to temporarily disable their protection while the SSL certificate is being deployed. Please exercise caution, especially if your website is susceptible to attacks during this period.
Cloudflare is a widely recognized reverse proxy service. When you choose to use their services, you typically update your default nameservers with their nameservers, point your DNS records to them, and then direct traffic through Cloudflare to your website.
After successfully deploying the SSL certificate, remember to purge your Cloudflare cache to ensure that the changes take effect smoothly.
Sucuri
If you are using Sucuri, it's necessary to temporarily disable their protection by switching the DNS records back to your server until the SSL certificate is deployed. Exercise caution, especially if your website is vulnerable to attacks during this transition.
Sucuri is a widely recognized reverse proxy service. When you opt for their services, you typically update your default nameservers, point your DNS records to them, and route traffic through Sucuri to your website.
Additionally, make sure to enable the "Forward Certificate Validation" setting to facilitate successful HTTPS provisioning. Contact Sucuri's support for assistance with this step, and once completed, proceed with deploying the SSL Certificate.
Deploying a Let’s Encrypt SSL Certificate via the Kloudbean Platform is remarkably straightforward, akin to calculating 2 + 2 = 4. The following steps will guide you through the process comprehensively:
- Access SSL/TLS Certificate Management: Log in to your Kloudbean account and navigate to the "SSL Certificate" section under the "Application Administration" tab for the specific application.
- Select Let’s Encrypt: Choose "Let’s Encrypt" as the SSL certificate provider from the available options.
- Enter Domain Information: Specify the domain name for which you want to install the Let’s Encrypt SSL certificate.
- Install Certificate: Click on the "Install Certificate" button to initiate the installation process.
- Automatic Installation and Renewal: Kloudbean will automatically handle the generation, installation, and renewal of the Let’s Encrypt SSL certificate for your specified domain.
- Wait for Completion: Allow a few moments for Kloudbean to complete the certificate installation process. Once done, your website will be secured with HTTPS
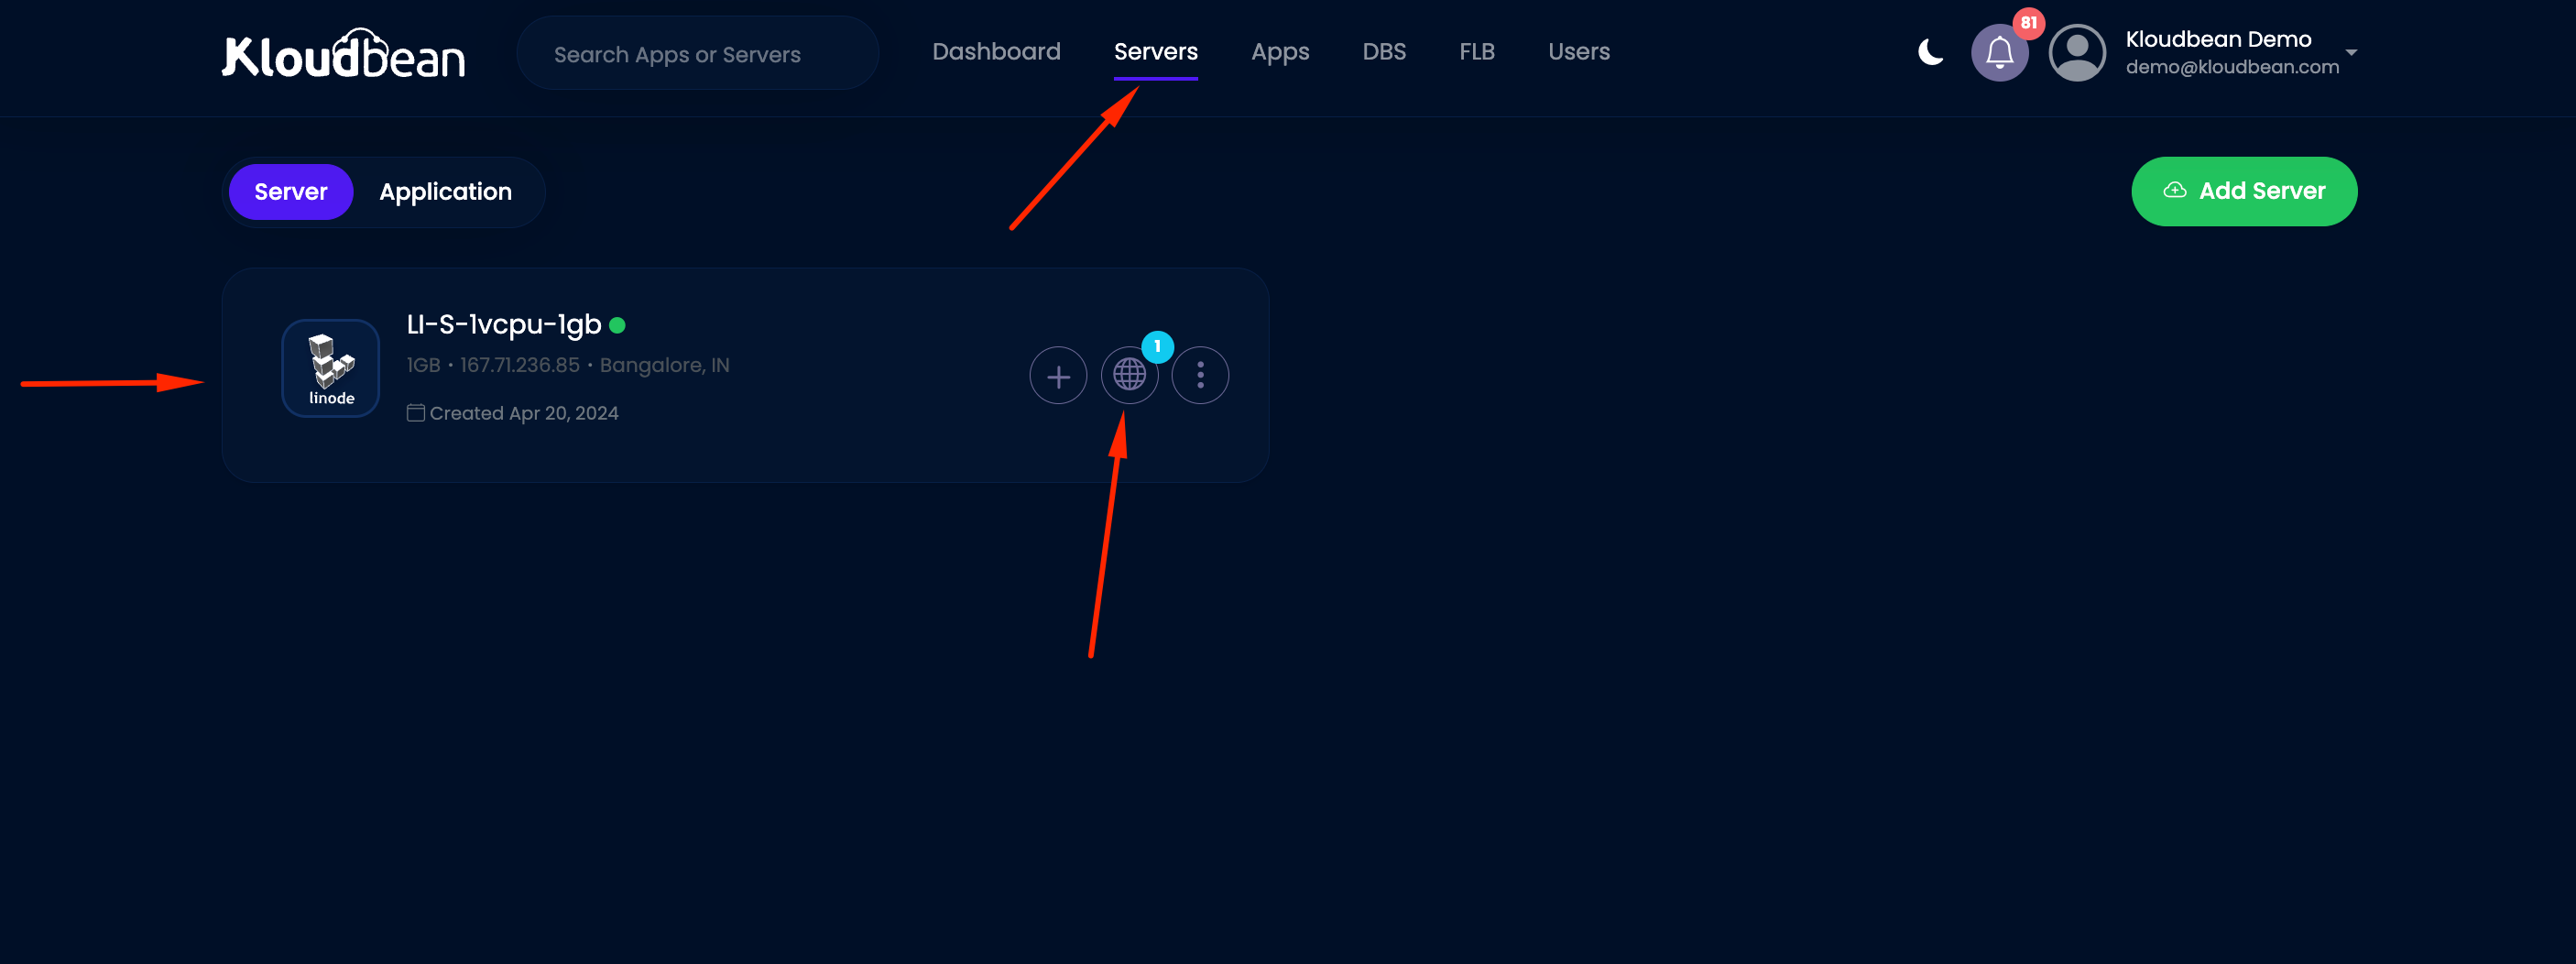
Step #1 — Navigate to SSL Management
- Log in to the Kloudbean Platform using your email address and password.
- From the top menu bar, click
- Then, choose the target server where your desired application is deployed.
Click on App Icon
Please select the application or platform where you need to install the SSL certificate:
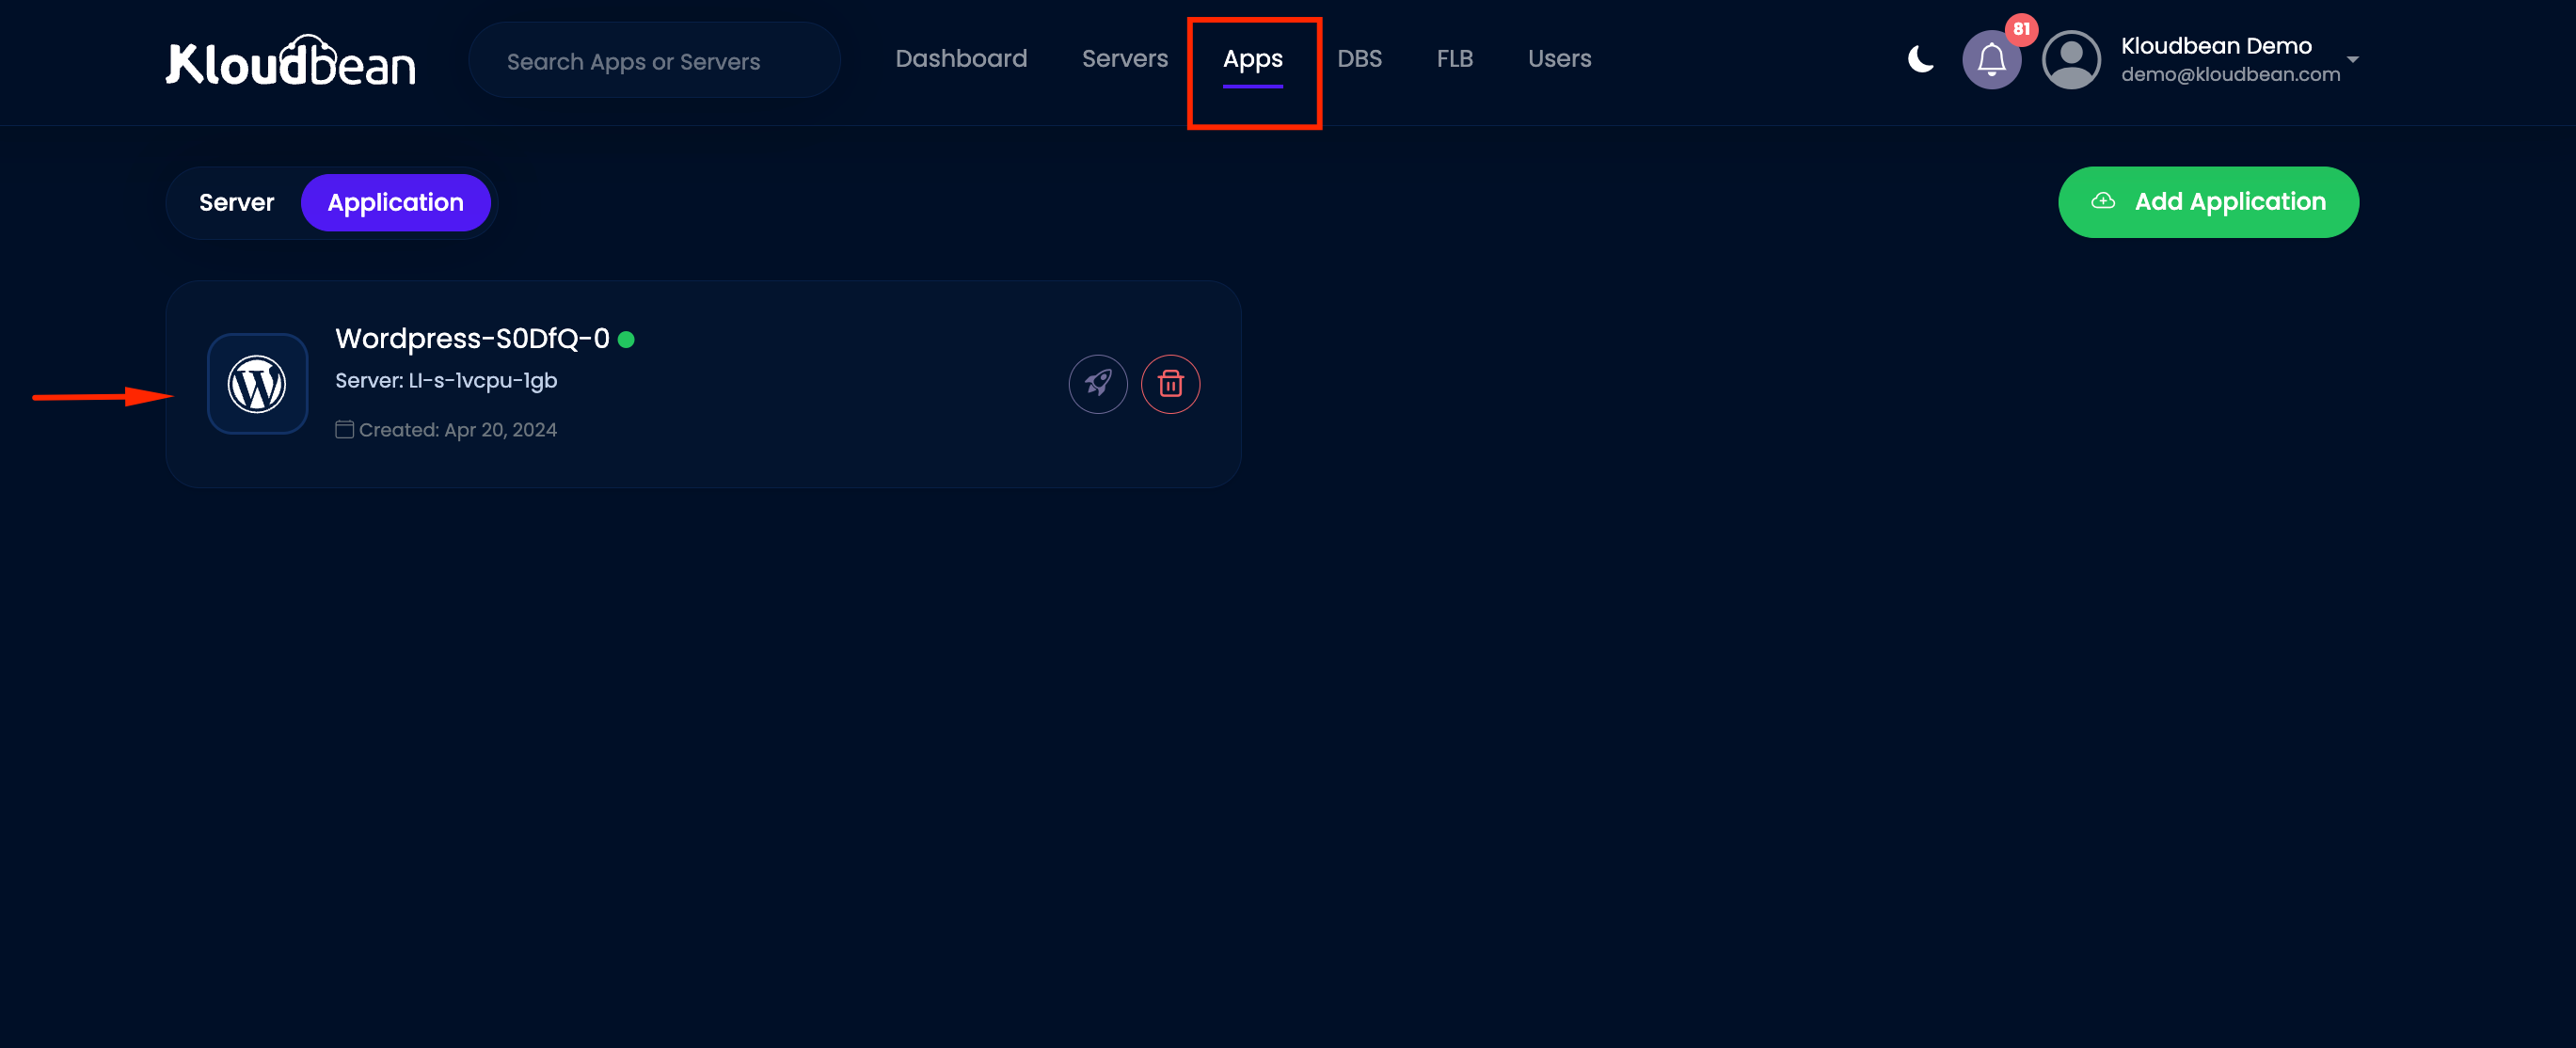
Under Application Administration, click the SSL Certificate.
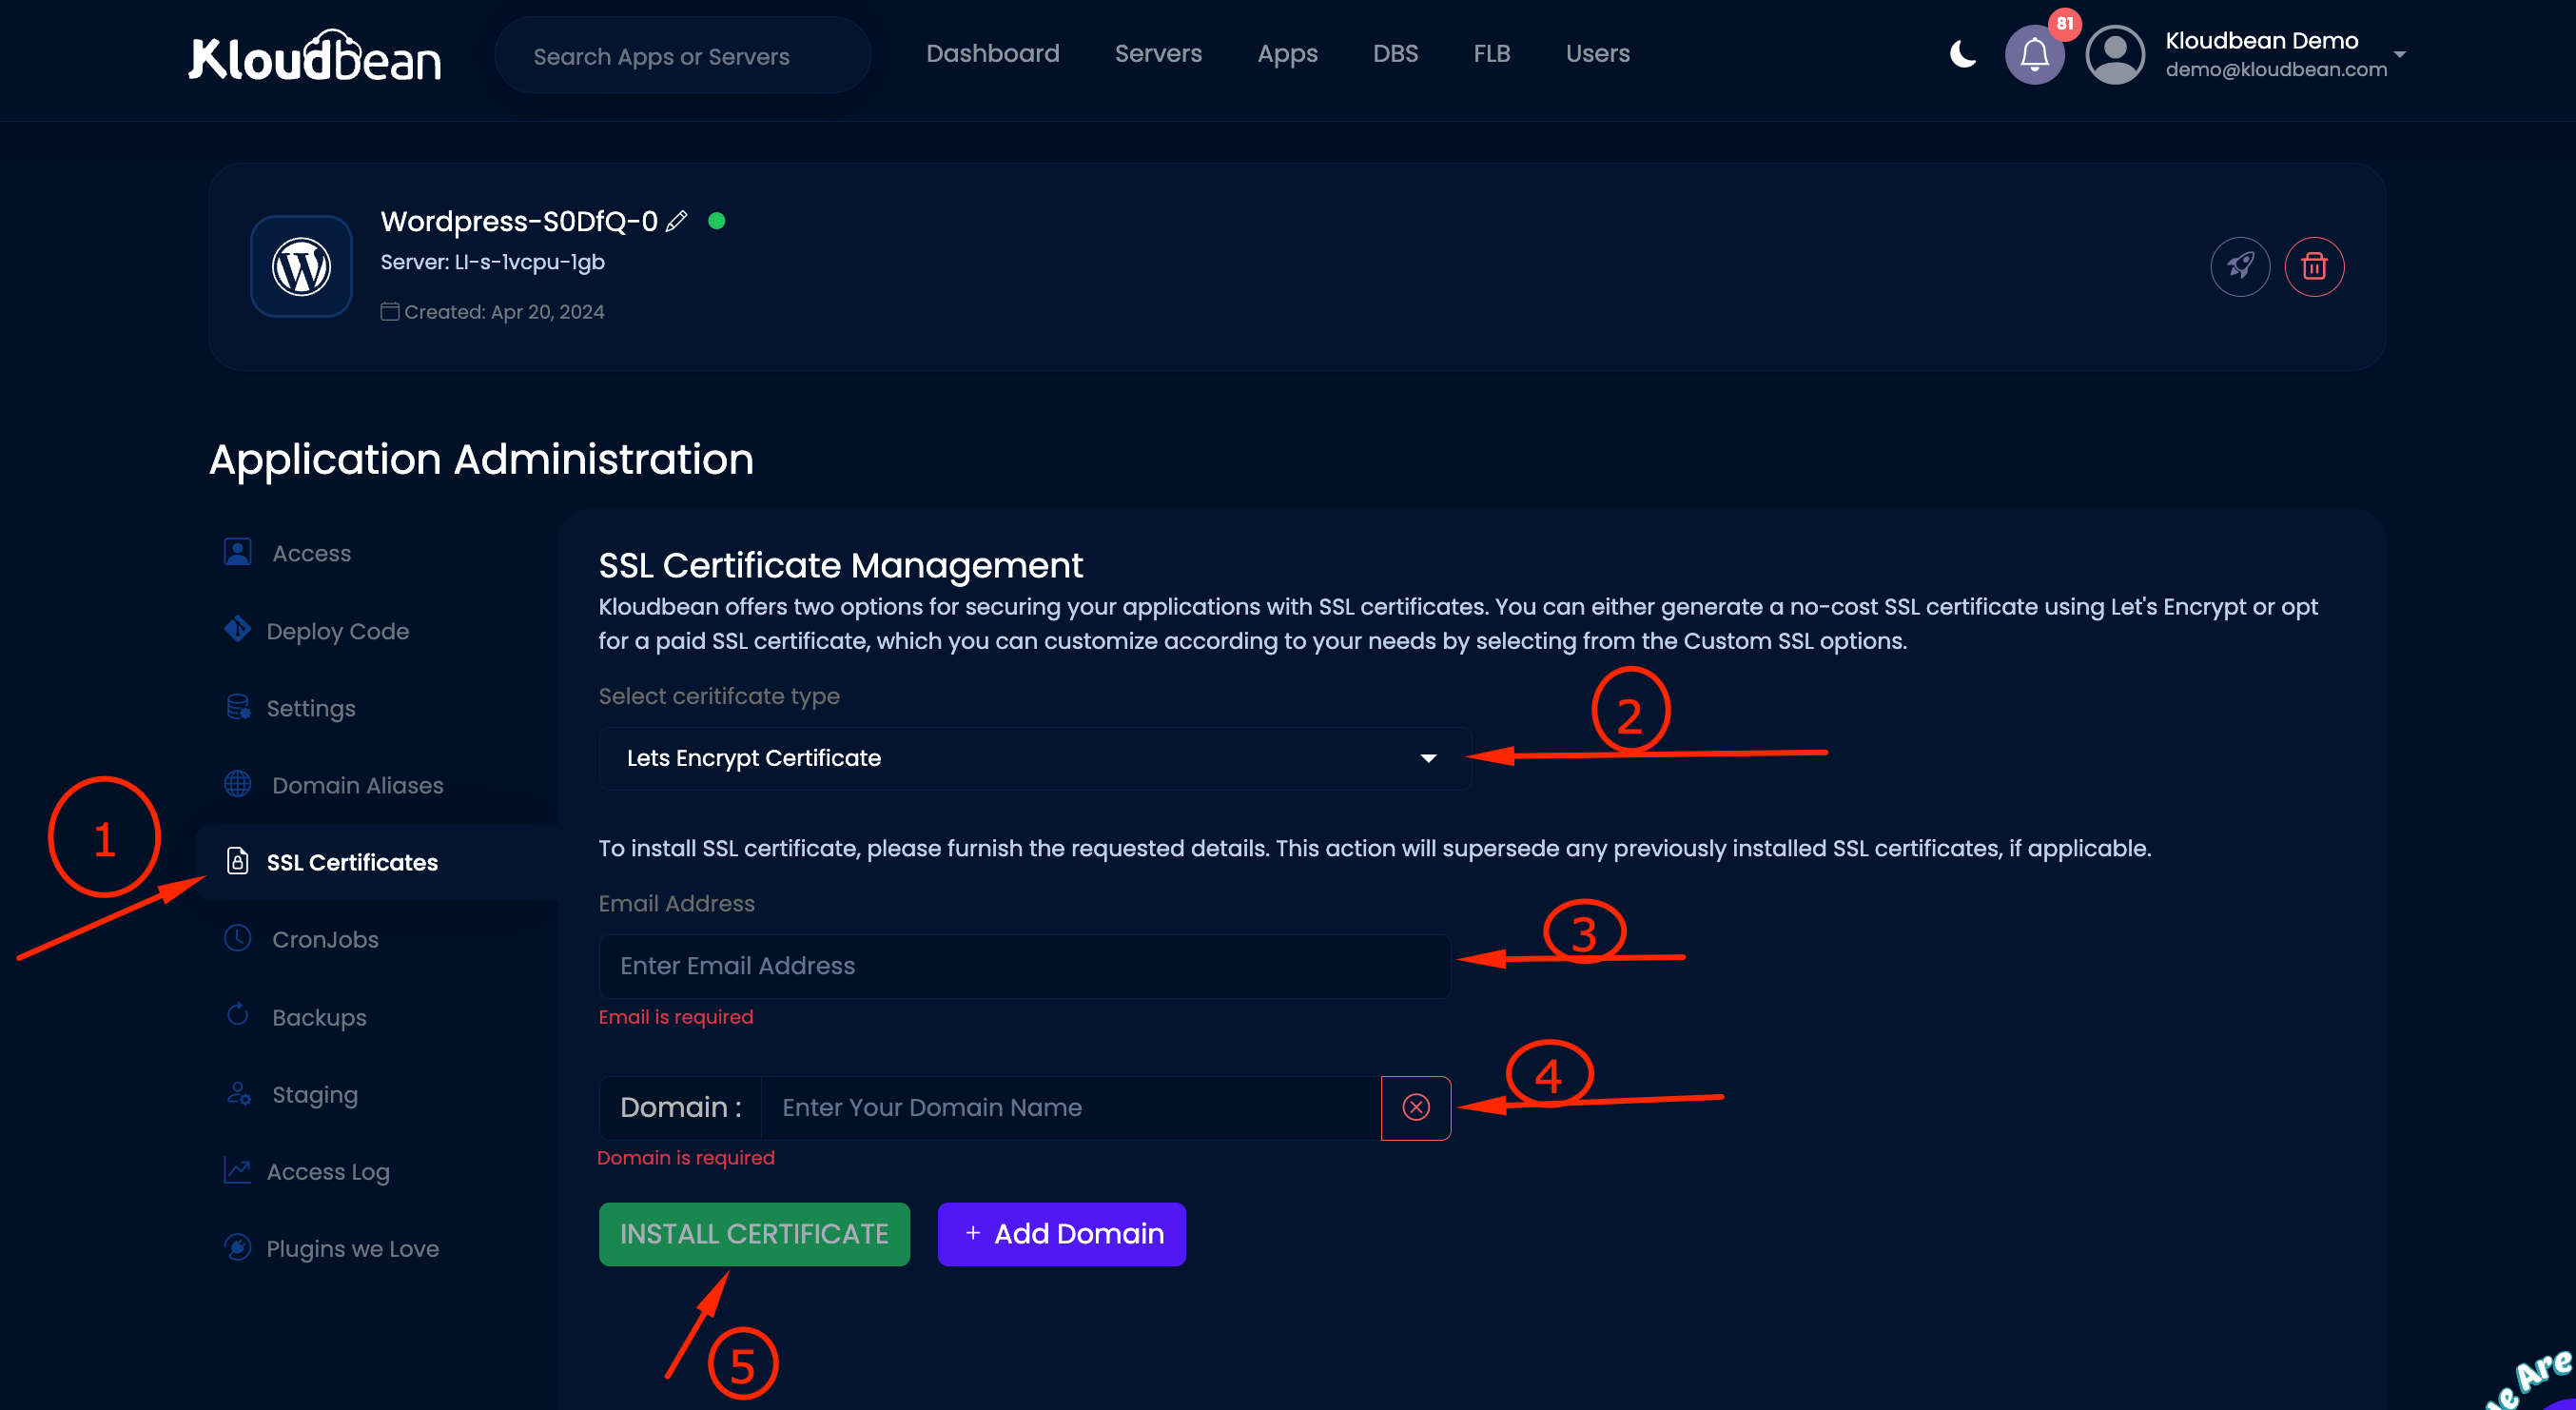
Step #2 — Deploying SSL Certificate
Under SSL Management, select Let’s Encrypt.
Now, you have two different choices to make, whether you want to cover a single domain or multiple domains with an SSL certificate.
- A single domain means one domain only, such as demo.kloudbean.com
- Multiple domains refer to additional domains and subdomains such as support.kloudbean.com, www.kloudbean.com, console.kloudbean.com
Option #1 — Single Domain
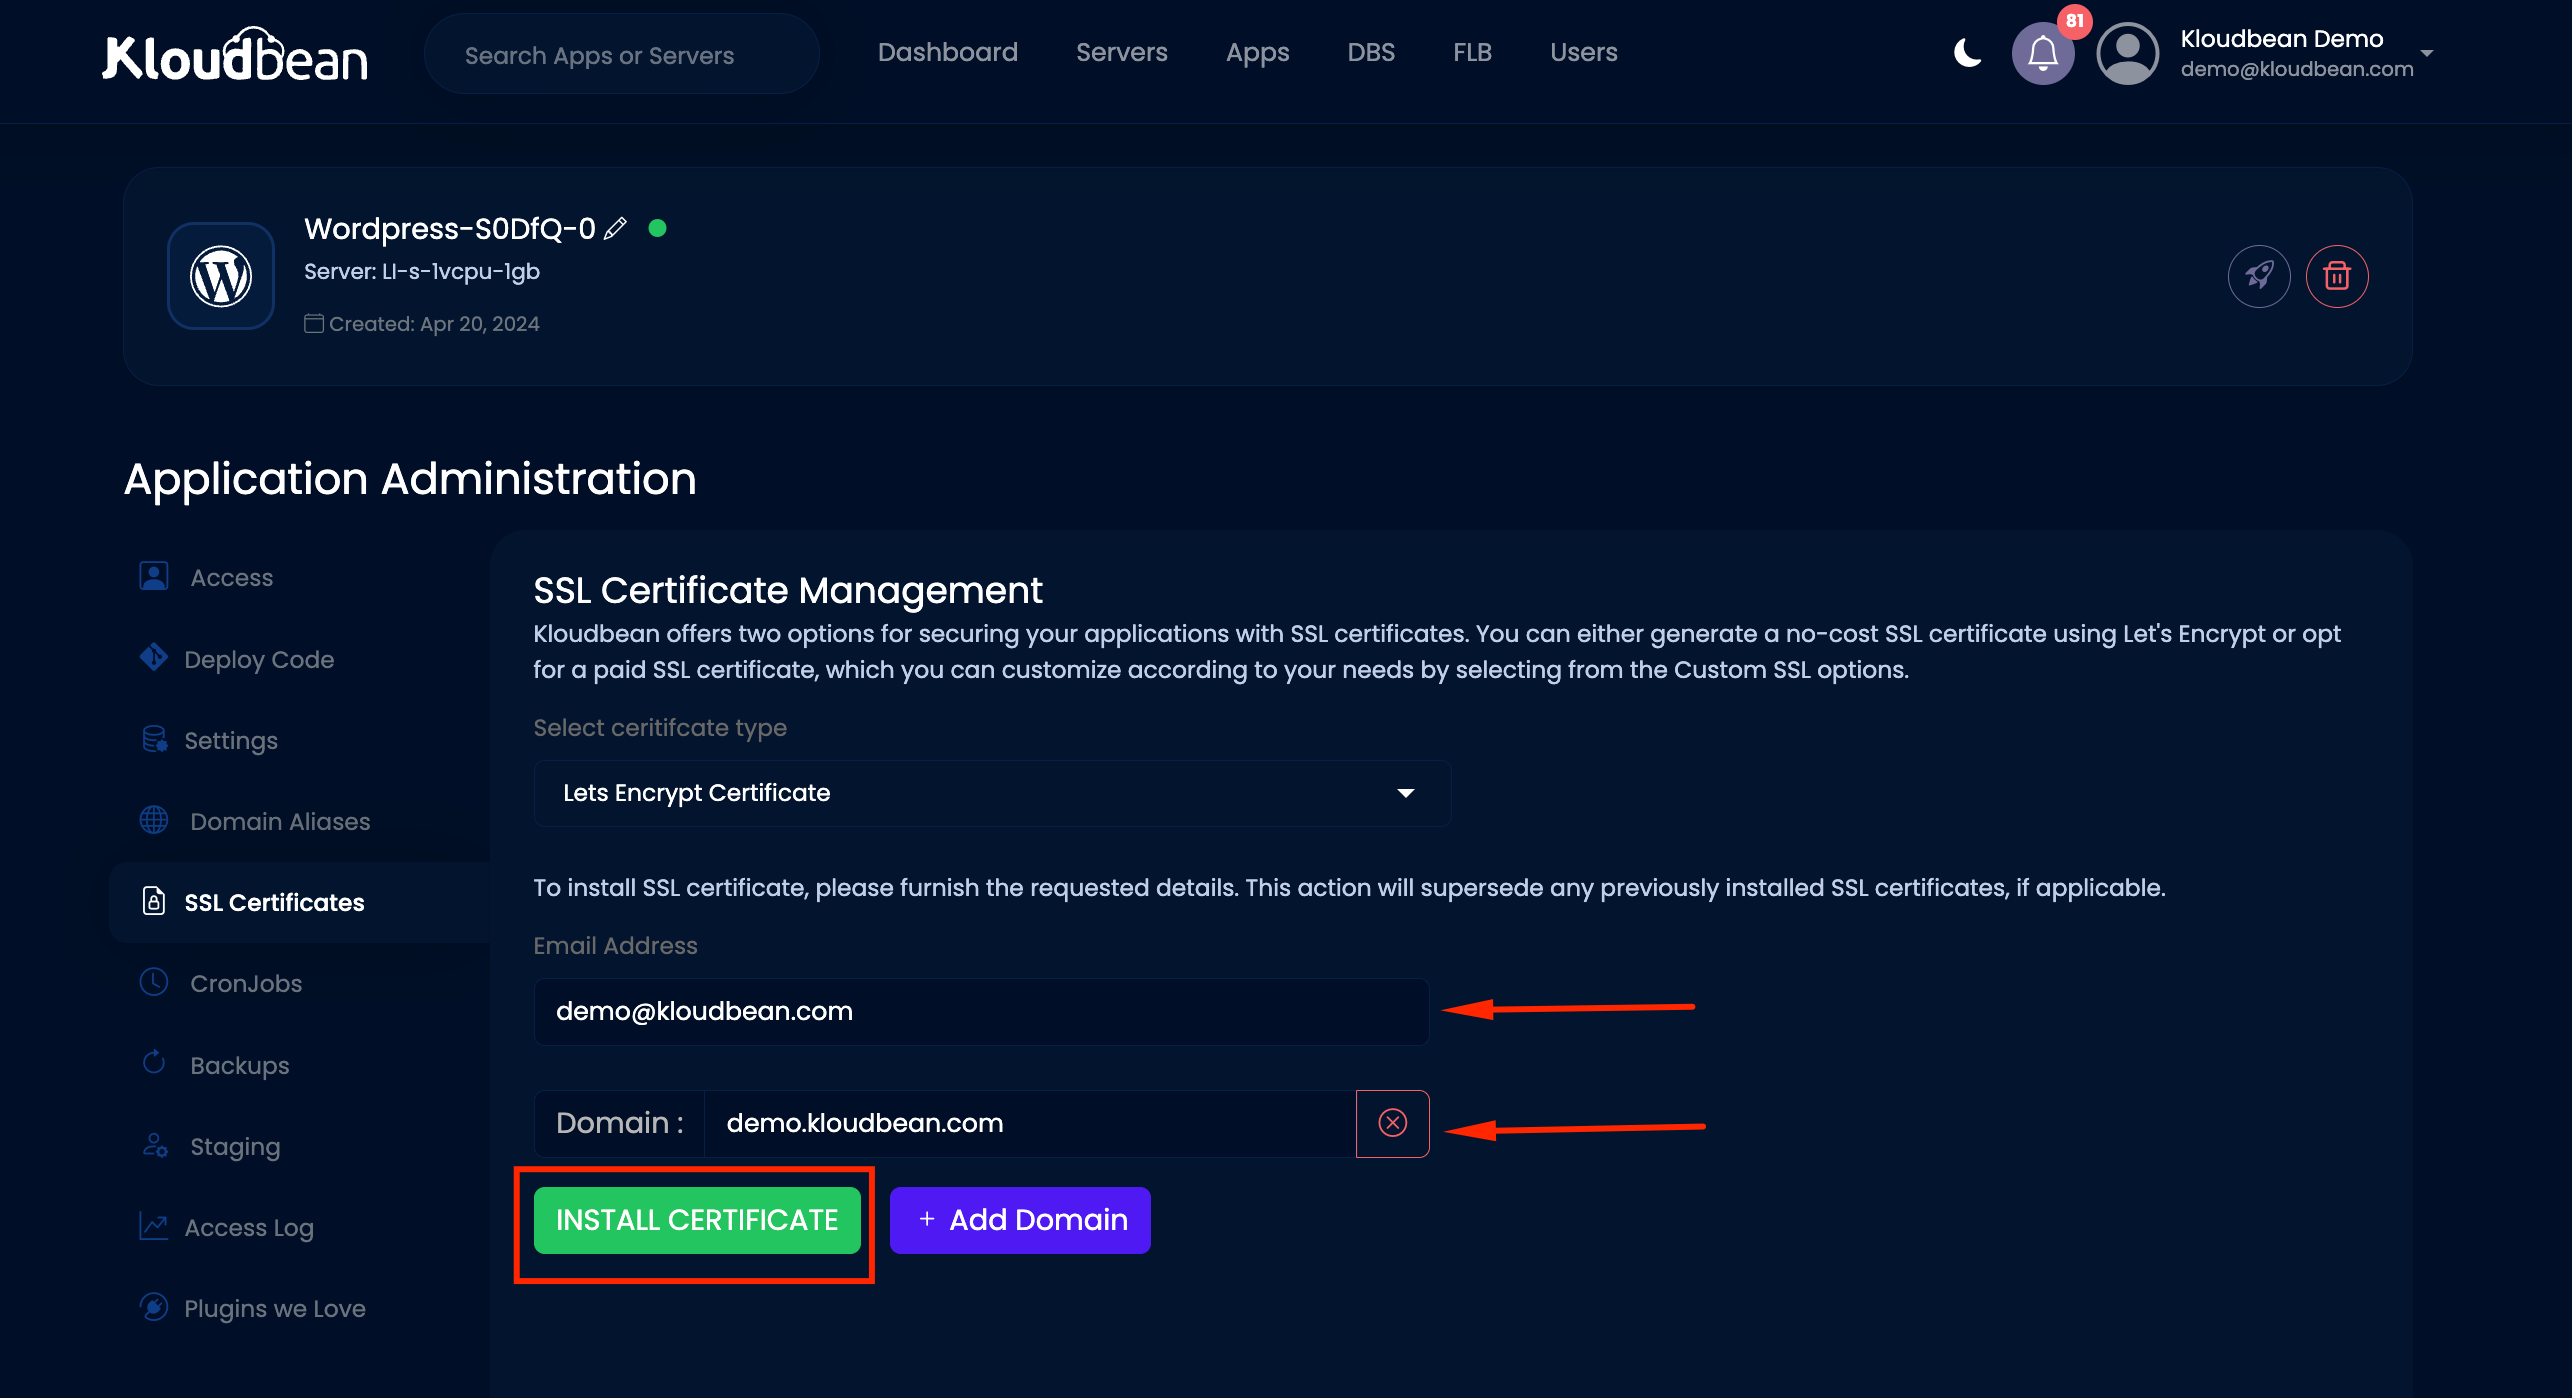
- First, enter your email address.
- Then, enter your desired domain.
- Once done, hit Install Certificate. In this example, we are using a root domain of our demo website (e.g., kloudbean.com).
Before Installing SSL
We have to Enter email and desired domain to Install SSL
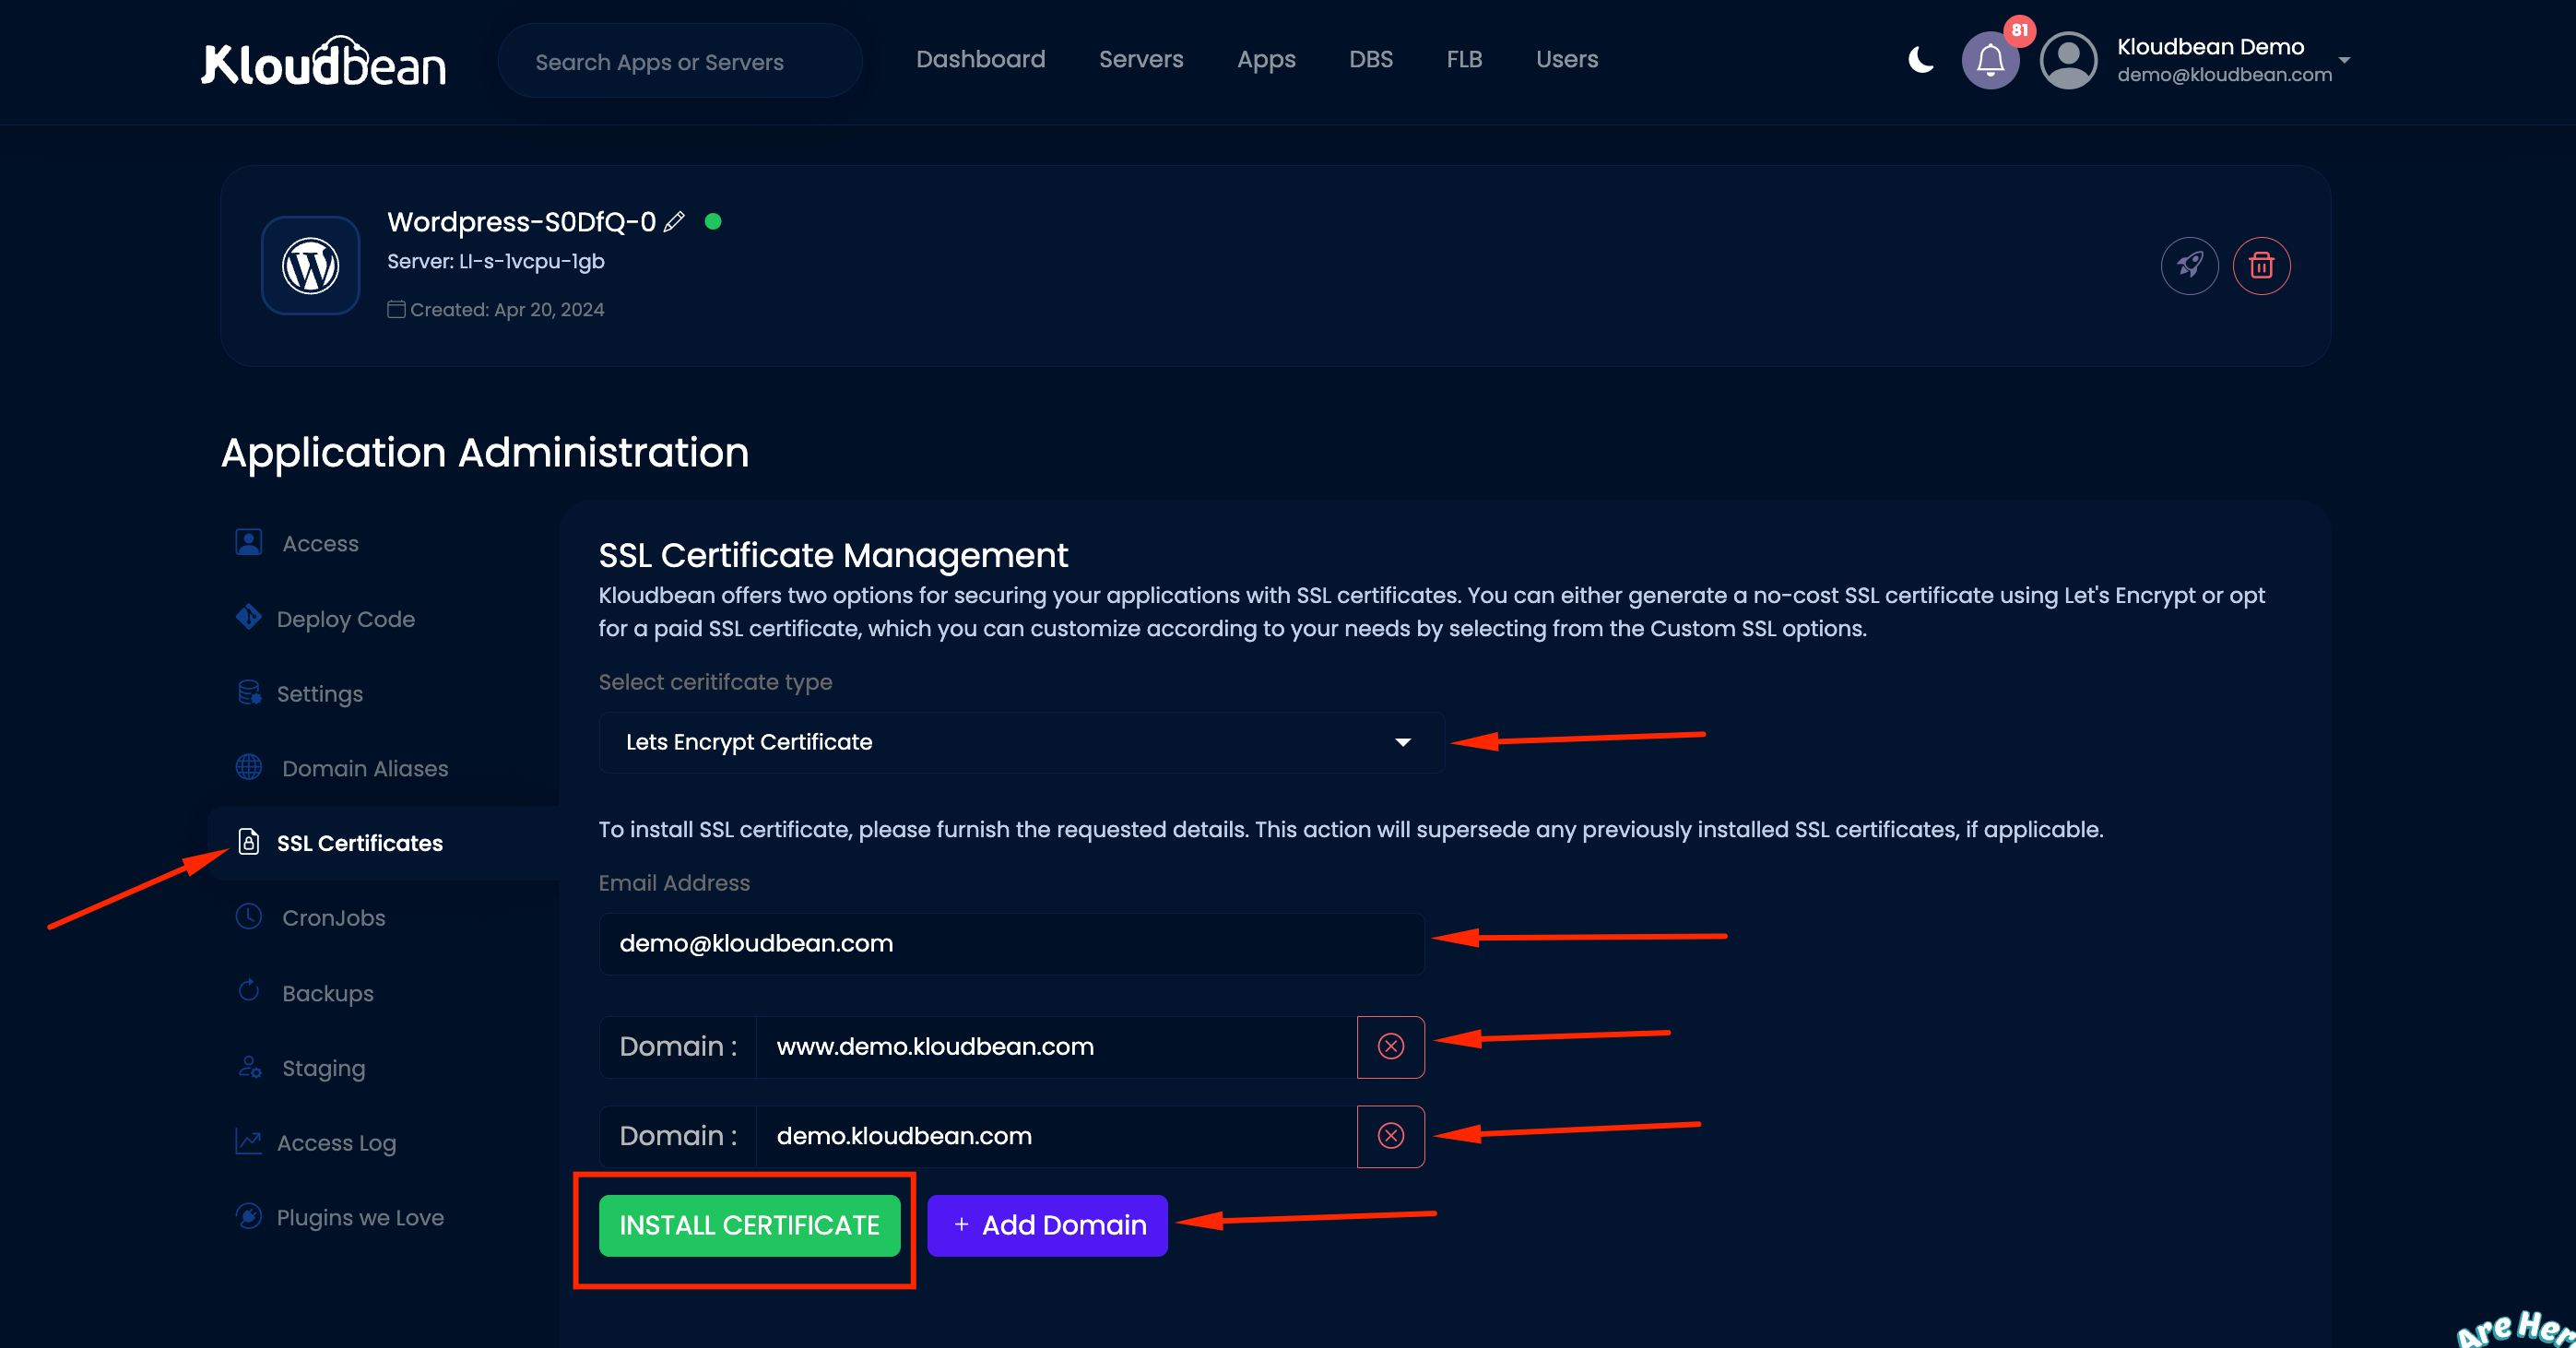
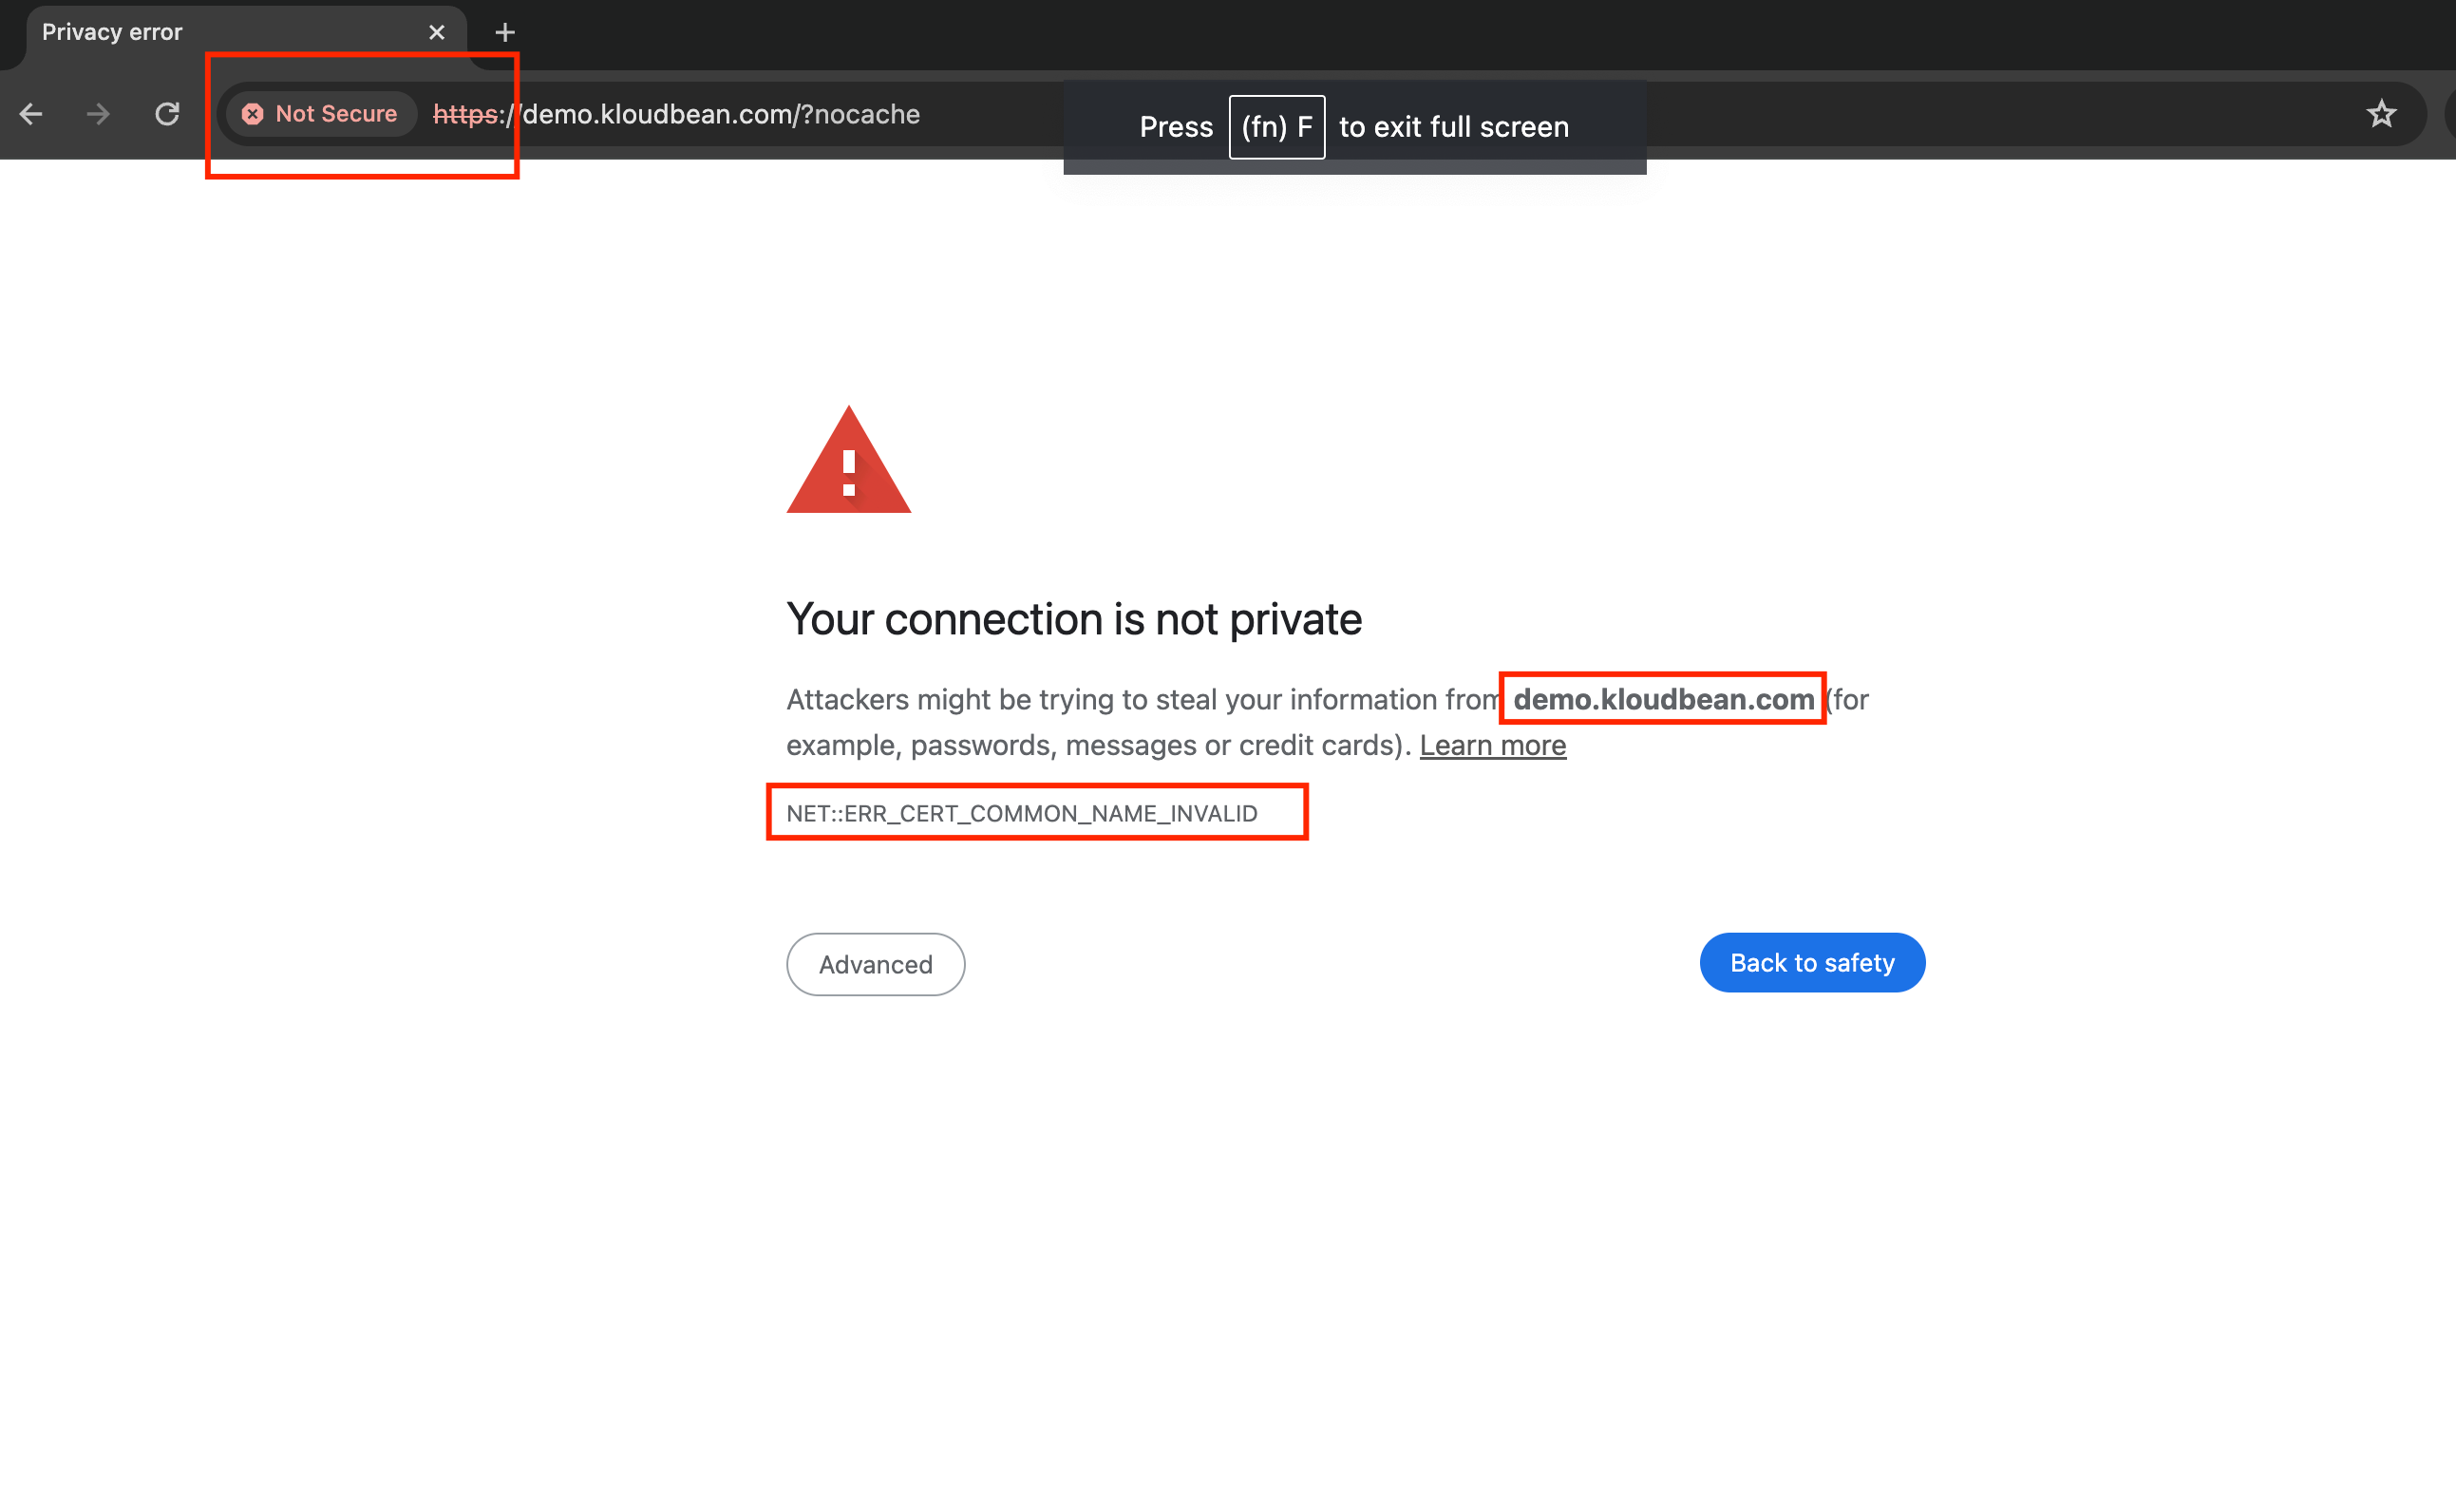
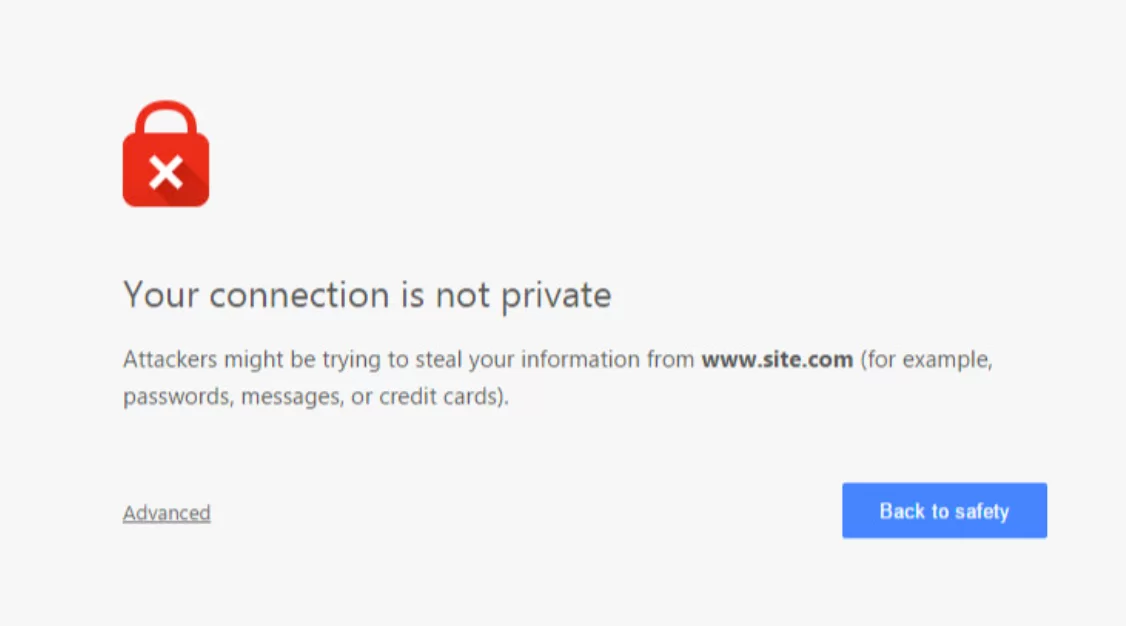
Now a days, many users continue to habitually add "www" to every domain they visit. If your SSL certificate does not encompass this variation, it can trigger an insecure warning in their browsers. This warning typically appears as follows:
To address this issue, you need to include the "www" subdomain as an additional domain when installing the SSL certificate. Here is an example of how this can be done during installation:
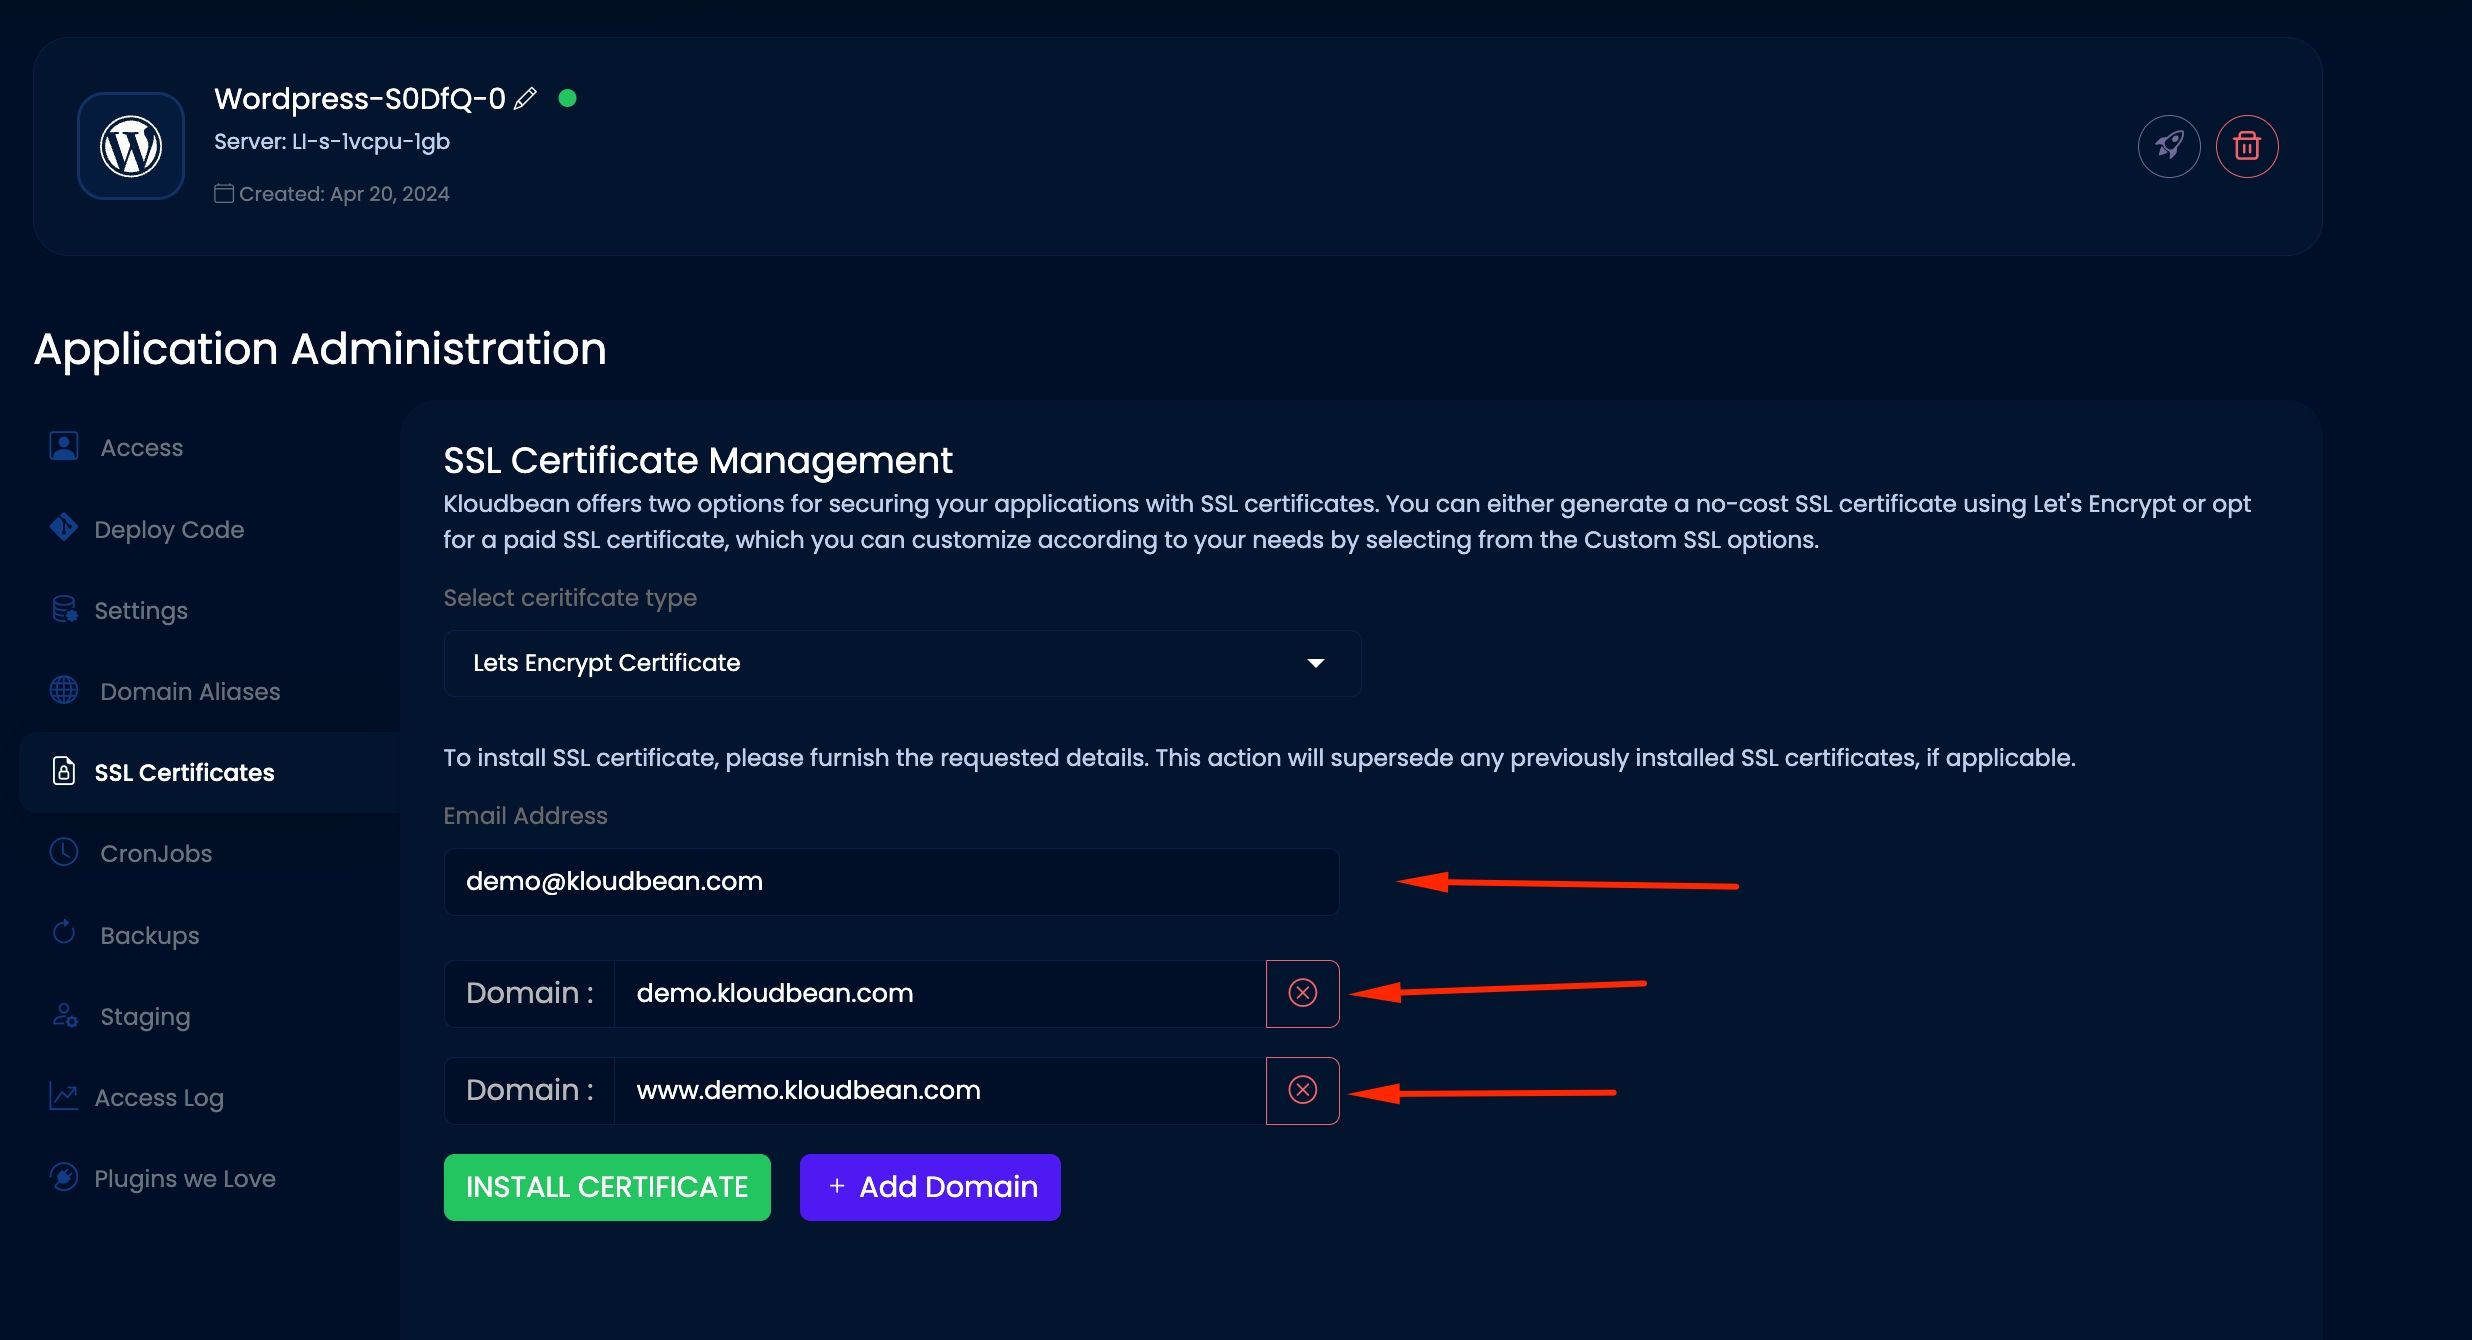
Certainly! When following these steps, remember to replace "demo.kloudbean.com" with your own domain and provide your actual email address. This adjustment will resolve the insecure warning in the browser when accessing the domain with the "www" subdomain.
Additionally, it's crucial to confirm that the "www" subdomain is correctly directed to your server's IP address. This can be achieved by setting up an A record pointing directly to the IP or a CNAME record pointing to the primary domain. Without this configuration, the subdomain won't resolve properly and can't be included in the SSL certificate.
That's it! Your application will soon have a free Let’s Encrypt SSL Certificate deployed within a few minutes. During this process, you might also be prompted to enable HTTPS redirection for enhanced security.
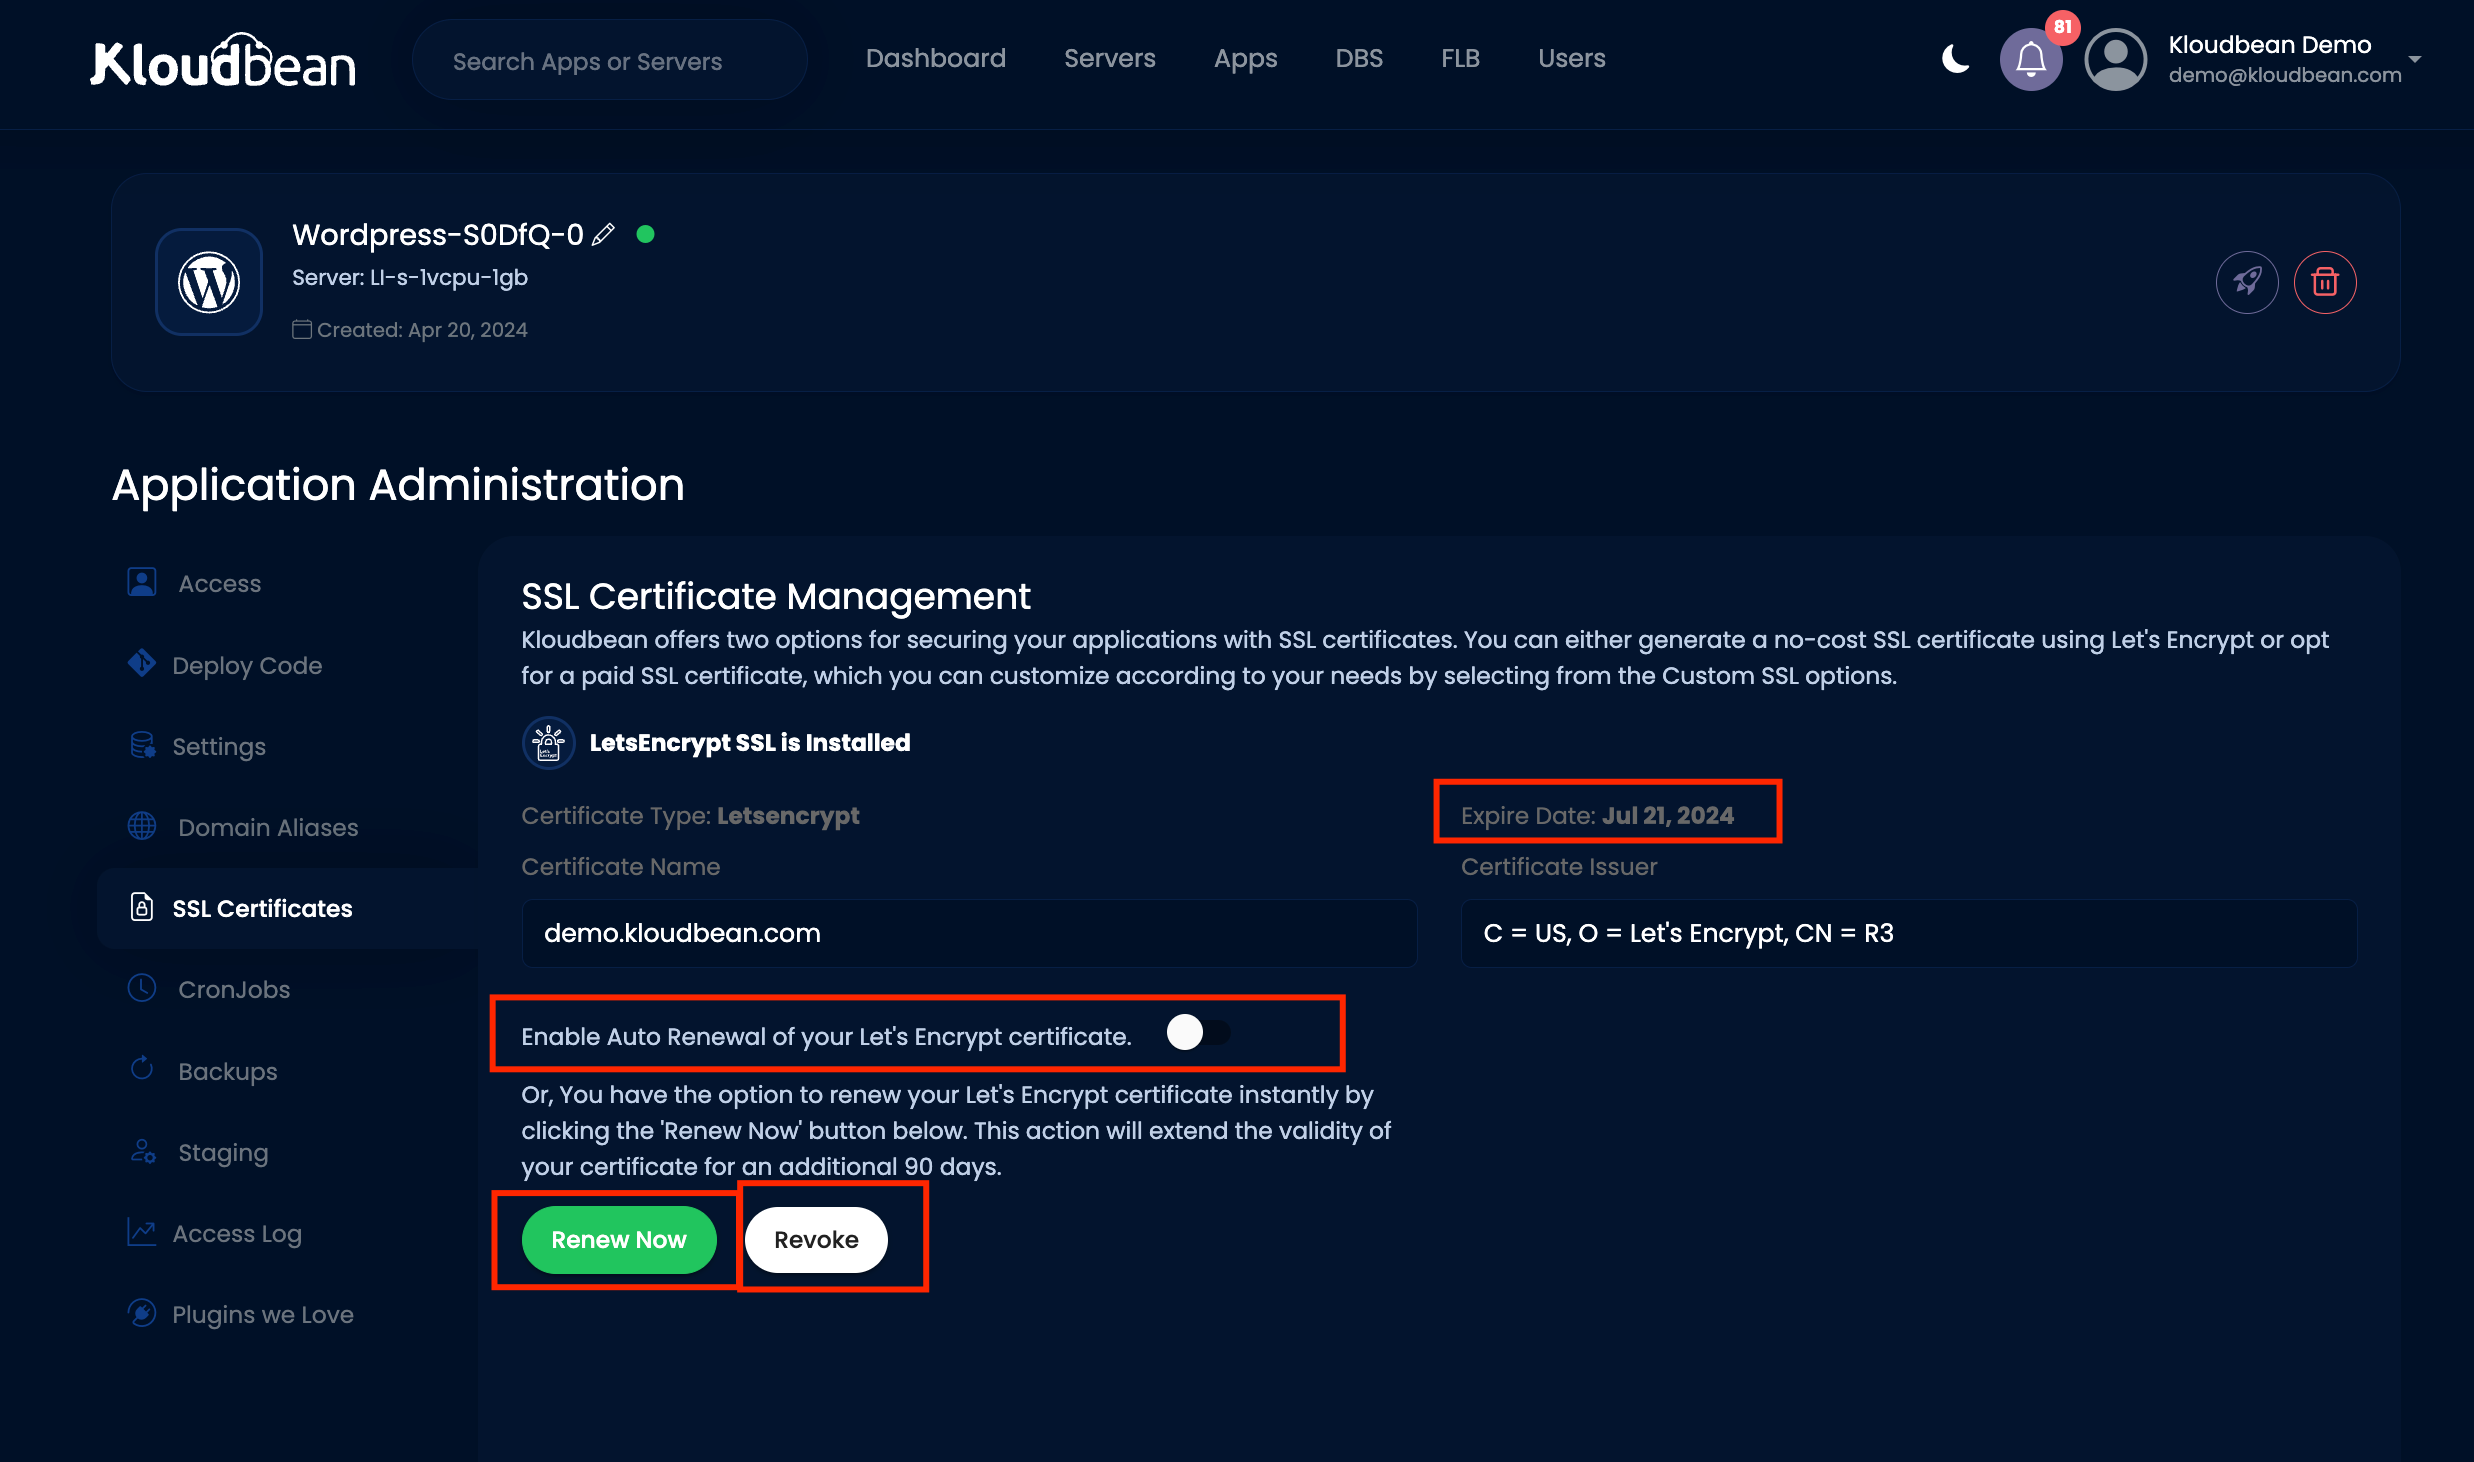
Once the SSL installation is complete, you will see a confirmation screen with important details such as the expiry date of the certificate and the domain name where the free SSL was installed.
On this screen, you will typically find options to manage your SSL certificate, including:
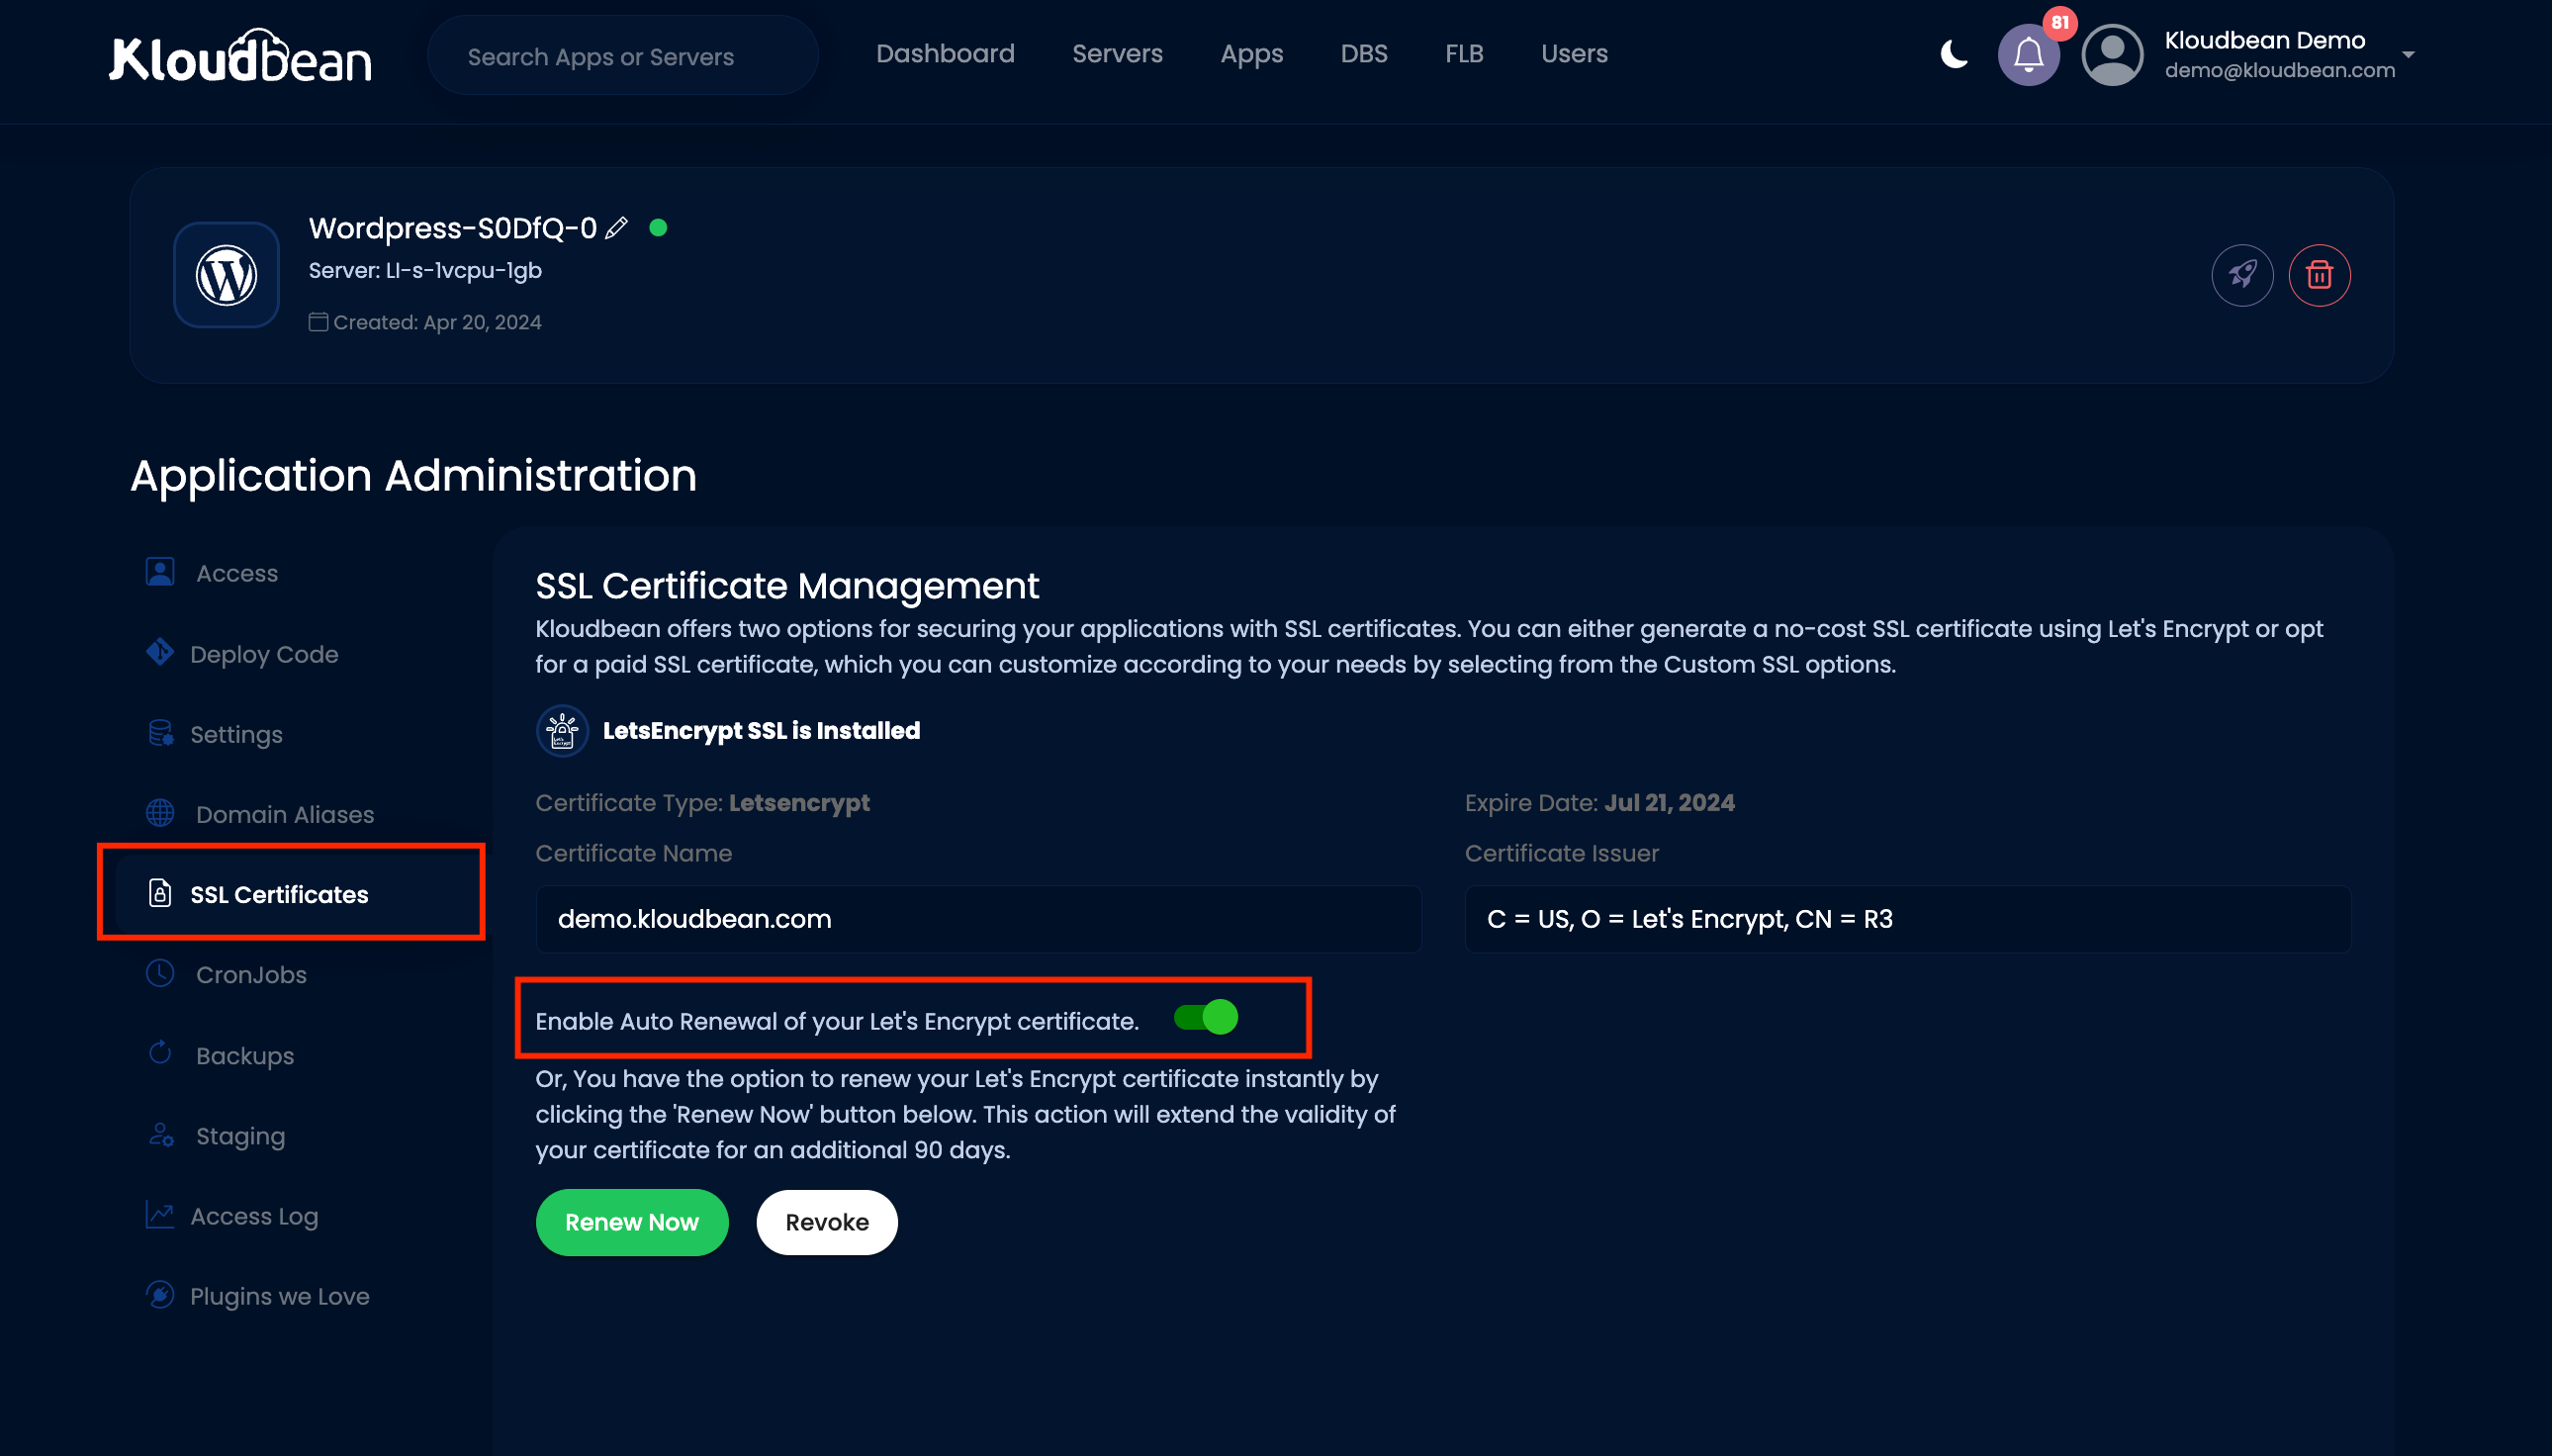
1. Auto Renewal Toggle: You can turn on the auto-renewal feature to ensure that your SSL certificate is automatically renewed before it expires, providing continuous security without manual intervention.
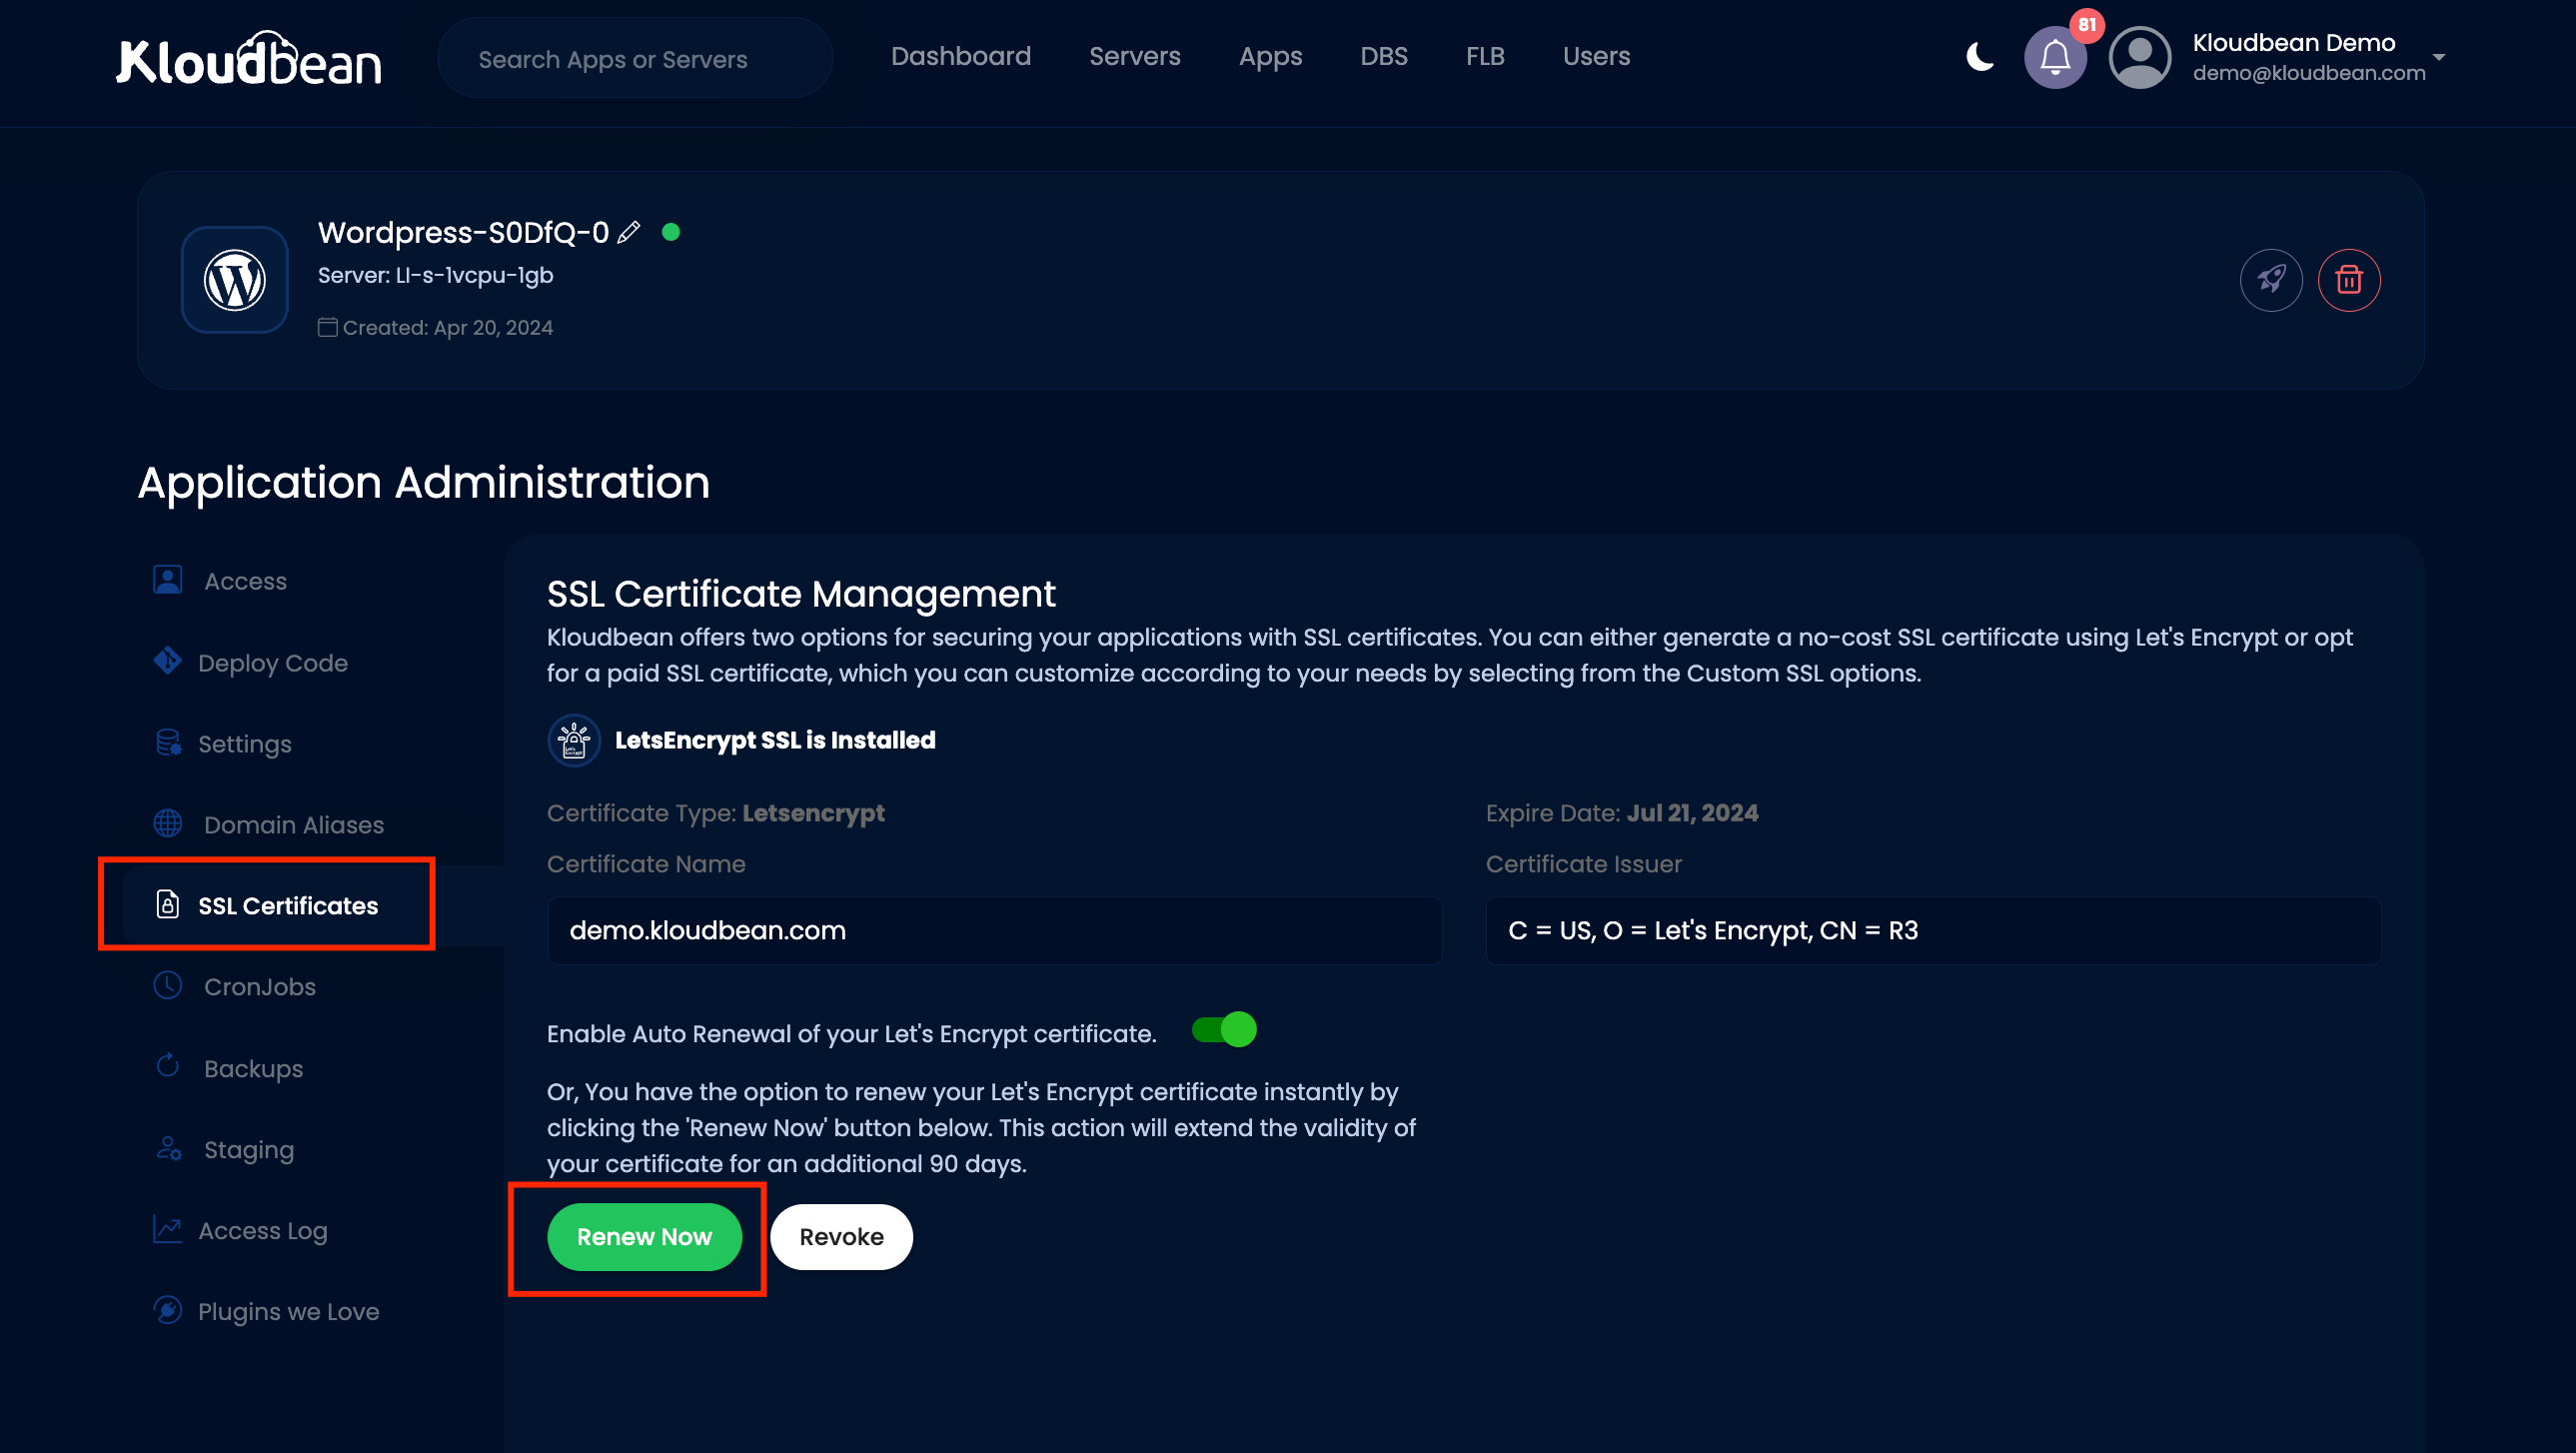
2. On Demand Renewal Button: If you prefer, there may be a button that allows you to manually renew your SSL certificate immediately. This is useful if you want to ensure the certificate is updated promptly or if automatic renewal is not enabled.
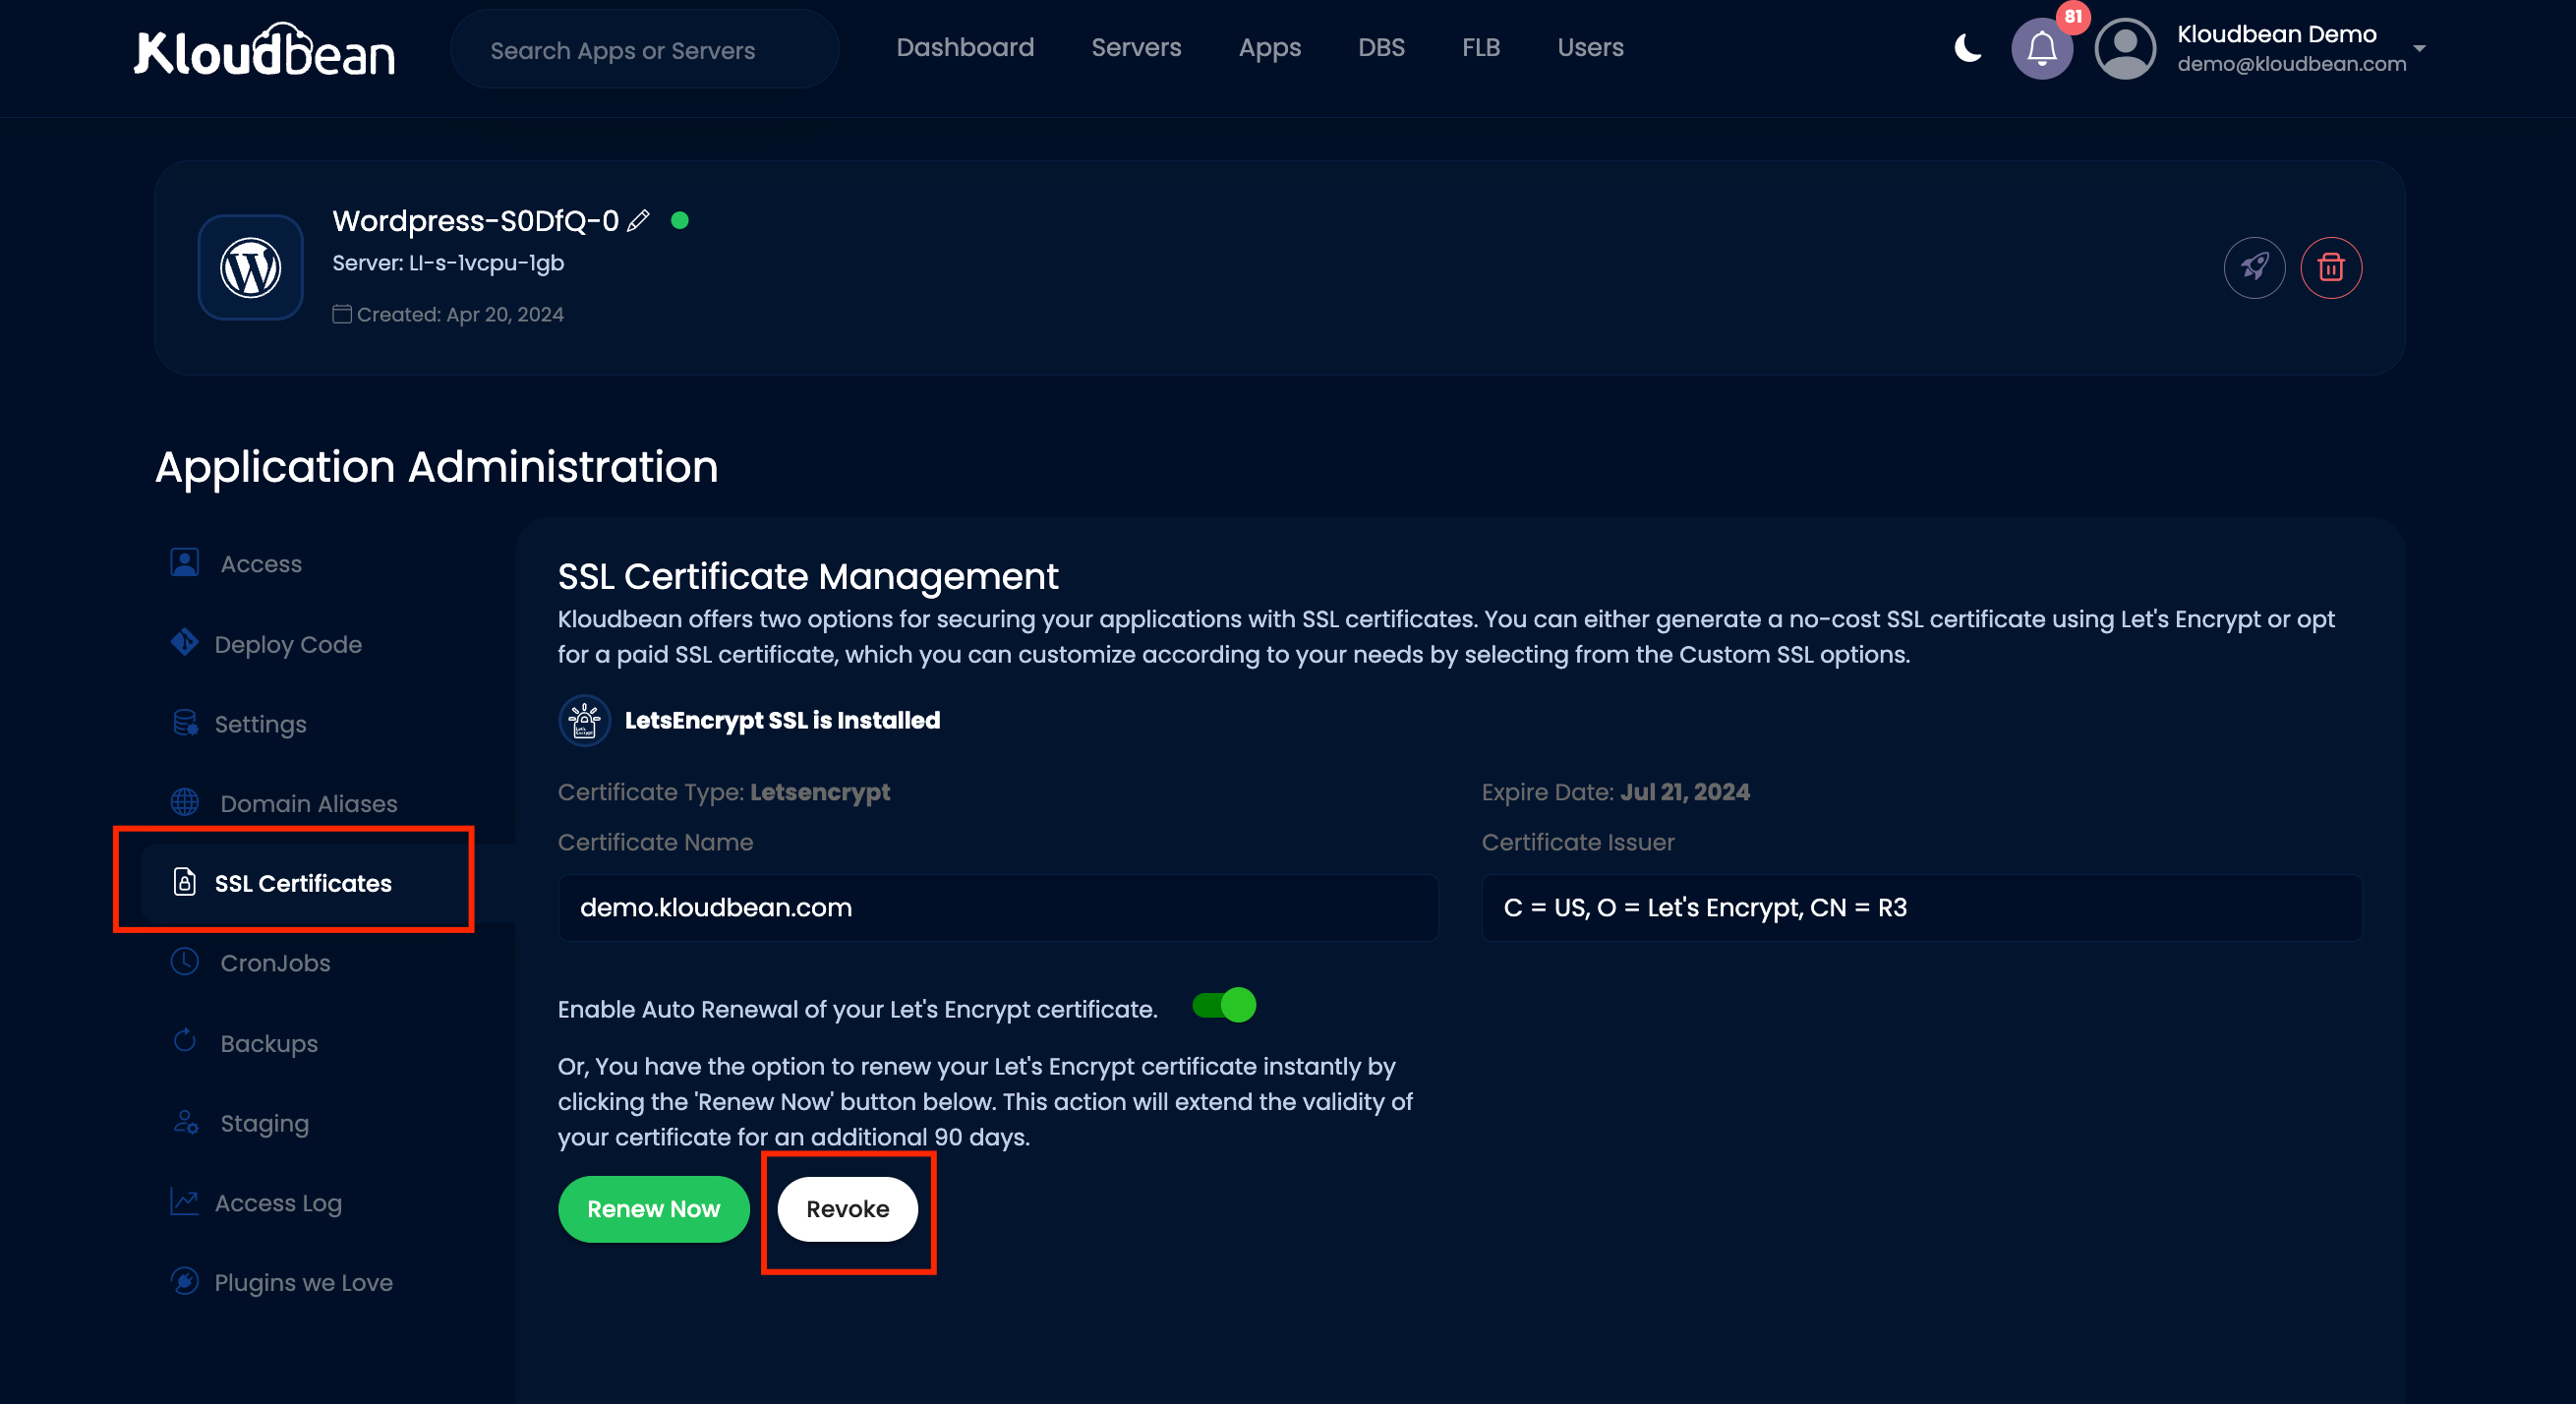
3. Certificate Revocation: Additionally, you may have the option to revoke your current SSL certificate if needed. This could be necessary in situations where the certificate has been compromised or if you need to replace it with a new certificate.
These features provide flexibility and control over the management of your SSL certificates, helping to maintain secure connections for your domain.
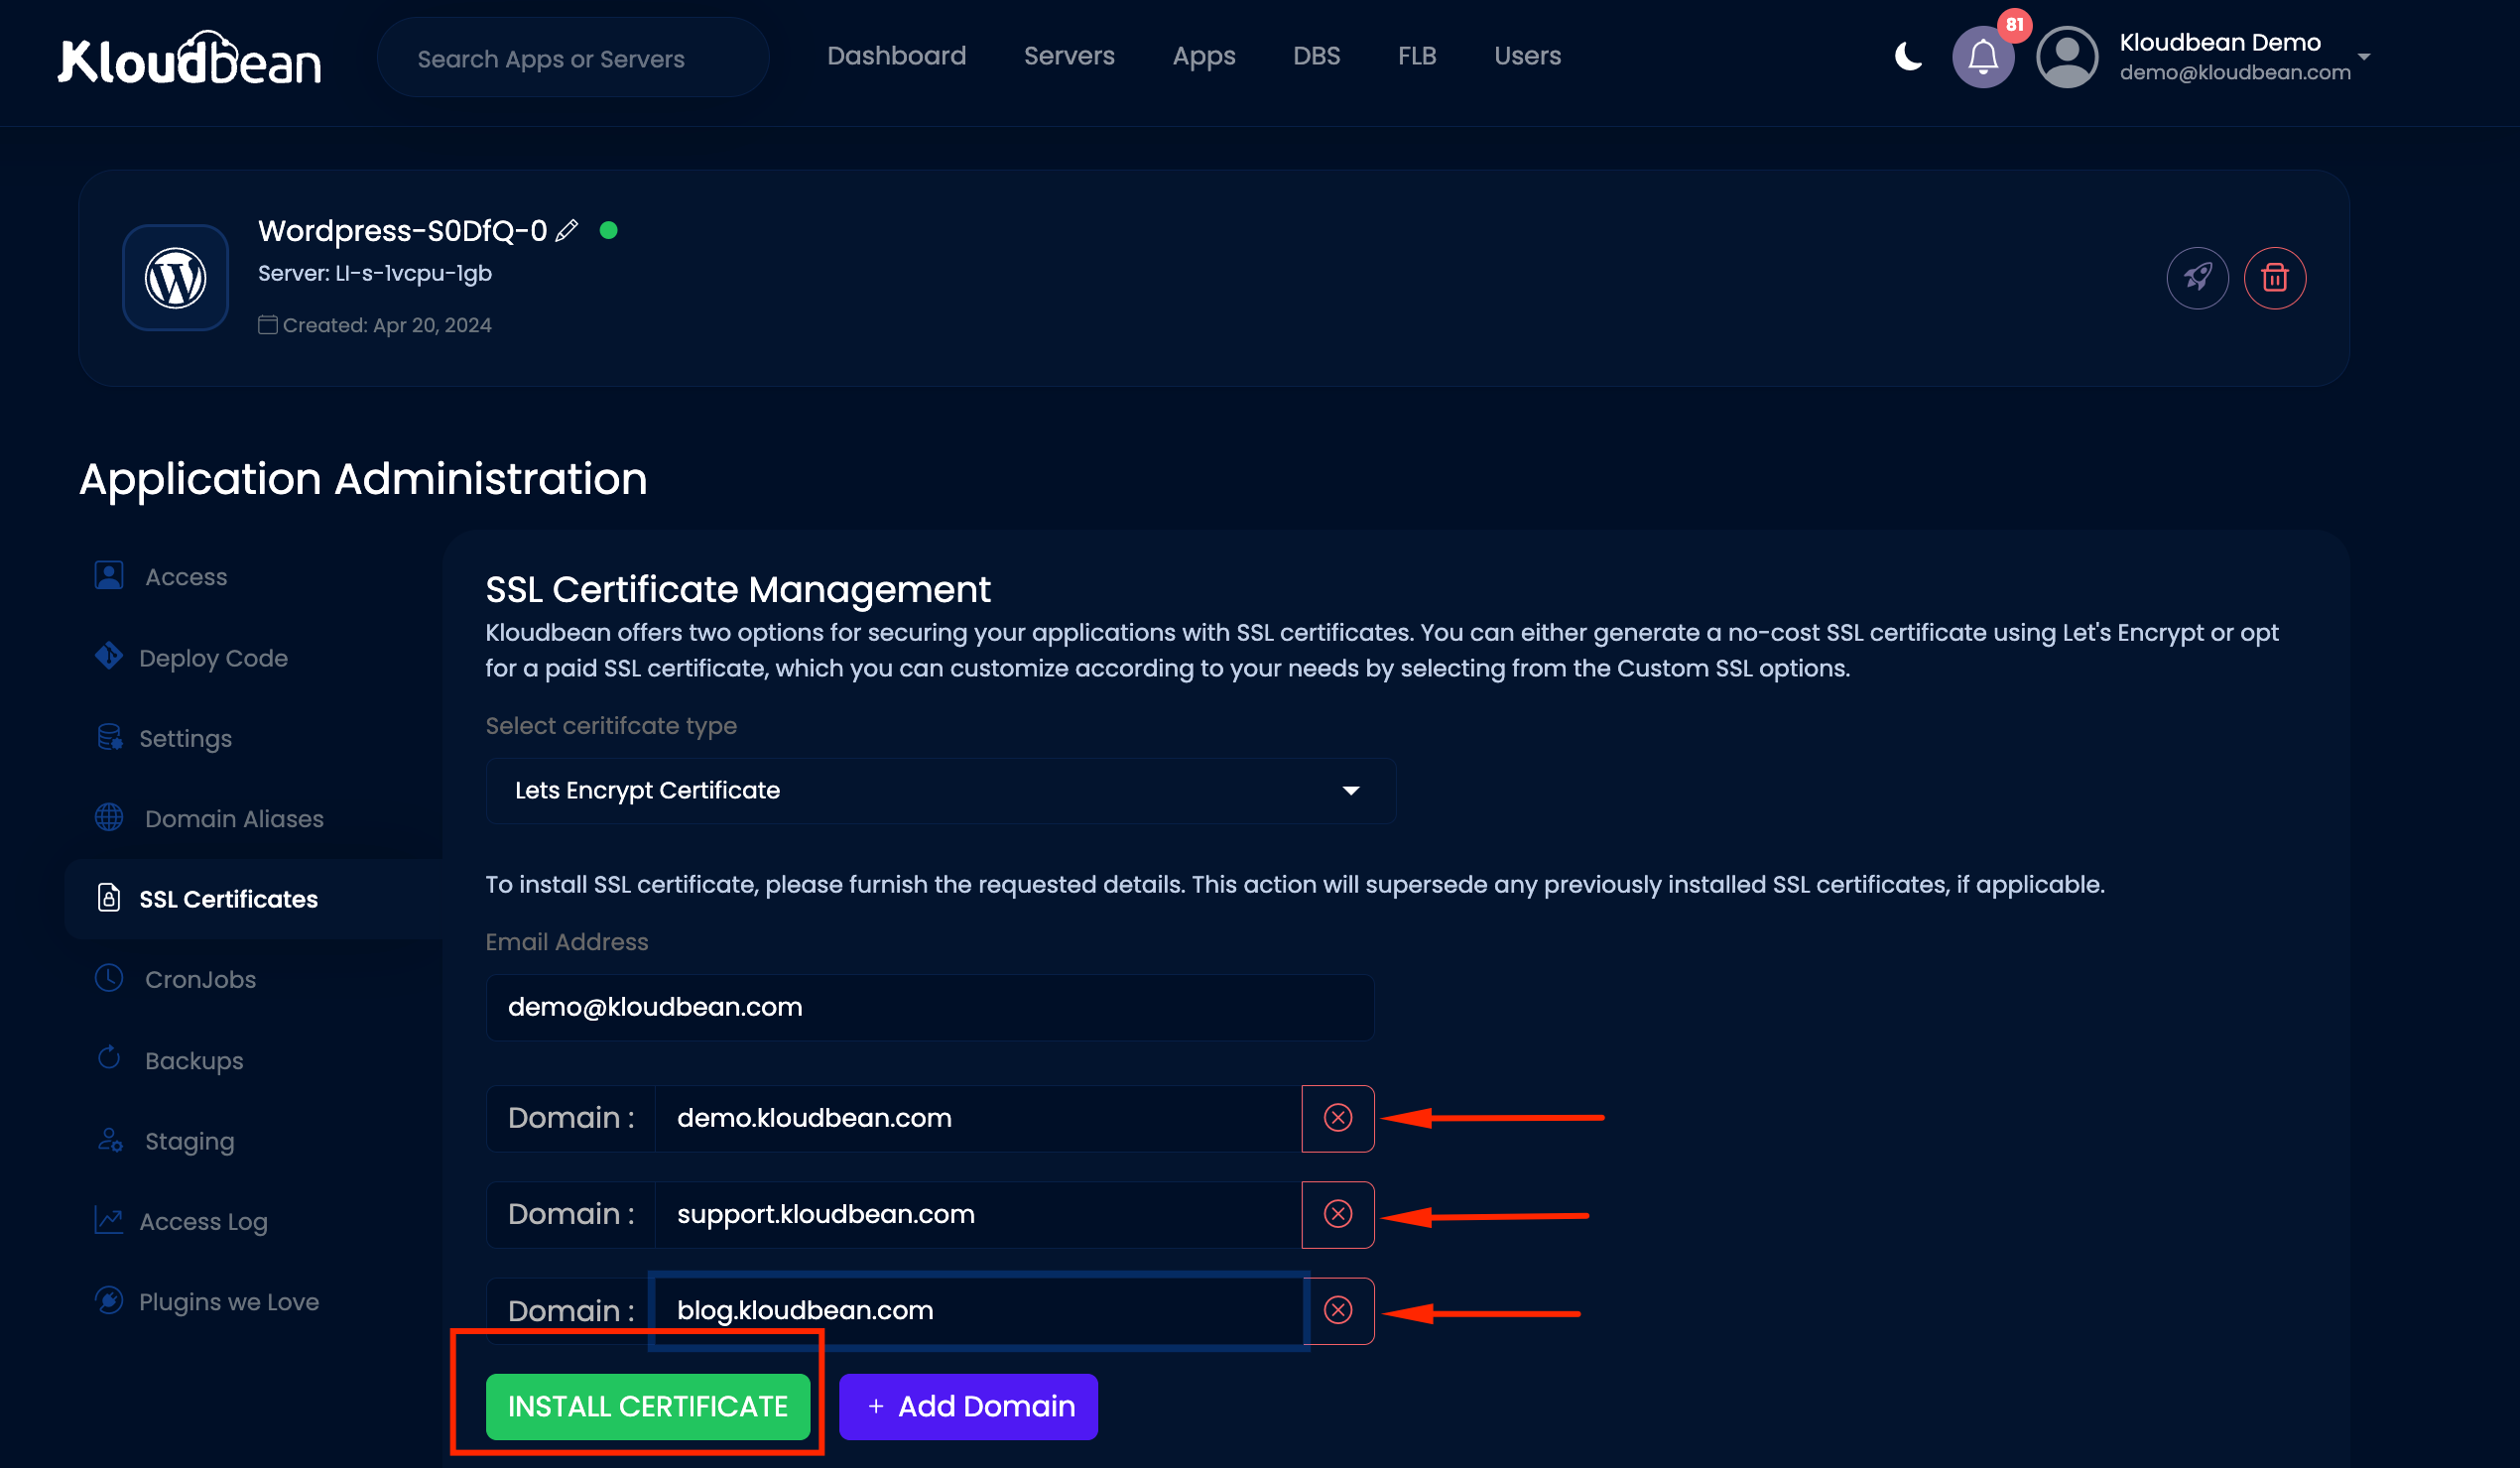
Option #2 — Multiple Domains
Multi-domain (SAN) Certificate:
- Subject Alternative Name (SAN) Functionality: SAN allows you to secure multiple domains (including root domains, additional domains, and subdomains) using a single SSL certificate.
- Listing Domains: You must specify and declare all the domains you intend to secure during the SSL certificate installation process.
- Flexibility: Ideal for securing a defined set of specific domains and subdomains under a single certificate.
- Example: You can secure
- Cost-effectiveness: Often more cost-effective than obtaining separate certificates for each domain.
To obtain a Multi-domain (SAN) Certificate, follow these steps:
- Enter Email Address: Provide your email address for certificate-related notifications and updates.
- Add Domains:
- Enter your primary domain in the "Domain Name" field.
- Click on "Add Domain" to include additional domains or subdomains that you want to secure under the same certificate.
- Keep in mind that each Let’s Encrypt SSL Certificate can accommodate up to 100 Subject Alternative Names (SANs), which include both additional domains and subdomains. Ensure that you stay within this limit.
Your application will have Free Let’s Encrypt SSL Certificate deployed in a few minutes. You may also be prompted to force HTTPS redirection.
Tip
- If you would like to update your root domain in the future, you need to revoke your existing certificate and deploy a new one.
- We recommend that you do not delete the CNAME record because it will affect your SSL certificate’s renewal process.
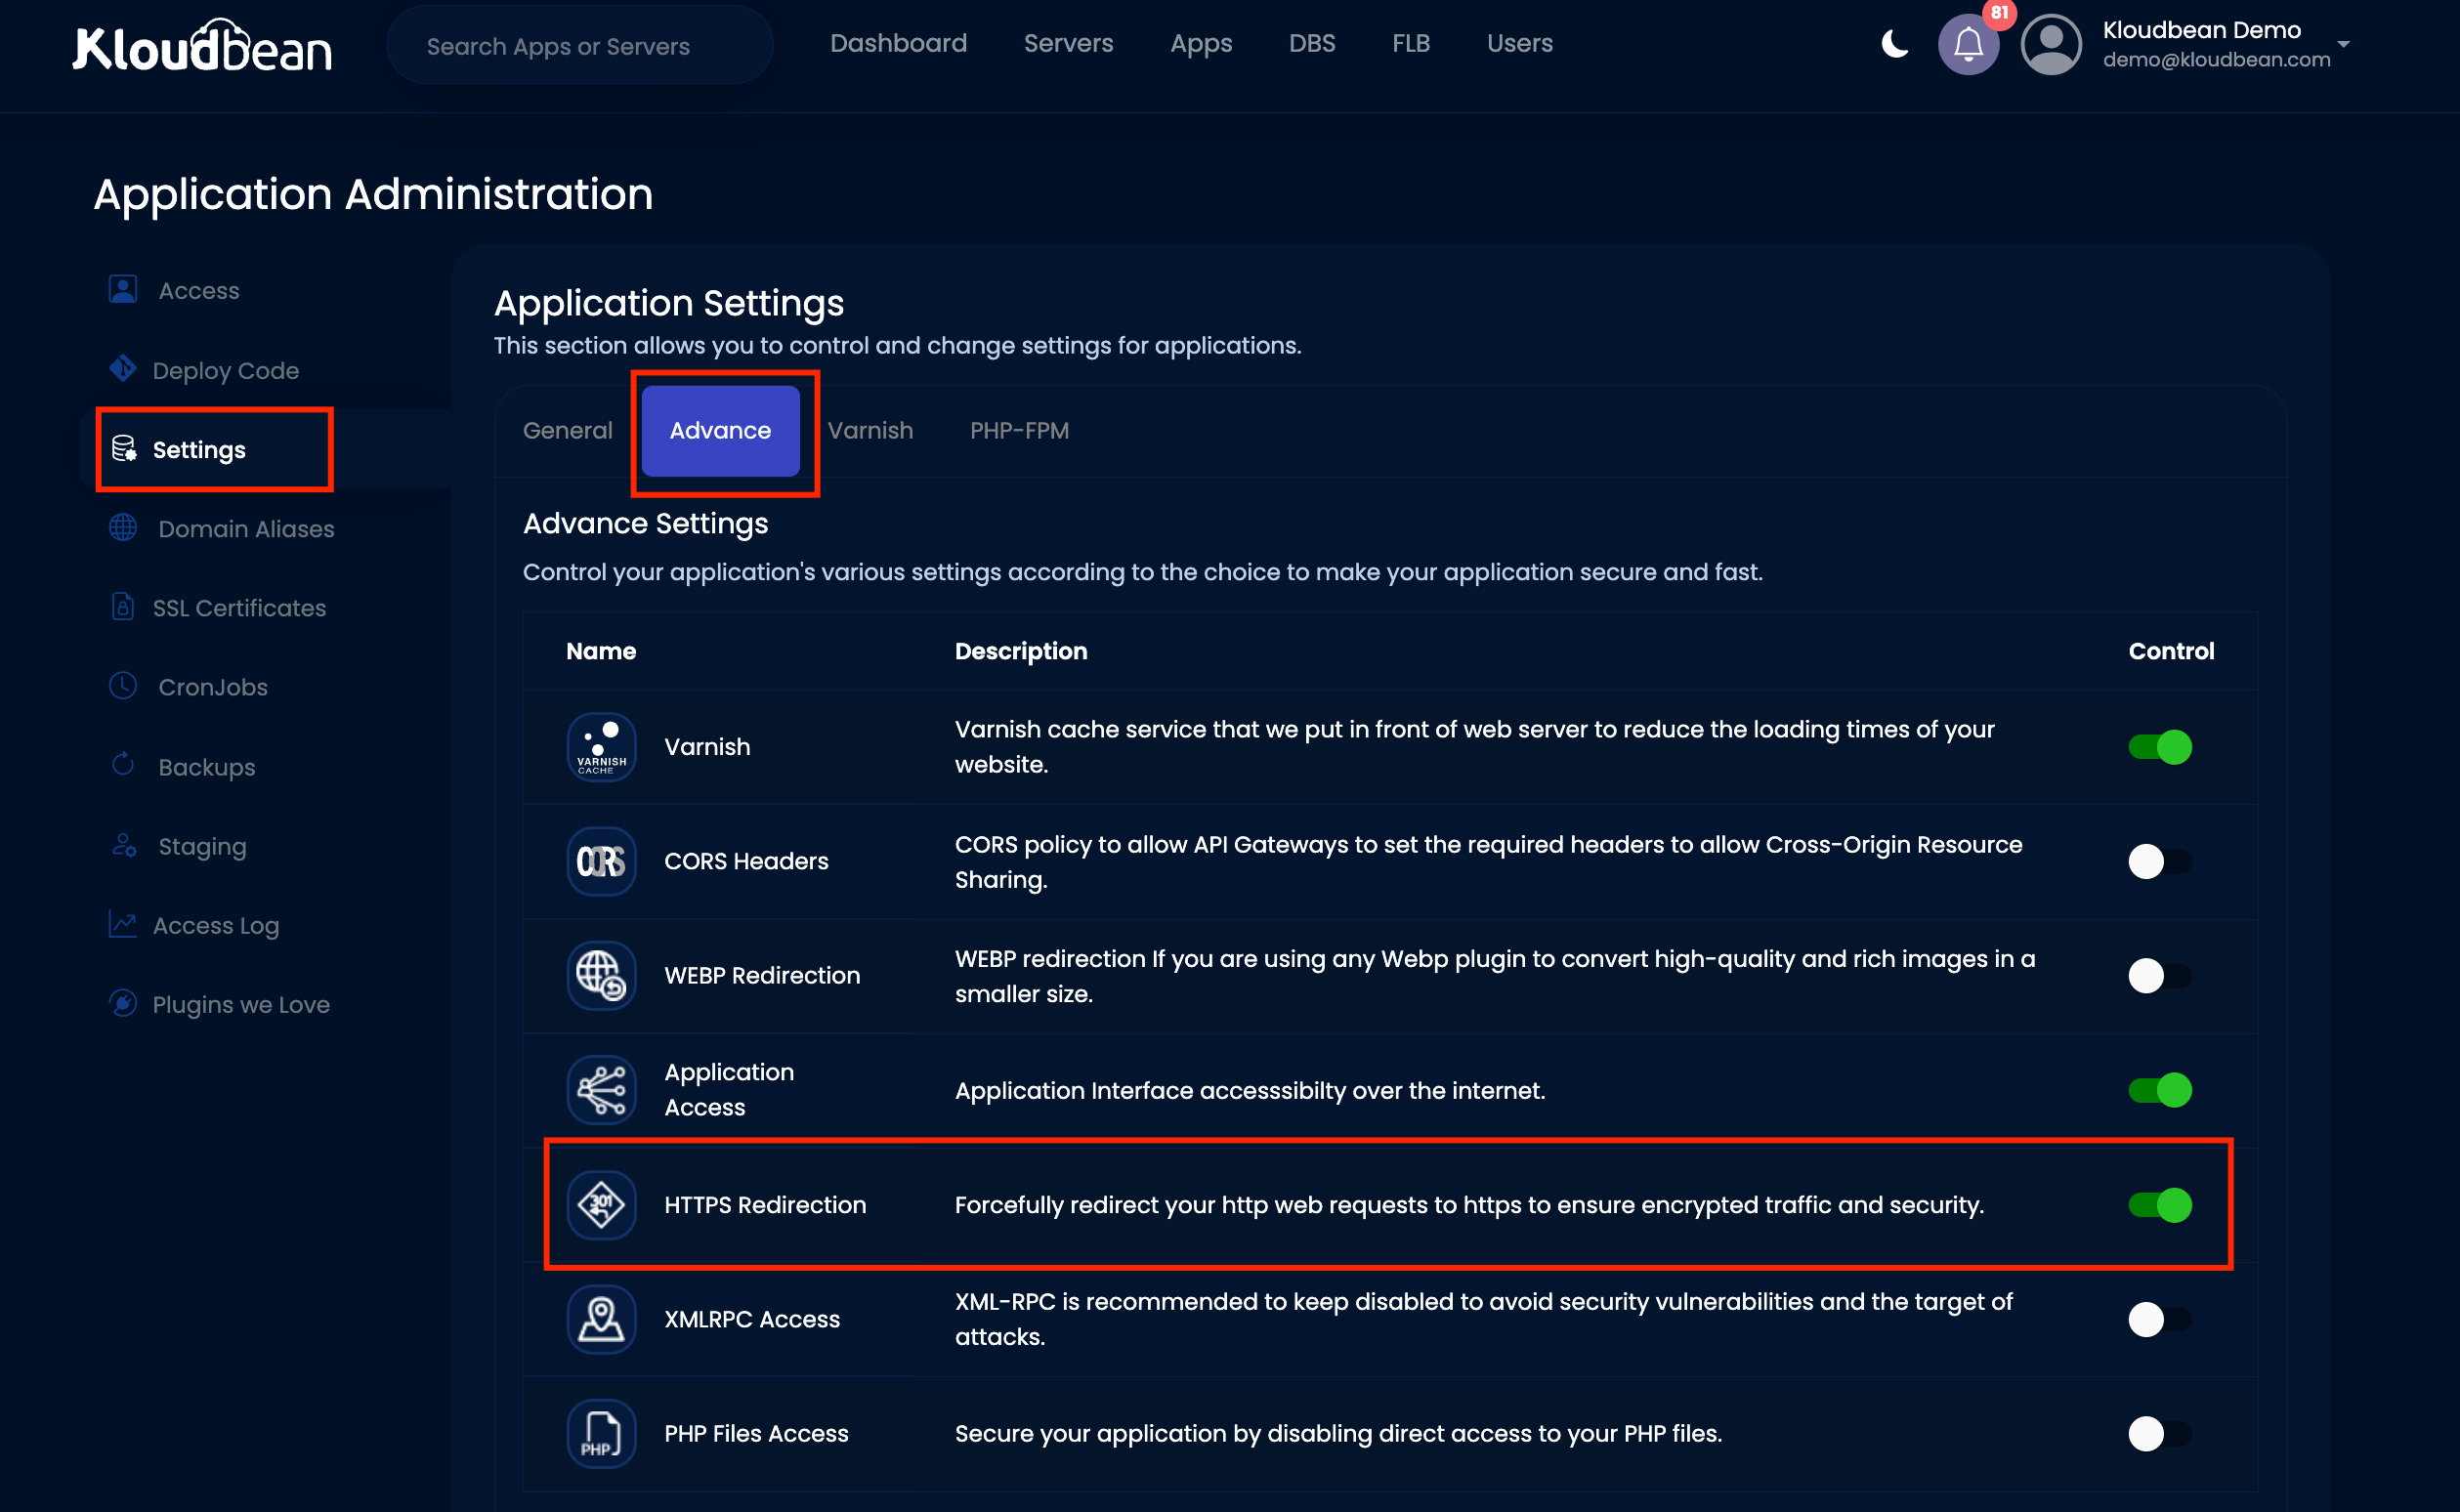
How to Force HTTPS Redirection
It's time to implement HTTPS redirection to ensure that your website consistently uses a secure protocol. When prompted, click on "Enable HTTPS." Note that if you have previously set up HTTPS redirection using other tools like Cloudflare, Sucuri, or within application plugins, you'll need to disable those mechanisms before enabling HTTPS redirection through the Kloudbean platform.
Important Considerations:
- Existing Redirection Mechanisms: If you use external services (e.g., Cloudflare, Sucuri) or application plugins/modules for HTTPS redirection, disable these before enabling redirection on Kloudbean.
- Consolidate Redirection Methods: Use only one method (either Kloudbean or external services/plugins) for enforcing HTTPS redirection to avoid conflicts.
Now it's time to proceed with verifying your SSL certificate to ensure that it is configured correctly. This step is crucial for confirming that your SSL certificate setup is accurate and functional.
FAQs
Is Let’s Encrypt a paid service?
We include Let’s Encrypt SSL Certificates at no additional cost with all of our server plans, enabling you to deploy and renew them for free.
How long is the certificate valid?
The Let’s Encrypt SSL Certificate is valid for 90 days and expires after this period. You have the option to either set up automatic renewal instructions for the SSL certificate or manually initiate the renewal when the expiry date is approaching.
How does the auto-renewal process work?
Enabling the auto-renewal feature ensures that your SSL certificate will be automatically renewed before it expires, typically within 30 days of the expiry date. This means you won't need to manually renew the SSL certificate yourself.
How many certificates can I install on one application?
Only one Let’s Encrypt SSL certificate can be installed per application.
Do browsers trust let’s Encrypt Certificate?
Yes, it is trusted by most browsers.
I already have my SSL Certificate installed. Can I install Let’s Encrypt?
Yes, you can. Let’s Encrypt SSL Certificate will overwrite the existing certificate.
Can I use Cloudflare or Sucuri over the Let’s Encrypt SSL Certificate?
Yes, you can, but the Cloudflare or Sucuri certificate will take precedence, and upon verifying your certificate, you will also see their certificate.
Utilize our WordPress hosting or Laravel Hosting services and benefit from a complimentary Let's Encrypt SSL certificate included at no extra cost.